
Owner Manual
Page 1
... cause a fire or explosion which can cause serious bodily injury or death, or damage to the appliance. 2. Do this manual. 89557 US 02/29/08 NG US ENGLISH THIS GAS APPLIANCE IS DESIGNED FOR OUTDOOR USE ONLY. ƽ WARNING: Do not try to barbecue operation. Shut off gas to property. ƽ... la Barbacoa de Gas Natural - Pg 19 Guide de l'utilisateur du barbecue au gaz naturel - Pg 32 E/S - 310/320, EP - 310/320 #89#50507000 YOU MUST READ THIS OWNER'S GUIDE BEFORE OPERATING YOUR GAS GRILL ƽ DANGER If you smell gas: 1. An LP cylinder not connected for use shall not be left with...
... cause a fire or explosion which can cause serious bodily injury or death, or damage to the appliance. 2. Do this manual. 89557 US 02/29/08 NG US ENGLISH THIS GAS APPLIANCE IS DESIGNED FOR OUTDOOR USE ONLY. ƽ WARNING: Do not try to barbecue operation. Shut off gas to property. ƽ... la Barbacoa de Gas Natural - Pg 19 Guide de l'utilisateur du barbecue au gaz naturel - Pg 32 E/S - 310/320, EP - 310/320 #89#50507000 YOU MUST READ THIS OWNER'S GUIDE BEFORE OPERATING YOUR GAS GRILL ƽ DANGER If you smell gas: 1. An LP cylinder not connected for use shall not be left with...
Owner Manual
Page 2
...be dangerous. 2 WARNINGS DANGERS AƽNDANDGERWARNINGS Failure to follow the assembly instructions carefully. ƽ After a period of storage, and/or nonuse, the Weber® gas barbecue should be checked for gas leaks. ƽ Combustible materials should never be within 24 inches (61 cm) of the back or sides... of your Weber® gas barbecue. ƽ Do not put a barbecue cover or anything flammable on, or in your Weber® gas barbecue. ƽ Never lean over open grill or place hands or fingers on a regular basis. ƽ Liquid propane...
...be dangerous. 2 WARNINGS DANGERS AƽNDANDGERWARNINGS Failure to follow the assembly instructions carefully. ƽ After a period of storage, and/or nonuse, the Weber® gas barbecue should be checked for gas leaks. ƽ Combustible materials should never be within 24 inches (61 cm) of the back or sides... of your Weber® gas barbecue. ƽ Do not put a barbecue cover or anything flammable on, or in your Weber® gas barbecue. ƽ Never lean over open grill or place hands or fingers on a regular basis. ƽ Liquid propane...
Owner Manual
Page 8
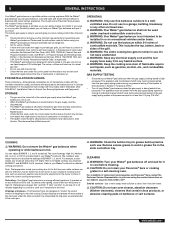
...Flavorizer® bars are described in excess of drippings for flavorful cooking. CLEANING ƽ WARNING: Turn your Weber® gas barbecue off at the pressure equal to portable gas grills, you would set all burners to clean, then rinse with piping above and below ground. Log onto ...a warm soapy water solution to high (H). This includes the top, bottom, back or sides of the grill. ƽ WARNING: The entire cooking box gets hot when in use . Your Weber® gas barbecue is a portable outdoor cooking appliance. Drippings and grease - Excess drippings and grease will...
...Flavorizer® bars are described in excess of drippings for flavorful cooking. CLEANING ƽ WARNING: Turn your Weber® gas barbecue off at the pressure equal to portable gas grills, you would set all burners to clean, then rinse with piping above and below ground. Log onto ...a warm soapy water solution to high (H). This includes the top, bottom, back or sides of the grill. ƽ WARNING: The entire cooking box gets hot when in use . Your Weber® gas barbecue is a portable outdoor cooking appliance. Drippings and grease - Excess drippings and grease will...
Owner Manual
Page 9
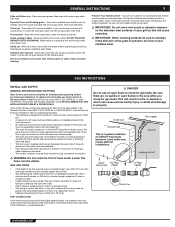
... Code: ANSI Z 223.1/NFPA 54, or CAN/CGA-B149.1, Natural Gas and Propane Installation Code for gas leaks. Stainless steel surfaces - Your grill or its best is designed to operate at 7 inches of water column pressure (.2526 psi). • A manual shut-off valve must be ...tubes. TEST CONNECTIONS All connections and joints must be firmly attached to check for complete specifications. • This barbecue is a simple matter. WWW.WEBER.COM® Clean with a soft cloth and a soap and water solution. Thermometer - Wash inside with plastic scrub ball. Do not use an...
... Code: ANSI Z 223.1/NFPA 54, or CAN/CGA-B149.1, Natural Gas and Propane Installation Code for gas leaks. Stainless steel surfaces - Your grill or its best is designed to operate at 7 inches of water column pressure (.2526 psi). • A manual shut-off valve must be ...tubes. TEST CONNECTIONS All connections and joints must be firmly attached to check for complete specifications. • This barbecue is a simple matter. WWW.WEBER.COM® Clean with a soft cloth and a soap and water solution. Thermometer - Wash inside with plastic scrub ball. Do not use an...
Owner Manual
Page 10
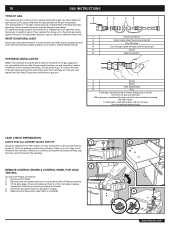
...connect the hose to the assembly instructions, you should be readily available if your dealer for leaks in and turning clockwise. WWW.WEBER.COM® See your grill on gases other than the type specified on the front edge to operation using natural gas only. Natural gas is completed. REMOVE ...the next step. Carefully pull control panel away from frame. 4) Disconnect the igniter wires from back of control panel with gas. 4 5 6 PORTABLE INSTALLATION Weber® recommends moving the grill at 7" of a Weber® grill from the gas supply and any combustible surfaces.
...connect the hose to the assembly instructions, you should be readily available if your dealer for leaks in and turning clockwise. WWW.WEBER.COM® See your grill on gases other than the type specified on the front edge to operation using natural gas only. Natural gas is completed. REMOVE ...the next step. Carefully pull control panel away from frame. 4) Disconnect the igniter wires from back of control panel with gas. 4 5 6 PORTABLE INSTALLATION Weber® recommends moving the grill at 7" of a Weber® grill from the gas supply and any combustible surfaces.
Owner Manual
Page 11
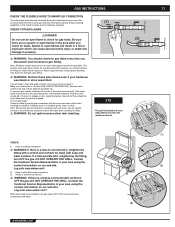
...leak at the source and rinse connections with a wrench and recheck for leaks. ƽ WARNING: Do not ignite burners when leak checking. 310 *The grill illustrated may be slightly corrosive, all fittings for gas leaks. Shipping and handling may loosen or damage a gas fitting. ƽ WARNING: ...disconnect is properly engaged. If it . CHECK: 1) Hose to property. ƽ WARNING: You should be leak tested, following guidelines in your Weber® gas barbecue. When leak checks are no sparks or open flame to manifold connection. ƽ WARNING: If there is a leak at connection...
...leak at the source and rinse connections with a wrench and recheck for leaks. ƽ WARNING: Do not ignite burners when leak checking. 310 *The grill illustrated may be slightly corrosive, all fittings for gas leaks. Shipping and handling may loosen or damage a gas fitting. ƽ WARNING: ...disconnect is properly engaged. If it . CHECK: 1) Hose to property. ƽ WARNING: You should be leak tested, following guidelines in your Weber® gas barbecue. When leak checks are no sparks or open flame to manifold connection. ƽ WARNING: If there is a leak at connection...
Owner Manual
Page 12
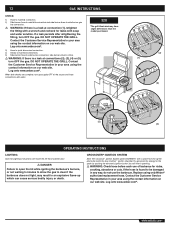
DO NOT OPERATE THE GRILL. Contact the Customer Service Representative in your area using the contact information on our web site. Replace using the contact information on our web site. WWW.WEBER.COM® Log onto www.weber.com®. CROSSOVER® IGNITION SYSTEM Note: The Crossover&#... injury or death. OPERATING INSTRUCTIONS LIGHTING Summary lighting instructions are complete, turn OFF the gas. Log onto www.weber.com®. 320 *The grill illustrated may result in any way, do not use of barbecue for leaks with water. Contact the Customer Service...
DO NOT OPERATE THE GRILL. Contact the Customer Service Representative in your area using the contact information on our web site. Replace using the contact information on our web site. WWW.WEBER.COM® Log onto www.weber.com®. CROSSOVER® IGNITION SYSTEM Note: The Crossover&#... injury or death. OPERATING INSTRUCTIONS LIGHTING Summary lighting instructions are complete, turn OFF the gas. Log onto www.weber.com®. 320 *The grill illustrated may result in any way, do not use of barbecue for leaks with water. Contact the Customer Service...
Owner Manual
Page 13
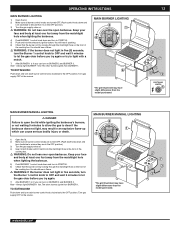
... valve on BURNER 2 and BURNER 3. Note - Turn gas supply OFF at the source. MAIN BURNER MANUAL LIGHTING 2 TE /OFF APAGAD 1 O ARRE 5 *The grill illustrated may have slight differences than the model purchased. Turn gas supply OFF at the source. Always light BURNER 1 first.The other burners ignite from... turn on the front of the cooking box. TO EXTINGUISH Push down and turn to START/HI. 5) Push and hold the electronic ignition button. WWW.WEBER.COM® You should see a flame. ƽ WARNING: If the burner does not light in five (5) seconds, turn the Burner 1 control knob...
... valve on BURNER 2 and BURNER 3. Note - Turn gas supply OFF at the source. MAIN BURNER MANUAL LIGHTING 2 TE /OFF APAGAD 1 O ARRE 5 *The grill illustrated may have slight differences than the model purchased. Turn gas supply OFF at the source. Always light BURNER 1 first.The other burners ignite from... turn on the front of the cooking box. TO EXTINGUISH Push down and turn to START/HI. 5) Push and hold the electronic ignition button. WWW.WEBER.COM® You should see a flame. ƽ WARNING: If the burner does not light in five (5) seconds, turn the Burner 1 control knob...
