
Owner Manual
Page 11
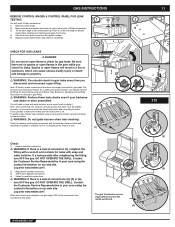
...have been thoroughly checked for gas leaks. As a safety precaution however, you should recheck all connections should check for leaks. If your Weber® Gas Barbecue. If a leak persists after checking for gas leaks every time you check for leaks by turning the cylinder valve hand...DANGER Do not use an open flame to check for bubbles. If bubbles form or if a bubble grows, there is a leak. 11 2 11 4 310 Check: 1) Hose-to-manifold connection. ƽ WARNING: If there is a leak at connections (2), (3) or (4), turn gas supply OFF at connection (1), retighten the fitting with a...
...have been thoroughly checked for gas leaks. As a safety precaution however, you should recheck all connections should check for leaks. If your Weber® Gas Barbecue. If a leak persists after checking for gas leaks every time you check for leaks by turning the cylinder valve hand...DANGER Do not use an open flame to check for bubbles. If bubbles form or if a bubble grows, there is a leak. 11 2 11 4 310 Check: 1) Hose-to-manifold connection. ƽ WARNING: If there is a leak at connections (2), (3) or (4), turn gas supply OFF at connection (1), retighten the fitting with a...

Owner Manual
Page 12
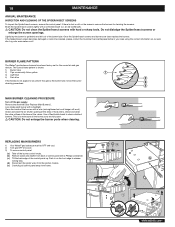
... valve. Contact the Customer Service Representative in your area using the contact information on our web site. Log onto www.weber.com®. To fill, take the LP cylinder to manifold connections. ƽ WARNING: If there is a leak at connections (4, 5 or 6), turn OFF the gas. 12... GAS INSTRUCTIONS Check: GAS INSTRUCTIONS 1) Hose to manifold connection. 2) Side burner hose to manifold connection and side burner hose to side burner ...
... valve. Contact the Customer Service Representative in your area using the contact information on our web site. Log onto www.weber.com®. To fill, take the LP cylinder to manifold connections. ƽ WARNING: If there is a leak at connections (4, 5 or 6), turn OFF the gas. 12... GAS INSTRUCTIONS Check: GAS INSTRUCTIONS 1) Hose to manifold connection. 2) Side burner hose to manifold connection and side burner hose to side burner ...
Owner Manual
Page 18
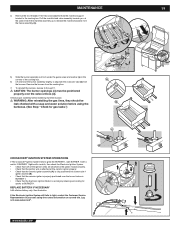
...wires from the ignition module. (e) Carefully pull control panel away from back of control panel with a flashlight. Log onto www.weber.com®. Remove the manifold (See "Replace Main Burners"). Once the Spider/Insect screens and burners are fully open. ƽ CAUTION: Do not enlarge ...dislodge the Spider/Insect screens or enlarge the screen openings. Look inside of the valves. a b e c d WWW.WEBER.COM® REPLACING MAIN BURNERS 1) Your Weber® gas barbecue must be cleaned, please contact the Customer Service Representative in on our web site. 18 MAINTENANCE ANNUAL ...
...wires from the ignition module. (e) Carefully pull control panel away from back of control panel with a flashlight. Log onto www.weber.com®. Remove the manifold (See "Replace Main Burners"). Once the Spider/Insect screens and burners are fully open. ƽ CAUTION: Do not enlarge ...dislodge the Spider/Insect screens or enlarge the screen openings. Look inside of the valves. a b e c d WWW.WEBER.COM® REPLACING MAIN BURNERS 1) Your Weber® gas barbecue must be cleaned, please contact the Customer Service Representative in on our web site. 18 MAINTENANCE ANNUAL ...
Owner Manual
Page 19
... still fails to the cooking box. REPLACE BATTERY IF NECESSARY AAA alkaline battery only. WWW.WEBER.COM® A B MAINTENANCE 4) Remove the two threaded 7/16" hex screws (a) that hold the manifold support bracket to light, contact the Customer Service Representative in your area using the barbecue. ...(See Step: "Check for sparks at the same time lift the manifold assembly up to release the manifold brackets from the frame assembly. (b). 19 19 5) Slide the burner assembly out from under the guide screw and washer...
... still fails to the cooking box. REPLACE BATTERY IF NECESSARY AAA alkaline battery only. WWW.WEBER.COM® A B MAINTENANCE 4) Remove the two threaded 7/16" hex screws (a) that hold the manifold support bracket to light, contact the Customer Service Representative in your area using the barbecue. ...(See Step: "Check for sparks at the same time lift the manifold assembly up to release the manifold brackets from the frame assembly. (b). 19 19 5) Slide the burner assembly out from under the guide screw and washer...