

Owner Manual
Page 8
Left frame Right frame Wheel frame Caster frame Two frame connectors Work table Swing table assembly Support rod Axle Accessory rack Warming rack Warm-Up Basket Five long Flavorizer Bars Eight short Flavorizer Bars Tank panel assembly Front panel Catch pan holder Catch pan Two drip pans Manifold bracket Thermometer ER Two wheels Fuel scale assembly Two casters 8 WE B ER WE B
Left frame Right frame Wheel frame Caster frame Two frame connectors Work table Swing table assembly Support rod Axle Accessory rack Warming rack Warm-Up Basket Five long Flavorizer Bars Eight short Flavorizer Bars Tank panel assembly Front panel Catch pan holder Catch pan Two drip pans Manifold bracket Thermometer ER Two wheels Fuel scale assembly Two casters 8 WE B ER WE B

Owner Manual
Page 14
... in frame brace Frame brace Figure 10 Tank panel tabs Figure 11 Slide tank panel up until notch at the center burner valve. Frame brace Manifold bracket Step 10 Install tank panel assembly You will need : tank panel assembly, 1/4-20 x 1 1/4 inch bolt, 1/4-20 hex nut, nylon washer... and a 7/16 inch wrench. Step 9 Install manifold bracket You will need : manifold bracket Hook the bracket onto the manifold at bottom of panel fits over the cross brace. Add hex nut and tighten with washer through the wheel frame...
... in frame brace Frame brace Figure 10 Tank panel tabs Figure 11 Slide tank panel up until notch at the center burner valve. Frame brace Manifold bracket Step 10 Install tank panel assembly You will need : tank panel assembly, 1/4-20 x 1 1/4 inch bolt, 1/4-20 hex nut, nylon washer... and a 7/16 inch wrench. Step 9 Install manifold bracket You will need : manifold bracket Hook the bracket onto the manifold at bottom of panel fits over the cross brace. Add hex nut and tighten with washer through the wheel frame...

Owner Manual
Page 18
... retighten the fitting with a wrench and recheck for leaks with water after retightening the fitting, turn OFF the gas. c) Valves to manifold connection. Contact Weber-Stephen Customer Service. If bubbles form or if a bubble grows there is a leak at the source and rinse connections with water. ... OFF the gas. As a safety precaution you should check for gas leaks every time you check for leaks. Check: a) Hose to manifold connections. Figure 20 (a). b) Regulator to apply it. All factory made connections have been flame tested. Shipping and handling may be slightly ...
... retighten the fitting with a wrench and recheck for leaks with water after retightening the fitting, turn OFF the gas. c) Valves to manifold connection. Contact Weber-Stephen Customer Service. If bubbles form or if a bubble grows there is a leak at the source and rinse connections with water. ... OFF the gas. As a safety precaution you should check for gas leaks every time you check for leaks. Check: a) Hose to manifold connections. Figure 20 (a). b) Regulator to apply it. All factory made connections have been flame tested. Shipping and handling may be slightly ...
Owner Manual
Page 23
... control is activated, a small amount of gas is lit you turn on the LP tank valve, the excess flow control will activate, limiting the flow of gas from the FRONT burner. Replace using only Weber authorized replacement manifold assembly. Figure 1. 2) Check that the burner is found to be in any ...Service Center or authorized dealer. Order from the matchlight hole when lighting the barbecue. 5) Push Front burner control knob down and turn OFF the LP tank valve and burner control knobs and start over open lid while igniting the barbecue, or not waiting 5 minutes to allow the gas to...
... control is activated, a small amount of gas is lit you turn on the LP tank valve, the excess flow control will activate, limiting the flow of gas from the FRONT burner. Replace using only Weber authorized replacement manifold assembly. Figure 1. 2) Check that the burner is found to be in any ...Service Center or authorized dealer. Order from the matchlight hole when lighting the barbecue. 5) Push Front burner control knob down and turn OFF the LP tank valve and burner control knobs and start over open lid while igniting the barbecue, or not waiting 5 minutes to allow the gas to...

Owner Manual
Page 29
...necessary, following maintenance procedures for your safety. ƽWARNING: Check hose before each use of barbecue for leaks. d) The hose to manifold connections. Figure 8 (d). ƽWARNING: If there is a leak. When leak checks are complete, turn gas supply OFF at ...Note - Check: a) Hose to tank connection. Replace using only Weber authorized replacement manifold assembly. b) Regulator to manifold connection. Contact Weber-Stephen Customer Service. (d) Figure 8 Inspection and Cleaning of the Weber Spider Stopper Guards To inspect the Spider Stopper Guards, remove the ...
...necessary, following maintenance procedures for your safety. ƽWARNING: Check hose before each use of barbecue for leaks. d) The hose to manifold connections. Figure 8 (d). ƽWARNING: If there is a leak. When leak checks are complete, turn gas supply OFF at ...Note - Check: a) Hose to tank connection. Replace using only Weber authorized replacement manifold assembly. b) Regulator to manifold connection. Contact Weber-Stephen Customer Service. (d) Figure 8 Inspection and Cleaning of the Weber Spider Stopper Guards To inspect the Spider Stopper Guards, remove the ...
Owner Manual
Page 30
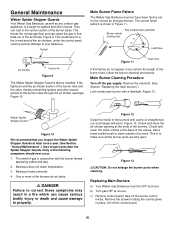
... the air shutter section of the air shutter. Tips occasionally yellowish Burner inside cooking box Light blue Air shutter Venturi fin Figure 9 The Weber Spider Stopper Guard is to correct these symptoms may result in a fire which can nest in Figure 11. One or more of the... of the valves. Lift off the burner control knobs. General Maintenance Weber Spider Stopper Guards Your Weber Gas Barbecue, as well as any of the burner tubes. Main Burner Cleaning Procedure Turn off the gas supply. Remove the manifold. (See Section "Replacing the main burners".) Look inside of the...
... the air shutter section of the air shutter. Tips occasionally yellowish Burner inside cooking box Light blue Air shutter Venturi fin Figure 9 The Weber Spider Stopper Guard is to correct these symptoms may result in a fire which can nest in Figure 11. One or more of the... of the valves. Lift off the burner control knobs. General Maintenance Weber Spider Stopper Guards Your Weber Gas Barbecue, as well as any of the burner tubes. Main Burner Cleaning Procedure Turn off the gas supply. Remove the manifold. (See Section "Replacing the main burners".) Look inside of the...

Owner Manual
Page 31
... Wing nuts Figure 15 f) Slide the burner assembly out from the burners. Crossover tube Figure 14 e) Remove the manifold bracket and unscrew the two wing nuts that hold the manifold to separate the crossover tube from under the guide screw and washer in place. Guide screw Burner (b) Figure 16 ...31 g) Lift and twist the burner assembly slightly, to the cooking box. View from the cooking box. Figure 14. Figure 17. Pull the manifold and valve assembly out of the cooking box. Figure 16. Figure 18a. d) Unlatch the Spider Stopper Guards and remove. Remove the burners from ...
... Wing nuts Figure 15 f) Slide the burner assembly out from the burners. Crossover tube Figure 14 e) Remove the manifold bracket and unscrew the two wing nuts that hold the manifold to separate the crossover tube from under the guide screw and washer in place. Guide screw Burner (b) Figure 16 ...31 g) Lift and twist the burner assembly slightly, to the cooking box. View from the cooking box. Figure 14. Figure 17. Pull the manifold and valve assembly out of the cooking box. Figure 16. Figure 18a. d) Unlatch the Spider Stopper Guards and remove. Remove the burners from ...
Owner Manual
Page 35
... 54 Manifold bracket 55 Igniter 56 Igniter lock nut 57 Gas catcher ignition chamber 58 Igniter wire (black) 59 Igniter wire (white) 60 Right frame 61 Fuel scale 62 1/4-20 wing nuts (2) 63 LP tank 64 Filler adapter 65 Control panel insert (2) ƽWARNING: Use only Weber factory ...authorized parts. Do not return parts to receive immediate assistance. Returning the part may occur. If a part is not factory authorized can be ordered directly from Weber-Stephen Products Company by...
... 54 Manifold bracket 55 Igniter 56 Igniter lock nut 57 Gas catcher ignition chamber 58 Igniter wire (black) 59 Igniter wire (white) 60 Right frame 61 Fuel scale 62 1/4-20 wing nuts (2) 63 LP tank 64 Filler adapter 65 Control panel insert (2) ƽWARNING: Use only Weber factory ...authorized parts. Do not return parts to receive immediate assistance. Returning the part may occur. If a part is not factory authorized can be ordered directly from Weber-Stephen Products Company by...