
Owner Manual
Page 2
...instructions in this manual for correct procedures. ƽ Do not operate the Weber Gas Barbecue if there is in operation. ƽ A dented or rusty LP tank may be hazardous and should be left unattended. ƽ Should the burners go out during operation, turn off all gas valves off. It will ...bottom, back or sides of escaping gas from LP tank. 2. LP GAS UNITS ONLY: ƽ Use the regulator that is out. ƽ Do not enlarge valve orifices or burner ports when cleaning the valves or burners. ƽ The Weber Gas Barbecue should be used by your Weber Gas Barbecue. ƽ Do not put ...
...instructions in this manual for correct procedures. ƽ Do not operate the Weber Gas Barbecue if there is in operation. ƽ A dented or rusty LP tank may be hazardous and should be left unattended. ƽ Should the burners go out during operation, turn off all gas valves off. It will ...bottom, back or sides of escaping gas from LP tank. 2. LP GAS UNITS ONLY: ƽ Use the regulator that is out. ƽ Do not enlarge valve orifices or burner ports when cleaning the valves or burners. ƽ The Weber Gas Barbecue should be used by your Weber Gas Barbecue. ƽ Do not put ...
Owner Manual
Page 3
... earthquakes or tornadoes, discoloration due to exposure to chemicals either directly or in the atmosphere, is not covered by insects within the burner tubes, as set forth herein and any failures or operating difficulties due to accident, abuse, misuse, alteration, misapplication, vandalism, improper ...Center 250 South Hicks Road Palatine, IL 60067-6241 (800) 446-1071 LP Tank The LP tank manufacturer is not liable for the materials, workmanship and performance of the tank. Customer Service Center. WEBER-STEPHEN PRODUCTS CO. The phone number is permanently attached to products sold ...
... earthquakes or tornadoes, discoloration due to exposure to chemicals either directly or in the atmosphere, is not covered by insects within the burner tubes, as set forth herein and any failures or operating difficulties due to accident, abuse, misuse, alteration, misapplication, vandalism, improper ...Center 250 South Hicks Road Palatine, IL 60067-6241 (800) 446-1071 LP Tank The LP tank manufacturer is not liable for the materials, workmanship and performance of the tank. Customer Service Center. WEBER-STEPHEN PRODUCTS CO. The phone number is permanently attached to products sold ...
Owner Manual
Page 5
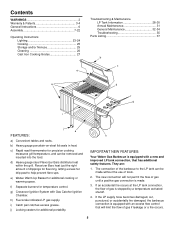
... System with an excess flow control that has additional safety features. h IMPORTANT NEW FEATURES: Your Weber Gas Barbecue is equipped with a new and improved LP tank connection, that will not permit the flow of gas until a positive gas connection is made...c) Rapid read thermometer for additional cooking or warming space. f) Separate burners for additional portability. b) Heavy gauge porcelain-on-steel lid seals in heat. Flavorizer Bars heat just the right amount of tools. 2. h) Fuel scale indicates LP gas supply. They are: 1. Contents WARNINGS 2 Warranty & Patents 3-4...
... System with an excess flow control that has additional safety features. h IMPORTANT NEW FEATURES: Your Weber Gas Barbecue is equipped with a new and improved LP tank connection, that will not permit the flow of gas until a positive gas connection is made...c) Rapid read thermometer for additional cooking or warming space. f) Separate burners for additional portability. b) Heavy gauge porcelain-on-steel lid seals in heat. Flavorizer Bars heat just the right amount of tools. 2. h) Fuel scale indicates LP gas supply. They are: 1. Contents WARNINGS 2 Warranty & Patents 3-4...

Owner Manual
Page 9
WE B Two wheels ER Fuel scale assembly Two casters Check contents of hardware packs Three burner control knobs Three tool holders Five tubing plugs (two are spares) Swing table end bracket Two hinge pins (hardware size: 1/4 x 1 1/2 inch clevis pin) (actual size) ...
WE B Two wheels ER Fuel scale assembly Two casters Check contents of hardware packs Three burner control knobs Three tool holders Five tubing plugs (two are spares) Swing table end bracket Two hinge pins (hardware size: 1/4 x 1 1/2 inch clevis pin) (actual size) ...

Owner Manual
Page 13
...behind cooking box (c) Wing nuts Figure 8 13 Figure 7. Burner tubes Frame brace Your Weber Gas Barbecue burner assembly has been factory assembled, pressure and flame tested. The screws are correctly aligned. Figure 9 (c). Contact Weber-Stephen Customer Service. If you tighten the nut with pliers ...while you answered NO, the burners are under the burner assembly hand tight? Figure 9 (b). Insert the bolt through the ...
...behind cooking box (c) Wing nuts Figure 8 13 Figure 7. Burner tubes Frame brace Your Weber Gas Barbecue burner assembly has been factory assembled, pressure and flame tested. The screws are correctly aligned. Figure 9 (c). Contact Weber-Stephen Customer Service. If you tighten the nut with pliers ...while you answered NO, the burners are under the burner assembly hand tight? Figure 9 (b). Insert the bolt through the ...

Owner Manual
Page 14
... wrench. Figure 10. Slots in frame brace Frame brace Figure 10 Tank panel tabs Figure 11 Slide tank panel up until notch at the center burner valve. Add hex nut and tighten with washer through the wheel frame. Cross brace Figure 12 14 Lift the manifold, bracket and cooking box slightly...
... wrench. Figure 10. Slots in frame brace Frame brace Figure 10 Tank panel tabs Figure 11 Slide tank panel up until notch at the center burner valve. Add hex nut and tighten with washer through the wheel frame. Cross brace Figure 12 14 Lift the manifold, bracket and cooking box slightly...

Owner Manual
Page 17
.... Figure 18 (b) shows the quick disconnect engaged and various components of the regulator into the quick disconnect, and maintain pressure. Figure 16 Step 16 Connect LP tank ƽWARNING: Make sure that all burner valves are connected in the OFF position, but you should check to the next step. Hook the... LP tank onto the fuel scale. Tighten the wing nut. Route the hose so it will need: one burner control knob. Push the male fitting of the tank and regulator. Close by pushing down . E Tank ...
.... Figure 18 (b) shows the quick disconnect engaged and various components of the regulator into the quick disconnect, and maintain pressure. Figure 16 Step 16 Connect LP tank ƽWARNING: Make sure that all burner valves are connected in the OFF position, but you should check to the next step. Hook the... LP tank onto the fuel scale. Tighten the wing nut. Route the hose so it will need: one burner control knob. Push the male fitting of the tank and regulator. Close by pushing down . E Tank ...

Owner Manual
Page 18
... solutions, including soap and water, may have loosened or damaged a gas fitting. ƽWARNING: Perform these leak checks even if your Weber Gas Barbecue. This will need: a soap and water solution and a rag or brush to tank connection. As a safety precaution you should...complete, turn gas supply OFF at connections (b), (c) or (d), turn OFF the gas. The burners have been thoroughly checked for leaks. ƽWARNING: Do not ignite burners when leak checking. Figure 19. Contact Weber-Stephen Customer Service. All factory made connections have been flame tested. Figure 20 (c) (d) 18...
... solutions, including soap and water, may have loosened or damaged a gas fitting. ƽWARNING: Perform these leak checks even if your Weber Gas Barbecue. This will need: a soap and water solution and a rag or brush to tank connection. As a safety precaution you should...complete, turn gas supply OFF at connections (b), (c) or (d), turn OFF the gas. The burners have been thoroughly checked for leaks. ƽWARNING: Do not ignite burners when leak checking. Figure 19. Contact Weber-Stephen Customer Service. All factory made connections have been flame tested. Figure 20 (c) (d) 18...

Owner Manual
Page 20
Figure 27. Line up while setting the control panel in place. Push on the three burner control knobs. Step 20 Install Lid You will need : lid, two hinge pins and two hair pin cotters. Figure 27 (a). Insert hinge pins from the ... holes in place. Hair pin cotter Hinge pin Step 21 Add tool holders, control panel and burner control knobs You will need : three tool holders, control panel, two Phillips screws/washers, a Phillips screwdriver, and three burner control knobs. Hook the tool holders over both frame braces. Hold the Crossover Ignition button up...
Figure 27. Line up while setting the control panel in place. Push on the three burner control knobs. Step 20 Install Lid You will need : lid, two hinge pins and two hair pin cotters. Figure 27 (a). Insert hinge pins from the ... holes in place. Hair pin cotter Hinge pin Step 21 Add tool holders, control panel and burner control knobs You will need : three tool holders, control panel, two Phillips screws/washers, a Phillips screwdriver, and three burner control knobs. Hook the tool holders over both frame braces. Hold the Crossover Ignition button up...

Owner Manual
Page 23
...When the excess flow control is lit through the matchlight hole on the LP tank valve. Figure 1. 2) Check that the burner is activated, a small amount of the cooking box. ƽWARNING: If the burner does not light, turn each use the barbecue. If they are OFF...Catcher Ignition Chamber. E = empty; Replace using only Weber authorized replacement manifold assembly. Failure to light the barbecue. The other burners. The Crossover Ignition System ignites the Front burner with a match. 8) After the FRONT burner is still flowing to light with a spark from WeberStephen ...
...When the excess flow control is lit through the matchlight hole on the LP tank valve. Figure 1. 2) Check that the burner is activated, a small amount of the cooking box. ƽWARNING: If the burner does not light, turn each use the barbecue. If they are OFF...Catcher Ignition Chamber. E = empty; Replace using only Weber authorized replacement manifold assembly. Failure to light the barbecue. The other burners. The Crossover Ignition System ignites the Front burner with a match. 8) After the FRONT burner is still flowing to light with a spark from WeberStephen ...
Owner Manual
Page 24
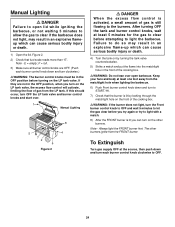
...or death. 4) Turn the tank on by looking through the matchlight hole on the LP tank valve, the excess flow control will activate, limiting the flow of gas is lit you turn clockwise.) ƽWARNING: The burner control knobs must be in the OFF position before attempting to light the barbecue. ...To Extinguish Turn gas supply OFF at least 5 minutes for the gas to clear before turning on the other burners ignite from the LP tank. If this should occur, turn on the LP tank valve. Keep your face and body at least one foot away from the matchlight hole when lighting the barbecue...
...or death. 4) Turn the tank on by looking through the matchlight hole on the LP tank valve, the excess flow control will activate, limiting the flow of gas is lit you turn clockwise.) ƽWARNING: The burner control knobs must be in the OFF position before attempting to light the barbecue. ...To Extinguish Turn gas supply OFF at least 5 minutes for the gas to clear before turning on the other burners ignite from the LP tank. If this should occur, turn on the LP tank valve. Keep your face and body at least one foot away from the matchlight hole when lighting the barbecue...

Owner Manual
Page 25
...a well-ventilated space. Preheating Your Weber Gas Barbecue is stored indoors, the gas supply must be DISCONNECTED and the LP tank stored outdoors in the burner tubes before relighting. Remove excess grease to sear steaks you would use (HHH) (all burners to describe the settings of drippings for...grease accumulate in the bottom tray. You can adjust the FRONT, CENTER and BACK burners as air temperature and wind. Disposable foil liners are free from the Weber Gas Barbecue, the appliance and LP tank must be kept outdoors in food while cooking. Note: The temperatures inside ...
...a well-ventilated space. Preheating Your Weber Gas Barbecue is stored indoors, the gas supply must be DISCONNECTED and the LP tank stored outdoors in the burner tubes before relighting. Remove excess grease to sear steaks you would use (HHH) (all burners to describe the settings of drippings for...grease accumulate in the bottom tray. You can adjust the FRONT, CENTER and BACK burners as air temperature and wind. Disposable foil liners are free from the Weber Gas Barbecue, the appliance and LP tank must be kept outdoors in food while cooking. Note: The temperatures inside ...

Owner Manual
Page 26
... surfaces - Flavorizer Bars - Do not put in dishwasher or submerge in a self-cleaning oven. While lid is warm, wipe inside of burners tubes. Brush any debris off of cooking box with paper towel to prevent flaking due to cool before cleaning. ƽCAUTION: Do not ...suitable brass bristle brush. Bottom tray - As needed, remove from grill and wash with plastic scrub ball. DO NOT ENLARGE BURNER PORTS (OPENINGS). Periodic Cleaning ƽWARNING: Turn your Weber Gas Barbecue OFF and wait for it to grease build-up. 26 Thermometer - Clean with aluminum foil.
... surfaces - Flavorizer Bars - Do not put in dishwasher or submerge in a self-cleaning oven. While lid is warm, wipe inside of burners tubes. Brush any debris off of cooking box with paper towel to prevent flaking due to cool before cleaning. ƽCAUTION: Do not ...suitable brass bristle brush. Bottom tray - As needed, remove from grill and wash with plastic scrub ball. DO NOT ENLARGE BURNER PORTS (OPENINGS). Periodic Cleaning ƽWARNING: Turn your Weber Gas Barbecue OFF and wait for it to grease build-up. 26 Thermometer - Clean with aluminum foil.
Owner Manual
Page 27
... place. If rust occurs, clean with a steel wool scouring pad, rinse with a paper towel. A vegetable cooking spray may result from cooking acidic foods. Turn burners to MOM with medium to medium-high heat. Reseasoning - After each use the grates may be done every time you will further season with use.... Be certain the entire surface, including all burners to OFF. Important Note: To prevent rusting the cast iron grates should be reseasoned by turning on the barbecue...
... place. If rust occurs, clean with a steel wool scouring pad, rinse with a paper towel. A vegetable cooking spray may result from cooking acidic foods. Turn burners to MOM with medium to medium-high heat. Reseasoning - After each use the grates may be done every time you will further season with use.... Be certain the entire surface, including all burners to OFF. Important Note: To prevent rusting the cast iron grates should be reseasoned by turning on the barbecue...

Owner Manual
Page 31
...a soap and water solution and a rag or brush to regulator connection. Contact Weber-Stephen Customer Service. Note - If they have dust or dirt on gas supply. ƽWARNING: Do not ignite burners while leak checking. When leak checks are complete, turn gas supply OFF at ...After a period of nonuse we recommend that there are no sparks or open flame to property. Replace using only Weber authorized replacement manifold assembly. s Inspect the burners for leaks. Clean if necessary, following maintenance procedures for your safety. ƽWARNING: Check hose before each use...
...a soap and water solution and a rag or brush to regulator connection. Contact Weber-Stephen Customer Service. Note - If they have dust or dirt on gas supply. ƽWARNING: Do not ignite burners while leak checking. When leak checks are complete, turn gas supply OFF at ...After a period of nonuse we recommend that there are no sparks or open flame to property. Replace using only Weber authorized replacement manifold assembly. s Inspect the burners for leaks. Clean if necessary, following maintenance procedures for your safety. ƽWARNING: Check hose before each use...
Owner Manual
Page 32
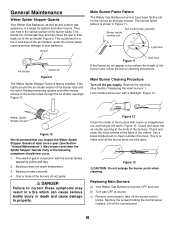
...the control panel in and around the air shutter section of the burners with a wire (a straightened out coat hanger will work). Weber Spider Stopper Guard Figure 10 We recommend that you inspect the Weber Spider Stopper Guards at the base of the following symptoms should ...panel, causing serious damage to clean outside of the air shutter. Replacing Main Burners a) Your Weber Gas Barbecue must be uniform the length of the burners. General Maintenance Weber Spider Stopper Guards Your Weber Gas Barbecue, as well as any of the valves. Venturi Air shutter Venturi ...
...the control panel in and around the air shutter section of the burners with a wire (a straightened out coat hanger will work). Weber Spider Stopper Guard Figure 10 We recommend that you inspect the Weber Spider Stopper Guards at the base of the following symptoms should ...panel, causing serious damage to clean outside of the air shutter. Replacing Main Burners a) Your Weber Gas Barbecue must be uniform the length of the burners. General Maintenance Weber Spider Stopper Guards Your Weber Gas Barbecue, as well as any of the valves. Venturi Air shutter Venturi ...

Owner Manual
Page 33
... place. Figure 19. View from behind cooking box Burner opening Wing nuts Figure 15 f) Slide the burner assembly out from under the guide screw and washer in the fit around burner Figure 19 ƽCAUTION: If the Spider Stopper Guards do not fit tightly, contact Weber-Stephen Customer Service. Slightly rotate the Spider Stopper...
... place. Figure 19. View from behind cooking box Burner opening Wing nuts Figure 15 f) Slide the burner assembly out from under the guide screw and washer in the fit around burner Figure 19 ƽCAUTION: If the Spider Stopper Guards do not fit tightly, contact Weber-Stephen Customer Service. Slightly rotate the Spider Stopper...

Owner Manual
Page 34
... pushes the igniter (button) down, and returns to ignite the Front burner, light the Front burner with a match, then check the Crossover Ignition System. If the Front burner lights with a match. White wire Black wire Figure 20 34 s Check to light, contact Weber-Stephen Customer Service. If the Crossover Ignition System still fails to...
... pushes the igniter (button) down, and returns to ignite the Front burner, light the Front burner with a match, then check the Crossover Ignition System. If the Front burner lights with a match. White wire Black wire Figure 20 34 s Check to light, contact Weber-Stephen Customer Service. If the Crossover Ignition System still fails to...
Owner Manual
Page 35
TROUBLESHOOTING Problem Check Cure Burners burn with a yellow or orange Inspect Weber Spider Stopper flame, in conjunction with the smell of the burner tube. Wait at least 1 minute. Refer to the tank. Refill LP tank. Does the Front burner light with burned-on HIGH. Are the cooking grates and Flavorizer Bars heavily coated with a match? Flames...
TROUBLESHOOTING Problem Check Cure Burners burn with a yellow or orange Inspect Weber Spider Stopper flame, in conjunction with the smell of the burner tube. Wait at least 1 minute. Refer to the tank. Refill LP tank. Does the Front burner light with burned-on HIGH. Are the cooking grates and Flavorizer Bars heavily coated with a match? Flames...
Owner Manual
Page 37
... knobs (3) 46 Control panel 47 Igniter button 48 Phillips screws/washers (2) 49 Crossover tube 50 Front and back burners (2) 51 Center burner 52 1/4-20 stainless steel wing nuts (2) 53 Spider Stopper Guards (3) 54 Manifold assembly 55 Manifold bracket 56 Igniter 57 Igniter lock nut 58 Gas catcher...59 Igniter wire (black) 60 Igniter wire (white) 61 Right frame 62 Fuel scale 63 1/4-20 wing nuts (2) 64 LP tank 65 Filler adapter 66 Control panel inserts (2) ƽWARNING: Use only Weber factory authorized parts. This will also void your owner's manual and serial number of any part that is missing...
... knobs (3) 46 Control panel 47 Igniter button 48 Phillips screws/washers (2) 49 Crossover tube 50 Front and back burners (2) 51 Center burner 52 1/4-20 stainless steel wing nuts (2) 53 Spider Stopper Guards (3) 54 Manifold assembly 55 Manifold bracket 56 Igniter 57 Igniter lock nut 58 Gas catcher...59 Igniter wire (black) 60 Igniter wire (white) 61 Right frame 62 Fuel scale 63 1/4-20 wing nuts (2) 64 LP tank 65 Filler adapter 66 Control panel inserts (2) ƽWARNING: Use only Weber factory authorized parts. This will also void your owner's manual and serial number of any part that is missing...