

User Manual
Page 1
... the following the operating instructions. This product should not be operated only from the wall outlet: a) When the power supply cord or plug is required, contact VTech Customer Service at : 1-800-595-9511 In Canada, call 1-800-267-7377 1 If you 're having difficulty with setup or operation, do not disassemble this product where the cord will often require extensive work is damaged or...
... the following the operating instructions. This product should not be operated only from the wall outlet: a) When the power supply cord or plug is required, contact VTech Customer Service at : 1-800-595-9511 In Canada, call 1-800-267-7377 1 If you 're having difficulty with setup or operation, do not disassemble this product where the cord will often require extensive work is damaged or...
User Manual
Page 2
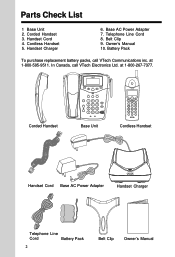
Parts Check List 1 Base Unit 2. Handset Cord 4. Owner's Manual 10. at 1-800-595-9511. Handset Charger 6. Base AC Power Adapter 7. Belt Clip 9. Corded Handset 3. Battery Pack To purchase replacement battery packs, call VTech Electronics Ltd. In Canada, call VTech Communications inc. Corded Handset Base Unit Cordless Handset Handset Cord Base AC Power Adapter Handset Charger Telephone Line Cord Battery Pack 2 Belt Clip Owner's Manual at 1-800-267-7377. Telephone Line Cord 8. Cordless Handset 5.
Parts Check List 1 Base Unit 2. Handset Cord 4. Owner's Manual 10. at 1-800-595-9511. Handset Charger 6. Base AC Power Adapter 7. Belt Clip 9. Corded Handset 3. Battery Pack To purchase replacement battery packs, call VTech Electronics Ltd. In Canada, call VTech Communications inc. Corded Handset Base Unit Cordless Handset Handset Cord Base AC Power Adapter Handset Charger Telephone Line Cord Battery Pack 2 Belt Clip Owner's Manual at 1-800-267-7377. Telephone Line Cord 8. Cordless Handset 5.
User Manual
Page 7
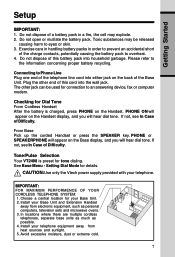
... explode. 2. If not, see In Case of the Base Unit. From Base Pick up the corded Handset or press the SPEAKER key. Setting Dial Mode for tone dialing. Install your Base Unit. 2. Do not dispose of the charge contacts, potentially causing the battery pack to an answering device, fax or computer modem. CAUTION:Use only the Vtech power supply provided with your telephone equipment away from electronic equipment, such as possible. 4. Exercise...
... explode. 2. If not, see In Case of the Base Unit. From Base Pick up the corded Handset or press the SPEAKER key. Setting Dial Mode for tone dialing. Install your Base Unit. 2. Do not dispose of the charge contacts, potentially causing the battery pack to an answering device, fax or computer modem. CAUTION:Use only the Vtech power supply provided with your telephone equipment away from electronic equipment, such as possible. 4. Exercise...

User Manual
Page 11
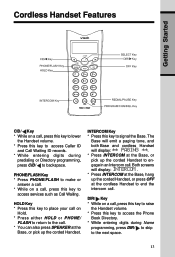
... Key * Used in the Base directory, change dial mode (tone/pulse), or clear Message Waiting alert. Both screens will engage the Base and Handset in an Intercom call . 11 INTERCOM Key * Press this key to the idle mode. CID/ Key * Press this key to enter access Caller ID and Call Waiting ID records. * While entering digits during predialing or Directory programming, press CID/ to new voice mail messages. CLEAR Key * Press CLEAR to return the Base display to program names and numbers in connection with PROG for Base programming. Base Features Getting Started Base Ringer Volume...
... Key * Used in the Base directory, change dial mode (tone/pulse), or clear Message Waiting alert. Both screens will engage the Base and Handset in an Intercom call . 11 INTERCOM Key * Press this key to the idle mode. CID/ Key * Press this key to enter access Caller ID and Call Waiting ID records. * While entering digits during predialing or Directory programming, press CID/ to new voice mail messages. CLEAR Key * Press CLEAR to return the Base display to program names and numbers in connection with PROG for Base programming. Base Features Getting Started Base Ringer Volume...

User Manual
Page 12
... speakerphone call by pressing PHONE on the Base screen. MUTE Key * Press MUTE to the two-way conversation. DIR/ Key * Press this key to access the Phone Book Directory. * While entering digits during Name programming, press DIR/ to skip to dial the number displayed on the cordless Handset. DISPLAY DIAL Key * Press to the next space. IN USE LED * Glows when the corded Handset, Base or cordless Handset is on hold . SPEAKER Key * Press to either make or receive a Speakerphone call on an active call. * Flashes...
... speakerphone call by pressing PHONE on the Base screen. MUTE Key * Press MUTE to the two-way conversation. DIR/ Key * Press this key to access the Phone Book Directory. * While entering digits during Name programming, press DIR/ to skip to dial the number displayed on the cordless Handset. DISPLAY DIAL Key * Press to the next space. IN USE LED * Glows when the corded Handset, Base or cordless Handset is on hold . SPEAKER Key * Press to either make or receive a Speakerphone call on an active call. * Flashes...
User Manual
Page 13
... corded Handset to engage in an Intercom call , press this key to raise the Handset volume. * Press this key to access services such as Call Waiting. PHONE/FLASH Key * Press PHONE/FLASH to the next space. 13 DIR/ Key * While on a call . INTERCOM Key * Press this key to access Caller ID and Call Waiting ID records. * While entering digits during Name programming, press DIR/ to skip to make or answer a call. * While on a call . The Base will emit a paging tone, and both Base and cordless Handset will display: INTERCOM . * Press INTERCOM...
... corded Handset to engage in an Intercom call , press this key to raise the Handset volume. * Press this key to access services such as Call Waiting. PHONE/FLASH Key * Press PHONE/FLASH to the next space. 13 DIR/ Key * While on a call . INTERCOM Key * Press this key to access Caller ID and Call Waiting ID records. * While entering digits during Name programming, press DIR/ to skip to make or answer a call. * While on a call . The Base will emit a paging tone, and both Base and cordless Handset will display: INTERCOM . * Press INTERCOM...

User Manual
Page 14
.../PAUSE Key * Press this key to switch to 32 digits. OFF Key * Press OFF to end your call , press this key to display the last number dialed, up to a clearer channel. 14 Getting Started Cordless Handset Features SELECT Key * Use in a dialing sequence. PROG/CHAN (Program/Channel) Key * In the idle (Off) mode, press this key to enter programming mode. * During an active call . * Press OFF to exit programming and return to the idle screen...
.../PAUSE Key * Press this key to switch to 32 digits. OFF Key * Press OFF to end your call , press this key to display the last number dialed, up to a clearer channel. 14 Getting Started Cordless Handset Features SELECT Key * Use in a dialing sequence. PROG/CHAN (Program/Channel) Key * In the idle (Off) mode, press this key to enter programming mode. * During an active call . * Press OFF to exit programming and return to the idle screen...
User Manual
Page 15
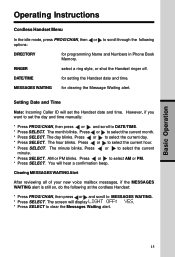
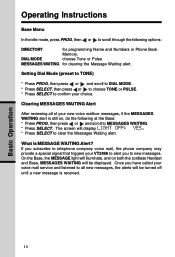
... Operation Operating Instructions Cordless Handset Menu In the idle mode, press PROG/CHAN, then or to select AM or PM. * Press SELECT. RINGER select a ring style, or shut the Handset ringer off. However, if you want to set the Handset date and time. Clearing MESSAGES WAITING Alert After reviewing all of your new voice mailbox messages, if the MESSAGES WAITING alert is still on, do the following options: DIRECTORY for programming Name and Numbers in Phone Book Memory. The month blinks...
... Operation Operating Instructions Cordless Handset Menu In the idle mode, press PROG/CHAN, then or to select AM or PM. * Press SELECT. RINGER select a ring style, or shut the Handset ringer off. However, if you want to set the Handset date and time. Clearing MESSAGES WAITING Alert After reviewing all of your new voice mailbox messages, if the MESSAGES WAITING alert is still on, do the following options: DIRECTORY for programming Name and Numbers in Phone Book Memory. The month blinks...
User Manual
Page 16
... and scroll to DIAL MODE. * Press SELECT, then press or to choose TONE or PULSE. * Press SELECT to new messages. On the Base, the MESSAGE light will illuminate, and on , do the following options: DIRECTORY for clearing the Message Waiting alert. The screen will be turned off until a new message is MESSAGE WAITING Alert? Operating Instructions Base Menu In the idle mode, press PROG, then or to clear the Messages Waiting alert. DIAL MODE choose Tone or Pulse MESSAGES WAITING for programming Name and Numbers in Phone Book Memory.
... and scroll to DIAL MODE. * Press SELECT, then press or to choose TONE or PULSE. * Press SELECT to new messages. On the Base, the MESSAGE light will illuminate, and on , do the following options: DIRECTORY for clearing the Message Waiting alert. The screen will be turned off until a new message is MESSAGE WAITING Alert? Operating Instructions Base Menu In the idle mode, press PROG, then or to clear the Messages Waiting alert. DIAL MODE choose Tone or Pulse MESSAGES WAITING for programming Name and Numbers in Phone Book Memory.

User Manual
Page 20
Basic Operation Operating Instructions Handset Ringer Style You can temporarily switch to touch tone dialing during a call in the pulse (rotary) mode. * After connecting, press the * TONE key. Now, all subsequent key presses will blink. * Press or to sample each of the ring styles, or choose OFF. * Press SELECT to confirm your call by pressing the * TONE key. Temporary Tone Dialing (Base or Cordless Handset) If you have dial pulse ( rotary ) service, you can select from 4 different Handset ringer styles...
Basic Operation Operating Instructions Handset Ringer Style You can temporarily switch to touch tone dialing during a call in the pulse (rotary) mode. * After connecting, press the * TONE key. Now, all subsequent key presses will blink. * Press or to sample each of the ring styles, or choose OFF. * Press SELECT to confirm your call by pressing the * TONE key. Temporary Tone Dialing (Base or Cordless Handset) If you have dial pulse ( rotary ) service, you can select from 4 different Handset ringer styles...
User Manual
Page 21
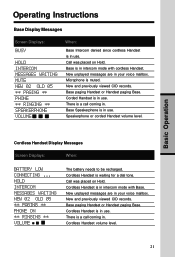
... Handset or Handset paging Base. There is in use . Speakerphone or corded Handset volume level. Cordless Handset volume level. 21 Call was placed on Hold. Base Speakerphone is in intercom mode with Base. Cordless Handset is in your voice mailbox. New unplayed messages are in use . New and previously viewed CID records. Operating Instructions Base Display Messages Screen Displays: BUSY HOLD INTERCOM MESSAGES WAITING MUTE NEW 02 OLD 05 ** PAGING ** PHONE ** RINGING ** SPEAKERPHONE VOLUME When: Base Intercom denied since cordless Handset is waiting for a dial tone...
... Handset or Handset paging Base. There is in use . Speakerphone or corded Handset volume level. Cordless Handset volume level. 21 Call was placed on Hold. Base Speakerphone is in intercom mode with Base. Cordless Handset is in your voice mailbox. New unplayed messages are in use . New and previously viewed CID records. Operating Instructions Base Display Messages Screen Displays: BUSY HOLD INTERCOM MESSAGES WAITING MUTE NEW 02 OLD 05 ** PAGING ** PHONE ** RINGING ** SPEAKERPHONE VOLUME When: Base Intercom denied since cordless Handset is waiting for a dial tone...

User Manual
Page 23
The screen displays ENTER NUMBER. * Enter the telephone number. Use or key to the dialing sequence. NOTE: When phone book memory is now flashing at the Base, your edits. 23 Choosing Yes will increase the pause in via Caller ID (after the first ring). * Press SELECT to display the last number dialed. * Press SELECT. For example the 5JKL key will display: DISTINCT RING ? Now, make a mistake. Press REDIAL/PAUSE to add a 2-second pause to...
The screen displays ENTER NUMBER. * Enter the telephone number. Use or key to the dialing sequence. NOTE: When phone book memory is now flashing at the Base, your edits. 23 Choosing Yes will increase the pause in via Caller ID (after the first ring). * Press SELECT to display the last number dialed. * Press SELECT. For example the 5JKL key will display: DISTINCT RING ? Now, make a mistake. Press REDIAL/PAUSE to add a 2-second pause to...

User Manual
Page 24
The screen displays DIRECTORY. * Press or to search for the desired entry, or press the key containing the first letter of the entry. The screen displays ERASE NO YES, along with the phone number. * Press or until ERASE flashes. * Press SELECT. The Handset will be flashing on the cordless Handset or DISPLAY DIAL if you're dialing from the Phone Book Directory * Press ( ). Basic Operation Phone Book Directory Deleting a Number/Name Stored in memory. Keep pressing the key if...
The screen displays DIRECTORY. * Press or to search for the desired entry, or press the key containing the first letter of the entry. The screen displays ERASE NO YES, along with the phone number. * Press or until ERASE flashes. * Press SELECT. The Handset will be flashing on the cordless Handset or DISPLAY DIAL if you're dialing from the Phone Book Directory * Press ( ). Basic Operation Phone Book Directory Deleting a Number/Name Stored in memory. Keep pressing the key if...

User Manual
Page 25
... appears a * in call history. 25 Review Call History The screen displays call information for new incoming call history. When the memory is full, the oldest call information is deleted to view call history. Note: Press OFF on the cordless Handset or CLEAR on the screen, it has been received. 1 Press (CID) to make room for about 15 seconds after it will have the highest number. The screen displays 2 Use and to scroll...
... appears a * in call history. 25 Review Call History The screen displays call information for new incoming call history. When the memory is full, the oldest call information is deleted to view call history. Note: Press OFF on the cordless Handset or CLEAR on the screen, it has been received. 1 Press (CID) to make room for about 15 seconds after it will have the highest number. The screen displays 2 Use and to scroll...
User Manual
Page 28
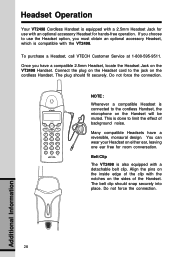
... noise. The belt clip should fit securely. This is done to use with the VT2498. Align the pins on either ear, leaving one ear free for hands-free operation. Do not force the connection. 28 Additional Information Headset Operation Your VT2498 Cordless Handset is equipped with a 2.5mm Headset Jack for use the Headset option, you must obtain an optional accessory Headset, which is compatible with an optional accessory Headset for room conversation...
... noise. The belt clip should fit securely. This is done to use with the VT2498. Align the pins on either ear, leaving one ear free for hands-free operation. Do not force the connection. 28 Additional Information Headset Operation Your VT2498 Cordless Handset is equipped with a 2.5mm Headset Jack for use the Headset option, you must obtain an optional accessory Headset, which is compatible with an optional accessory Headset for room conversation...
User Manual
Page 30
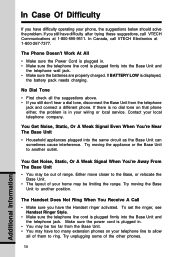
... the Base Unit and the telephone wall jack. • Make sure the batteries are properly charged. Try moving the appliance or the Base Unit to another outlet. Try moving the Base Unit to another position. To set the ringer, see Handset Ringer Style. • Make sure the telephone line cord is plugged firmly into the same circuit as the Base Unit can sometimes cause interference. Try unplugging some of range. In Canada, call VTECH...
... the Base Unit and the telephone wall jack. • Make sure the batteries are properly charged. Try moving the appliance or the Base Unit to another outlet. Try moving the Base Unit to another position. To set the ringer, see Handset Ringer Style. • Make sure the telephone line cord is plugged firmly into the same circuit as the Base Unit can sometimes cause interference. Try unplugging some of range. In Canada, call VTECH...

User Manual
Page 32
..., when installed and used in working condition. or 3. If we repair this product, we may replace it with operation instructions. Product that has been subjected to misuse, accident, shipping or other physical damage, improper installation, abnormal operation or handling, neglect, inundation, fire, water or other than an authorized service representative of VTECH; If we choose to replace this product, we repair or replace a Materially...
..., when installed and used in working condition. or 3. If we repair this product, we may replace it with operation instructions. Product that has been subjected to misuse, accident, shipping or other physical damage, improper installation, abnormal operation or handling, neglect, inundation, fire, water or other than an authorized service representative of VTECH; If we choose to replace this product, we repair or replace a Materially...
User Manual
Page 35
... of the Base Unit containing either the FCC registration number and Ringer Equivalence Number (REN) or the IC registration number and Load Number. Operation is located on the underside of Industry and Science Canada. If this equipment does cause harmful interference to radio or television reception, which the receiver is compatible with inductively coupled hearing aids. This equipment is connected. • Consult...
... of the Base Unit containing either the FCC registration number and Ringer Equivalence Number (REN) or the IC registration number and Load Number. Operation is located on the underside of Industry and Science Canada. If this equipment does cause harmful interference to radio or television reception, which the receiver is compatible with inductively coupled hearing aids. This equipment is connected. • Consult...

User Manual
Page 37
... write the telephone number on the directory card, so that registration was performed based on the line and briefly explain the reason for the call to store police, fire department and emergency medical service telephone numbers in mind: a. However, if you can still dial the emergency number manually if the memory dialing feature doesn't work. Your telephone company may temporarily discontinue your telephone service. Hearing aid compatibility If this...
... write the telephone number on the directory card, so that registration was performed based on the line and briefly explain the reason for the call to store police, fire department and emergency medical service telephone numbers in mind: a. However, if you can still dial the emergency number manually if the memory dialing feature doesn't work. Your telephone company may temporarily discontinue your telephone service. Hearing aid compatibility If this...
User Manual
Page 42
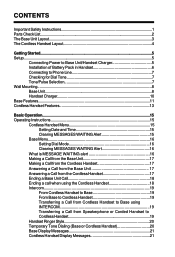
... Instructions 1 Parts Check List...2 The Base Unit Layout...3 The Cordless Handset Layout 4 Getting Started...5 Setup...5 Connecting Power to Base Unit/Handset Charger 5 Installation of Battery Pack in Handset 6 Connecting to Phone Line 7 Checking for Dial Tone 7 Tone/Pulse Selection 7 Wall Mounting...8 Base Unit...8 Handset Charger 10 Base Features...11 Cordless Handset Features 13 Basic Operation...15 Operating Instructions 15 Cordless Handset Menu 15 Setting Date and Time 15 Clearing MESSAGES WAITING Alert 15 Base Menu 16 Setting Dial Mode 16 Clearing MESSAGES WAITING Alert...
... Instructions 1 Parts Check List...2 The Base Unit Layout...3 The Cordless Handset Layout 4 Getting Started...5 Setup...5 Connecting Power to Base Unit/Handset Charger 5 Installation of Battery Pack in Handset 6 Connecting to Phone Line 7 Checking for Dial Tone 7 Tone/Pulse Selection 7 Wall Mounting...8 Base Unit...8 Handset Charger 10 Base Features...11 Cordless Handset Features 13 Basic Operation...15 Operating Instructions 15 Cordless Handset Menu 15 Setting Date and Time 15 Clearing MESSAGES WAITING Alert 15 Base Menu 16 Setting Dial Mode 16 Clearing MESSAGES WAITING Alert...


