
User Manual
Page 2
... electric shock from the wall outlet and refer servicing to the store. If you 're having difficulty with setup or operation, do not return your phone to an authorized service facility under the following the operating instructions. When the power supply cord or plug is damaged or frayed. E. Call our Customer...
... electric shock from the wall outlet and refer servicing to the store. If you 're having difficulty with setup or operation, do not return your phone to an authorized service facility under the following the operating instructions. When the power supply cord or plug is damaged or frayed. E. Call our Customer...

User Manual
Page 3
...services, and they may not be available in areas offering Caller ID service, and if both you may need to change your local phone service provider. This product can use this feature. Caller ID with Call Waiting service. There are in all areas. Dual Band ...Canada Ltd. In Canada, call VTech Communications, Inc. Telephone Line Cord 5. Belt Clip 7. AC Power Adapter 4. at 1-800- 595-9511. About Caller Identification (Caller ID) This product has a Caller ID with Call Waiting feature that works with service from your phone service to either Caller ID ...
...services, and they may not be available in areas offering Caller ID service, and if both you may need to change your local phone service provider. This product can use this feature. Caller ID with Call Waiting service. There are in all areas. Dual Band ...Canada Ltd. In Canada, call VTech Communications, Inc. Telephone Line Cord 5. Belt Clip 7. AC Power Adapter 4. at 1-800- 595-9511. About Caller Identification (Caller ID) This product has a Caller ID with Call Waiting feature that works with service from your phone service to either Caller ID ...
User Manual
Page 4
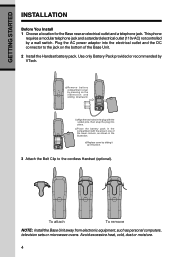
... illustration. Plug the AC power adaptor into the electrical outlet and the DC connector to the cordless Handset (optional). d)Replace cover by VTech. c)Place the battery pack in the compartment with the wires in the plug with the socket pins, then snap the plug into place...dust or moisture. 4 GETTING STARTED INSTALLATION Before You Install 1 Choose a location for the Base near an electrical outlet and a telephone jack. This phone requires a modular telephone jack and a standard electrical outlet (110v AC) not controlled by pressing on the bottom of the lower corners, as personal ...
... illustration. Plug the AC power adaptor into the electrical outlet and the DC connector to the cordless Handset (optional). d)Replace cover by VTech. c)Place the battery pack in the compartment with the wires in the plug with the socket pins, then snap the plug into place...dust or moisture. 4 GETTING STARTED INSTALLATION Before You Install 1 Choose a location for the Base near an electrical outlet and a telephone jack. This phone requires a modular telephone jack and a standard electrical outlet (110v AC) not controlled by pressing on the bottom of the lower corners, as personal ...
User Manual
Page 5
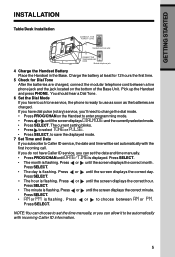
...the currently selected mode. • Press SELECT. Press SELECT. • AM or PM is flashing. If you do not have touch tone service, the phone is ready to Caller ID service, the date and time will be automatically with the first incoming call. Press SELECT. • The hour is flashing... the batteries are charged, connect the modular telephone cord between AM or PM. Press SELECT. NOTE:You can allow it to choose between a live phone jack and the jack located on the Handset to enter programming mode. • Press or until DATE/TIME is flashing. Press SELECT. • ...
...the currently selected mode. • Press SELECT. Press SELECT. • AM or PM is flashing. If you do not have touch tone service, the phone is ready to Caller ID service, the date and time will be automatically with the first incoming call. Press SELECT. • The hour is flashing... the batteries are charged, connect the modular telephone cord between AM or PM. Press SELECT. NOTE:You can allow it to choose between a live phone jack and the jack located on the Handset to enter programming mode. • Press or until DATE/TIME is flashing. Press SELECT. • ...

User Manual
Page 7
.... Press REDIAL/PAUSE twice to a clearer channel while on a call on hold , OR picking up to 32 digits). -ORPress REDIAL/PAUSE, then press PHONE to the idle (on hook). 7 Program/Channel Switch to delete the last number dialed record with Handset idle (on hook) mode. Make a Call Press... PHONE then dial the number, OR Dial the number (use to backspace and correct digits), then press PHONE to put a call . HOLD Press to call , adjust the volume of what you hear.
.... Press REDIAL/PAUSE twice to a clearer channel while on a call on hold , OR picking up to 32 digits). -ORPress REDIAL/PAUSE, then press PHONE to the idle (on hook). 7 Program/Channel Switch to delete the last number dialed record with Handset idle (on hook) mode. Make a Call Press... PHONE then dial the number, OR Dial the number (use to backspace and correct digits), then press PHONE to put a call . HOLD Press to call , adjust the volume of what you hear.
User Manual
Page 9
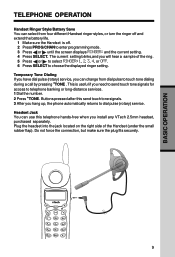
... You can use this send touch tone signals. 3 After you hang up, the phone automatically returns to dial pulse (rotary) service. This is off and extend the battery life. 1 Make sure the Handset is useful if you install any VTech 2.5mm headset, purchased separately. Do not force the connection, but make sure...
... You can use this send touch tone signals. 3 After you hang up, the phone automatically returns to dial pulse (rotary) service. This is off and extend the battery life. 1 Make sure the Handset is useful if you install any VTech 2.5mm headset, purchased separately. Do not force the connection, but make sure...

User Manual
Page 10
... OFF . Display Screen Messages The Handset is in use The Base is paging the Handset. If you receive a call might not connect when you press PHONE . The Battery Pack needs to be left "off the hook." If you are out of range without pressing OFF, your home or office. To improve... Handset might hear noise or interference. If you might not ring - which can communicate over only a certain distance - Move closer to the Base, then press PHONE to the Base. Even so, this Handset and Base can vary with the locations of the Base and Handset, the weather, and the construction of...
... OFF . Display Screen Messages The Handset is in use The Base is paging the Handset. If you receive a call might not connect when you press PHONE . The Battery Pack needs to be left "off the hook." If you are out of range without pressing OFF, your home or office. To improve... Handset might hear noise or interference. If you might not ring - which can communicate over only a certain distance - Move closer to the Base, then press PHONE to the Base. Even so, this Handset and Base can vary with the locations of the Base and Handset, the weather, and the construction of...
User Manual
Page 11
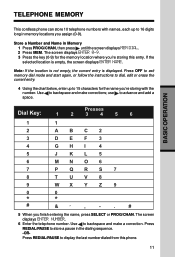
...1 1 2 ABC2 3 DEF 3 4 GHI 4 5 J KL 5 6 MN O6 7 P QRS 7 8 T UV8 9 WX Y Z 9 0 0 * * # & ’ , - . # 5 When you 're storing this phone. 11 Press REDIAL/PAUSE to store a pause in Memory 1 Press PROG/CHAN, then press until the screen displays MEM DIAL. 2 Press MEM. Store a Number and...backspace and make corrections; The screen displays ENTER NUMBER. 6 Enter the telephone number. TELEPHONE MEMORY BASIC OPERATION This cordless phone can store 10 telephone numbers with names, each up to 15 characters for the memory location where you finish entering ...
...1 1 2 ABC2 3 DEF 3 4 GHI 4 5 J KL 5 6 MN O6 7 P QRS 7 8 T UV8 9 WX Y Z 9 0 0 * * # & ’ , - . # 5 When you 're storing this phone. 11 Press REDIAL/PAUSE to store a pause in Memory 1 Press PROG/CHAN, then press until the screen displays MEM DIAL. 2 Press MEM. Store a Number and...backspace and make corrections; The screen displays ENTER NUMBER. 6 Enter the telephone number. TELEPHONE MEMORY BASIC OPERATION This cordless phone can store 10 telephone numbers with names, each up to 15 characters for the memory location where you finish entering ...

User Manual
Page 12
...end of the entry you wish to edit. 3 When the screen displays the number you to calls from this number by changing to dial, press PHONE. 12 Then press or until YES flashes. 6 Press SELECT. BASIC OPERATION TELEPHONE MEMORY 7 Press SELECT or PROG/CHAN to edit the name. ...displays the number you want to dial. 3 When the screen displays the number you chose Y, a D will be displayed with the directory entry. The phone automatically dials the number. -ORWhen the screen displays the number you want to a distinctive ringing pattern after the first ring. Use , and the dial...
...end of the entry you wish to edit. 3 When the screen displays the number you to calls from this number by changing to dial, press PHONE. 12 Then press or until YES flashes. 6 Press SELECT. BASIC OPERATION TELEPHONE MEMORY 7 Press SELECT or PROG/CHAN to edit the name. ...displays the number you want to dial. 3 When the screen displays the number you chose Y, a D will be displayed with the directory entry. The phone automatically dials the number. -ORWhen the screen displays the number you want to a distinctive ringing pattern after the first ring. Use , and the dial...
User Manual
Page 13
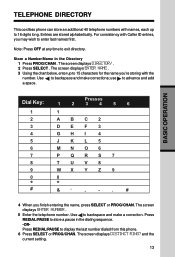
... backspace and make a correction. The screen displays ENTER NAME . 3 Using the chart below, enter up to display the last number dialed from this phone. 6 Press SELECT or PROG/CHAN. use to exit directory. Note: Press OFF at any time to advance and add a space. Press REDIAL/PAUSE...dialing sequence. -ORPress REDIAL/PAUSE to 16 digits long. The screen displays ENTER NUMBER . 5 Enter the telephone number. TELEPHONE DIRECTORY This cordless phone can store an additional 40 telephone numbers with names, each up to 15 characters for the name you're storing with Caller ID entries, ...
... backspace and make a correction. The screen displays ENTER NAME . 3 Using the chart below, enter up to display the last number dialed from this phone. 6 Press SELECT or PROG/CHAN. use to exit directory. Note: Press OFF at any time to advance and add a space. Press REDIAL/PAUSE...dialing sequence. -ORPress REDIAL/PAUSE to 16 digits long. The screen displays ENTER NUMBER . 5 Enter the telephone number. TELEPHONE DIRECTORY This cordless phone can store an additional 40 telephone numbers with names, each up to 15 characters for the name you're storing with Caller ID entries, ...

User Manual
Page 14
... store a new number until YES flashes. 6 Press SELECT. TELEPHONE DIRECTORY 7 Press or to edit the name. Choose N (for No) for Yes) if you wish the phone to alert you will be able to a distinctive ringing pattern after the first ring. The screen displays DIRECTORY . 2 Press or to edit, press SELECT . Use...
... store a new number until YES flashes. 6 Press SELECT. TELEPHONE DIRECTORY 7 Press or to edit the name. Choose N (for No) for Yes) if you wish the phone to alert you will be able to a distinctive ringing pattern after the first ring. The screen displays DIRECTORY . 2 Press or to edit, press SELECT . Use...

User Manual
Page 15
BASIC OPERATION TELEPHONE DIRECTORY -ORPress the dial pad key for the first letter of the entry you want to dial. 3 When the screen displays the number you want to dial, press PHONE. 15 Then press or until DIAL flashes. 4 Press SELECT. The phone automatically dials the number. -ORWhen the screen displays the number you want to dial, press SELECT.
BASIC OPERATION TELEPHONE DIRECTORY -ORPress the dial pad key for the first letter of the entry you want to dial. 3 When the screen displays the number you want to dial, press PHONE. 15 Then press or until DIAL flashes. 4 Press SELECT. The phone automatically dials the number. -ORWhen the screen displays the number you want to dial, press SELECT.

User Manual
Page 16
...flashes. You'll hear a beep confirming the deletion. Delete All Calls 1 While viewing call history. The screen displays ERASE NO YES ALL and the phone number. Note: Press OFF at any time to exit call history, press SELECT, then press or until ERASE flashes. 2 Press SELECT. CALLER ID ...record you answer a call history. 2 Press SELECT, then press or until YES flashes. 5 Press SELECT. The screen displays ERASE NO YES ALL and the phone number. For each incoming call a number from call before the information appears on the screen, it has been received. 1 Press ( CID ) to view...
...flashes. You'll hear a beep confirming the deletion. Delete All Calls 1 While viewing call history. The screen displays ERASE NO YES ALL and the phone number. Note: Press OFF at any time to exit call history, press SELECT, then press or until ERASE flashes. 2 Press SELECT. CALLER ID ...record you answer a call history. 2 Press SELECT, then press or until YES flashes. 5 Press SELECT. The screen displays ERASE NO YES ALL and the phone number. For each incoming call a number from call before the information appears on the screen, it has been received. 1 Press ( CID ) to view...

User Manual
Page 17
...any alternate dialing sequences available for this call (area code + number; 1 + area code + number; Choose N (for No) for dialing, press PHONE. The screen displays ERASE ALL NO YES. Dial a Displayed Number 1 Locate the record in the format it was received. 4 Press SELECT when the ... DISTINCT RING? And the current setting. 5 Press or to confirm your selection. BASIC OPERATION CALLER ID OPERATION 3 Press or until PGM flashes. The phone number will be displayed in call history you want to dial. 2 If you chose Y, a D will hear a beep confirming the deletion. You ...
...any alternate dialing sequences available for this call (area code + number; 1 + area code + number; Choose N (for No) for dialing, press PHONE. The screen displays ERASE ALL NO YES. Dial a Displayed Number 1 Locate the record in the format it was received. 4 Press SELECT when the ... DISTINCT RING? And the current setting. 5 Press or to confirm your selection. BASIC OPERATION CALLER ID OPERATION 3 Press or until PGM flashes. The phone number will be displayed in call history you want to dial. 2 If you chose Y, a D will hear a beep confirming the deletion. You ...
User Manual
Page 18
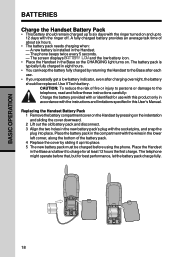
... use with this product only in accordance with the instructions and limitations specified in this User's Manual. The telephone might operate before using the phone. A fully charged battery provides an average talk time of the battery pack. 4 Replace the cover by pressing on the indentation and sliding ...plug into place. 5 The new battery pack must be replaced. Place the Handset in the Base so the CHARGING light turns on. Use VTech battery. BASIC OPERATION BATTERIES Charge the Handset Battery Pack • This battery should be charged before that, but for at least 12 hours the...
... use with this product only in accordance with the instructions and limitations specified in this User's Manual. The telephone might operate before using the phone. A fully charged battery provides an average talk time of the battery pack. 4 Replace the cover by pressing on the indentation and sliding ...plug into place. 5 The new battery pack must be replaced. Place the Handset in the Base so the CHARGING light turns on. Use VTech battery. BASIC OPERATION BATTERIES Charge the Handset Battery Pack • This battery should be charged before that, but for at least 12 hours the...
User Manual
Page 19
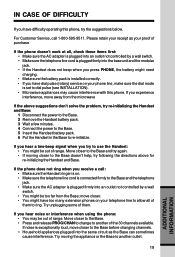
... the telephone line cord is plugged firmly into the base unit and the modular jack. • If the Handset does not beep when you press PHONE, the battery might have dial pulse (rotary) service on your telephone line to allow all , check these items first: • Make sure the AC...same circuit as your proof of range. Try unplugging some of range. For Customer Service, call : • Make sure the Handset ringer is on your phone line, make sure the dial mode is exceptionally loud, move closer. • You might need charging. • Make sure the battery pack is installed ...
... the telephone line cord is plugged firmly into the base unit and the modular jack. • If the Handset does not beep when you press PHONE, the battery might have dial pulse (rotary) service on your telephone line to allow all , check these items first: • Make sure the AC...same circuit as your proof of range. Try unplugging some of range. For Customer Service, call : • Make sure the Handset ringer is on your phone line, make sure the dial mode is exceptionally loud, move closer. • You might need charging. • Make sure the battery pack is installed ...
User Manual
Page 20
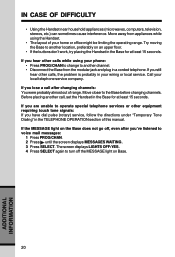
... tone signals: If you are unable to the Base before changing channels. Move away from the modular jack and plug in a corded telephone. Call your phone: • Press PROG/CHAN to change to another call after changing channels: You were probably almost out of range. If you have dial pulse (rotary...
... tone signals: If you are unable to the Base before changing channels. Move away from the modular jack and plug in a corded telephone. Call your phone: • Press PROG/CHAN to change to another call after changing channels: You were probably almost out of range. If you have dial pulse (rotary...


