
User Manual
Page 2
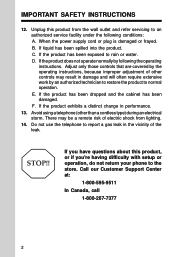
... in damage and will often require extensive work by following conditions: A. If liquid has been spilled into the product. Do not use the telephone to rain or water. If the product exhibits a distinct change in the vicinity of electric shock from the wall outlet and refer servicing to the store. Call our Customer Support Center at: 1-800-595-9511 In...
... in damage and will often require extensive work by following conditions: A. If liquid has been spilled into the product. Do not use the telephone to rain or water. If the product exhibits a distinct change in the vicinity of electric shock from the wall outlet and refer servicing to the store. Call our Customer Support Center at: 1-800-595-9511 In...

User Manual
Page 3
... BEGIN Enhanced 2.4GHz Technology - Parts Check List: 1. Telephone Line Cord 5. Battery Pack 6. Dual Band transmission combines the best of 2.4GHz and 900MHz technologies, providing enhanced performance over standard cordless telephones. Contact your phone service provider if: • You have only Caller ID service, or only Call Waiting service • You don't subscribe to change your local phone service provider. Handset 3. AC Power Adapter 4. Owner's Manual To purchase replacement battery packs, call VTech Telecommunications Canada Ltd. at 1-800...
... BEGIN Enhanced 2.4GHz Technology - Parts Check List: 1. Telephone Line Cord 5. Battery Pack 6. Dual Band transmission combines the best of 2.4GHz and 900MHz technologies, providing enhanced performance over standard cordless telephones. Contact your phone service provider if: • You have only Caller ID service, or only Call Waiting service • You don't subscribe to change your local phone service provider. Handset 3. AC Power Adapter 4. Owner's Manual To purchase replacement battery packs, call VTech Telecommunications Canada Ltd. at 1-800...
User Manual
Page 5
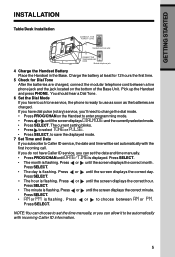
... set the date and time manually. • Press PROG/CHAN until the screen displays DIALMODE: and the currently selected mode. • Press SELECT. Press or to choose between a live phone jack and the jack located on the Handset to use as soon as the batteries are charged, connect the modular telephone cord between AM or PM. GETTING STARTED INSTALLATION Table/Desk Installation CONNECT THE POWER CORD Standard electrical outlet CONNECT THE TELEPHONE LINE CORD Modular telephone...
... set the date and time manually. • Press PROG/CHAN until the screen displays DIALMODE: and the currently selected mode. • Press SELECT. Press or to choose between a live phone jack and the jack located on the Handset to use as soon as the batteries are charged, connect the modular telephone cord between AM or PM. GETTING STARTED INSTALLATION Table/Desk Installation CONNECT THE POWER CORD Standard electrical outlet CONNECT THE TELEPHONE LINE CORD Modular telephone...

User Manual
Page 7
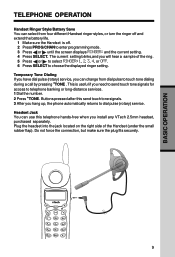
... number dialed. Make a Call Press PHONE then dial the number, OR Dial the number (use to backspace and correct digits), then press PHONE to delete the last number dialed record with Handset idle (on hook) mode. HOLD Press to the idle (on hook). 7 press again to release hold ; Program/Channel Switch to call . Flash/Call Waiting Access special telephone company subscriber services. End a Call Press OFF or place Handset in Base. Handset Volume While on a call , adjust the volume of what you hear. Enter programming mode...
... number dialed. Make a Call Press PHONE then dial the number, OR Dial the number (use to backspace and correct digits), then press PHONE to delete the last number dialed record with Handset idle (on hook) mode. HOLD Press to the idle (on hook). 7 press again to release hold ; Program/Channel Switch to call . Flash/Call Waiting Access special telephone company subscriber services. End a Call Press OFF or place Handset in Base. Handset Volume While on a call , adjust the volume of what you hear. Enter programming mode...
User Manual
Page 9
...-distance services. 1 Dial the number. 2 Press *TONE. Do not force the connection, but make sure the plug fits securely. 9 Buttons pressed after this telephone hands-free when you install any VTech 2.5mm headset, purchased separately. The current setting blinks,and you can change from four different Handset ringer styles, or turn the ringer off and extend the battery life. 1 Make sure the Handset is useful if you hang up, the phone automatically returns to enter programming mode...
...-distance services. 1 Dial the number. 2 Press *TONE. Do not force the connection, but make sure the plug fits securely. 9 Buttons pressed after this telephone hands-free when you install any VTech 2.5mm headset, purchased separately. The current setting blinks,and you can change from four different Handset ringer styles, or turn the ringer off and extend the battery life. 1 Make sure the Handset is useful if you hang up, the phone automatically returns to enter programming mode...

User Manual
Page 10
... Base, then press PHONE to answer the call while you press PHONE . To hang up properly, walk back into range, periodically pressing OFF . BASIC OPERATION TELEPHONE OPERATION Operating Range This cordless telephone operates within the maximum power allowed by the Federal Communications Commission (FCC). Display Screen Messages The Handset is in use The Base is paging the Handset. If you move closer to be left "off the hook." If you receive a call . The Battery...
... Base, then press PHONE to answer the call while you press PHONE . To hang up properly, walk back into range, periodically pressing OFF . BASIC OPERATION TELEPHONE OPERATION Operating Range This cordless telephone operates within the maximum power allowed by the Federal Communications Commission (FCC). Display Screen Messages The Handset is in use The Base is paging the Handset. If you move closer to be left "off the hook." If you receive a call . The Battery...

User Manual
Page 12
.... The screen displays ENTER 0-9. 2 Press the memory location key of the name. BASIC OPERATION TELEPHONE MEMORY 7 Press SELECT or PROG/CHAN to edit the number. Choose N (for No) for Yes) if you wish the phone to alert you want to delete, press SELECT. Edit a Number/Name Stored in Memory 1 Press MEM . Use , and the dial pad keys to confirm your entry. Then press or until DIAL flashes. 4 Press...
.... The screen displays ENTER 0-9. 2 Press the memory location key of the name. BASIC OPERATION TELEPHONE MEMORY 7 Press SELECT or PROG/CHAN to edit the number. Choose N (for No) for Yes) if you wish the phone to alert you want to delete, press SELECT. Edit a Number/Name Stored in Memory 1 Press MEM . Use , and the dial pad keys to confirm your entry. Then press or until DIAL flashes. 4 Press...
User Manual
Page 13
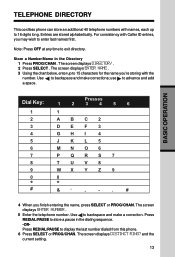
... to 16 digits long. The screen displays ENTER NUMBER . 5 Enter the telephone number. Note: Press OFF at any time to advance and add a space. Use to backspace and make a correction. The screen displays DISTINCT RING? Press REDIAL/PAUSE to store a pause in the Directory 1 Press PROG/CHAN . Entries are stored alphabetically. The screen displays DIRECTORY . 2 Press SELECT . TELEPHONE DIRECTORY This cordless phone can store an additional 40 telephone numbers with...
... to 16 digits long. The screen displays ENTER NUMBER . 5 Enter the telephone number. Note: Press OFF at any time to advance and add a space. Use to backspace and make a correction. The screen displays DISTINCT RING? Press REDIAL/PAUSE to store a pause in the Directory 1 Press PROG/CHAN . Entries are stored alphabetically. The screen displays DIRECTORY . 2 Press SELECT . TELEPHONE DIRECTORY This cordless phone can store an additional 40 telephone numbers with...

User Manual
Page 14
... the screen displays MEMORY FULL , an error tone sounds, and you will be able to store a new number until YES flashes. 6 Press SELECT. Delete a Number/Name Stored in the Directory 1 Press ( ). Press SELECT to move to edit the Distinctive Ring setting. 5 Press SELECT to scroll alphabetically through entries stored in memory. -ORPress the dial pad key for Yes) if you wish the phone to a distinctive ringing pattern...
... the screen displays MEMORY FULL , an error tone sounds, and you will be able to store a new number until YES flashes. 6 Press SELECT. Delete a Number/Name Stored in the Directory 1 Press ( ). Press SELECT to move to edit the Distinctive Ring setting. 5 Press SELECT to scroll alphabetically through entries stored in memory. -ORPress the dial pad key for Yes) if you wish the phone to a distinctive ringing pattern...

User Manual
Page 16
... the phone number. Note: Press OFF at any time to delete Caller ID records manually. The current choice flashes. 4 Press or until ERASE flashes. 2 Press SELECT. When the memory is full, the oldest call information is deleted to make room for about 15 seconds after it will have to exit call information. Review Call History The screen displays call information for new incoming call history. BASIC OPERATION 3 Press SELECT. You'll hear a beep confirming the deletion...
... the phone number. Note: Press OFF at any time to delete Caller ID records manually. The current choice flashes. 4 Press or until ERASE flashes. 2 Press SELECT. When the memory is full, the oldest call information is deleted to make room for about 15 seconds after it will have to exit call information. Review Call History The screen displays call information for new incoming call history. BASIC OPERATION 3 Press SELECT. You'll hear a beep confirming the deletion...

User Manual
Page 17
... screen displays DISTINCT RING? Choose N (for No) for a normal ringing pattern. 6 Press SELECT or PROG/CHAN to change how the number is correctly for this number by changing to alert you chose Y, a D will be displayed in call (area code + number; 1 + area code + number; The phone number will hear a beep confirming the deletion. The screen displays any alternate dialing sequences available for dialing, press PHONE. And the current setting. 5 Press or to confirm your selection. Display Screen Messages 17...
... screen displays DISTINCT RING? Choose N (for No) for a normal ringing pattern. 6 Press SELECT or PROG/CHAN to change how the number is correctly for this number by changing to alert you chose Y, a D will be displayed in call (area code + number; 1 + area code + number; The phone number will hear a beep confirming the deletion. The screen displays any alternate dialing sequences available for dialing, press PHONE. And the current setting. 5 Press or to confirm your selection. Display Screen Messages 17...
User Manual
Page 18
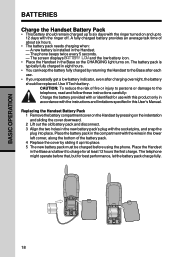
... phone. A new battery is typically fully charged in the new battery pack's plug with the ringer off. The screen displays BATTERY LOW and the low battery icon. • Place the Handset in the Handset. - BASIC OPERATION BATTERIES Charge the Handset Battery Pack • This battery should be charged before that, but for best performance, let the battery pack charge fully. 18 The phone beeps twice every 5 seconds. - The battery pack is installed in the Base so the CHARGING light turns...
... phone. A new battery is typically fully charged in the new battery pack's plug with the ringer off. The screen displays BATTERY LOW and the low battery icon. • Place the Handset in the Handset. - BASIC OPERATION BATTERIES Charge the Handset Battery Pack • This battery should be charged before that, but for best performance, let the battery pack charge fully. 18 The phone beeps twice every 5 seconds. - The battery pack is installed in the Base so the CHARGING light turns...
User Manual
Page 19
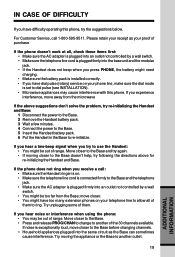
... , check these items first: • Make sure the AC adapter is plugged into an outlet not controlled by a wall switch. • Make sure the telephone line cord is set to dial pulse (see INSTALLATION). • Microwave appliances may be out of range. If the phone does not ring when you receive a call 1-800-595-9511. For Customer Service, call : • Make sure the Handset ringer is on. • Make sure the telephone line cord is connected...
... , check these items first: • Make sure the AC adapter is plugged into an outlet not controlled by a wall switch. • Make sure the telephone line cord is set to dial pulse (see INSTALLATION). • Microwave appliances may be out of range. If the phone does not ring when you receive a call 1-800-595-9511. For Customer Service, call : • Make sure the Handset ringer is on. • Make sure the telephone line cord is connected...
User Manual
Page 20
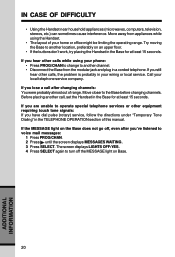
... another call after you have dial pulse (rotary) service, follow the directions under "Temporary Tone Dialing" in the Base for at least 15 seconds. The screen displays LIGHTS OFF:YES . 4 Press SELECT again to another channel. • Disconnect the Base from appliances while using your wiring or local service. Try moving the Base to turn off , even after changing channels: You were probably almost out of range. If you are unable...
... another call after you have dial pulse (rotary) service, follow the directions under "Temporary Tone Dialing" in the Base for at least 15 seconds. The screen displays LIGHTS OFF:YES . 4 Press SELECT again to another channel. • Disconnect the Base from appliances while using your wiring or local service. Try moving the Base to turn off , even after changing channels: You were probably almost out of range. If you are unable...
User Manual
Page 22
..., when installed and used normally and in the sales package ("Product") are free from the date of purchase if we may use with operation instructions. How long is shipped to you ") that the product and all accessories provided by signal conditions, network reliability or cable or antenna systems; or 5. If we choose to replace this product, we repair or replace a Materially...
..., when installed and used normally and in the sales package ("Product") are free from the date of purchase if we may use with operation instructions. How long is shipped to you ") that the product and all accessories provided by signal conditions, network reliability or cable or antenna systems; or 5. If we choose to replace this product, we repair or replace a Materially...

User Manual
Page 24
...; Connect the equipment into an outlet or on the underside of the Base Unit containing either the FCC registration number and Ringer Equivalence Number (REN) or the IC registration number and Load Number. Operation is no guarantee that may ask you with inductively coupled hearing aids. It also complies with the instructions, may not cause interference, and (2) this equipment from that date, it...
...; Connect the equipment into an outlet or on the underside of the Base Unit containing either the FCC registration number and Ringer Equivalence Number (REN) or the IC registration number and Load Number. Operation is no guarantee that may ask you with inductively coupled hearing aids. It also complies with the instructions, may not cause interference, and (2) this equipment from that date, it...
User Manual
Page 25
.... 4. This information must comply with the FCC. This equipment may make changes in the user's manual. Repair instructions If this product is used with Coin Telephone Lines or with this telephone equipment can only be connected to determine how many devices you of this equipment to connect this equipment does not disable your telephone line and still have questions about what will be five (5.0) or...
.... 4. This information must comply with the FCC. This equipment may make changes in the user's manual. Repair instructions If this product is used with Coin Telephone Lines or with this telephone equipment can only be connected to determine how many devices you of this equipment to connect this equipment does not disable your telephone line and still have questions about what will be five (5.0) or...
User Manual
Page 26
... to request the user to store police, fire department and emergency medical service telephone numbers in some situations. However, if you have stored is registered for this product has memory dialing locations, you can still dial the emergency number manually if the memory dialing feature doesn't work. The term "IC:" before hanging up. • Programming/testing of connection. The abbreviation, IC, before the registration number signifies that...
... to request the user to store police, fire department and emergency medical service telephone numbers in some situations. However, if you have stored is registered for this product has memory dialing locations, you can still dial the emergency number manually if the memory dialing feature doesn't work. The term "IC:" before hanging up. • Programming/testing of connection. The abbreviation, IC, before the registration number signifies that...

User Manual
Page 28
TECHNICAL SPECIFICATIONS FREQUENCY CONTROL WEIGHT Crystal controlled PLL synthesizer TRANSMIT FREQUENCY Base: 2411.15 - 2418.4 MHz Handset: 912.75 - 917.10 MHz RECEIVE FREQUENCY Handset : 148 grams Base : 214 grams (excluding battery pack) POWER REQUIREMENTS Handset : Base : 400mAh NI-CD Battery Pack 9V DC @ 300mA Base: 912.75 - 917.10 MHz Handset: 2411.15 - 2418.4 MHz CHANNELS 30 Channels NOMINAL EFFECTIVE RANGE Maximum power allowed by FCC and IC. MEMORY Speed Dial: 10 Memory locations 16 digits per location...
TECHNICAL SPECIFICATIONS FREQUENCY CONTROL WEIGHT Crystal controlled PLL synthesizer TRANSMIT FREQUENCY Base: 2411.15 - 2418.4 MHz Handset: 912.75 - 917.10 MHz RECEIVE FREQUENCY Handset : 148 grams Base : 214 grams (excluding battery pack) POWER REQUIREMENTS Handset : Base : 400mAh NI-CD Battery Pack 9V DC @ 300mA Base: 912.75 - 917.10 MHz Handset: 2411.15 - 2418.4 MHz CHANNELS 30 Channels NOMINAL EFFECTIVE RANGE Maximum power allowed by FCC and IC. MEMORY Speed Dial: 10 Memory locations 16 digits per location...

User Manual
Page 30
... 3 Parts Check List ...3 Getting Started...4 INSTALLATION ...4 Before You Install 4 Table/Desk Installation 5 Wall Installation on a standard modular Wall Plate 6 Basic Operation...7 TELEPHONE OPERATION 7 Make a Call...7 Answer a Call ...7 End a Call ...7 Program/Channel 7 Redial/Pause ...7 Handset Volume 7 Flash/Call Waiting 7 Hold ...7 Page/Handset Locator 8 Message Waiting Indicator 8 In Use/Charging Indicator 8 Handset Ringer Style/ Battery Save 9 Temporary Tone Dialing 9 Headset Jack...9 Operating Range 10 Display Screen Messages 10 TELEPHONE MEMORY ...11 Store a Number and...
... 3 Parts Check List ...3 Getting Started...4 INSTALLATION ...4 Before You Install 4 Table/Desk Installation 5 Wall Installation on a standard modular Wall Plate 6 Basic Operation...7 TELEPHONE OPERATION 7 Make a Call...7 Answer a Call ...7 End a Call ...7 Program/Channel 7 Redial/Pause ...7 Handset Volume 7 Flash/Call Waiting 7 Hold ...7 Page/Handset Locator 8 Message Waiting Indicator 8 In Use/Charging Indicator 8 Handset Ringer Style/ Battery Save 9 Temporary Tone Dialing 9 Headset Jack...9 Operating Range 10 Display Screen Messages 10 TELEPHONE MEMORY ...11 Store a Number and...


