User Manual
Page 1
...it is out of 3 feet / 1 meter). Note • Users cannot set between 50 oF (10 oC) and 76 oF (24oC). VM3261-X_CA_CIB_V5. Press to install and operate your new VTech product. Press or to choose the desired time period to automatically turn on or off the parent unit screen without interruption... to change the brightness of your baby unit. Positioning the baby monitor Caution • Keep the baby unit out of the reach of children. adjust camera angle manually. • Pan - Power on or off . The screen turns off the parent unit • Press and hold , , or to pan or...
...it is out of 3 feet / 1 meter). Note • Users cannot set between 50 oF (10 oC) and 76 oF (24oC). VM3261-X_CA_CIB_V5. Press to install and operate your new VTech product. Press or to choose the desired time period to automatically turn on or off the parent unit screen without interruption... to change the brightness of your baby unit. Positioning the baby monitor Caution • Keep the baby unit out of the reach of children. adjust camera angle manually. • Pan - Power on or off . The screen turns off the parent unit • Press and hold , , or to pan or...
User Manual
Page 2
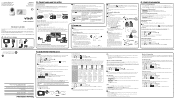
...is being viewed; Your parent unit display will repair or replace at authorized VTech product service centers. Storage When you return with any interference received, including ...switch to ON to AC power. Try installing your baby in PATROL mode. • For VM3261-2 only Warning icons and messages The battery is not a medical device and should be illegal...2 3 8 4 9 10 5 6 7 11 12 1 2 3 4 5 6 8 7 9 8 10 Light sensor Camera Infrared LEDs Speaker 11 Infrared LEDs 12 Antenna 5 • For signal reception6. or when the link to baby units, the CEC...
...is being viewed; Your parent unit display will repair or replace at authorized VTech product service centers. Storage When you return with any interference received, including ...switch to ON to AC power. Try installing your baby in PATROL mode. • For VM3261-2 only Warning icons and messages The battery is not a medical device and should be illegal...2 3 8 4 9 10 5 6 7 11 12 1 2 3 4 5 6 8 7 9 8 10 Light sensor Camera Infrared LEDs Speaker 11 Infrared LEDs 12 Antenna 5 • For signal reception6. or when the link to baby units, the CEC...

Quick Start Guide
Page 2
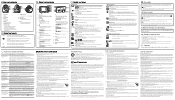
... the holes into a stud, go to step 3. -ORIf you have powered on automatically. Place the baby unit on the wall mount bracket. For VM3261-2 only Status check - Two baby units If you can choose to your baby unit's viewing angles by tilting the wall mount bracket. turns on the...8226; If you see Adjust the sound sensitivity of the wall mount bracket. Mount the baby unit (optional) NNOoTtEeSs • Check for reception strength and camera angle before drilling the holes. • The types of screws and anchors you could do... Use a pencil to tighten the joint and secure the angle...
... the holes into a stud, go to step 3. -ORIf you have powered on automatically. Place the baby unit on the wall mount bracket. For VM3261-2 only Status check - Two baby units If you can choose to your baby unit's viewing angles by tilting the wall mount bracket. turns on the...8226; If you see Adjust the sound sensitivity of the wall mount bracket. Mount the baby unit (optional) NNOoTtEeSs • Check for reception strength and camera angle before drilling the holes. • The types of screws and anchors you could do... Use a pencil to tighten the joint and secure the angle...


