
User Manual
Page 1
Instruction Manual ® HATCH & T-RE ROAAAR EGG X RACERTM
Instruction Manual ® HATCH & T-RE ROAAAR EGG X RACERTM
User Manual
Page 2
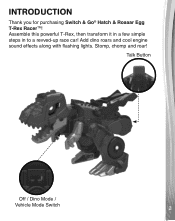
Add dino roars and cool engine sound effects along with flashing lights. Stomp, chomp and roar! Talk Button Off / Dino Mode / Vehicle Mode Switch 2 INTRODUCTION Thank you for purchasing Switch & Go® Hatch & Roaaar Egg T-Rex RacerTM! Assemble this powerful T-Rex, then transform it in a few simple steps in to a revved-up race car!
Add dino roars and cool engine sound effects along with flashing lights. Stomp, chomp and roar! Talk Button Off / Dino Mode / Vehicle Mode Switch 2 INTRODUCTION Thank you for purchasing Switch & Go® Hatch & Roaaar Egg T-Rex RacerTM! Assemble this powerful T-Rex, then transform it in a few simple steps in to a revved-up race car!
User Manual
Page 3
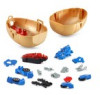
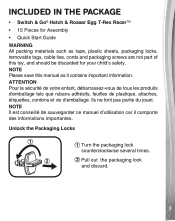
... Turn the packaging lock counterclockwise several times. INCLUDED IN THE PACKAGE • Switch & Go® Hatch & Roaaar Egg T-Rex RacerTM • 15 Pieces for your child's safety. NOTE Please save this toy, and should be discarded for Assembly • Quick Start Guide WARNING All packing materials such as tape, plastic sheets, packaging locks, removable tags, cable ties, cords and packaging screws are not part of this manual...
... Turn the packaging lock counterclockwise several times. INCLUDED IN THE PACKAGE • Switch & Go® Hatch & Roaaar Egg T-Rex RacerTM • 15 Pieces for your child's safety. NOTE Please save this toy, and should be discarded for Assembly • Quick Start Guide WARNING All packing materials such as tape, plastic sheets, packaging locks, removable tags, cable ties, cords and packaging screws are not part of this manual...
User Manual
Page 4
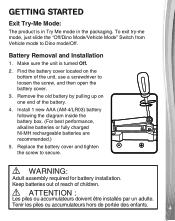
... is turned Off. 2. Make sure the unit is in Try Me mode in the packaging. Remove the old battery by pulling up on the bottom of the unit, use a screwdriver to loosen the screw, and then open the battery cover. 3. To exit try-me mode, just slide the "Off/Dino Mode/Vehicle Mode" Switch from Vehicle mode to secure. Find the battery cover located on one end of children. Install 1 new...
... is turned Off. 2. Make sure the unit is in Try Me mode in the packaging. Remove the old battery by pulling up on the bottom of the unit, use a screwdriver to loosen the screw, and then open the battery cover. 3. To exit try-me mode, just slide the "Off/Dino Mode/Vehicle Mode" Switch from Vehicle mode to secure. Find the battery cover located on one end of children. Install 1 new...

User Manual
Page 5
... not mix old and new batteries. • Do not mix alkaline, standard (carbon-zinc) or rechargeable batteries. • Only batteries of the same or equivalent type as recommended are to be used. • Do not short-circuit the supply terminals. • Remove batteries during long periods of non-use. • Remove exhausted batteries from the toy before charging. • Rechargeable batteries are only to...
... not mix old and new batteries. • Do not mix alkaline, standard (carbon-zinc) or rechargeable batteries. • Only batteries of the same or equivalent type as recommended are to be used. • Do not short-circuit the supply terminals. • Remove batteries during long periods of non-use. • Remove exhausted batteries from the toy before charging. • Rechargeable batteries are only to...
User Manual
Page 7
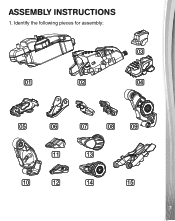
ASSEMBLY INSTRUCTIONS 1. Identify the following pieces for assembly: 03 01 02 04 05 06 07 08 09 11 13 10 12 14 15 7
ASSEMBLY INSTRUCTIONS 1. Identify the following pieces for assembly: 03 01 02 04 05 06 07 08 09 11 13 10 12 14 15 7
User Manual
Page 8
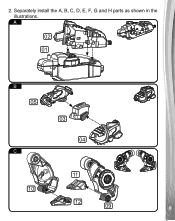
Separately install the A, B, C, D, E, F, G and H parts as shown in the illustrations. 2. A 02 01 B 05 C 03 04 11 10 12 09 8
Separately install the A, B, C, D, E, F, G and H parts as shown in the illustrations. 2. A 02 01 B 05 C 03 04 11 10 12 09 8

User Manual
Page 11
Next, flip a Vehicle. mode/Vehicle mode Switch to Vehicle mode to Dino mode, follow the above steps in Dino mode. 2. Flip up the Dino's feet. Slide the Off/Dino up the Dino's mouth, then 4. Flip the tail up the front claws. Note: To switch from Vehicle mode to play Vehicle responses. TRANSFORMATION 1. Begin in reverse order. 11 The Dino is now changed into flip up toward the Dino's head. 1 2 3 3.
Next, flip a Vehicle. mode/Vehicle mode Switch to Vehicle mode to Dino mode, follow the above steps in Dino mode. 2. Flip up the Dino's feet. Slide the Off/Dino up the Dino's mouth, then 4. Flip the tail up the front claws. Note: To switch from Vehicle mode to play Vehicle responses. TRANSFORMATION 1. Begin in reverse order. 11 The Dino is now changed into flip up toward the Dino's head. 1 2 3 3.
User Manual
Page 12
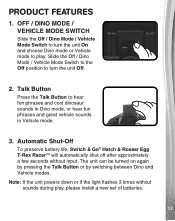
... preserve battery life, Switch & Go® Hatch & Roaaar Egg T-Rex RacerTM will automatically shut off after approximately a few seconds without sounds during play . OFF / DINO MODE / VEHICLE MODE SWITCH Slide the Off / Dino Mode / Vehicle Mode Switch to turn the unit Off. 2. Talk Button Press the Talk Button to play , please install a new set of batteries. 12 Slide the Off / Dino Mode / Vehicle Mode Switch to the Off position to turn the unit On and choose Dino mode or Vehicle mode to hear fun phrases...
... preserve battery life, Switch & Go® Hatch & Roaaar Egg T-Rex RacerTM will automatically shut off after approximately a few seconds without sounds during play . OFF / DINO MODE / VEHICLE MODE SWITCH Slide the Off / Dino Mode / Vehicle Mode Switch to turn the unit Off. 2. Talk Button Press the Talk Button to play , please install a new set of batteries. 12 Slide the Off / Dino Mode / Vehicle Mode Switch to the Off position to turn the unit On and choose Dino mode or Vehicle mode to hear fun phrases...

User Manual
Page 13
... cloth. 2. A service representative will not be ready to use for you to moisture or water. If the unit still does not work, replace with a new set of direct sunlight and away from any problems and/or suggestions you to ensure the accuracy of the information, which forms the value of time. 4. TROUBLESHOOTING If for a few minutes, then replace the batteries. 4. Interrupt the power supply...
... cloth. 2. A service representative will not be ready to use for you to moisture or water. If the unit still does not work, replace with a new set of direct sunlight and away from any problems and/or suggestions you to ensure the accuracy of the information, which forms the value of time. 4. TROUBLESHOOTING If for a few minutes, then replace the batteries. 4. Interrupt the power supply...

User Manual
Page 14
... found to comply with the instructions, may cause harmful interference to radio communications. This equipment generates, uses and can be determined by turning the equipment off and on, the user is encouraged to try to correct the interference by the party responsible for compliance could void the user's authority to operate the equipment. 14 These limits...
... found to comply with the instructions, may cause harmful interference to radio communications. This equipment generates, uses and can be determined by turning the equipment off and on, the user is encouraged to try to correct the interference by the party responsible for compliance could void the user's authority to operate the equipment. 14 These limits...

User Manual
Page 15
...Small parts. Not for children under 3 yrs. AVERTISSEMENT: RISQUE DE SUFFOCATION-Petites pièces. Address: 1156 W. OPERATION IS ...SUBJECT TO THE FOLLOWING TWO CONDITIONS: (1) THIS DEVICE MAY NOT CAUSE HARMFUL INTERFERENCE, AND (2) THIS DEVICE MUST ACCEPT ANY INTERFERENCE RECEIVED, INCLUDING INTERFERENCE THAT MAY CAUSE UNDESIRED OPERATION. Supplier's Declaration of Conformity 47 CFR § 2.1077 Compliance Information Trade Name: VTech® Model: 5591 Product Name: Switch & Go® Hatch & Roaaar Egg T-Rex RacerTM Responsible Party: VTech Electronics...
...Small parts. Not for children under 3 yrs. AVERTISSEMENT: RISQUE DE SUFFOCATION-Petites pièces. Address: 1156 W. OPERATION IS ...SUBJECT TO THE FOLLOWING TWO CONDITIONS: (1) THIS DEVICE MAY NOT CAUSE HARMFUL INTERFERENCE, AND (2) THIS DEVICE MUST ACCEPT ANY INTERFERENCE RECEIVED, INCLUDING INTERFERENCE THAT MAY CAUSE UNDESIRED OPERATION. Supplier's Declaration of Conformity 47 CFR § 2.1077 Compliance Information Trade Name: VTech® Model: 5591 Product Name: Switch & Go® Hatch & Roaaar Egg T-Rex RacerTM Responsible Party: VTech Electronics...

User Manual
Page 16
IM-559100-000 Version:1 All rights reserved. vtechkids.com vtechkids.ca Read our complete warranty policy online at vtechkids.com/warranty vtechkids.ca/warranty TM & © 2022 VTech Holdings Limited. Visit our website for more information about our products, downloads, resources and more.
IM-559100-000 Version:1 All rights reserved. vtechkids.com vtechkids.ca Read our complete warranty policy online at vtechkids.com/warranty vtechkids.ca/warranty TM & © 2022 VTech Holdings Limited. Visit our website for more information about our products, downloads, resources and more.

