User Manual
Page 1
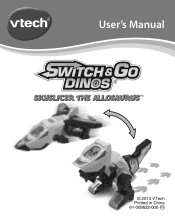
User's Manual SKYSLICER THE ALLOSAURUS TM © 2013 VTech Printed in China 91-009632-000 US
User's Manual SKYSLICER THE ALLOSAURUS TM © 2013 VTech Printed in China 91-009632-000 US
User Manual
Page 2
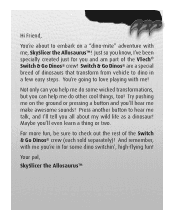
... to hear me talk, and I 've been specially created just for some wicked transformations, but you 'll even learn a thing or two. Switch & Go Dinos® are a special breed of the VTech® Switch & Go Dinos® crew! Try pushing me on a "dino-mite" adventure with me, SkySlicer the Allosaurus™! And remember, with me you're in a few easy steps. Your pal, SkySlicer the Allosaurus™...
... to hear me talk, and I 've been specially created just for some wicked transformations, but you 'll even learn a thing or two. Switch & Go Dinos® are a special breed of the VTech® Switch & Go Dinos® crew! Try pushing me on a "dino-mite" adventure with me, SkySlicer the Allosaurus™! And remember, with me you're in a few easy steps. Your pal, SkySlicer the Allosaurus™...
User Manual
Page 3
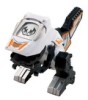
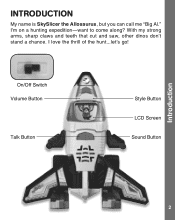
INTRODUCTION My name is SkySlicer the Allosaurus, but you can call me "Big Al." I 'm on a hunting expedition-want to come along? I love the thrill of the hunt...let's go! On/Off Switch Volume Button Talk Button Style Button LCD Screen Sound Button Introduction 2 With my strong arms, sharp claws and teeth that cut and saw, other dinos don't stand a chance.
INTRODUCTION My name is SkySlicer the Allosaurus, but you can call me "Big Al." I 'm on a hunting expedition-want to come along? I love the thrill of the hunt...let's go! On/Off Switch Volume Button Talk Button Style Button LCD Screen Sound Button Introduction 2 With my strong arms, sharp claws and teeth that cut and saw, other dinos don't stand a chance.
User Manual
Page 4
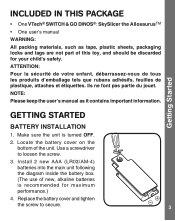
Locate the battery cover on the bottom of this toy, and should be discarded for maximum performance.) 4. Install 2 new AAA (LR03/AM-4) batteries into the main unit following the diagram inside the battery box. (The use of new, alkaline batteries is turned OFF. 2. Use a screwdriver to secure. 3 Replace the battery cover and tighten the screw to loosen the screw. 3. Getting Started GETTING STARTED BATTERY INSTALLATION 1. Make sure the unit is recommended for your...
Locate the battery cover on the bottom of this toy, and should be discarded for maximum performance.) 4. Install 2 new AAA (LR03/AM-4) batteries into the main unit following the diagram inside the battery box. (The use of new, alkaline batteries is turned OFF. 2. Use a screwdriver to secure. 3 Replace the battery cover and tighten the screw to loosen the screw. 3. Getting Started GETTING STARTED BATTERY INSTALLATION 1. Make sure the unit is recommended for your...
User Manual
Page 5
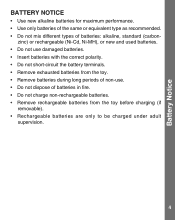
... new and used batteries. • Do not use damaged batteries. • Insert batteries with the correct polarity. • Do not short-circuit the battery terminals. • Remove exhausted batteries from the toy. • Remove batteries during long periods of non-use. • Do not dispose of batteries: alkaline, standard (carbon- Battery Notice BATTERY NOTICE • Use new alkaline batteries for maximum performance. • Use only batteries of the same or equivalent type...
... new and used batteries. • Do not use damaged batteries. • Insert batteries with the correct polarity. • Do not short-circuit the battery terminals. • Remove exhausted batteries from the toy. • Remove batteries during long periods of non-use. • Do not dispose of batteries: alkaline, standard (carbon- Battery Notice BATTERY NOTICE • Use new alkaline batteries for maximum performance. • Use only batteries of the same or equivalent type...
User Manual
Page 6
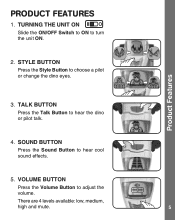
VOLUME BUTTON Press the Volume Button to choose a pilot or change the dino eyes. STYLE BUTTON Press the Style Button to adjust the volume. TURNING THE UNIT ON Slide the ON/OFF Switch to ON to hear cool sound effects. 5. SOUND BUTTON Press the Sound Button to turn the unit ON. 2. There are 4 levels available: low, medium, high and mute. 5 PRODUCT FEATURES 1. TALK BUTTON Press the Talk Button to hear the dino or pilot talk. 4. Product Features 3.
VOLUME BUTTON Press the Volume Button to choose a pilot or change the dino eyes. STYLE BUTTON Press the Style Button to adjust the volume. TURNING THE UNIT ON Slide the ON/OFF Switch to ON to hear cool sound effects. 5. SOUND BUTTON Press the Sound Button to turn the unit ON. 2. There are 4 levels available: low, medium, high and mute. 5 PRODUCT FEATURES 1. TALK BUTTON Press the Talk Button to hear the dino or pilot talk. 4. Product Features 3.
User Manual
Page 7
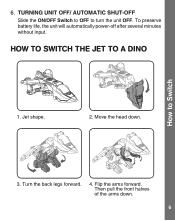
Jet shape. 2. Flip the arms forward. Then pull the front halves of the arms down . 3. HOW TO SWITCH THE JET TO A DINO How to turn the unit OFF. Move the head down . 6 To preserve battery life, the unit will automatically power-off after several minutes without input. Turn the back legs forward. 4. 6. TURNING UNIT OFF/ AUTOMATIC SHUT-OFF Slide the ON/OFF Switch to OFF to Switch 1.
Jet shape. 2. Flip the arms forward. Then pull the front halves of the arms down . 3. HOW TO SWITCH THE JET TO A DINO How to turn the unit OFF. Move the head down . 6 To preserve battery life, the unit will automatically power-off after several minutes without input. Turn the back legs forward. 4. 6. TURNING UNIT OFF/ AUTOMATIC SHUT-OFF Slide the ON/OFF Switch to OFF to Switch 1.

User Manual
Page 8
How to form the tail. Note: To change the dino back into a jet, reverse the order of the wings 180 degrees. 6. Dino shape. 5. Fold the nose under the chin and open the mouth. 8. Move the wings up to Switch 7. Turn the outer half of the steps above. 7
How to form the tail. Note: To change the dino back into a jet, reverse the order of the wings 180 degrees. 6. Dino shape. 5. Fold the nose under the chin and open the mouth. 8. Move the wings up to Switch 7. Turn the outer half of the steps above. 7

User Manual
Page 9
... the problem persists, please call our Consumer Services Department at 1-800-521-2010 in Canada, and a service representative will be ready to play again. 5. TROUBLESHOOTING If for some reason the unit stops working or malfunctions, please follow these steps: 1. Interrupt the power supply by wiping it with a new set of direct sunlight and away from any direct heat source. 3. Keep the unit clean by removing the batteries. 3.
... the problem persists, please call our Consumer Services Department at 1-800-521-2010 in Canada, and a service representative will be ready to play again. 5. TROUBLESHOOTING If for some reason the unit stops working or malfunctions, please follow these steps: 1. Interrupt the power supply by wiping it with a new set of direct sunlight and away from any direct heat source. 3. Keep the unit clean by removing the batteries. 3.

User Manual
Page 10
... radio frequency energy and, if not installed and used in a residential installation. OPERATION IS SUBJECT TO THE FOLLOWING TWO CONDITIONS...OPERATION. These limits are designed to provide reasonable protection against harmful interference in accordance with the limits for compliance could void the user's authority to Part...instructions, may cause harmful interference to which the receiver is no guarantee that interference will not occur in a particular installation. However, there is connected • Consult the dealer or an experienced radio/TV technician for help Caution: changes...
... radio frequency energy and, if not installed and used in a residential installation. OPERATION IS SUBJECT TO THE FOLLOWING TWO CONDITIONS...OPERATION. These limits are designed to provide reasonable protection against harmful interference in accordance with the limits for compliance could void the user's authority to Part...instructions, may cause harmful interference to which the receiver is no guarantee that interference will not occur in a particular installation. However, there is connected • Consult the dealer or an experienced radio/TV technician for help Caution: changes...


