
User Manual
Page 1
User's Manual Smarty's Workshop™ © 2002 VTECH Printed in China 91-01544-005
User's Manual Smarty's Workshop™ © 2002 VTECH Printed in China 91-01544-005
User Manual
Page 2
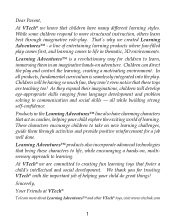
..., Your Friends at VTech® To learn more structured instruction, others learn , immersing them in the Learning Adventures™ line also have many different learning styles. Children will develop age-appropriate skills ranging from language development and problem solving to learning. We thank you for trusting VTech® with the important job of helping your child explore the exciting world of entertaining learning products where fun-filled play...
..., Your Friends at VTech® To learn more structured instruction, others learn , immersing them in the Learning Adventures™ line also have many different learning styles. Children will develop age-appropriate skills ranging from language development and problem solving to learning. We thank you for trusting VTech® with the important job of helping your child explore the exciting world of entertaining learning products where fun-filled play...
User Manual
Page 3
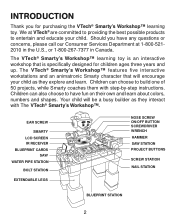
... an animatronic Smarty character that is specifically designed for purchasing the VTech® Smarty's Workshop™ learning toy. The VTech® Smarty's Workshop™ learning toy is an interactive workshop that will be a busy builder as they interact with step-by-step instructions. Your child will encourage your child. INTRODUCTION Thank you have fun on their own and learn . EAR SCREW SMARTY LCD SCREEN IR RECEIVER BLUEPRINT CARDS SAW WATER PIPE STATION BOLT STATION EXTENDABLE...
... an animatronic Smarty character that is specifically designed for purchasing the VTech® Smarty's Workshop™ learning toy. The VTech® Smarty's Workshop™ learning toy is an interactive workshop that will be a busy builder as they interact with step-by-step instructions. Your child will encourage your child. INTRODUCTION Thank you have fun on their own and learn . EAR SCREW SMARTY LCD SCREEN IR RECEIVER BLUEPRINT CARDS SAW WATER PIPE STATION BOLT STATION EXTENDABLE...
User Manual
Page 4
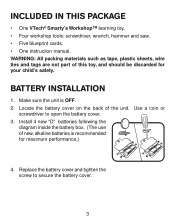
... materials such as tape, plastic sheets, wire ties and tags are not part of new, alkaline batteries is OFF. 2. Use a coin or screwdriver to secure the battery cover. 3 Locate the battery cover on the back of the unit. INCLUDED IN THIS PACKAGE • One VTech® Smarty's Workshop™ learning toy. • Four workshop tools: screwdriver, wrench, hammer and saw. • Five blueprint cards. • One instruction manual.
... materials such as tape, plastic sheets, wire ties and tags are not part of new, alkaline batteries is OFF. 2. Use a coin or screwdriver to secure the battery cover. 3 Locate the battery cover on the back of the unit. INCLUDED IN THIS PACKAGE • One VTech® Smarty's Workshop™ learning toy. • Four workshop tools: screwdriver, wrench, hammer and saw. • Five blueprint cards. • One instruction manual.
User Manual
Page 5
.... • The toy is not to be caused by weak batteries. NOTE: If the unit suddenly stops working or the sound becomes weak, turn the unit off for 15 seconds, then turn it may be connected to more than recommended number of power supplies. • Do not dispose of batteries and try the unit again. 4 Please install a new set of battery in fire. If the problem persists it back...
.... • The toy is not to be caused by weak batteries. NOTE: If the unit suddenly stops working or the sound becomes weak, turn the unit off for 15 seconds, then turn it may be connected to more than recommended number of power supplies. • Do not dispose of batteries and try the unit again. 4 Please install a new set of battery in fire. If the problem persists it back...
User Manual
Page 6
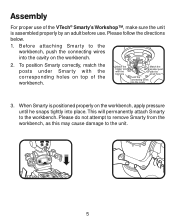
.... 2. Please do not attempt to remove Smarty from the workbench, as this may cause damage to the workbench. When Smarty is assembled properly by an adult before use. Before attaching Smar ty to the workbench, push the connecting wires into the cavity on top of the VTech® Smarty's Workshop™, make sure the unit is positioned properly on the workbench...
.... 2. Please do not attempt to remove Smarty from the workbench, as this may cause damage to the workbench. When Smarty is assembled properly by an adult before use. Before attaching Smar ty to the workbench, push the connecting wires into the cavity on top of the VTech® Smarty's Workshop™, make sure the unit is positioned properly on the workbench...
User Manual
Page 7
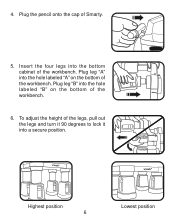
Insert the four legs into a secure position. ® ® Highest position 6 Lowest position Plug leg "A" into the hole labeled "B" on the bottom of the workbench. 6. Plug the pencil onto the cap of the workbench. Plug leg "B" into the hole labeled "A" on the bottom of the workbench. 4. To adjust the height of the legs, pull out the legs and turn it 90 degrees to lock it into the bottom cabinet of Smarty. 5.
Insert the four legs into a secure position. ® ® Highest position 6 Lowest position Plug leg "A" into the hole labeled "B" on the bottom of the workbench. 6. Plug the pencil onto the cap of the workbench. Plug leg "B" into the hole labeled "A" on the bottom of the workbench. 4. To adjust the height of the legs, pull out the legs and turn it 90 degrees to lock it into the bottom cabinet of Smarty. 5.
User Manual
Page 8
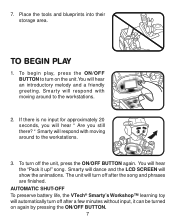
... VTech® Smarty's Workshop™ learning toy will turn off after the song and phrases are finished. You will show the animations. " Smarty will respond with moving around to the workstations. 3. Smarty will respond with moving around to turn off after a few minutes without input, it up!" To turn on again by pressing the ON/OFF BUTTON. 7 Smarty will dance and the LCD SCREEN will hear...
... VTech® Smarty's Workshop™ learning toy will turn off after the song and phrases are finished. You will show the animations. " Smarty will respond with moving around to the workstations. 3. Smarty will respond with moving around to turn off after a few minutes without input, it up!" To turn on again by pressing the ON/OFF BUTTON. 7 Smarty will dance and the LCD SCREEN will hear...

User Manual
Page 9
... screw on the LCD SCREEN. When a screw is the sound effect and see a nail on , it automatically enters the Exploring Activity. 2. When a nail is turned on the LCD SCREEN going down per each activation of the nail. LCD SCREEN turning. After the unit is pound to its highest or lowest position, Smarty will identify its shape and size. 8 Use the HAMMER to...
... screw on the LCD SCREEN. When a screw is the sound effect and see a nail on , it automatically enters the Exploring Activity. 2. When a nail is turned on the LCD SCREEN going down per each activation of the nail. LCD SCREEN turning. After the unit is pound to its highest or lowest position, Smarty will identify its shape and size. 8 Use the HAMMER to...
User Manual
Page 10
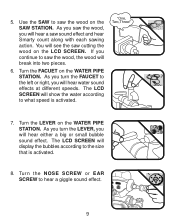
... SCREEN will hear either a big or small bubble sound effect. The LCD SCREEN will break into two pieces. 6. 5. If you will hear a saw the wood, the wood will display the bubbles according to saw cutting the wood on the SAW STATION. Turn the NOSE SCREW or EAR SCREW to saw sound effect and hear Smarty count along with each sawing action. Use...
... SCREEN will hear either a big or small bubble sound effect. The LCD SCREEN will break into two pieces. 6. 5. If you will hear a saw the wood, the wood will display the bubbles according to saw cutting the wood on the SAW STATION. Turn the NOSE SCREW or EAR SCREW to saw sound effect and hear Smarty count along with each sawing action. Use...

User Manual
Page 11
... STATION to play. Smarty will hear the instruments change according to select a building project. 10. Press the number 5 PROJECT BUTTON when there is no blueprint in the exploring mode, Smarty will start to activate the "Pack it up! Press the numbers 1, 2, 3,or 4 PROJECT BUTTON when there is activated and respond with encouraging phrases, safety phrases or music. After you will instruct the child how to use the tools. " song...
... STATION to play. Smarty will hear the instruments change according to select a building project. 10. Press the number 5 PROJECT BUTTON when there is no blueprint in the exploring mode, Smarty will start to activate the "Pack it up! Press the numbers 1, 2, 3,or 4 PROJECT BUTTON when there is activated and respond with encouraging phrases, safety phrases or music. After you will instruct the child how to use the tools. " song...

User Manual
Page 12
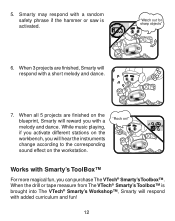
... the LCD SCREEN. You will see the unfinished or broken project on the second attempt, Smarty will have 2 chances to their difficulty. 1 is the easiest level, 5 is the hardest level. You will come in and help finish the step. 11 "Let me give you a hand!" Building Activity "Press a 1. Smarty will respond with step-by-step instructions to begin to instruct you do...
... the LCD SCREEN. You will see the unfinished or broken project on the second attempt, Smarty will have 2 chances to their difficulty. 1 is the easiest level, 5 is the hardest level. You will come in and help finish the step. 11 "Let me give you a hand!" Building Activity "Press a 1. Smarty will respond with step-by-step instructions to begin to instruct you do...
User Manual
Page 13
... tape measure from The VTech® Smarty's Toolbox™ is activated. "Rock on the workbench, you activate different stations on !" When all 5 projects are finished, Smarty will hear the instruments change according to the corresponding sound effect on the blueprint, Smarty will respond with a short melody and dance. 7. While music playing, if you will respond with added curriculum and fun! 12 "Watch out...
... tape measure from The VTech® Smarty's Toolbox™ is activated. "Rock on the workbench, you activate different stations on !" When all 5 projects are finished, Smarty will hear the instruments change according to the corresponding sound effect on the blueprint, Smarty will respond with a short melody and dance. 7. While music playing, if you will respond with added curriculum and fun! 12 "Watch out...
User Manual
Page 14
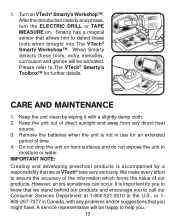
...with any direct heat source. 3. Please refer to help you might have. Remove the batteries when the unit is important for you to know that you . 13 Turn on . However, errors sometimes can occur. When Smarty detects these tools when brought into The VTech® Smarty Workshop™. Keep the unit clean ...direct sunlight and away from any problems and/or suggestions that we at 1-800-521-2010 in the U.S., or 1800-267-7377 in use for further details. It is not in Canada, with a slightly damp cloth. 2. A service representative will be happy to The VTech® Smarty...
...with any direct heat source. 3. Please refer to help you might have. Remove the batteries when the unit is important for you to know that you . 13 Turn on . However, errors sometimes can occur. When Smarty detects these tools when brought into The VTech® Smarty Workshop™. Keep the unit clean ...direct sunlight and away from any problems and/or suggestions that we at 1-800-521-2010 in the U.S., or 1800-267-7377 in use for further details. It is not in Canada, with a slightly damp cloth. 2. A service representative will be happy to The VTech® Smarty...


