User Manual
Page 3
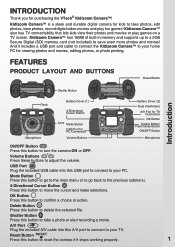
.... Features Product Layout and Buttons Reset Button Introduction Shutter Button Flash Microphone Battery Cover (1) 4-Directional Cursor Button Lens Mode Button USB Port for PC Connection Volume Buttons Battery Cover (2) Dual Viewfinders A/V Port for purchasing the VTech® Kidizoom Camera™! Kidizoom Camera™ also has TV connectability that lets kids view their photos and movies or...
.... Features Product Layout and Buttons Reset Button Introduction Shutter Button Flash Microphone Battery Cover (1) 4-Directional Cursor Button Lens Mode Button USB Port for PC Connection Volume Buttons Battery Cover (2) Dual Viewfinders A/V Port for purchasing the VTech® Kidizoom Camera™! Kidizoom Camera™ also has TV connectability that lets kids view their photos and movies or...
User Manual
Page 6
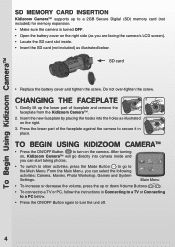
...the up or down Volume Buttons . • To connect to a TV or PC, follow the instructions in place. To Begin Using Kidizoom Camera™ SD Memory Card Insertion Kidizoom Camera™ supports up to a 2GB Secure Digital (SD) memory card (not included) for memory expansion. • Make sure the... faceplate from the Kidizoom Camera™. 2. SD card • Replace the battery cover and tighten the screw. Do not over-tighten the screw. From the Main Menu, you can start taking photos. • To switch to other activities, press the Mode Button to go directly into the holes ...
...the up or down Volume Buttons . • To connect to a TV or PC, follow the instructions in place. To Begin Using Kidizoom Camera™ SD Memory Card Insertion Kidizoom Camera™ supports up to a 2GB Secure Digital (SD) memory card (not included) for memory expansion. • Make sure the... faceplate from the Kidizoom Camera™. 2. SD card • Replace the battery cover and tighten the screw. Do not over-tighten the screw. From the Main Menu, you can start taking photos. • To switch to other activities, press the Mode Button to go directly into the holes ...

User Manual
Page 9
... arrows on the 4-Directional Cursor Button once to view the previous or next picture stored in the album. • While in the Movie Album, press the Delete Button currently shown on the SD memory card (not included) if one is inserted into the camera. To change your Kidizoom Camera™, make sure ...be part of the SD card (not included), otherwise you 've taken, press the Up or Down arrows on the 4-Directional Cursor Button once to the root directory of the Kidizoom Camera™ or the root directory of the photo. • To view the photos you may not be saved in the ...
... arrows on the 4-Directional Cursor Button once to view the previous or next picture stored in the album. • While in the Movie Album, press the Delete Button currently shown on the SD memory card (not included) if one is inserted into the camera. To change your Kidizoom Camera™, make sure ...be part of the SD card (not included), otherwise you 've taken, press the Up or Down arrows on the 4-Directional Cursor Button once to the root directory of the Kidizoom Camera™ or the root directory of the photo. • To view the photos you may not be saved in the ...
User Manual
Page 10
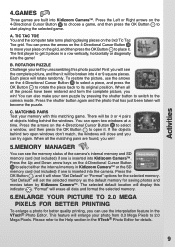
...add to your selection. D. Voice Photos cannot be saved. Choose it will be heard while the photos are saved in the Kidizoom Camera™ internal memory or on the 4-Directional Cursor Button to choose an effect, and then press the OK Button to your voice. Play icon : Choose this icon ...icon : Choose this icon to select a photo frame to add to your selection and to start , press the Left or Right arrows on the 4-Directional Cursor Button to choose an animation effect, and then press the OK Button to select a photo. Photo Frame Icon : Choose this icon to view ...
...add to your selection. D. Voice Photos cannot be saved. Choose it will be heard while the photos are saved in the Kidizoom Camera™ internal memory or on the 4-Directional Cursor Button to choose an effect, and then press the OK Button to your voice. Play icon : Choose this icon ...icon : Choose this icon to select a photo frame to add to your selection and to start , press the Left or Right arrows on the 4-Directional Cursor Button to choose an animation effect, and then press the OK Button to select a photo. Photo Frame Icon : Choose this icon to view ...
User Manual
Page 11
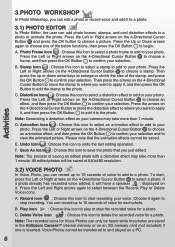
... in the VTech® Photo Editor for the selected memory. To restore the picture, use the interpolation feature in Kidizoom Camera™ or the SD memory card (not included) if one is inserted into 4 or 9 square pieces. Matching Pairs Test your piece on the 4-Directional Cursor Button ...printing To enlarge a photo for saving photos and movies taken by Kidizoom Camera™. Activities 4. C. If the objects behind the windows. "Set Default" will close and you can press the arrows on the 4-Directional Cursor Button to move your memory with this photo puzzle! Tic Tac...
... in the VTech® Photo Editor for the selected memory. To restore the picture, use the interpolation feature in Kidizoom Camera™ or the SD memory card (not included) if one is inserted into 4 or 9 square pieces. Matching Pairs Test your piece on the 4-Directional Cursor Button ...printing To enlarge a photo for saving photos and movies taken by Kidizoom Camera™. Activities 4. C. If the objects behind the windows. "Set Default" will close and you can press the arrows on the 4-Directional Cursor Button to move your memory with this photo puzzle! Tic Tac...
User Manual
Page 12
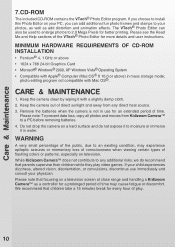
... A very small percentage of direct sunlight and away from Kidizoom Camera™ to any direct heat source. 3. Please see the Read Me and Help sections of time. CARE & MAINTENANCE 1. If your physician. While Kidizoom Camera™ does not contribute to a PC before removing batteries. 4. CD-ROM The included CD-ROM contains the VTech® Photo Editor program...
... A very small percentage of direct sunlight and away from Kidizoom Camera™ to any direct heat source. 3. Please see the Read Me and Help sections of time. CARE & MAINTENANCE 1. If your physician. While Kidizoom Camera™ does not contribute to a PC before removing batteries. 4. CD-ROM The included CD-ROM contains the VTech® Photo Editor program...


