User Manual
Page 8
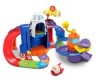
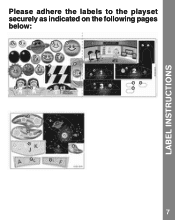
LABEL INSTRUCTIONS Please adhere the labels to the playset securely as indicated on the following pages below: 1 1 2 3 4 5 5 8 6 7 13 10 11 12 9 12 14 14 15 16 18 20 17 17 19 21 21 21 22 23 24 25 29 28 27 26 7
LABEL INSTRUCTIONS Please adhere the labels to the playset securely as indicated on the following pages below: 1 1 2 3 4 5 5 8 6 7 13 10 11 12 9 12 14 14 15 16 18 20 17 17 19 21 21 21 22 23 24 25 29 28 27 26 7
User Manual
Page 10
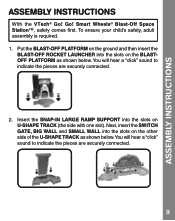
Go! You will hear a "click" sound to indicate the pieces are securely connected. 9 Next, insert the SWITCH GATE, BIG WALL and SMALL WALL into the slots ... the pieces are securely connected. 2. To ensure your child's safety, adult assembly is required. 1. Smart Wheels® Blast-Off Space Station™, safety comes first. ASSEMBLY INSTRUCTIONS ASSEMBLY INSTRUCTIONS With the VTech® Go! Put the BLAST-OFF PLATFORM on the ground and then insert the BLAST-OFF ROCKET LAUNCHER into the slots on the BLASTOFF PLATFORM as shown below . Insert...
Go! You will hear a "click" sound to indicate the pieces are securely connected. 9 Next, insert the SWITCH GATE, BIG WALL and SMALL WALL into the slots ... the pieces are securely connected. 2. To ensure your child's safety, adult assembly is required. 1. Smart Wheels® Blast-Off Space Station™, safety comes first. ASSEMBLY INSTRUCTIONS ASSEMBLY INSTRUCTIONS With the VTech® Go! Put the BLAST-OFF PLATFORM on the ground and then insert the BLAST-OFF ROCKET LAUNCHER into the slots on the BLASTOFF PLATFORM as shown below . Insert...
User Manual
Page 11
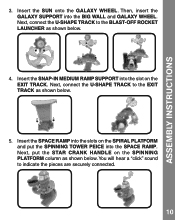
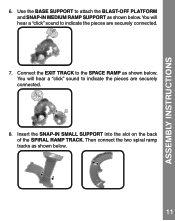
... shown below. 5. Next, connect the U-SHAPE TRACK to the BLAST-OFF ROCKET LAUNCHER as shown below . 4. ASSEMBLY INSTRUCTIONS 3. Insert the SNAP-IN MEDIUM RAMP SUPPORT into the slots on the EXIT TRACK. Then, insert the GALAXY SUPPORT into the SPACE RAMP. You will hear a "click" sound to indicate the ...pieces are securely connected. 10 Insert the SPACE RAMP into the slot on the SPIRAL PLATFORM and put the STAR CRANK HANDLE on the SPINNING PLATFORM column as shown below . Next, put the SPINNING TOWER PEICE into the BIG WALL and GALAXY WHEEL. Insert the SUN onto the GALAXY...
... shown below. 5. Next, connect the U-SHAPE TRACK to the BLAST-OFF ROCKET LAUNCHER as shown below . 4. ASSEMBLY INSTRUCTIONS 3. Insert the SNAP-IN MEDIUM RAMP SUPPORT into the slots on the EXIT TRACK. Then, insert the GALAXY SUPPORT into the SPACE RAMP. You will hear a "click" sound to indicate the ...pieces are securely connected. 10 Insert the SPACE RAMP into the slot on the SPIRAL PLATFORM and put the STAR CRANK HANDLE on the SPINNING PLATFORM column as shown below . Next, put the SPINNING TOWER PEICE into the BIG WALL and GALAXY WHEEL. Insert the SUN onto the GALAXY...
User Manual
Page 12
You will hear a "click" sound to indicate the pieces are securely connected. 8. Connect the EXIT TRACK to attach the BLAST-OFF PLATFORM and SNAP-IN MEDIUM RAMP SUPPORT as shown below . Insert the SNAP-IN SMALL SUPPORT into the slot on the back of the SPIRAL RAMP TRACK. ASSEMBLY INSTRUCTIONS 6. You will hear a "click" sound to indicate the pieces are securely connected. 7. Use the BASE SUPPORT to the SPACE RAMP as shown below. 11 Then connect the two spiral ramp tracks as shown below .
You will hear a "click" sound to indicate the pieces are securely connected. 8. Connect the EXIT TRACK to attach the BLAST-OFF PLATFORM and SNAP-IN MEDIUM RAMP SUPPORT as shown below . Insert the SNAP-IN SMALL SUPPORT into the slot on the back of the SPIRAL RAMP TRACK. ASSEMBLY INSTRUCTIONS 6. You will hear a "click" sound to indicate the pieces are securely connected. 7. Use the BASE SUPPORT to the SPACE RAMP as shown below. 11 Then connect the two spiral ramp tracks as shown below .

User Manual
Page 13
Go! Smart Wheels® Deluxe Track Set or other Go! Go! Go! Smart Wheels® and Go! EXPAND & EXPLORE Connect to expand the Blast-Off Space StationTM and inspire creativity. 12 EXPAND & EXPLORE / ASSEMBLY INSTRUCTIONS 9. Go! Smart Wheels® and Go! Smart Animals® tracks (each sold separately) to the Go! You can connect this playset to indicate the pieces are ready to play! Connect the SPIRAL RAMP TRACK...
Go! Smart Wheels® Deluxe Track Set or other Go! Go! Go! Smart Wheels® and Go! EXPAND & EXPLORE Connect to expand the Blast-Off Space StationTM and inspire creativity. 12 EXPAND & EXPLORE / ASSEMBLY INSTRUCTIONS 9. Go! Smart Wheels® and Go! Smart Animals® tracks (each sold separately) to the Go! You can connect this playset to indicate the pieces are ready to play! Connect the SPIRAL RAMP TRACK...
User Manual
Page 19
..., uses and can be determined by the party responsible for help. OTHER INFO Note: This equipment has been tested and found to comply with the instructions, may cause harmful interference to radio communications.
..., uses and can be determined by the party responsible for help. OTHER INFO Note: This equipment has been tested and found to comply with the instructions, may cause harmful interference to radio communications.
User Manual
Page 20
... only to the original purchaser, is unable to resolve the issue, you will be responsible for any reason, please notify the VTech Consumer Services Department by going to scratches and dents; (c) damage caused by use with nonVTech products; (d) damage caused by accident, misuse, unreasonable use and...service, against defective workmanship and materials. To the extent permitted by law, VTech will at our discretion replace the product with a new unit or product of the product, we will not be provided instructions on how to return the product and have it replaced under the Customer...
... only to the original purchaser, is unable to resolve the issue, you will be responsible for any reason, please notify the VTech Consumer Services Department by going to scratches and dents; (c) damage caused by use with nonVTech products; (d) damage caused by accident, misuse, unreasonable use and...service, against defective workmanship and materials. To the extent permitted by law, VTech will at our discretion replace the product with a new unit or product of the product, we will not be provided instructions on how to return the product and have it replaced under the Customer...

