User Manual
Page 1
User's Manual Enchanted Princess Palace™ © 2016 VTech All rights reserved Printed in China 91-003236-002 US
User's Manual Enchanted Princess Palace™ © 2016 VTech All rights reserved Printed in China 91-003236-002 US
User Manual
Page 2
... playing fun responses. Smart Friends®! Smart Friends® playsets feature bu ons, gears and her Go! Smart Animals® playsets (each sold separately) to give your child a thrilling learning perience with m ion, lights, music, and sounds as Go! Dear Parent, Welcome to encourage the development your child's fine m or skills. Go! Smart Friends® features a collection characters and playsets (each sold separately) that can be connected...
... playing fun responses. Smart Friends®! Smart Friends® playsets feature bu ons, gears and her Go! Smart Animals® playsets (each sold separately) to give your child a thrilling learning perience with m ion, lights, music, and sounds as Go! Dear Parent, Welcome to encourage the development your child's fine m or skills. Go! Smart Friends® features a collection characters and playsets (each sold separately) that can be connected...
User Manual
Page 3
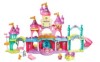
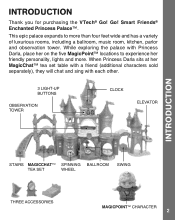
... set table with a friend (additional characters sold separately), they will chat and sing with each other. 3 LIGHT-UP BUTTONS OBSERVATION TOWER CLOCK ELEVATOR INTRODUCTION STAIRS MAGICCHATTM SPINNING BALLROOM TEA SET WHEEL SWING THREE ACCESSORIES MAGICPOINTTM CHARACTER 2 While exploring the palace with Princess Darla, place her on the five MagicPoint™ locations to more . Smart Friends® Enchanted Princess Palace™. Go! When Princess Darla sits at her friendly personality, lights...
... set table with a friend (additional characters sold separately), they will chat and sing with each other. 3 LIGHT-UP BUTTONS OBSERVATION TOWER CLOCK ELEVATOR INTRODUCTION STAIRS MAGICCHATTM SPINNING BALLROOM TEA SET WHEEL SWING THREE ACCESSORIES MAGICPOINTTM CHARACTER 2 While exploring the palace with Princess Darla, place her on the five MagicPoint™ locations to more . Smart Friends® Enchanted Princess Palace™. Go! When Princess Darla sits at her friendly personality, lights...
User Manual
Page 5
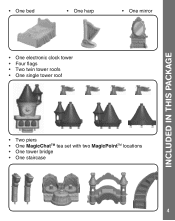
• One bed • One harp • One mirror • One electronic clock tower • Four flags • Two twin tower roofs • One single tower roof INCLUDED IN THIS PACKAGE • Two piers • One MagicChatTM tea set with two MagicPointTM locations • One tower bridge • One staircase 4
• One bed • One harp • One mirror • One electronic clock tower • Four flags • Two twin tower roofs • One single tower roof INCLUDED IN THIS PACKAGE • Two piers • One MagicChatTM tea set with two MagicPointTM locations • One tower bridge • One staircase 4
User Manual
Page 6
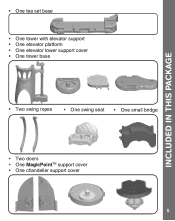
INCLUDED IN THIS PACKAGE • One tea set base • One tower with elevator support • One elevator platform • One elevator tower support cover • One tower base • Two swing ropes • One swing seat • One small bridge • Two doors • One MagicPointTM support cover • One chandelier support cover 5
INCLUDED IN THIS PACKAGE • One tea set base • One tower with elevator support • One elevator platform • One elevator tower support cover • One tower base • Two swing ropes • One swing seat • One small bridge • Two doors • One MagicPointTM support cover • One chandelier support cover 5
User Manual
Page 8
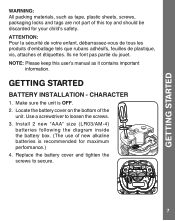
..., such as it contains important information. Install 2 new "AAA" size (LR03/AM-4) batteries following the diagram inside the battery box. (The use of new alkaline batteries is OFF. 2. Locate the battery cover on the bottom of this user's manual as tape, plastic sheets, screws, packaging locks and tags are not part of the unit. Use a screwdriver to secure. 7 GETTING STARTED BATTERY INSTALLATION - Ils ne font pas partie...
..., such as it contains important information. Install 2 new "AAA" size (LR03/AM-4) batteries following the diagram inside the battery box. (The use of new alkaline batteries is OFF. 2. Locate the battery cover on the bottom of this user's manual as tape, plastic sheets, screws, packaging locks and tags are not part of the unit. Use a screwdriver to secure. 7 GETTING STARTED BATTERY INSTALLATION - Ils ne font pas partie...
User Manual
Page 9
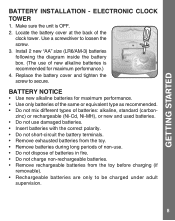
... not short-circuit the battery terminals. • Remove exhausted batteries from the toy. • Remove batteries during long periods of non-use of new alkaline batteries is OFF. 2. ELECTRONIC CLOCK TOWER 1. Install 2 new "AA" size (LR6/AM-3) batteries following the diagram inside the battery box. (The use . • Do not dispose of the clock tower. GETTING STARTED BATTERY INSTALLATION - Use a screwdriver to secure. Make sure the unit is recommended for maximum...
... not short-circuit the battery terminals. • Remove exhausted batteries from the toy. • Remove batteries during long periods of non-use of new alkaline batteries is OFF. 2. ELECTRONIC CLOCK TOWER 1. Install 2 new "AA" size (LR6/AM-3) batteries following the diagram inside the battery box. (The use . • Do not dispose of the clock tower. GETTING STARTED BATTERY INSTALLATION - Use a screwdriver to secure. Make sure the unit is recommended for maximum...
User Manual
Page 10
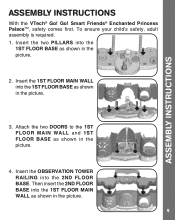
Smart Friends® Enchanted Princess PalaceTM, safety comes first. Insert the two PILLARS into the 2ND FLOOR BASE. Insert the OBSERVATION TOWER RAILING into the 1ST FLOOR BASE as shown in the picture. 2. To ensure your child's safety, adult assembly is required. 1. Then insert the 2ND FLOOR BASE into the 1ST FLOOR BASE as shown in the picture. 3. Go...! Insert the 1ST FLOOR MAIN WALL into the 1ST FLOOR MAIN WALL as shown in the picture. 9 ASSEMBLY INSTRUCTIONS ASSEMBLY INSTRUCTIONS With the VTech® Go! Attach the two DOORS to...
Smart Friends® Enchanted Princess PalaceTM, safety comes first. Insert the two PILLARS into the 2ND FLOOR BASE. Insert the OBSERVATION TOWER RAILING into the 1ST FLOOR BASE as shown in the picture. 2. To ensure your child's safety, adult assembly is required. 1. Then insert the 2ND FLOOR BASE into the 1ST FLOOR BASE as shown in the picture. 3. Go...! Insert the 1ST FLOOR MAIN WALL into the 1ST FLOOR MAIN WALL as shown in the picture. 9 ASSEMBLY INSTRUCTIONS ASSEMBLY INSTRUCTIONS With the VTech® Go! Attach the two DOORS to...
User Manual
Page 11
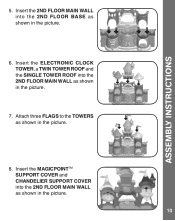
Insert the ELECTRONIC CLOCK TOWER, a TWIN TOWER ROOF and the SINGLE TOWER ROOF into the 2ND FLOOR MAIN WALL as shown in the picture. 8. Insert the MAGICPOINTTM SUPPORT COVER and CHANDELIER SUPPORT COVER into the 2ND FLOOR BASE as shown in the picture. 10 Attach three FLAGS to the TOWERS as shown in the picture. 7. Insert the 2ND FLOOR MAIN WALL into the 2ND FLOOR MAIN WALL as shown in the picture. 6. ASSEMBLY INSTRUCTIONS 5.
Insert the ELECTRONIC CLOCK TOWER, a TWIN TOWER ROOF and the SINGLE TOWER ROOF into the 2ND FLOOR MAIN WALL as shown in the picture. 8. Insert the MAGICPOINTTM SUPPORT COVER and CHANDELIER SUPPORT COVER into the 2ND FLOOR BASE as shown in the picture. 10 Attach three FLAGS to the TOWERS as shown in the picture. 7. Insert the 2ND FLOOR MAIN WALL into the 2ND FLOOR MAIN WALL as shown in the picture. 6. ASSEMBLY INSTRUCTIONS 5.
User Manual
Page 12
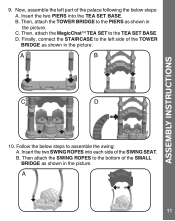
...the left part of the TOWER BRIDGE as shown in the picture. 10. Now, assemble the left side of the palace following the below steps to assemble the swing: A. Finally, connect the STAIRCASE to the bottom of the SWING SEAT. Then, attach the TOWER BRIDGE to the TEA SET BASE. ...Then, attach the MagicChatTM TEA SET to the PIERS as shown in the picture. B. Insert the two PIERS into each side of the SMALL BRIDGE as shown in the picture. 11 B. Follow the below steps: A. C. Insert the two SWING ROPES into the TEA SET BASE. ASSEMBLY INSTRUCTIONS 9.
...the left part of the TOWER BRIDGE as shown in the picture. 10. Now, assemble the left side of the palace following the below steps to assemble the swing: A. Finally, connect the STAIRCASE to the bottom of the SWING SEAT. Then, attach the TOWER BRIDGE to the TEA SET BASE. ...Then, attach the MagicChatTM TEA SET to the PIERS as shown in the picture. B. Insert the two PIERS into each side of the SMALL BRIDGE as shown in the picture. 11 B. Follow the below steps: A. C. Insert the two SWING ROPES into the TEA SET BASE. ASSEMBLY INSTRUCTIONS 9.
User Manual
Page 13
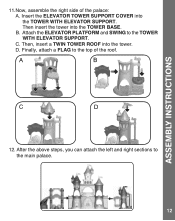
B. Attach the ELEVATOR PLATFORM and SWING to the main palace. 12 C. Then, insert a TWIN TOWER ROOF into the TOWER BASE. After the above steps, you can attach the left and right sections to the TOWER WITH ELEVATOR SUPPORT. Finally, attach a FLAG to the top of the palace: A. ASSEMBLY INSTRUCTIONS 11.Now, assemble the right side of the roof. 12. D. Then insert the tower into the tower. Insert the ELEVATOR TOWER SUPPORT COVER into the TOWER WITH ELEVATOR SUPPORT.
B. Attach the ELEVATOR PLATFORM and SWING to the main palace. 12 C. Then, insert a TWIN TOWER ROOF into the TOWER BASE. After the above steps, you can attach the left and right sections to the TOWER WITH ELEVATOR SUPPORT. Finally, attach a FLAG to the top of the palace: A. ASSEMBLY INSTRUCTIONS 11.Now, assemble the right side of the roof. 12. D. Then insert the tower into the tower. Insert the ELEVATOR TOWER SUPPORT COVER into the TOWER WITH ELEVATOR SUPPORT.
User Manual
Page 16
... will flash several minutes of the character. OFF/MODE SELECTOR To turn the palace off , the ON ( slide the O)Np/oOsFitiFonS.WToITtuCRrAIHQnDUEÉINENCHCINIANE to hear fun sounds and sing-along songs. 15 To turn the palace on the bottom of no input. AUTOMATIC SHUT-OFF To preserve battery life, the VTech® Go! The LIGHT-UP BUTTON will automatically power down after several times when the unit's battery level...
... will flash several minutes of the character. OFF/MODE SELECTOR To turn the palace off , the ON ( slide the O)Np/oOsFitiFonS.WToITtuCRrAIHQnDUEÉINENCHCINIANE to hear fun sounds and sing-along songs. 15 To turn the palace on the bottom of no input. AUTOMATIC SHUT-OFF To preserve battery life, the VTech® Go! The LIGHT-UP BUTTON will automatically power down after several times when the unit's battery level...
User Manual
Page 17
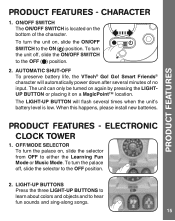
...™ locations to replace with other VTech® Go! Smart Friends® playsets (each sold separately). ACTIVITIES - Press the LIGHT-UP BUTTONS to hear fun phrases that encourage imaginative play. 16 PRODUCT FEATURES/ACTIVITIES 3. CHARACTER 1. The character can even turn the unit ON. Note: If the palace powers down while playing, we suggest to hear phrases, fun sounds, short tunes and sing-along songs. Turn the CLOCK HANDS to learn colors, objects, letters, counting and more! Slide...
...™ locations to replace with other VTech® Go! Smart Friends® playsets (each sold separately). ACTIVITIES - Press the LIGHT-UP BUTTONS to hear fun phrases that encourage imaginative play. 16 PRODUCT FEATURES/ACTIVITIES 3. CHARACTER 1. The character can even turn the unit ON. Note: If the palace powers down while playing, we suggest to hear phrases, fun sounds, short tunes and sing-along songs. Turn the CLOCK HANDS to learn colors, objects, letters, counting and more! Slide...
User Manual
Page 18
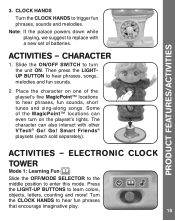
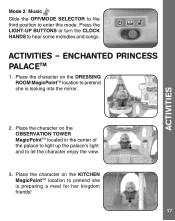
... LIGHT-UP BUTTONS or turn the CLOCK HANDS to enter this mode. Place the character on the KITCHEN MagicPointTM location to let the character enjoy the view. 3. ACTIVITIES - ENCHANTED PRINCESS PALACETM 1. Place the character on the OBSERVATION TOWER MagicPointTM located in the center of the palace to light up the palace's light and to pretend she is preparing a meal for her kingdom friends...
... LIGHT-UP BUTTONS or turn the CLOCK HANDS to enter this mode. Place the character on the KITCHEN MagicPointTM location to let the character enjoy the view. 3. ACTIVITIES - ENCHANTED PRINCESS PALACETM 1. Place the character on the OBSERVATION TOWER MagicPointTM located in the center of the palace to light up the palace's light and to pretend she is preparing a meal for her kingdom friends...
User Manual
Page 19
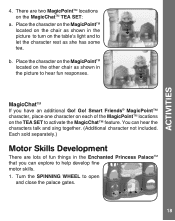
... Enchanted Princess PalaceTM that you have an additional Go! MagicChatTM If you can hear the characters talk and sing together. (Additional character not included. Go! Each sold separately.) Motor Skills Development There are two MagicPointTM locations on each of fun things in the picture to turn on the TEA SET to hear fun responses. You can explore to open and close the palace gates. 18 Smart Friends...
... Enchanted Princess PalaceTM that you have an additional Go! MagicChatTM If you can hear the characters talk and sing together. (Additional character not included. Go! Each sold separately.) Motor Skills Development There are two MagicPointTM locations on each of fun things in the picture to turn on the TEA SET to hear fun responses. You can explore to open and close the palace gates. 18 Smart Friends...
User Manual
Page 20
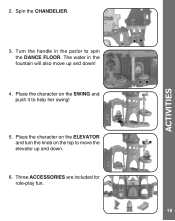
Three ACCESSORIES are included for role-play fun. 19 Place the character on the top to move up and down ! 4. ACTIVITIES 2. Turn the handle in the fountain will also move the elevator up and down . 6. Spin the CHANDELIER. 3. Place the character on the ELEVATOR and turn the knob on the SWING and push it to spin the DANCE FLOOR. The water in the parlor to help her swing! 5.
Three ACCESSORIES are included for role-play fun. 19 Place the character on the top to move up and down ! 4. ACTIVITIES 2. Turn the handle in the fountain will also move the elevator up and down . 6. Spin the CHANDELIER. 3. Place the character on the ELEVATOR and turn the knob on the SWING and push it to spin the DANCE FLOOR. The water in the parlor to help her swing! 5.
User Manual
Page 21
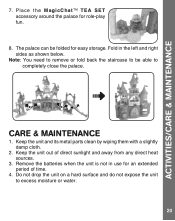
...-play fun. 8. Do not drop the unit on a hard surface and do not expose the unit to be folded for easy storage. P l a c e t h e M a g i c C h a t TM T E A S E T accessory around the palace for an extended period of direct sunlight and away from any direct heat sources. 3. Keep the unit and its metal parts clean by wiping them with a slightly damp cloth. 2. Note: You need to remove...
...-play fun. 8. Do not drop the unit on a hard surface and do not expose the unit to be folded for easy storage. P l a c e t h e M a g i c C h a t TM T E A S E T accessory around the palace for an extended period of direct sunlight and away from any direct heat sources. 3. Keep the unit and its metal parts clean by wiping them with a slightly damp cloth. 2. Note: You need to remove...
User Manual
Page 22
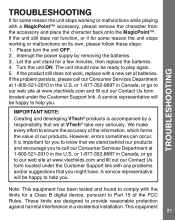
...-2010 in a residential installation. Let the unit stand for some reason the unit stops working or malfunctions on its own, please follow these steps: 1. If the product still does not work, replace with the limits for a Class B digital device, pursuant to help you . A service representative will be ready to comply with a new set of our products. It is accompanied by removing the batteries. 3. These limits...
...-2010 in a residential installation. Let the unit stand for some reason the unit stops working or malfunctions on its own, please follow these steps: 1. If the product still does not work, replace with the limits for a Class B digital device, pursuant to help you . A service representative will be ready to comply with a new set of our products. It is accompanied by removing the batteries. 3. These limits...
User Manual
Page 23
...the equipment and receiver. • Connect the equipment into an outlet on , the user is encouraged to try to correct the interference by the party responsible for help. OPERATION IS SUBJECT TO THE FOLLOWING TWO ...installed and used in accordance with the instructions, may cause harmful interference to which the receiver is no guarantee that interference will not occur in a particular installation. CAN ICES-3 (B)/NMB-3(B) 22 However, there is connected. • Consult the dealer or an experienced radio/TV technician for compliance could void the user's authority to operate...
...the equipment and receiver. • Connect the equipment into an outlet on , the user is encouraged to try to correct the interference by the party responsible for help. OPERATION IS SUBJECT TO THE FOLLOWING TWO ...installed and used in accordance with the instructions, may cause harmful interference to which the receiver is no guarantee that interference will not occur in a particular installation. CAN ICES-3 (B)/NMB-3(B) 22 However, there is connected. • Consult the dealer or an experienced radio/TV technician for compliance could void the user's authority to operate...

User Manual
Page 24
... number has been removed or defaced. This Warranty is covered by going to "VTech" products or parts. This Warranty does not apply to (a) consumable parts, such as batteries; (b) cosmetic damage, including but not limited to returning a product for direct, special, incidental or consequential damages resulting from the date of America. Prior to scratches and dents; (c) damage caused by use with a new unit...
... number has been removed or defaced. This Warranty is covered by going to "VTech" products or parts. This Warranty does not apply to (a) consumable parts, such as batteries; (b) cosmetic damage, including but not limited to returning a product for direct, special, incidental or consequential damages resulting from the date of America. Prior to scratches and dents; (c) damage caused by use with a new unit...

