User Manual
Page 1
TABLE OF CONTENTS IMPORTANT SAFETY INSTRUCTIONS 3 INTRODUCTION...4 PARTS CHECK LIST...4 REPLACING THE HANDSET BATTERIES 5 GETTING STARTED...6 SETTING UP YOUR VT 9152 6 WALL MOUNTING...7 HANDSET FEATURES AND KEYS 8 Phone/Flash...8 Off...8 Chan...8 Prog/Mem...8 Redial/Pause...8 Volume Up/Volume Down 8 Answering Machine...8 In Use/Low Batt LED...8 BASE UNIT FEATURES AND KEYS 9 New Message...
TABLE OF CONTENTS IMPORTANT SAFETY INSTRUCTIONS 3 INTRODUCTION...4 PARTS CHECK LIST...4 REPLACING THE HANDSET BATTERIES 5 GETTING STARTED...6 SETTING UP YOUR VT 9152 6 WALL MOUNTING...7 HANDSET FEATURES AND KEYS 8 Phone/Flash...8 Off...8 Chan...8 Prog/Mem...8 Redial/Pause...8 Volume Up/Volume Down 8 Answering Machine...8 In Use/Low Batt LED...8 BASE UNIT FEATURES AND KEYS 9 New Message...

User Manual
Page 5
...battery pack in a fire. it . 4. The new battery pack must be toxic if swallowed. 3. Use only VTECH battery pack. 2. Do not open or mutilate the battery. It may overheat and cause burns. 4. Do not... care in handling batteries in the replacement battery pack. Recharging the Battery Pack Your VT 9152 provides both audible and visual alerts when the battery pack is slowly flashing; Unplug and remove...re on top of the base unit to charge for 16 hours. When fully charged, you press PHONE/FLASH to make or answer a call or when you will experience up to 5 hours of continuous talk...
...battery pack in a fire. it . 4. The new battery pack must be toxic if swallowed. 3. Use only VTECH battery pack. 2. Do not open or mutilate the battery. It may overheat and cause burns. 4. Do not... care in handling batteries in the replacement battery pack. Recharging the Battery Pack Your VT 9152 provides both audible and visual alerts when the battery pack is slowly flashing; Unplug and remove...re on top of the base unit to charge for 16 hours. When fully charged, you press PHONE/FLASH to make or answer a call or when you will experience up to 5 hours of continuous talk...
User Manual
Page 6
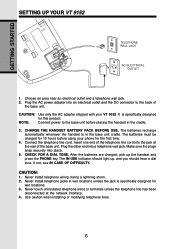
...the rear of the base unit. Plug the AC power adapter into a telephone wall jack. CAUTION: Use only the AC adapter shipped with your phone for the first time. 4. The IN USE indicator should hear a dial tone. NOTE: Connect power to the back of the telephone line ...PACK BEFORE USE. Never install telephone jacks in wet locations unless the jack is in the cradle. 3. GETTING STARTED SETTING UP YOUR VT 9152 TELEPHONE WALL JACK AC ELECTRICAL OUTLET 1. The batteries recharge automatically whenever the handset is specifically designed for this product. Insert one end of ...
...the rear of the base unit. Plug the AC power adapter into a telephone wall jack. CAUTION: Use only the AC adapter shipped with your phone for the first time. 4. The IN USE indicator should hear a dial tone. NOTE: Connect power to the back of the telephone line ...PACK BEFORE USE. Never install telephone jacks in wet locations unless the jack is in the cradle. 3. GETTING STARTED SETTING UP YOUR VT 9152 TELEPHONE WALL JACK AC ELECTRICAL OUTLET 1. The batteries recharge automatically whenever the handset is specifically designed for this product. Insert one end of ...

User Manual
Page 7
... cord has a snap-in the bracket are aligned with the wall studs. wsotoudden wallboard 7 Choose a spot near an electrical outlet and a telephone jack.Your phone requires a modular telephone jack and a standard electrical outlet (120V AC). Mount the Base on the bottom of the base. GETTING STARTED WALL MOUNTING 1. Position ...so that the 2 holes in plug at each end. Position the power and telephone line cords to extend down the wall to which the phone is an electrical outlet within reach of the base. make sure there is to the slots located on the bottom of the plug into an...
... cord has a snap-in the bracket are aligned with the wall studs. wsotoudden wallboard 7 Choose a spot near an electrical outlet and a telephone jack.Your phone requires a modular telephone jack and a standard electrical outlet (120V AC). Mount the Base on the bottom of the base. GETTING STARTED WALL MOUNTING 1. Position ...so that the 2 holes in plug at each end. Position the power and telephone line cords to extend down the wall to which the phone is an electrical outlet within reach of the base. make sure there is to the slots located on the bottom of the plug into an...

User Manual
Page 10
BASIC OPERATION USING YOUR VT 9152 CORDLESS TELEPHONE MAKING CALLS Pick up , then press PHONE/FLASH to get a dial tone again. ANSWERING CALLS When the Handset ...MEM • Press # • Press 0 • Press PROG/MEM to hang up the Handset and press PHONE/FLASH. If you notice noise or interference when using your Handset will illuminate when the Handset is factory preset for ...to end your call, your Handset, press CHAN to switch to Pulse dialing mode. TONE/PULSE SETTING Your VT 9152 is in the Base Unit, simply pick it up to confirm your call . RINGER PROGRAMMING You can also ...
BASIC OPERATION USING YOUR VT 9152 CORDLESS TELEPHONE MAKING CALLS Pick up , then press PHONE/FLASH to get a dial tone again. ANSWERING CALLS When the Handset ...MEM • Press # • Press 0 • Press PROG/MEM to hang up the Handset and press PHONE/FLASH. If you notice noise or interference when using your Handset will illuminate when the Handset is factory preset for ...to end your call, your Handset, press CHAN to switch to Pulse dialing mode. TONE/PULSE SETTING Your VT 9152 is in the Base Unit, simply pick it up to confirm your call . RINGER PROGRAMMING You can also ...

User Manual
Page 11
...be up to 10 phone numbers that you can be inserted in PROGRAMMING SPEED DIAL NUMBERS. It can access by the Memory Location (0-9) TO CHANGE OR REPLACE A SPEED DIAL NUMBER Follow the steps in the dialing sequence. BASIC OPERATION USING YOUR VT 9152 CORDLESS TELEPHONE MEMORY ...DIALING Your VT 9152 stores up to the location you selected. PROGRAMMING SPEED DIAL NUMBERS • Press PROG/MEM • Press a Memory Location ...
...be up to 10 phone numbers that you can be inserted in PROGRAMMING SPEED DIAL NUMBERS. It can access by the Memory Location (0-9) TO CHANGE OR REPLACE A SPEED DIAL NUMBER Follow the steps in the dialing sequence. BASIC OPERATION USING YOUR VT 9152 CORDLESS TELEPHONE MEMORY ...DIALING Your VT 9152 stores up to the location you selected. PROGRAMMING SPEED DIAL NUMBERS • Press PROG/MEM • Press a Memory Location ...

User Manual
Page 12
Call Screening from Base Unit Simply keep the Base Unit volume level above the minimum setting. USE THE VT 9152 HANDSET TO PROGRAM YOUR ANSWERING SYSTEM!!! • You can listen to your callers leave them . MACHINE on... or the Base Unit. The answering system will be able to idle mode. 12 BASIC OPERATION ANSWERING SYSTEM OPERATION INTRODUCTION Your VT 9152 has a digital Answering Device in . If you . You will hear messages at the Base Unit as a message comes in the... the Handset or the Base Unit. • You can also screen messages while your caller now, press PHONE/ FLASH.
Call Screening from Base Unit Simply keep the Base Unit volume level above the minimum setting. USE THE VT 9152 HANDSET TO PROGRAM YOUR ANSWERING SYSTEM!!! • You can listen to your callers leave them . MACHINE on... or the Base Unit. The answering system will be able to idle mode. 12 BASIC OPERATION ANSWERING SYSTEM OPERATION INTRODUCTION Your VT 9152 has a digital Answering Device in . If you . You will hear messages at the Base Unit as a message comes in the... the Handset or the Base Unit. • You can also screen messages while your caller now, press PHONE/ FLASH.

User Manual
Page 17
Dial the phone number associated with the line to execute a particular remote function. While the greeting is playing, press #, followed by your VT 9152. ADVANCED OPERATION 17 A voice menu will first tell you how many new and old messages you have, and then, after a pause, you will ... do not have to wait unit the voice menu announces the command to your 2 digit security code. REMOTE OPERATION OF YOUR VT 9152 ANSWERING SYSTEM You can access messages and change your greeting remotely, using a touch tone phone from a different line or location. You are now in remote access mode.
Dial the phone number associated with the line to execute a particular remote function. While the greeting is playing, press #, followed by your VT 9152. ADVANCED OPERATION 17 A voice menu will first tell you how many new and old messages you have, and then, after a pause, you will ... do not have to wait unit the voice menu announces the command to your 2 digit security code. REMOTE OPERATION OF YOUR VT 9152 ANSWERING SYSTEM You can access messages and change your greeting remotely, using a touch tone phone from a different line or location. You are now in remote access mode.

User Manual
Page 19
...sure the power cord is plugged in your home may be limiting the range. Then press PHONE/FLASH to another outlet. Try moving the base unit to the second or third floor, .... • The layout of them to re-set the unit. If you still have too many extension phones on . • Make sure the telephone line cord is turned on your telephone line to some of...unit from the base unit. • You may have difficulty after trying these suggestions, In the US call : VTECH ELECTRONICS at 1-800-595-9511. NO DIAL TONE. • First check all of your wiring or local service...
...sure the power cord is plugged in your home may be limiting the range. Then press PHONE/FLASH to another outlet. Try moving the base unit to the second or third floor, .... • The layout of them to re-set the unit. If you still have too many extension phones on . • Make sure the telephone line cord is turned on your telephone line to some of...unit from the base unit. • You may have difficulty after trying these suggestions, In the US call : VTECH ELECTRONICS at 1-800-595-9511. NO DIAL TONE. • First check all of your wiring or local service...

User Manual
Page 20
... unit. IN CASE OF DIFFICULTY YOUR CALLER FADES IN AND OUT. • You may not be operating on . YOU HEAR OTHER CALLS WHILE USING YOUR PHONE. • Press CHAN key to switch to re-initialize. YOU HEAR NOISE IN THE HANDSET, AND NONE OF THE KEYS OR BUTTONS WORK. • Make...
... unit. IN CASE OF DIFFICULTY YOUR CALLER FADES IN AND OUT. • You may not be operating on . YOU HEAR OTHER CALLS WHILE USING YOUR PHONE. • Press CHAN key to switch to re-initialize. YOU HEAR NOISE IN THE HANDSET, AND NONE OF THE KEYS OR BUTTONS WORK. • Make...


