
User Manual
Page 1
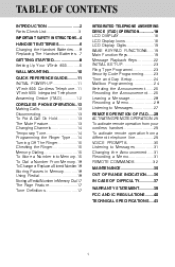
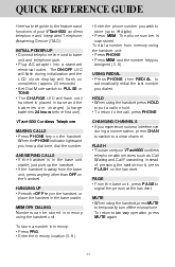
...Handset Batteries...6 Replacing The Handset Batteries...7 GETTING STARTED...8 Setting Up Your VTech 900i...8 WALL MOUNTING...10 QUICK REFERENCE GUIDE...11 INITIAL POWER-UP...11 VTech 900i Cordless Telephone...11 VTech 900i Integrated Telephone Answering Device (ITAD)...12 CORDLESS PHONE OPERATION...13 Making Calls...13 Disconnecting...13 To Put A Call On Hold...13 The Mute Feature...13 Changing Channels...14 Temporary Tone...14 Programming the Ringer Type...14 Turning Off The Ringer...15 Checking the Ringer...15 Memory Dialing...15 To Store a Number into Memory..15 To Dial a Number From Memory...
...Handset Batteries...6 Replacing The Handset Batteries...7 GETTING STARTED...8 Setting Up Your VTech 900i...8 WALL MOUNTING...10 QUICK REFERENCE GUIDE...11 INITIAL POWER-UP...11 VTech 900i Cordless Telephone...11 VTech 900i Integrated Telephone Answering Device (ITAD)...12 CORDLESS PHONE OPERATION...13 Making Calls...13 Disconnecting...13 To Put A Call On Hold...13 The Mute Feature...13 Changing Channels...14 Temporary Tone...14 Programming the Ringer Type...14 Turning Off The Ringer...15 Checking the Ringer...15 Memory Dialing...15 To Store a Number into Memory..15 To Dial a Number From Memory...
User Manual
Page 2
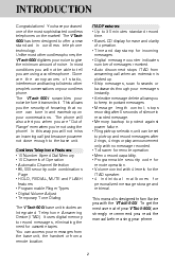
...ITAD speaker. • 4 individual mailboxes for incoming messages. • Digital message counter indicates number of messages received. • Auto disconnect stops ITAD from answering call just because you 're not using a cordless phone. stops recording after 2 rings, 4 rings or play announcement only with no one of Operation • Automatic Channel Selection • 65,000 security code combinations Page • HOLD, REDIAL, MUTE and FLASH features • Programmable Ringer Types • Digital Volume Adjust • Temporary Tone Dialing The VTech 900i base unit includes...
...ITAD speaker. • 4 individual mailboxes for incoming messages. • Digital message counter indicates number of messages received. • Auto disconnect stops ITAD from answering call just because you 're not using a cordless phone. stops recording after 2 rings, 4 rings or play announcement only with no one of Operation • Automatic Channel Selection • 65,000 security code combinations Page • HOLD, REDIAL, MUTE and FLASH features • Programmable Ringer Types • Digital Volume Adjust • Temporary Tone Dialing The VTech 900i base unit includes...
User Manual
Page 6
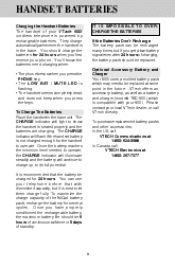
... charging. You should be charged for the handset to show the handset is in the base unit. It is powered by rechargeable batteries. You can be replaced at 1-800-267-7377 6 Optional Accessory Battery and Charger Your 900i uses a molded battery pack which is compatible with diminished capacity, but if you press the keys. The CHARGE indicator will flash if the handset battery is best to its full potential. Please contact your telephone...
... charging. You should be charged for the handset to show the handset is in the base unit. It is powered by rechargeable batteries. You can be replaced at 1-800-267-7377 6 Optional Accessory Battery and Charger Your 900i uses a molded battery pack which is compatible with diminished capacity, but if you press the keys. The CHARGE indicator will flash if the handset battery is best to its full potential. Please contact your telephone...
User Manual
Page 8
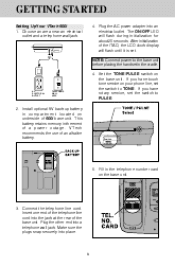
... other end into the jack at the rear of an alkaline battery. 5. If you have rotary service, set the switch to PULSE. This battery retains memory in the telephone number card on your phone line, set . Insert one end of the telephone line cord into a telephone wall jack. GETTING STARTED Setting Up Your VTech 900i 1. Install optional 9V back-up battery in the cradle. 4. NOTE: Connect power to TONE. Fill in the event of 900i base unit.
... other end into the jack at the rear of an alkaline battery. 5. If you have rotary service, set the switch to PULSE. This battery retains memory in the telephone number card on your phone line, set . Insert one end of the telephone line cord into a telephone wall jack. GETTING STARTED Setting Up Your VTech 900i 1. Install optional 9V back-up battery in the cradle. 4. NOTE: Connect power to TONE. Fill in the event of 900i base unit.
User Manual
Page 11
... memory using the handset, press MUTE to temporarily turn off the microphone. To dial a number from the base unit, press any key other than OFF on the handset. HOLD • When using the handset unit. To return to automatically redial the last number you dialed. Instead of your VTech 900i cordless telephone with services such as Call Waiting and Call Forwarding. ANSWERING CALLS • If the handset is placed in base and the batteries are charged (charge batteries 24 hours before first use your VTech 900i cordless telephone...
... memory using the handset, press MUTE to temporarily turn off the microphone. To dial a number from the base unit, press any key other than OFF on the handset. HOLD • When using the handset unit. To return to automatically redial the last number you dialed. Instead of your VTech 900i cordless telephone with services such as Call Waiting and Call Forwarding. ANSWERING CALLS • If the handset is placed in base and the batteries are charged (charge batteries 24 hours before first use your VTech 900i cordless telephone...

User Manual
Page 12
.... • Press STOP. QUICK REFERENCE GUIDE VOLUME CONTROLS • The handset has digital volume controls. • The volume controls for the handset are located on the display. • Press PLAY. • REPEAT and SKIP keys can be used to scan forwards or backwards through messages. • Press STOP to exit. LISTENING TO MESSAGES • Press MAILBOX key until you hear a beep. • Press SETUP again briefly. • Use REPEAT and...
.... • Press STOP. QUICK REFERENCE GUIDE VOLUME CONTROLS • The handset has digital volume controls. • The volume controls for the handset are located on the display. • Press PLAY. • REPEAT and SKIP keys can be used to scan forwards or backwards through messages. • Press STOP to exit. LISTENING TO MESSAGES • Press MAILBOX key until you hear a beep. • Press SETUP again briefly. • Use REPEAT and...
User Manual
Page 14
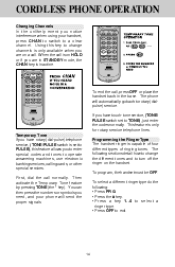
... the codes normally. Temporary Tone If you have touch-tone service, (TONE/ PULSE switch set to PULSE), this key to change the different tones and to a clear channel. You can then press the numbers or symbols you need, and your handset, press CHAN to switch to turn off the ringer on the handset. Using this feature allows you to enter special codes and tones to operate answering machines, use electronic banking services, calling cards, or other special services. CORDLESS PHONE OPERATION Changing Channels...
... the codes normally. Temporary Tone If you have touch-tone service, (TONE/ PULSE switch set to PULSE), this key to change the different tones and to a clear channel. You can then press the numbers or symbols you need, and your handset, press CHAN to switch to turn off the ringer on the handset. Using this feature allows you to enter special codes and tones to operate answering machines, use electronic banking services, calling cards, or other special services. CORDLESS PHONE OPERATION Changing Channels...
User Manual
Page 15
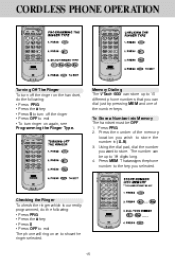
... Memory The handset must be up to 10 different phone numbers that you can dial just by pressing MEM and one of the memory location you selected. The number can store up to show the ringer selected. 15 Press MEM. CORDLESS PHONE OPERATION Turning Off The Ringer To turn ringer on again, see Programming the Ringer Type. Press the number of the number keys. That assigns the phone number to store. Memory Dialing The VTech 900i...
... Memory The handset must be up to 10 different phone numbers that you can dial just by pressing MEM and one of the memory location you selected. The number can store up to show the ringer selected. 15 Press MEM. CORDLESS PHONE OPERATION Turning Off The Ringer To turn ringer on again, see Programming the Ringer Type. Press the number of the number keys. That assigns the phone number to store. Memory Dialing The VTech 900i...
User Manual
Page 19
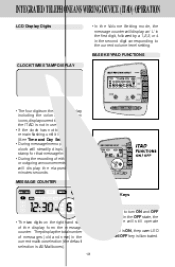
... cordless phone will still operate normally. • When the ITAD is ON, the power LED beside the ON/OFF key is All Mailboxes). 19 While in use. • If the clock has not been set (See Time and Day Setup). • During message/memo playback, the clock will steadily display the time stamp for that message/memo. • During the recording of the display form...
... cordless phone will still operate normally. • When the ITAD is ON, the power LED beside the ON/OFF key is All Mailboxes). 19 While in use. • If the clock has not been set (See Time and Day Setup). • During message/memo playback, the clock will steadily display the time stamp for that message/memo. • During the recording of the display form...

User Manual
Page 20
... to standard operation mode, and the default selection is All Mailboxes. 20 • The Announcement key, ANNC, is used to select the next announcement option in the following order:Announcement1, Announcement 2, OutGoing Message (see Activating Remote Operation). INTEGRATED TELEPHONE ANSWERING DEVICE (ITAD) OPERATION • Regardless of silence. For example, mailbox 1 is for John, mailbox 2 is used to begin recording. • Stop recording by pressing PHONE, *, # (see...
... to standard operation mode, and the default selection is All Mailboxes. 20 • The Announcement key, ANNC, is used to select the next announcement option in the following order:Announcement1, Announcement 2, OutGoing Message (see Activating Remote Operation). INTEGRATED TELEPHONE ANSWERING DEVICE (ITAD) OPERATION • Regardless of silence. For example, mailbox 1 is for John, mailbox 2 is used to begin recording. • Stop recording by pressing PHONE, *, # (see...

User Manual
Page 21
... TELEPHONE ANSWERING DEVICE (ITAD) OPERATION • Press and hold ANNC for 2 seconds to begin announcement recording (see the different set -up mode, either press STOP or it for more available Memory, delete old messages and/or record shorter outgoing message(s). SETUP • The SETUP key is used to check the amount of memory still available for 2 seconds after this key doesn't change the volume level but just displays the current volume. • The volume...
... TELEPHONE ANSWERING DEVICE (ITAD) OPERATION • Press and hold ANNC for 2 seconds to begin announcement recording (see the different set -up mode, either press STOP or it for more available Memory, delete old messages and/or record shorter outgoing message(s). SETUP • The SETUP key is used to check the amount of memory still available for 2 seconds after this key doesn't change the volume level but just displays the current volume. • The volume...

User Manual
Page 23
... ring type, security code, time/day and mailbox programming as follows. The security code default setting is answered after 4 rings. To change ring type setting: 1. INITIAL SET-UP Press the SETUP key for more than 2 seconds to enter the set -up mode or until it beeps once. if there are new messages/ memos present in the following order 2 rings, 4 rings, Toll saver. 3. Toll Saver The incoming call , you can hang-up to avoid any long distance charges. Use...
... ring type, security code, time/day and mailbox programming as follows. The security code default setting is answered after 4 rings. To change ring type setting: 1. INITIAL SET-UP Press the SETUP key for more than 2 seconds to enter the set -up mode or until it beeps once. if there are new messages/ memos present in the following order 2 rings, 4 rings, Toll saver. 3. Toll Saver The incoming call , you can hang-up to avoid any long distance charges. Use...
User Manual
Page 24
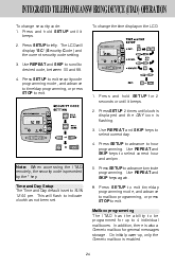
.... INTEGRATED TELEPHONE ANSWERING DEVICE (ITAD) OPERATION To change the time display on the LCD: 1. Press SETUP to exit security code programming mode, and advance to time/day programming, or press STOP to minute programming. Note: When accessing the ITAD remotely, the security code is enabled. 24 Use REPEAT and SKIP keys to desired code, between 00 and 99. 4. Time and Day Setup The Time and Day default is flashing. 3. Press and hold SETUP for general messages storage. Press SETUP briefly. Use REPEAT...
.... INTEGRATED TELEPHONE ANSWERING DEVICE (ITAD) OPERATION To change the time display on the LCD: 1. Press SETUP to exit security code programming mode, and advance to time/day programming, or press STOP to minute programming. Note: When accessing the ITAD remotely, the security code is enabled. 24 Use REPEAT and SKIP keys to desired code, between 00 and 99. 4. Time and Day Setup The Time and Day default is flashing. 3. Press and hold SETUP for general messages storage. Press SETUP briefly. Use REPEAT...

User Manual
Page 26
... of recording. • Messages can 't come to stop the recording. 5. Press and hold the PLAY key for 26 Recording a Memo To record a memo at the base unit: 1. Announcement can be cut-off. The MEMO, MAILBOX and corresponding Mailbox Number icons will automatically stop recording if there is All, the memo will answer the call us press 0 or just stay on the line and record after the beep...
... of recording. • Messages can 't come to stop the recording. 5. Press and hold the PLAY key for 26 Recording a Memo To record a memo at the base unit: 1. Announcement can be cut-off. The MEMO, MAILBOX and corresponding Mailbox Number icons will automatically stop recording if there is All, the memo will answer the call us press 0 or just stay on the line and record after the beep...

User Manual
Page 30
... record memo" "Press # to STOP message playback. VOICE PROMPTS Upon entering the remote access mode you must press 4 to turn answering machine off" "Press * for other functions" If the * key is low on charge. The first voice prompt will be either "X new messages", or "No new messages", indicating the total number of new messages present in the middle of voice prompts are: "During message playback" "Press 2 to repeat message" "Press 3 to skip message" "Press 4 to stop...
... record memo" "Press # to STOP message playback. VOICE PROMPTS Upon entering the remote access mode you must press 4 to turn answering machine off" "Press * for other functions" If the * key is low on charge. The first voice prompt will be either "X new messages", or "No new messages", indicating the total number of new messages present in the middle of voice prompts are: "During message playback" "Press 2 to repeat message" "Press 3 to skip message" "Press 4 to stop...
User Manual
Page 36
... to the base unit and this time. If the handset is moved out of range, the handset will not work until the base is powered again and the handset is brought closer to the base. If you are presently engaged in the base, your handset and base to recognize each other , and minimizes the possibility of another cordless phone usings your telephone line. The base unit will continue to make the beeps at...
... to the base unit and this time. If the handset is moved out of range, the handset will not work until the base is powered again and the handset is brought closer to the base. If you are presently engaged in the base, your handset and base to recognize each other , and minimizes the possibility of another cordless phone usings your telephone line. The base unit will continue to make the beeps at...
User Manual
Page 37
... IN USE and PHONE indicators do not light when you press PHONE, you must charge the batteries. • If you still don't hear a dial tone, disconnect the base unit from the telephone jack and connect a different phone. Follow the procedure: 1. Remove battery from base unit. 3. Re-connect power supply to get a line. Place the handset in handset. 6. NO DIAL TONE. • First check all the suggestions above. • If you recently installed a new battery pack, make sure it is no dial tone...
... IN USE and PHONE indicators do not light when you press PHONE, you must charge the batteries. • If you still don't hear a dial tone, disconnect the base unit from the telephone jack and connect a different phone. Follow the procedure: 1. Remove battery from base unit. 3. Re-connect power supply to get a line. Place the handset in handset. 6. NO DIAL TONE. • First check all the suggestions above. • If you recently installed a new battery pack, make sure it is no dial tone...

User Manual
Page 38
... A CALL. • Make sure you still hear other phones. YOU HEAR NOISE IN THE HANDSET, AND NONE OF THE KEYS OR BUTTONS WORK. • Make sure the power cord is plugged firmly into the base unit and the telephone jack. If the unit does not seem to respond after doing this a few minutes. Connect the handset battery. Try unplugging some of them to reload the security code and reset the channel. Make...
... A CALL. • Make sure you still hear other phones. YOU HEAR NOISE IN THE HANDSET, AND NONE OF THE KEYS OR BUTTONS WORK. • Make sure the power cord is plugged firmly into the base unit and the telephone jack. If the unit does not seem to respond after doing this a few minutes. Connect the handset battery. Try unplugging some of them to reload the security code and reset the channel. Make...
User Manual
Page 40
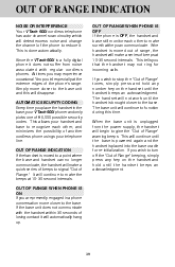
... the handset out of range during a phone conversation, you will give an 'Out of Range' tone to operate at the maximum power allowed by pressing any number key on the handset. FCC Part 15 Warning: Changes or modifications to the base. This equipment generates, uses and can communicate only over a certain distance - However, there is encouraged to try and correct the interference by turning the...
... the handset out of range during a phone conversation, you will give an 'Out of Range' tone to operate at the maximum power allowed by pressing any number key on the handset. FCC Part 15 Warning: Changes or modifications to the base. This equipment generates, uses and can communicate only over a certain distance - However, there is encouraged to try and correct the interference by turning the...
User Manual
Page 41
... the telephone network. The handset contains a user replaceable battery pack. This equipment may be made by the phone company or on a circuit different from the modular jack until the problem has been corrected. FCC and IC REGULATIONS Reorient or relocate the receiving antenna. Increase the separation between the equipment and receiver. The base unit contains no user serviceable parts. Repairs to this telephone equipment...
... the telephone network. The handset contains a user replaceable battery pack. This equipment may be made by the phone company or on a circuit different from the modular jack until the problem has been corrected. FCC and IC REGULATIONS Reorient or relocate the receiving antenna. Increase the separation between the equipment and receiver. The base unit contains no user serviceable parts. Repairs to this telephone equipment...


