
Download
Page 11
1 To install the base: 1. Align and slide the neck into the bottom of the TV as carpet, rug, or blanket. Place the TV screen-down on a soft surface, such as shown. 4 M601d/M701d-A3 2. It is recommended that two people take part in the base installation. Insert and tighten four(4) [M601d/M701d-A3] or five (5) [M801d-A3] Phillips screws into the TV base. Remove any plastic wrapping from the TV and stand. To prevent scratches or damage to the screen, place the TV on a clean, flat surface.
1 To install the base: 1. Align and slide the neck into the bottom of the TV as carpet, rug, or blanket. Place the TV screen-down on a soft surface, such as shown. 4 M601d/M701d-A3 2. It is recommended that two people take part in the base installation. Insert and tighten four(4) [M601d/M701d-A3] or five (5) [M801d-A3] Phillips screws into the TV base. Remove any plastic wrapping from the TV and stand. To prevent scratches or damage to the screen, place the TV on a clean, flat surface.

Download
Page 12
... a TV on a wall requires lifting. Be sure the surface is capable of supporting the weight of this TV. Screw Size: Screw Length: Hole Pattern: M601d-A3, M701d-A3, & M801d-A3 M6 10mm 400mm (V) x 400mm (H) 5 When you are finished, place the TV on a stable, level surface Installing the TV on a wall, you . ... of debris that came with a UL-listed wall mount bracket rated for the weight of the TV. To install your mount. 1 M801d-A3 3. Be sure the mount you can scratch or damage the TV. 3. Use only with your TV on a clean, flat, stable surface. See Appendix...
... a TV on a wall requires lifting. Be sure the surface is capable of supporting the weight of this TV. Screw Size: Screw Length: Hole Pattern: M601d-A3, M701d-A3, & M801d-A3 M6 10mm 400mm (V) x 400mm (H) 5 When you are finished, place the TV on a stable, level surface Installing the TV on a wall, you . ... of debris that came with a UL-listed wall mount bracket rated for the weight of the TV. To install your mount. 1 M801d-A3 3. Be sure the mount you can scratch or damage the TV. 3. Use only with your TV on a clean, flat, stable surface. See Appendix...
Download
Page 53
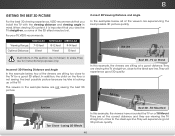
... Eye Line Illustrations in the example below , all of the 3D effect may be lost. For your TV, VIZIO recommends: M601d-A3 Viewing Range: 7-10 feet Optimal Distance: 8 feet M701d-A3 M801d-A3 8-12 feet 9-14 feet 9 feet 10 feet Correct 3D Viewing Distance and Angle In the examples below are ...experience good 3D picture quality. 46 They will experience good 3D quality. 8 Getting the Best 3D Picture For the best 3D viewing experience, VIZIO recommends that you install the TV with the viewing distance and viewing angle in mind. TV on , close to the ideal eye line. ...
... Eye Line Illustrations in the example below , all of the 3D effect may be lost. For your TV, VIZIO recommends: M601d-A3 Viewing Range: 7-10 feet Optimal Distance: 8 feet M701d-A3 M801d-A3 8-12 feet 9-14 feet 9 feet 10 feet Correct 3D Viewing Distance and Angle In the examples below are ...experience good 3D picture quality. 46 They will experience good 3D quality. 8 Getting the Best 3D Picture For the best 3D viewing experience, VIZIO recommends that you install the TV with the viewing distance and viewing angle in mind. TV on , close to the ideal eye line. ...

Download
Page 57
Specifications B Screen Size: Viewable Area: Dimensions w/ Stand: w/o Stand: M601d-A3 60" 60.04" 53.64" x 33.56" x 10.40" 53.64" x 30.90" x 2.22" Weight w/ Stand... Video Inputs: 178° (H) / 178° (V) 4 1 Composite Inputs: RF Antenna Input: USB 2.0 Ports: 1 (Shared with Component) 1 2 M701d-A3 70" 69.51" 61.96" x 37.98" x 11.30" 61.96" x 35.69" x 2.32" 97.00 lbs 85.98 lbs LED 240...Backlight Scanning 1920 x 1080 .802 mm (H) x .802 mm (V) 4ms 350 nits 130 nits 178° (H) / 178° (V) 4 1 M801d-A3 80" 80.01" 71.21" x 43.43" x 12.80" 71.21" x 41.10" x 2.62" 134.48 lbs 113.98 lbs ...
Specifications B Screen Size: Viewable Area: Dimensions w/ Stand: w/o Stand: M601d-A3 60" 60.04" 53.64" x 33.56" x 10.40" 53.64" x 30.90" x 2.22" Weight w/ Stand... Video Inputs: 178° (H) / 178° (V) 4 1 Composite Inputs: RF Antenna Input: USB 2.0 Ports: 1 (Shared with Component) 1 2 M701d-A3 70" 69.51" 61.96" x 37.98" x 11.30" 61.96" x 35.69" x 2.32" 97.00 lbs 85.98 lbs LED 240...Backlight Scanning 1920 x 1080 .802 mm (H) x .802 mm (V) 4ms 350 nits 130 nits 178° (H) / 178° (V) 4 1 M801d-A3 80" 80.01" 71.21" x 43.43" x 12.80" 71.21" x 41.10" x 2.62" 134.48 lbs 113.98 lbs ...

Download
Page 5
PACKAGE CONTENTS VIZIO LED HDTV with Stand VIZIO QUICK START GUIDE This Quick Start Guide INPUT LIST EXIT MENU INFO BACK VOL GUIDE CH 3D 1 2 3 4 5 6 7 8 9 ENTER 0 Remote Control and Batteries Power Cord 4 M5 x 23mm Phillips Screws (M601d-A3 & M701d-A3) Theater 3D Glasses Glasses may vary slightly from those shown. 5 M6 x 28mm Phillips Screws (M801d-A3)
PACKAGE CONTENTS VIZIO LED HDTV with Stand VIZIO QUICK START GUIDE This Quick Start Guide INPUT LIST EXIT MENU INFO BACK VOL GUIDE CH 3D 1 2 3 4 5 6 7 8 9 ENTER 0 Remote Control and Batteries Power Cord 4 M5 x 23mm Phillips Screws (M601d-A3 & M701d-A3) Theater 3D Glasses Glasses may vary slightly from those shown. 5 M6 x 28mm Phillips Screws (M801d-A3)

Download
Page 7
When you are finished, place the TV on a stable, level surface 2 M601d-A3 and M701d-A3 M801d-A3 Align and slide the neck into the bottom of the TV as shown. Insert and tighten four (4) Phillips screws (M601d-A3 and M701d-A3) or five (5) Philips screws (M801d-A3) into the TV base.
When you are finished, place the TV on a stable, level surface 2 M601d-A3 and M701d-A3 M801d-A3 Align and slide the neck into the bottom of the TV as shown. Insert and tighten four (4) Phillips screws (M601d-A3 and M701d-A3) or five (5) Philips screws (M801d-A3) into the TV base.


