
E370VT User Manual
Page 5
...no objects filled with liquids, such as vases, shall be placed on the power cord may cause the batteries to leak which can damage the remote control or injure the operator. To avoid electric shock, avoid handling the power cord during electrical storms. • Unplug your TV during lightning. ...user to the presence of electric shock, do not perform any smoke or odor becomes apparent, unplug the power cord and contact your dealer. E320VT / E370VT / E420VT to constitute a risk of time. Any other hazards. Continued use of your TV may cause fire or electric shock. • Follow ...
...no objects filled with liquids, such as vases, shall be placed on the power cord may cause the batteries to leak which can damage the remote control or injure the operator. To avoid electric shock, avoid handling the power cord during electrical storms. • Unplug your TV during lightning. ...user to the presence of electric shock, do not perform any smoke or odor becomes apparent, unplug the power cord and contact your dealer. E320VT / E370VT / E420VT to constitute a risk of time. Any other hazards. Continued use of your TV may cause fire or electric shock. • Follow ...

E370VT User Manual
Page 7
...TV 1 Inspecting the Package Contents 1 Installing the TV 1 Installing the TV Stand 1 Installing the TV on a Wall 2 Controls and Connections 3 Rear Panel 3 Front Panel 4 Right Side Panel 4 Remote Control 5 Replacing the Batteries 6 Connecting Your Devices 7 Before You Begin 7 Connecting Your Devices 7 Completing the First-Time Setup 9... 26 Enabling or Disabling the Ambient Light Sensor 26 Resetting the Picture Settings 26 Setting the Parental Controls 27 Enabling or Disabling Program Ratings 27 Locking and Unlocking Channels 27 Blocking and Unblocking Content by Rating 27
...TV 1 Inspecting the Package Contents 1 Installing the TV 1 Installing the TV Stand 1 Installing the TV on a Wall 2 Controls and Connections 3 Rear Panel 3 Front Panel 4 Right Side Panel 4 Remote Control 5 Replacing the Batteries 6 Connecting Your Devices 7 Before You Begin 7 Connecting Your Devices 7 Completing the First-Time Setup 9... 26 Enabling or Disabling the Ambient Light Sensor 26 Resetting the Picture Settings 26 Setting the Parental Controls 27 Enabling or Disabling Program Ratings 27 Locking and Unlocking Channels 27 Blocking and Unblocking Content by Rating 27
E370VT User Manual
Page 8
Changing the Parental Control Passcode 28 Resetting the Content Locks 28 Viewing System Info and Resetting to Factory ...screen 31 There is no sound 31 The colors on the TV don't look right 31 The buttons on the remote aren't working 31 The image quality is not good 31 The picture is distorted 32 The display image does not...Type of Service 35 Limitations and Exclusions 35 Personal Data 35 Zero Bright Pixel Defect Guarantee 35 E320VT / E370VT / E420VT Legal & Compliance 36 FCC Class B Radio Interference Statement 36 Notice...36 FCC warning 36 Caution 36 Open Source...
Changing the Parental Control Passcode 28 Resetting the Content Locks 28 Viewing System Info and Resetting to Factory ...screen 31 There is no sound 31 The colors on the TV don't look right 31 The buttons on the remote aren't working 31 The image quality is not good 31 The picture is distorted 32 The display image does not...Type of Service 35 Limitations and Exclusions 35 Personal Data 35 Zero Bright Pixel Defect Guarantee 35 E320VT / E370VT / E420VT Legal & Compliance 36 FCC Class B Radio Interference Statement 36 Notice...36 FCC warning 36 Caution 36 Open Source...
E370VT User Manual
Page 9
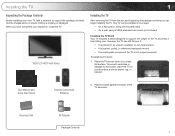
...) Installing the TV Stand Your TV includes a stand designed to inspect the package contents. VIZIO LCD HDTV with Batteries 2. Place the TV screen-down on a soft surface, such as shown. User Manual and Quick Start Guide Remote Control with Stand Installing the TV After removing the TV from the box and inspecting the...
...) Installing the TV Stand Your TV includes a stand designed to inspect the package contents. VIZIO LCD HDTV with Batteries 2. Place the TV screen-down on a soft surface, such as shown. User Manual and Quick Start Guide Remote Control with Stand Installing the TV After removing the TV from the box and inspecting the...
E370VT User Manual
Page 12
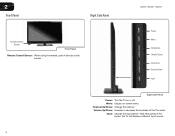
Menu: Display on or off. Volume Up/Down: Increase or decrease the loudness of the button, the TV will display a different input source. 4 2 Front Panel Right Side Panel Remote Control Sensor Front Panel Remote Control Sensor: When using the remote, point it directly at this sensor. Channel Up/Down: Change the channel. E320VT / E370VT / E420VT Power Menu Channel Up Channel Down Volume Up Volume Down Input Right Side Panel Power: Turn the TV on -screen menu. With each press of the TVs audio. Input: Change the input device.
Menu: Display on or off. Volume Up/Down: Increase or decrease the loudness of the button, the TV will display a different input source. 4 2 Front Panel Right Side Panel Remote Control Sensor Front Panel Remote Control Sensor: When using the remote, point it directly at this sensor. Channel Up/Down: Change the channel. E320VT / E370VT / E420VT Power Menu Channel Up Channel Down Volume Up Volume Down Input Right Side Panel Power: Turn the TV on -screen menu. With each press of the TVs audio. Input: Change the input device.

E370VT User Manual
Page 13
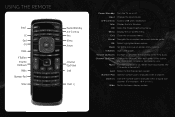
...CC: Open the Closed Captioning menu. Last: Return to the previous on -screen menu. Remote Control 5 Info: Display the Info Window. Volume Up/Down: Increase or decrease the loudness of the but- A/V Controls: Control USB photo slideshow. Back: Go to the channel last viewed. Menu: Display the on ...., the TV will increase or decrease by one. E320VT / E370VT / E420VT Input CC Exit OK Back Volume Up/Down Mute Number Pad Wide Power/Standby A/V Controls Info Menu Arrow Channel Up/Down Last Dash (-) 2 Remote Control Power/Standby: Turn the TV on -screen menu and episode ...
...CC: Open the Closed Captioning menu. Last: Return to the previous on -screen menu. Remote Control 5 Info: Display the Info Window. Volume Up/Down: Increase or decrease the loudness of the but- A/V Controls: Control USB photo slideshow. Back: Go to the channel last viewed. Menu: Display the on ...., the TV will increase or decrease by one. E320VT / E370VT / E420VT Input CC Exit OK Back Volume Up/Down Mute Number Pad Wide Power/Standby A/V Controls Info Menu Arrow Channel Up/Down Last Dash (-) 2 Remote Control Power/Standby: Turn the TV on -screen menu and episode ...

E370VT User Manual
Page 14
... of old or dead batteries in cracking or leakage that the (+) and (-) symbols on the batteries match the (+) and (-) symbols inside the battery compartment. 3. E320VT / E370VT / E420VT 6 Insert two AAA batteries into the remote control. 2 Replacing the Batteries 1.
... of old or dead batteries in cracking or leakage that the (+) and (-) symbols on the batteries match the (+) and (-) symbols inside the battery compartment. 3. E320VT / E370VT / E420VT 6 Insert two AAA batteries into the remote control. 2 Replacing the Batteries 1.

E370VT User Manual
Page 19
...connected to rename, then press OK. 6. Use the Arrow buttons to spell the custom input name. The on the remote control. Press EXIT. 11 Press the MENU button on the remote. Customizing Input Names To customize an input name: 1. To change the input source, press the INPUT button on -... OK. 5. Use the Arrow buttons to highlight TV and press OK. 3. Use the Arrow buttons to highlight TV and press OK. 3. E320VT / E370VT / E420VT 5 Changing the Input Source External devices such as My Blu-ray. Use the Arrow buttons on -screen menu is displayed. 7. Your TV ...
...connected to rename, then press OK. 6. Use the Arrow buttons to spell the custom input name. The on the remote control. Press EXIT. 11 Press the MENU button on the remote. Customizing Input Names To customize an input name: 1. To change the input source, press the INPUT button on -... OK. 5. Use the Arrow buttons to highlight TV and press OK. 3. Use the Arrow buttons to highlight TV and press OK. 3. E320VT / E370VT / E420VT 5 Changing the Input Source External devices such as My Blu-ray. Use the Arrow buttons on -screen menu is displayed. 7. Your TV ...
E370VT User Manual
Page 25
...'s audio using the TV's remote control. 5. Use the Arrow buttons on the remote to control HDMI-connected devices with the included remote without any additional programming. To use CEC, you to highlight CEC Settings and press OK. Use the Arrow buttons on the remote to adjust each setting: • CEC Function - E320VT / E370VT / E420VT 5 Enabling or Disabling...
...'s audio using the TV's remote control. 5. Use the Arrow buttons on the remote to control HDMI-connected devices with the included remote without any additional programming. To use CEC, you to highlight CEC Settings and press OK. Use the Arrow buttons on the remote to adjust each setting: • CEC Function - E320VT / E370VT / E420VT 5 Enabling or Disabling...
E370VT User Manual
Page 26
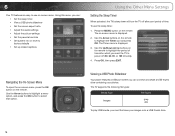
... menu option, and press the OK button to highlight the period of time after a set period of time. Press the MENU button on the remote to highlight the Timer icon and press OK. The Timer menu is displayed. 2. The TV supports the following file types: Media Type File Types... a USB photo slideshow • Set the screen aspect ratio • Adjust the audio settings • Adjust the picture settings • Set the parental controls • Get system info or reset to factory defaults • Set up closed captions Using the Other Menu Settings Setting the Sleep Timer When activated...
... menu option, and press the OK button to highlight the period of time after a set period of time. Press the MENU button on the remote to highlight the Timer icon and press OK. The Timer menu is displayed. 2. The TV supports the following file types: Media Type File Types... a USB photo slideshow • Set the screen aspect ratio • Adjust the audio settings • Adjust the picture settings • Set the parental controls • Get system info or reset to factory defaults • Set up closed captions Using the Other Menu Settings Setting the Sleep Timer When activated...

E370VT User Manual
Page 35
...If you to highlight the rating type and press OK. 3. From the Parental Controls menu, highlight Rating Enable and press OK. TV - E320VT / E370VT / E420VT 6 Setting the Parental Controls The TV's parental controls allow you have not set a custom passcode, the default is 0000. Press the... MENU button on the remote to prevent the TV from viewing inappropriate material. Highlight the...
...If you to highlight the rating type and press OK. 3. From the Parental Controls menu, highlight Rating Enable and press OK. TV - E320VT / E370VT / E420VT 6 Setting the Parental Controls The TV's parental controls allow you have not set a custom passcode, the default is 0000. Press the... MENU button on the remote to prevent the TV from viewing inappropriate material. Highlight the...

E370VT User Manual
Page 36
...accessing inappropriate material. 1. Viewing System Info and Resetting to Factory Defaults You can use the Number Pad on the remote to re-enter your new 4-digit parental control passcode. 4. When you want to RESET ALL LOCKS SETTINGS to the factory defaults?" 2. The Change PIN menu...: 1. Highlight Yes and press OK. 6 E320VT / E370VT / E420VT Changing the Parental Control Passcode If you use the Number Pad on the remote to enter your new 4-digit parental control passcode. 3. In the New Pin field, use the parental controls, you should change the passcode to the factory-default settings...
...accessing inappropriate material. 1. Viewing System Info and Resetting to Factory Defaults You can use the Number Pad on the remote to re-enter your new 4-digit parental control passcode. 4. When you want to RESET ALL LOCKS SETTINGS to the factory defaults?" 2. The Change PIN menu...: 1. Highlight Yes and press OK. 6 E320VT / E370VT / E420VT Changing the Parental Control Passcode If you use the Number Pad on the remote to enter your new 4-digit parental control passcode. 3. In the New Pin field, use the parental controls, you should change the passcode to the factory-default settings...
E370VT User Manual
Page 39
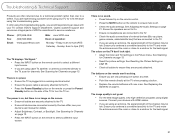
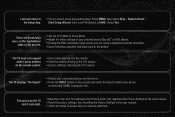
...If you are integral parts of the channel may be low. See Scanning for the best signal. Connect your devices with your TV, contact VIZIO's Support Department. Ensure your TV, try to select a different input source. Quality customer support and service are experiencing a problem when using ... source. • If you are set to On. • Ensure no sound. • Press Volume Up on the remote control. • Press the MUTE button on the remote aren't working electrical outlet. • Ensure the power cable is no headphones are connected to the TV, scan for details....
...If you are integral parts of the channel may be low. See Scanning for the best signal. Connect your devices with your TV, contact VIZIO's Support Department. Ensure your TV, try to select a different input source. Quality customer support and service are experiencing a problem when using ... source. • If you are set to On. • Ensure no sound. • Press Volume Up on the remote control. • Press the MUTE button on the remote aren't working electrical outlet. • Ensure the power cable is no headphones are connected to the TV, scan for details....

E370VT Quick Start Guide
Page 2
PACKAGE CONTENTS 1 Remote Control with Batteries VIZIO LCD HDTV with Base Cleaning Cloth RF Adapter User Manual and Quick Start Guide
PACKAGE CONTENTS 1 Remote Control with Batteries VIZIO LCD HDTV with Base Cleaning Cloth RF Adapter User Manual and Quick Start Guide
E370VT Quick Start Guide
Page 3
.../Down: Increase or decrease the loudness of the button, the channel will increase or decrease by one. USING THE REMOTE Input CC Exit OK Back V Button Volume Up/Down Mute Number Pad Wide Power/Standby A/V Controls Info Menu Arrow Channel Up/Down Last Dash (-) Power/Standby: Turn the TV on -screen menu...
.../Down: Increase or decrease the loudness of the button, the channel will increase or decrease by one. USING THE REMOTE Input CC Exit OK Back V Button Volume Up/Down Mute Number Pad Wide Power/Standby A/V Controls Info Menu Arrow Channel Up/Down Last Dash (-) Power/Standby: Turn the TV on -screen menu...
E370VT Quick Start Guide
Page 15
... Yes. The TV displays "No Signal" • Ensure your connected devices are turned on. • Press the INPUT button on the remote control. • Insert new batteries into the remote. • Point the remote directly at the TV's sensor. • Ensure nothing is connected (HDMI, Composite, etc). Press MENU, then select Help > System Reset.../ sides of your PIN (default is 0000). See Adjusting the Picture Settings in the user manual. • Reset the picture settings. I press buttons on the remote and select the input to which your device is blocking the TV's sensor.
... Yes. The TV displays "No Signal" • Ensure your connected devices are turned on. • Press the INPUT button on the remote control. • Insert new batteries into the remote. • Point the remote directly at the TV's sensor. • Ensure nothing is connected (HDMI, Composite, etc). Press MENU, then select Help > System Reset.../ sides of your PIN (default is 0000). See Adjusting the Picture Settings in the user manual. • Reset the picture settings. I press buttons on the remote and select the input to which your device is blocking the TV's sensor.

