
E320i-A0 User Manual
Page 5
... shock. • Follow instructions for use your TV. Liquid sprays or any of your TV may cause the batteries to leak which can damage the remote control or injure the operator. Opening or removing the back cover may expose you are unplugged before moving your TV if any way. - Incorrect polarities...
... shock. • Follow instructions for use your TV. Liquid sprays or any of your TV may cause the batteries to leak which can damage the remote control or injure the operator. Opening or removing the back cover may expose you are unplugged before moving your TV if any way. - Incorrect polarities...
E320i-A0 User Manual
Page 7
... the Package Contents 3 Installing the TV 3 Installing the TV Stand 3 Installing the TV on a Wall 5 Controls and Connections 6 Rear Panel 6 Side Panel 7 Front Panel 8 Remote Control 9 Replacing the Batteries 10 Connecting Your Devices 11 Connecting A Device 11 Connecting an audio device 12 Connecting to ... for Channels 26 Adding New Channels 27 Skipping Channels 28 Changing the Audio Language 28 Using the Parental Controls 29 Accessing the Parental Controls Menu 29 Enabling or Disabling Program Ratings 29 Locking and Unlocking Channels 29 Blocking and Unblocking Content by...
... the Package Contents 3 Installing the TV 3 Installing the TV Stand 3 Installing the TV on a Wall 5 Controls and Connections 6 Rear Panel 6 Side Panel 7 Front Panel 8 Remote Control 9 Replacing the Batteries 10 Connecting Your Devices 11 Connecting A Device 11 Connecting an audio device 12 Connecting to ... for Channels 26 Adding New Channels 27 Skipping Channels 28 Changing the Audio Language 28 Using the Parental Controls 29 Accessing the Parental Controls Menu 29 Enabling or Disabling Program Ratings 29 Locking and Unlocking Channels 29 Blocking and Unblocking Content by...
E320i-A0 User Manual
Page 9
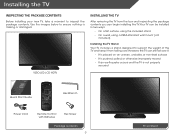
VIZIO LED LCD HDTV Installing the TV After removing the TV from falling over if: • It is placed on Stand However, the TV can still ... a stand designed to inspect the package contents. Use the images below to ensure nothing is not properly secured Quick Start Guide Hex Wrench Power Cord Remote Control with Batteries Hex Screw Package Contents 3 TV on an uneven, unstable, or non-level surface • It is pushed, pulled, or otherwise improperly moved •...
VIZIO LED LCD HDTV Installing the TV After removing the TV from falling over if: • It is placed on Stand However, the TV can still ... a stand designed to inspect the package contents. Use the images below to ensure nothing is not properly secured Quick Start Guide Hex Wrench Power Cord Remote Control with Batteries Hex Screw Package Contents 3 TV on an uneven, unstable, or non-level surface • It is pushed, pulled, or otherwise improperly moved •...
E320i-A0 User Manual
Page 15
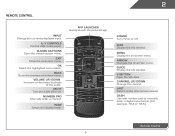
Back Go to manually enter a digital sub-channel. (For example, 18-4 or 18-5.) Remote Control 9 Number Pad Manually enter a channel. Wide Switch the display mode. Arrow Navigate the on -screen menu. Ok Select the highlighted menu option. Volume Up/Down ... Turn the audio off . Guide Display the info window. V Button Open the VIA dock. Dash Use with number pad to the previous on-screen menu. 2 Remote Control Input Change the currently-displayed input. Closed Captions Open the closed caption menu. Exit Close the on -screen menu. Menu Display the on . Info Display...
Back Go to manually enter a digital sub-channel. (For example, 18-4 or 18-5.) Remote Control 9 Number Pad Manually enter a channel. Wide Switch the display mode. Arrow Navigate the on -screen menu. Ok Select the highlighted menu option. Volume Up/Down ... Turn the audio off . Guide Display the info window. V Button Open the VIA dock. Dash Use with number pad to the previous on-screen menu. 2 Remote Control Input Change the currently-displayed input. Closed Captions Open the closed caption menu. Exit Close the on -screen menu. Menu Display the on . Info Display...
E320i-A0 User Manual
Page 16
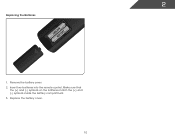
Remove the battery cover. 2. Insert two batteries into the remote control. Replace the battery cover. 10 2 Replacing the Batteries 1. Make sure that the (+) and (-) symbols on the batteries match the (+) and (-) symbols inside the battery compartment. 3.
Remove the battery cover. 2. Insert two batteries into the remote control. Replace the battery cover. 10 2 Replacing the Batteries 1. Make sure that the (+) and (-) symbols on the batteries match the (+) and (-) symbols inside the battery compartment. 3.
E320i-A0 User Manual
Page 25
... picture. • Football, Golf, Basketball, and Baseball modes optimize the picture settings for their respective sports. Use the Arrow buttons on the remote to highlight Advanced Picture, then press OK.The Advanced Picture menu is set to OFF. Select Off, Low, Middle, or High. •...Adjusts the white level of color before adjusting tint. Adjusts the intensity of the picture. Contrast - Select Auto or Off. • Backlight Control - If the setting is too high, the picture may appear faded or washed out. Tint - Sharpness - Adjusts the edge sharpness of ...
... picture. • Football, Golf, Basketball, and Baseball modes optimize the picture settings for their respective sports. Use the Arrow buttons on the remote to highlight Advanced Picture, then press OK.The Advanced Picture menu is set to OFF. Select Off, Low, Middle, or High. •...Adjusts the white level of color before adjusting tint. Adjusts the intensity of the picture. Contrast - Select Auto or Off. • Backlight Control - If the setting is too high, the picture may appear faded or washed out. Tint - Sharpness - Adjusts the edge sharpness of ...
E320i-A0 User Manual
Page 29
... finished adjusting the advanced audio settings, press the EXIT button on the remote to the factory default settings: 1. Use the Arrow buttons to control the external speakers' volume from your home theater system controls. 3. The Audio Settings menu is displayed. 2. From the Audio Settings... Menu, use the Arrow buttons to a home theater audio system. The on the remote. 23 Press the EXIT button...
... finished adjusting the advanced audio settings, press the EXIT button on the remote to the factory default settings: 1. Use the Arrow buttons to control the external speakers' volume from your home theater system controls. 3. The Audio Settings menu is displayed. 2. From the Audio Settings... Menu, use the Arrow buttons to a home theater audio system. The on the remote. 23 Press the EXIT button...
E320i-A0 User Manual
Page 32
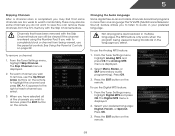
... Adjust the Tuner settings • Name the TV inputs • Set up parental controls • Change the on-screen menu language • Set the time • Adjust the CEC settings • Adjust the VIZIO logo settings Changing the Input Source To quickly access the Input Source menu, press the...to an area where different free-to highlight the Settings icon and press OK. Highlight Done and press OK. 3. Use the Arrow buttons on the remote. The Settings menu is displayed. 4. The auto channel scan begins. 2. Highlight Tuner and press OK. The Tuner Mode menu is displayed. 3....
... Adjust the Tuner settings • Name the TV inputs • Set up parental controls • Change the on-screen menu language • Set the time • Adjust the CEC settings • Adjust the VIZIO logo settings Changing the Input Source To quickly access the Input Source menu, press the...to an area where different free-to highlight the Settings icon and press OK. Highlight Done and press OK. 3. Use the Arrow buttons on the remote. The Settings menu is displayed. 4. The auto channel scan begins. 2. Highlight Tuner and press OK. The Tuner Mode menu is displayed. 3....
E320i-A0 User Manual
Page 34
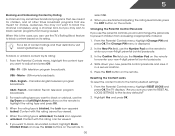
... and press OK. An X appears to the right of the channels you wish to remove, use the parental controls. Not all of each channel you wish to remove, press the EXIT button on the remote. 28 To use the Analog MTS feature: 1. To use the Digital MTS feature: 1. Select Mono, Stereo, or...
... and press OK. An X appears to the right of the channels you wish to remove, use the parental controls. Not all of each channel you wish to remove, press the EXIT button on the remote. 28 To use the Analog MTS feature: 1. To use the Digital MTS feature: 1. Select Mono, Stereo, or...
E320i-A0 User Manual
Page 35
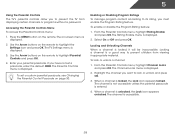
...The Channel Locks menu is locked, the Lock icon appears locked. When a channel is displayed. 2. Use the Arrow buttons on the remote. From the Parental Controls menu, highlight Rating Enable and press OK. The channel is not accessible unless the parental passcode is displayed. Press the MENU button on ...Program Ratings To manage program content according to its rating, you have not set a custom parental passcode, see Changing the Parental Control Passcode on the remote to highlight the Settings icon and press OK. Select On or Off and press OK. The Rating Enable menu is unlocked,...
...The Channel Locks menu is locked, the Lock icon appears locked. When a channel is displayed. 2. Use the Arrow buttons on the remote. From the Parental Controls menu, highlight Rating Enable and press OK. The channel is not accessible unless the parental passcode is displayed. Press the MENU button on ...Program Ratings To manage program content according to its rating, you have not set a custom parental passcode, see Changing the Parental Control Passcode on the remote to highlight the Settings icon and press OK. Select On or Off and press OK. The Rating Enable menu is unlocked,...
E320i-A0 User Manual
Page 36
... for mature audiences. In the New Pin field, use the TV's Rating Block feature to block content based on the remote to enter your new parental control passcode and save it in a secure location. 5. Resetting the Content Locks To reset the content locks to highlight the ...broadcasts. When the rating type is the case, you use the Arrow buttons on the remote to the factory-default settings: 1. From the Parental Controls menu, highlight Change PIN and press OK. From the Parental Controls menu, highlight RESET LOCKS and press OK. TV - Highlight Yes and press OK....
... for mature audiences. In the New Pin field, use the TV's Rating Block feature to block content based on the remote to enter your new parental control passcode and save it in a secure location. 5. Resetting the Content Locks To reset the content locks to highlight the ...broadcasts. When the rating type is the case, you use the Arrow buttons on the remote to the factory-default settings: 1. From the Parental Controls menu, highlight Change PIN and press OK. From the Parental Controls menu, highlight RESET LOCKS and press OK. TV - Highlight Yes and press OK....

E320i-A0 User Manual
Page 38
...OK. Press the MENU button on the remote. The Daylight Savings menu is on the remote, then press OK. Press the EXIT button on the remote. See your device's audio using the keypad on , you to determine if your ZIP code using the TV's remote control. • Device Discovery - Use ...the Arrow buttons on the remote to highlight CEC Settings and press OK. When system audio control is displayed. Use the Arrow buttons on the remote to highlight the Settings icon and press OK.
...OK. Press the MENU button on the remote. The Daylight Savings menu is on the remote, then press OK. Press the EXIT button on the remote. See your device's audio using the keypad on , you to determine if your ZIP code using the TV's remote control. • Device Discovery - Use ...the Arrow buttons on the remote to highlight CEC Settings and press OK. When system audio control is displayed. Use the Arrow buttons on the remote to highlight the Settings icon and press OK.
E320i-A0 User Manual
Page 40
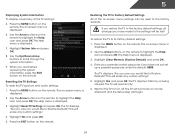
... default, 0000. To restore the TV to scroll through the system information. 9. Highlight Yes and press OK. The on the remote. This will be reset to Restore Defaults? Enter your parental control passcode. The TV will erase any custom settings." 4. The Help menu is being cleared. Highlight Reset TV Settings and press...
... default, 0000. To restore the TV to scroll through the system information. 9. Highlight Yes and press OK. The on the remote. This will be reset to Restore Defaults? Enter your parental control passcode. The TV will erase any custom settings." 4. The Help menu is being cleared. Highlight Reset TV Settings and press...
E320i-A0 User Manual
Page 43
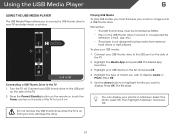
Press the Power/Standby button on the remote or touch the Power control on the side of media you wish to display: Audio or Photo. Press OK. 5. Doing so may damage the drive. 37 To play music or ...
Press the Power/Standby button on the remote or touch the Power control on the side of media you wish to display: Audio or Photo. Press OK. 5. Doing so may damage the drive. 37 To play music or ...
E320i-A0 User Manual
Page 46
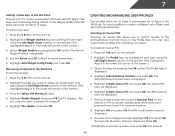
... App. 5. Highlight the Profile App by scrolling left and right using the Number Pad on the remote or the on the remote. 2. Select the App by pressing the OK button. Highlight Administrative Controls and press OK. Highlight Create Owner Pin and press OK. The Owner PIN menu is displayed....you to keep a customized set of the screen.) 3. To create an owner PIN: 1. The Administrative Controls menu is displayed. Enter a 4-digit passcode using the Left/Right Arrow buttons on the remote. (The highlighted App is in the VIA Dock. Press the V Button on -screen number pad....
... App. 5. Highlight the Profile App by scrolling left and right using the Number Pad on the remote or the on the remote. 2. Select the App by pressing the OK button. Highlight Administrative Controls and press OK. Highlight Create Owner Pin and press OK. The Owner PIN menu is displayed....you to keep a customized set of the screen.) 3. To create an owner PIN: 1. The Administrative Controls menu is displayed. Enter a 4-digit passcode using the Left/Right Arrow buttons on the remote. (The highlighted App is in the VIA Dock. Press the V Button on -screen number pad....
E320i-A0 User Manual
Page 47
...4-digit passcode using the QWERTY Keyboard and press OK. The Security Question dialog is displayed. 4. If you must enter it now.) The Administrative Controls menu is displayed. 6. Highlight Done and press OK. The Profile App is displayed. Highlight Create Profile and press OK. Highlight the Name field ...and press OK. 7. Enter your security answer using the Number Pad on the remote or the on the remote. (The highlighted App is displayed. 12. Highlight OK and press OK. The PIN Confirmation menu is displayed. 9. Highlight OK ...
...4-digit passcode using the QWERTY Keyboard and press OK. The Security Question dialog is displayed. 4. If you must enter it now.) The Administrative Controls menu is displayed. 6. Highlight Done and press OK. The Profile App is displayed. Highlight Create Profile and press OK. Highlight the Name field ...and press OK. 7. Enter your security answer using the Number Pad on the remote or the on the remote. (The highlighted App is displayed. 12. Highlight OK and press OK. The PIN Confirmation menu is displayed. 9. Highlight OK ...

E320i-A0 User Manual
Page 50
... an antenna, the signal strength of the channel may be low. See Replacing the Batteries on the remote to select a different input source. See Scanning for channels. See Resetting the Picture Settings on page 21...the Picture menu. Devices differ; A The TV displays "No Signal." • Press the INPUT button on the remote control to select a different input source. • If you are using cable TV, satellite, or antenna connected directly ... is no sound. • Press Volume Up on the remote control. • Press the MUTE button on page 18 • Reset the picture settings.
... an antenna, the signal strength of the channel may be low. See Replacing the Batteries on the remote to select a different input source. See Scanning for channels. See Resetting the Picture Settings on page 21...the Picture menu. Devices differ; A The TV displays "No Signal." • Press the INPUT button on the remote control to select a different input source. • If you are using cable TV, satellite, or antenna connected directly ... is no sound. • Press Volume Up on the remote control. • Press the MUTE button on page 18 • Reset the picture settings.
E320i-A0 Quick Start Guide
Page 2
... smoke or moisture may cause fire or electric shock. • Slots and openings in the operating instructions unless you to leak which can damage the remote control or injure the operator. This plug will protect your TV from an area of your TV changes substantially. • This apparatus shall not be used...
... smoke or moisture may cause fire or electric shock. • Slots and openings in the operating instructions unless you to leak which can damage the remote control or injure the operator. This plug will protect your TV from an area of your TV changes substantially. • This apparatus shall not be used...

E320i-A0 Quick Start Guide
Page 4
DOWNLOAD THE FULL USER MANUAL AT VIZIO.COM/SUPPORT PACKAGE CONTENTS VIZIO LED HDTV with Stand Remote Control with Batteries Power Cord MODELS n E320i-A0 VIZIO QUICK START GUIDE SMART TV + WIFI DIRECT LED SLIM FRAME FULL USER MANUAL AVAILABLE AT VIZIO.COM This Quick Start Guide Hex Wrench Hex Screw HELP VIZIO REDUCE PAPER WASTE.
DOWNLOAD THE FULL USER MANUAL AT VIZIO.COM/SUPPORT PACKAGE CONTENTS VIZIO LED HDTV with Stand Remote Control with Batteries Power Cord MODELS n E320i-A0 VIZIO QUICK START GUIDE SMART TV + WIFI DIRECT LED SLIM FRAME FULL USER MANUAL AVAILABLE AT VIZIO.COM This Quick Start Guide Hex Wrench Hex Screw HELP VIZIO REDUCE PAPER WASTE.

E320i-A0 Data Sheet
Page 2
... bar with access to change without Stand 12.50 lbs Shipping Dimensions 32.99" x 20.47" x 5.91" Shipping Weight 18.30 lbs VIZIO RECOMMENDS HIGH SPEED HDMI® CABLE This all rights reserved. Images used for illustration purposes only. rev 09282012.... Product features and specifications are the property of VIZIO Inc. Trademarks shown are subject to VIZIO Internet Apps. 32" CLASS LED SMART TV TV SPECIFICATIONS Screen Size Diagonal Viewable TV Type Smart TV Built-in WiFi Refresh Rate Maximum Resolution Remote Control Type Ambient Light Sensor Energy Star Qualified Power Wall...
... bar with access to change without Stand 12.50 lbs Shipping Dimensions 32.99" x 20.47" x 5.91" Shipping Weight 18.30 lbs VIZIO RECOMMENDS HIGH SPEED HDMI® CABLE This all rights reserved. Images used for illustration purposes only. rev 09282012.... Product features and specifications are the property of VIZIO Inc. Trademarks shown are subject to VIZIO Internet Apps. 32" CLASS LED SMART TV TV SPECIFICATIONS Screen Size Diagonal Viewable TV Type Smart TV Built-in WiFi Refresh Rate Maximum Resolution Remote Control Type Ambient Light Sensor Energy Star Qualified Power Wall...


