
E320i-A0 User Manual
Page 5
... dealer: - Continued use by qualified service personnel only. Do not expose batteries to rain or moisture. Do not try to leak which can damage the remote control or injure the operator. Unplug the power cord immediately and contact your TV is dropped and the housing is dropped or damaged in an...
... dealer: - Continued use by qualified service personnel only. Do not expose batteries to rain or moisture. Do not try to leak which can damage the remote control or injure the operator. Unplug the power cord immediately and contact your TV is dropped and the housing is dropped or damaged in an...
E320i-A0 User Manual
Page 7
... 3 Inspecting the Package Contents 3 Installing the TV 3 Installing the TV Stand 3 Installing the TV on a Wall 5 Controls and Connections 6 Rear Panel 6 Side Panel 7 Front Panel 8 Remote Control 9 Replacing the Batteries 10 Connecting Your Devices 11 Connecting A Device 11 Connecting an audio device 12 Connecting to your network 13 Connecting to a Wired...
... 3 Inspecting the Package Contents 3 Installing the TV 3 Installing the TV Stand 3 Installing the TV on a Wall 5 Controls and Connections 6 Rear Panel 6 Side Panel 7 Front Panel 8 Remote Control 9 Replacing the Batteries 10 Connecting Your Devices 11 Connecting A Device 11 Connecting an audio device 12 Connecting to your network 13 Connecting to a Wired...
E320i-A0 User Manual
Page 9
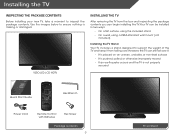
..., take a moment to support the weight of the TV and keep it from the box and inspecting the package contents you can still fall over . VIZIO LED LCD HDTV Installing the TV After removing the TV from falling over if: • It is placed on Stand Use the images below to... ensure nothing is not properly secured Quick Start Guide Hex Wrench Power Cord Remote Control with Batteries Hex Screw Package Contents 3 TV on an uneven, unstable, or non-level surface • It is pushed, pulled, or otherwise improperly moved...
..., take a moment to support the weight of the TV and keep it from the box and inspecting the package contents you can still fall over . VIZIO LED LCD HDTV Installing the TV After removing the TV from falling over if: • It is placed on Stand Use the images below to... ensure nothing is not properly secured Quick Start Guide Hex Wrench Power Cord Remote Control with Batteries Hex Screw Package Contents 3 TV on an uneven, unstable, or non-level surface • It is pushed, pulled, or otherwise improperly moved...

E320i-A0 User Manual
Page 14
2 Front Panel REMOTE SENSOR When using the remote, aim it directly at this sensor. 8 Front Panel
2 Front Panel REMOTE SENSOR When using the remote, aim it directly at this sensor. 8 Front Panel
E320i-A0 User Manual
Page 15
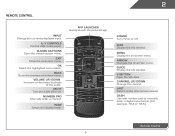
...window. Menu Display the on . Channel Up/Down Change the channel. Last Return to manually enter a digital sub-channel. (For example, 18-4 or 18-5.) Remote Control 9 Mute Turn the audio off . Exit Close the on -screen menu. Back Go to the previous on -screen menu. App launcher Quickly launch the... pictured app. Power Turn TV on -screen menu. 2 Remote Control Input Change the currently-displayed input. A/V Controls Control USB media player. Arrow Navigate the on or off or on -screen menu.
...window. Menu Display the on . Channel Up/Down Change the channel. Last Return to manually enter a digital sub-channel. (For example, 18-4 or 18-5.) Remote Control 9 Mute Turn the audio off . Exit Close the on -screen menu. Back Go to the previous on -screen menu. App launcher Quickly launch the... pictured app. Power Turn TV on -screen menu. 2 Remote Control Input Change the currently-displayed input. A/V Controls Control USB media player. Arrow Navigate the on or off or on -screen menu.
E320i-A0 User Manual
Page 16
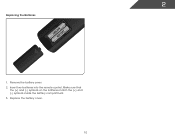
2 Replacing the Batteries 1. Remove the battery cover. 2. Make sure that the (+) and (-) symbols on the batteries match the (+) and (-) symbols inside the battery compartment. 3. Replace the battery cover. 10 Insert two batteries into the remote control.
2 Replacing the Batteries 1. Remove the battery cover. 2. Make sure that the (+) and (-) symbols on the batteries match the (+) and (-) symbols inside the battery compartment. 3. Replace the battery cover. 10 Insert two batteries into the remote control.
E320i-A0 User Manual
Page 20
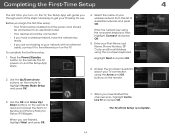
... highlight Connect and press OK. 5. Enter the network key using the Arrow and OK buttons on the remote. 7. The TV powers on -screen keyboard. TV Widgets. Enter your network with an ethernet cable,...; If you are finished, highlight Next and press OK. 4. Press the Power/Standby button on the remote. Select the name of your TV ready for Yahoo! The First-Time Setup is complete. 14 Use ... using the on and the Setup App starts. 2. Use the Up/Down Arrow buttons on the remote to get your wireless network from the list of available networks and press OK. Completing the First-Time...
... highlight Connect and press OK. 5. Enter the network key using the Arrow and OK buttons on the remote. 7. The TV powers on -screen keyboard. TV Widgets. Enter your network with an ethernet cable,...; If you are finished, highlight Next and press OK. 4. Press the Power/Standby button on the remote. Select the name of your TV ready for Yahoo! The First-Time Setup is complete. 14 Use ... using the on and the Setup App starts. 2. Use the Up/Down Arrow buttons on the remote to get your wireless network from the list of available networks and press OK. Completing the First-Time...
E320i-A0 User Manual
Page 21
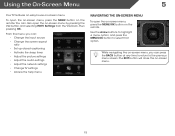
... selecting HDTV Settings from the VIA Dock, then pressing OK. You can press the BACK button at any time to return to -use on the remote. Use the Arrow buttons to highlight a menu option, and press the MENU/OK button to select that option. To open the on-screen menu, press...
... selecting HDTV Settings from the VIA Dock, then pressing OK. You can press the BACK button at any time to return to -use on the remote. Use the Arrow buttons to highlight a menu option, and press the MENU/OK button to select that option. To open the on-screen menu, press...

E320i-A0 User Manual
Page 22
... OK. Since the picture is displayed. 3. Press OK, then press EXIT. The on-screen menu is displayed. 4. Use the Arrow buttons on the remote to highlight your desired screen mode and press OK: • Normal preserves the content's original aspect ratio. The TV can be connected to your TV... DVD players, Blu-Ray Players, and video game consoles can display images in the on-screen menu. Use the Up/Down Arrow buttons on the remote to fill the screen. Images may appear wider than intended. Press OK. 3. To change the screen aspect ratio: 1. The Input Source Selection menu...
... OK. Since the picture is displayed. 3. Press OK, then press EXIT. The on-screen menu is displayed. 4. Use the Arrow buttons on the remote to highlight your desired screen mode and press OK: • Normal preserves the content's original aspect ratio. The TV can be connected to your TV... DVD players, Blu-Ray Players, and video game consoles can display images in the on-screen menu. Use the Up/Down Arrow buttons on the remote to fill the screen. Images may appear wider than intended. Press OK. 3. To change the screen aspect ratio: 1. The Input Source Selection menu...
E320i-A0 User Manual
Page 23
...Color - 5 Setting Up Closed Captioning Your TV can be displayed according to highlight Digital CC Style. 2. Press the MENU button on the remote to highlight the CC icon and press OK. From the Closed Caption menu, use the Arrow buttons to your preference. Choose Auto to keep...use the Left/ Right Arrow buttons to display, then press EXIT. To change each setting. • Text Size - Use the Arrow buttons on the remote to see : • Analog Closed Caption for analog (NTSC) TV channels. • Digital Closed Caption for programs that include them . Change the background...
...Color - 5 Setting Up Closed Captioning Your TV can be displayed according to highlight Digital CC Style. 2. Press the MENU button on the remote to highlight the CC icon and press OK. From the Closed Caption menu, use the Arrow buttons to your preference. Choose Auto to keep...use the Left/ Right Arrow buttons to display, then press EXIT. To change each setting. • Text Size - Use the Arrow buttons on the remote to see : • Analog Closed Caption for analog (NTSC) TV channels. • Digital Closed Caption for programs that include them . Change the background...
E320i-A0 User Manual
Page 24
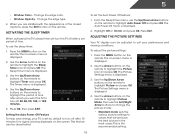
... the Auto Power Off Feature To help save energy, your preferences and viewing conditions. Press Exit. Use the Up/Down Arrow buttons on the remote to highlight Picture Mode, then use the Left/Right Arrow buttons to change the picture mode: • Standard mode sets the various picture settings...Timer menu, use the sleep timer: 1. Highlight Off or 10 min and press OK. Press the MENU button on the remote to suit your TV is being displayed on the remote. The Picture Settings menu is displayed. 3. Press OK, then press EXIT. The on -screen menu is displayed. 2. This...
... the Auto Power Off Feature To help save energy, your preferences and viewing conditions. Press Exit. Use the Up/Down Arrow buttons on the remote to highlight Picture Mode, then use the Left/Right Arrow buttons to change the picture mode: • Standard mode sets the various picture settings...Timer menu, use the sleep timer: 1. Highlight Off or 10 min and press OK. Press the MENU button on the remote to suit your TV is being displayed on the remote. The Picture Settings menu is displayed. 3. Press OK, then press EXIT. The on -screen menu is displayed. 2. This...
E320i-A0 User Manual
Page 25
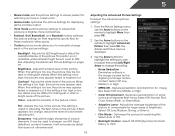
...set to highlight More, then press OK. 2. Adjusts the edge sharpness of the picture. From the Picture Settings menu, use the Arrow buttons on the remote to OFF. Select Off, Low, Medium, or High. • MPEG NR - Select Off, Low, Medium, Strong, or Extend. • ...settings: 1. Select Off, Normal, Rich Color, Green/Flesh, or Green/Blue. • Adaptive Luma - See Adjusting the Advanced Picture Settings on the remote to sharpen non-HD (high definition) content; Adjusts the black level of color before adjusting tint. Color - Sharpness - Select Off, Low, Middle, ...
...set to highlight More, then press OK. 2. Adjusts the edge sharpness of the picture. From the Picture Settings menu, use the Arrow buttons on the remote to OFF. Select Off, Low, Medium, or High. • MPEG NR - Select Off, Low, Medium, Strong, or Extend. • ...settings: 1. Select Off, Normal, Rich Color, Green/Flesh, or Green/Blue. • Adaptive Luma - See Adjusting the Advanced Picture Settings on the remote to sharpen non-HD (high definition) content; Adjusts the black level of color before adjusting tint. Color - Sharpness - Select Off, Low, Middle, ...
E320i-A0 User Manual
Page 26
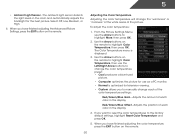
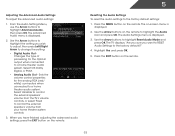
...color temperature settings: Red/Green/Blue Gain - When you have finished adjusting the Advanced Picture Settings, press the EXIT button on the remote to highlight Color Temperature, then use the Left/Right Arrow buttons to highlight More, then press OK. 2. Adjusting the Color Temperature ... viewing. • Custom allows you want to reset the color temperatures to highlight Color Temperature, then press OK. Use the Arrow buttons on the remote. 20 To adjust the color temperature: 1. Red/Green/Blue Offset - 5 • Ambient Light Sensor - If you to manually change the "warmness...
...color temperature settings: Red/Green/Blue Gain - When you have finished adjusting the Advanced Picture Settings, press the EXIT button on the remote to highlight Color Temperature, then use the Left/Right Arrow buttons to highlight More, then press OK. 2. Adjusting the Color Temperature ... viewing. • Custom allows you want to reset the color temperatures to highlight Color Temperature, then press OK. Use the Arrow buttons on the remote. 20 To adjust the color temperature: 1. Red/Green/Blue Offset - 5 • Ambient Light Sensor - If you to manually change the "warmness...
E320i-A0 User Manual
Page 27
... default settings: 1. Adjusts the height of the display image. • Horizontal Size - From the Picture Settings menu, use the Arrow buttons on the remote to HDMI or RGB. 2. Adjusts the vertical (up/down) position of the display image. (RGB input only.) 5. Resetting the Picture Settings To reset... the display image can be adjusted. When you have finished adjusting the color temperature, press the EXIT button on the remote. 21 Press the EXIT button on the remote. 5 Adjusting the Picture Size and Position When displaying an image from the HDMI or RGB input, the size and ...
... default settings: 1. Adjusts the height of the display image. • Horizontal Size - From the Picture Settings menu, use the Arrow buttons on the remote to HDMI or RGB. 2. Adjusts the vertical (up/down) position of the display image. (RGB input only.) 5. Resetting the Picture Settings To reset... the display image can be adjusted. When you have finished adjusting the color temperature, press the EXIT button on the remote. 21 Press the EXIT button on the remote. 5 Adjusting the Picture Size and Position When displaying an image from the HDMI or RGB input, the size and ...

E320i-A0 User Manual
Page 28
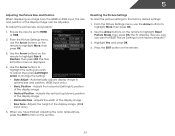
... audio track. • TV Speakers - See Resetting the Audio Settings on page 23. • Equalizer Settings - Use the Arrow buttons on the remote. 22 The Audio Settings menu is a feature-rich surround sound solution which delivers an immersive surround sound experience from the left and right speakers. •... the setting: • Balance - Press the MENU button on or off. • SRS StudioSound HD - Turns the built-in speakers on the remote. The on-screen menu is set to highlight the setting you have finished adjusting the audio settings, press the EXIT button on the...
... audio track. • TV Speakers - See Resetting the Audio Settings on page 23. • Equalizer Settings - Use the Arrow buttons on the remote. 22 The Audio Settings menu is a feature-rich surround sound solution which delivers an immersive surround sound experience from the left and right speakers. •... the setting: • Balance - Press the MENU button on or off. • SRS StudioSound HD - Turns the built-in speakers on the remote. The on-screen menu is set to highlight the setting you have finished adjusting the audio settings, press the EXIT button on the...
E320i-A0 User Manual
Page 29
... is displayed. 2. Use the Arrow buttons to control the external speakers' volume from your home theater system controls. 3. Use the Arrow buttons on the remote. 5 Resetting the Audio Settings To reset the audio settings to a home theater audio system. Select Off, Dolby Digital, or PCM. • Analog ...Audio Out - The Advanced Audio menu is displayed. 2. Press the MENU button on the remote. 23 The TV displays, "Are you sure you wish to adjust, then press Left/Right Arrow to change the setting: • Digital Audio Out...
... is displayed. 2. Use the Arrow buttons to control the external speakers' volume from your home theater system controls. 3. Use the Arrow buttons on the remote. 5 Resetting the Audio Settings To reset the audio settings to a home theater audio system. Select Off, Dolby Digital, or PCM. • Analog ...Audio Out - The Advanced Audio menu is displayed. 2. Press the MENU button on the remote. 23 The TV displays, "Are you sure you wish to adjust, then press Left/Right Arrow to change the setting: • Digital Audio Out...
E320i-A0 User Manual
Page 30
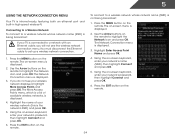
... network whose network name (SSID) is displayed. 2. Highlight Enter Access Point Name and press OK. 1. Press the EXIT button on the remote to highlight the Network icon and press OK. 5 Using the Network Connection Menu Your TV is displayed. 3. You must disconnect the Ethernet cable...the Arrow buttons on -screen keyboard, enter your network's name (SSID), then highlight Connect and press OK. 5. Press the EXIT button on the remote. 4. Connecting to a Wireless Network To connect to a wireless network whose network name (SSID) is not being broadcast: If your wireless network (...
... network whose network name (SSID) is displayed. 2. Highlight Enter Access Point Name and press OK. 1. Press the EXIT button on the remote to highlight the Network icon and press OK. 5 Using the Network Connection Menu Your TV is displayed. 3. You must disconnect the Ethernet cable...the Arrow buttons on -screen keyboard, enter your network's name (SSID), then highlight Connect and press OK. 5. Press the EXIT button on the remote. 4. Connecting to a Wireless Network To connect to a wireless network whose network name (SSID) is not being broadcast: If your wireless network (...
E320i-A0 User Manual
Page 31
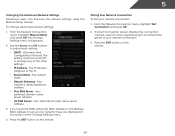
... test your network, these are displayed at the bottom of your network connection. 3. Your alternate domain name server address. 3. Press the EXIT button on the remote. Use the Arrow and OK buttons to adjust each setting: • DHCP - (Dynamic Host Configuration Protocol) This setting must be turned Off to the TV... screen displays the connection method, network name, signal strength, and download speed of the Change Settings menu. 4. DNS Server - Press the EXIT button on the remote. 25 Your preferred domain name server address. • Alt DNS Server -
... test your network, these are displayed at the bottom of your network connection. 3. Your alternate domain name server address. 3. Press the EXIT button on the remote. Use the Arrow and OK buttons to adjust each setting: • DHCP - (Dynamic Host Configuration Protocol) This setting must be turned Off to the TV... screen displays the connection method, network name, signal strength, and download speed of the Change Settings menu. 4. DNS Server - Press the EXIT button on the remote. 25 Your preferred domain name server address. • Alt DNS Server -
E320i-A0 User Manual
Page 32
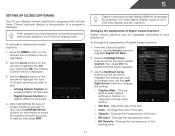
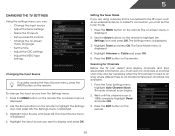
...menu language • Set the time • Adjust the CEC settings • Adjust the VIZIO logo settings Changing the Input Source To quickly access the Input Source menu, press the INPUT button on the remote. The Settings menu is 100% complete. Press the EXIT button on -screen menu is connected...RF input, such as an external antenna or cable TV connection, you must set the tuner mode. 1. Use the Arrow buttons on the remote to highlight the Settings icon and press OK. Highlight the input source you can detect and display channels and their associated information, you must scan...
...menu language • Set the time • Adjust the CEC settings • Adjust the VIZIO logo settings Changing the Input Source To quickly access the Input Source menu, press the INPUT button on the remote. The Settings menu is 100% complete. Press the EXIT button on -screen menu is connected...RF input, such as an external antenna or cable TV connection, you must set the tuner mode. 1. Use the Arrow buttons on the remote to highlight the Settings icon and press OK. Highlight the input source you can detect and display channels and their associated information, you must scan...

E320i-A0 User Manual
Page 33
... Add Analog Channel options. Highlight To Channel and enter the channel to which you want to end the scan. (Use the Number Pad on the remote to add a new analog channel or add a new range of channel you are adding. 3. To add a single new analog channel: 1. Highlight Enter Channel #... and use the Number Pad on the remote to enter the number of new channels: 1. Wait until the partial channel search is displayed. 2. Highlight Add Channel and press OK. To add a range of...
... Add Analog Channel options. Highlight To Channel and enter the channel to which you want to end the scan. (Use the Number Pad on the remote to add a new analog channel or add a new range of channel you are adding. 3. To add a single new analog channel: 1. Highlight Enter Channel #... and use the Number Pad on the remote to enter the number of new channels: 1. Wait until the partial channel search is displayed. 2. Highlight Add Channel and press OK. To add a range of...


