

E320ME User Manual
Page 2
... trademarks of SRS Labs, Inc. This product qualifies for ENERGY STAR in the "factory default" setting and this is the setting in which power savings will increase power consumption that could exceed the limits necessary to qualify for ENERGY STAR rating. Dolby and the double-D symbol are trademarks of Dolby Laboratories. ®...
... trademarks of SRS Labs, Inc. This product qualifies for ENERGY STAR in the "factory default" setting and this is the setting in which power savings will increase power consumption that could exceed the limits necessary to qualify for ENERGY STAR rating. Dolby and the double-D symbol are trademarks of Dolby Laboratories. ®...

E320ME User Manual
Page 4
... or covered. This plug will fit only into the apparatus, the apparatus has been exposed E320ME to rain or moisture, does not operate normally or has been dropped. • Unplug the power cord before cleaning your TV. • When moving the cart/ apparatus combination to avoid ...8226; Use only with the cart, stand, tripod, bracket, or table specified by the manufacturer, or sold with a third grounding pin). To totally disconnect power, unplug the power cord. • The lightning flash with a dry cloth. • Do not block any way, such as a radiator, heater, oven, amplifier etc....
... or covered. This plug will fit only into the apparatus, the apparatus has been exposed E320ME to rain or moisture, does not operate normally or has been dropped. • Unplug the power cord before cleaning your TV. • When moving the cart/ apparatus combination to avoid ...8226; Use only with the cart, stand, tripod, bracket, or table specified by the manufacturer, or sold with a third grounding pin). To totally disconnect power, unplug the power cord. • The lightning flash with a dry cloth. • Do not block any way, such as a radiator, heater, oven, amplifier etc....
E320ME User Manual
Page 5
... cause fire or electric shock. • Do not install your TV from moisture. E320ME • Do not overload power strips and extension cords. If your TV, hold the AC/DC power adapter, not the cord. Overloading can result in accordance with arrowhead symbol within an ...• CAUTION - Incorrect polarities may cause the batteries to rain or other cables are for your TV during lightning. The power cord fails or frays. - The performance of electrical shock to the presence of electric shock, do so. These servicing instructions are unplugged ...
... cause fire or electric shock. • Do not install your TV from moisture. E320ME • Do not overload power strips and extension cords. If your TV, hold the AC/DC power adapter, not the cord. Overloading can result in accordance with arrowhead symbol within an ...• CAUTION - Incorrect polarities may cause the batteries to rain or other cables are for your TV during lightning. The power cord fails or frays. - The performance of electrical shock to the presence of electric shock, do so. These servicing instructions are unplugged ...

E320ME User Manual
Page 6
... products. Lightning Protection For added protection of processing digital broadcasts. Electric Service Equipment Grounding Conductors (NEC Section 810-21) Ground Clamps Power Service Grounding Electrode System (NEC ART 250, part H) Analog-only TVs should continue to work as appropriate: FCC (US Federal ...during a lightning storm or when it could fall into such power lines or circuits. No extra converter box is left unattended or unused for long periods of the grounding electrode. E320ME Television Antenna Connection Protection If an outside antenna/satellite dish ...
... products. Lightning Protection For added protection of processing digital broadcasts. Electric Service Equipment Grounding Conductors (NEC Section 810-21) Ground Clamps Power Service Grounding Electrode System (NEC ART 250, part H) Analog-only TVs should continue to work as appropriate: FCC (US Federal ...during a lightning storm or when it could fall into such power lines or circuits. No extra converter box is left unattended or unused for long periods of the grounding electrode. E320ME Television Antenna Connection Protection If an outside antenna/satellite dish ...

E320ME User Manual
Page 8
... to the Factory Default Settingss 28 Restarting the Setup Wizard 28 Troubleshooting & Technical Support 29 The TV displays "No Signal 29 There is no power 29 The power is on, but there is no image on the screen 29 There is no sound 29 The colors on the TV don't look right...
... to the Factory Default Settingss 28 Restarting the Setup Wizard 28 Troubleshooting & Technical Support 29 The TV displays "No Signal 29 There is no power 29 The power is on, but there is no image on the screen 29 There is no sound 29 The colors on the TV don't look right...

E320ME User Manual
Page 12
... devices. Digital Audio Out: Connect SPDIF/Optical audio device (soundbar, receiver, etc). 4 Right Side Panel Controls and Connections Power Menu Channel Up Channel Down Volume Up Volume Down Input Right Side Panel Power: Turn the TV on -screen menu. Component/ Connect component or composite video/audio device. RGB PC: Connect RGB cable...
... devices. Digital Audio Out: Connect SPDIF/Optical audio device (soundbar, receiver, etc). 4 Right Side Panel Controls and Connections Power Menu Channel Up Channel Down Volume Up Volume Down Input Right Side Panel Power: Turn the TV on -screen menu. Component/ Connect component or composite video/audio device. RGB PC: Connect RGB cable...

E320ME User Manual
Page 13
... channel. Remote Control 5 With each press of the TV's audio. OK: Display the on or off. E320ME Remote Control Info Input (Specific) OK Mute Volume Up/Down Last Number Pad Input Exit Power/Standby Arrow Channel Up/Down Dash (-) A/V Controls 2 Power/Standby: Turn the TV on -screen menu or select highlighted menu option.
... channel. Remote Control 5 With each press of the TV's audio. OK: Display the on or off. E320ME Remote Control Info Input (Specific) OK Mute Volume Up/Down Last Number Pad Input Exit Power/Standby Arrow Channel Up/Down Dash (-) A/V Controls 2 Power/Standby: Turn the TV on -screen menu or select highlighted menu option.

E320ME User Manual
Page 15
See the Device Connection Chart on the remote. 4. Turn the TV on by pressing the Power/Standby button on the next page. Check the list of devices/connection types below for Channels on page 11. • RGB Make sure the desktop ...
See the Device Connection Chart on the remote. 4. Turn the TV on by pressing the Power/Standby button on the next page. Check the list of devices/connection types below for Channels on page 11. • RGB Make sure the desktop ...
E320ME User Manual
Page 17
... time you turn on the TV, the Setup App will guide you begin the first-time setup: • Your TV should be installed and the power cord should be connected to step 5. Use the Up/Down Arrow buttons on the remote, then select the input to which your preferred language, then... without a set -top box, press the EXIT button on the remote to highlight Scan, then press Right Arrow. Turn the TV on by pressing the Power/Standby button on the remote to highlight your set-top box is displayed. If the TV is connected to a cable or satellite set -top box...
... time you turn on the TV, the Setup App will guide you begin the first-time setup: • Your TV should be installed and the power cord should be connected to step 5. Use the Up/Down Arrow buttons on the remote, then select the input to which your preferred language, then... without a set -top box, press the EXIT button on the remote to highlight Scan, then press Right Arrow. Turn the TV on by pressing the Power/Standby button on the remote to highlight your set-top box is displayed. If the TV is connected to a cable or satellite set -top box...

E320ME User Manual
Page 34
... Settngs To reset the audio settings to the factory defaults?" Use the Arrow buttons to power off (30, 60, 90, or 120 minutes). 4. Press EXIT. The on the remote to highlight the Timer icon and press OK. E320ME Setting the Sleep Timer When activated, the TV's sleep timer will turn the TV...
... Settngs To reset the audio settings to the factory defaults?" Use the Arrow buttons to power off (30, 60, 90, or 120 minutes). 4. Press EXIT. The on the remote to highlight the Timer icon and press OK. E320ME Setting the Sleep Timer When activated, the TV's sleep timer will turn the TV...

E320ME User Manual
Page 37
.... • Press Volume Up on the remote control. • Press the MUTE button on the remote to service excellence. Ensure your TV, contact VIZIO's Support Department. If, after using cable TV, satellite, or antenna connected directly to select a different input source. • If you are using... when using your device's user manual for the best signal. 29 The buttons on the remote aren't working electrical outlet. • Ensure the power cable is no image on the TV don't look right. • Adust the Color and Tint settings in the Picture menu. Troubleshooting & Technical...
.... • Press Volume Up on the remote control. • Press the MUTE button on the remote to service excellence. Ensure your TV, contact VIZIO's Support Department. If, after using cable TV, satellite, or antenna connected directly to select a different input source. • If you are using... when using your device's user manual for the best signal. 29 The buttons on the remote aren't working electrical outlet. • Ensure the power cable is no image on the TV don't look right. • Adust the Color and Tint settings in the Picture menu. Troubleshooting & Technical...

E320ME User Manual
Page 39
...: Component Video Inputs: Composite Inputs: RF/Coaxial Input: USB Ports: RGB Inputs: OSD Language: Audio Outputs: Number of Speakers Watts/Channel Simulated Surround: Sound Leveler: E320ME 32" Class 31.51" 30.76 x 21.63 x 8.13" 30.76 x 19.51 x 3.29" 23.37 lbs 21.52 lbs CCFL 60 Hz 1366 x... nits 3 1 1 (Shared with Component) 1 1 1 English, Spanish, French Optical Digital Audio Out, RCA 2 10W SRS TruSurround HD, Dolby Digital SRS TruVolume Ambient Light Sensor: Compliance: Power Consumption: Voltage Range: Standby Power: B E320ME Yes Energy Star FCC Class B HDMI 1.3 140W 120~240 VAC @ 50/60 Hz
...: Component Video Inputs: Composite Inputs: RF/Coaxial Input: USB Ports: RGB Inputs: OSD Language: Audio Outputs: Number of Speakers Watts/Channel Simulated Surround: Sound Leveler: E320ME 32" Class 31.51" 30.76 x 21.63 x 8.13" 30.76 x 19.51 x 3.29" 23.37 lbs 21.52 lbs CCFL 60 Hz 1366 x... nits 3 1 1 (Shared with Component) 1 1 1 English, Spanish, French Optical Digital Audio Out, RCA 2 10W SRS TruSurround HD, Dolby Digital SRS TruVolume Ambient Light Sensor: Compliance: Power Consumption: Voltage Range: Standby Power: B E320ME Yes Energy Star FCC Class B HDMI 1.3 140W 120~240 VAC @ 50/60 Hz

E320ME User Manual
Page 40
...VIZIO service center. Zero Bright Pixel Defect Guarantee This policy covers "zero bright pixel" defects for the duration of the limited "ONE YEAR WARRANTY" on the box. This warranty does not cover, for example: cosmetic damage, normal wear and tear, improper operation, improper voltage supply or power... maintenance are warranted for the remaining portion of Service Defective Products must utilize either repair or replace the Product at VIZIO's option and sole discretion. ANY IMPLIED WARRANTIES, INCLUDING ANY IMPLIED WARRANTY OF MERCHANTABILITY AND FITNESS FOR A PARTICULAR PURPOSE...
...VIZIO service center. Zero Bright Pixel Defect Guarantee This policy covers "zero bright pixel" defects for the duration of the limited "ONE YEAR WARRANTY" on the box. This warranty does not cover, for example: cosmetic damage, normal wear and tear, improper operation, improper voltage supply or power... maintenance are warranted for the remaining portion of Service Defective Products must utilize either repair or replace the Product at VIZIO's option and sole discretion. ANY IMPLIED WARRANTIES, INCLUDING ANY IMPLIED WARRANTY OF MERCHANTABILITY AND FITNESS FOR A PARTICULAR PURPOSE...

E320ME User Manual
Page 41
...of performing such distribution, such as the cost of copyrights to the PL2.0/LGPL2.1 License Agreements. Shielded interface cables and AC power cord, if any, must accept any open source software on CD-ROM for attribution of media, shipping and handling upon request... copy of the user to radio communications. These limits are subject to any interference received, including interference that is subject to VIZIO at www.VIZIO.com. However, there is the responsibilities of gSOAP public license from that are designed to provide reasonable protection against harmful interference...
...of performing such distribution, such as the cost of copyrights to the PL2.0/LGPL2.1 License Agreements. Shielded interface cables and AC power cord, if any, must accept any open source software on CD-ROM for attribution of media, shipping and handling upon request... copy of the user to radio communications. These limits are subject to any interference received, including interference that is subject to VIZIO at www.VIZIO.com. However, there is the responsibilities of gSOAP public license from that are designed to provide reasonable protection against harmful interference...

E320ME Quick Start Guide
Page 3
... menu. Input (Specific): Change the input device. USING THE REMOTE Info Input OK Mute Volume Up/Down Last Number Pad Input Exit Power/Standby Arrow Channel Up/Down Dash (-) A/V Controls Power/Standby: Turn the TV on or off . With each press of the TV's audio. Press the button that corresponds to the...
... menu. Input (Specific): Change the input device. USING THE REMOTE Info Input OK Mute Volume Up/Down Last Number Pad Input Exit Power/Standby Arrow Channel Up/Down Dash (-) A/V Controls Power/Standby: Turn the TV on or off . With each press of the TV's audio. Press the button that corresponds to the...

E320ME Quick Start Guide
Page 6
Connect the power cord to the + and - symbols on the "V" and pushing away from the remote. Plug the power cord into place. symbols inside the battery compartment. Replace the battery cover by pressing gently on the batteries must correspond to the back of the TV. Insert the batteries. FIRST-TIME SETUP 1 2 Remove the battery cover by gently sliding it back into an electrical outlet. The + and -
Connect the power cord to the + and - symbols on the "V" and pushing away from the remote. Plug the power cord into place. symbols inside the battery compartment. Replace the battery cover by pressing gently on the batteries must correspond to the back of the TV. Insert the batteries. FIRST-TIME SETUP 1 2 Remove the battery cover by gently sliding it back into an electrical outlet. The + and -

E320ME Quick Start Guide
Page 7
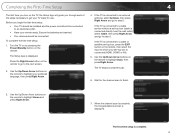
If the cable does not fit, use the included L-shaped adapter. The Setup App is displayed. Press Right Arrow to go to the TV with an RF/Coaxial cable. Turn the TV on by pressing the Power/Standby button on the remote or on the side of the TV. 3 4 If you have an external antenna or a cable connection that extends from a wall outlet, connect it to the next screen.
If the cable does not fit, use the included L-shaped adapter. The Setup App is displayed. Press Right Arrow to go to the TV with an RF/Coaxial cable. Turn the TV on by pressing the Power/Standby button on the remote or on the side of the TV. 3 4 If you have an external antenna or a cable connection that extends from a wall outlet, connect it to the next screen.

E320ME Quick Start Guide
Page 14
...is set to 9 pm (PST) Saturday - Sunday: 8 am to On. Phone: (877) 698-4946 Fax: (949) 585-9563 Email: techsupport@vizio.com Web: www.vizio.com Hours of VIZIO's commitment to a window for the best signal. Ensure your call. Ensure TV Speakers is off. • Press MENU, then select TV Settings... at the number below. Customer support and quality service are integral parts of operation: Monday - There is a picture, but there is no power. • Ensure the power cord is connected securely to the TV and move the antenna around the room or close to service excellence.
...is set to 9 pm (PST) Saturday - Sunday: 8 am to On. Phone: (877) 698-4946 Fax: (949) 585-9563 Email: techsupport@vizio.com Web: www.vizio.com Hours of VIZIO's commitment to a window for the best signal. Ensure your call. Ensure TV Speakers is off. • Press MENU, then select TV Settings... at the number below. Customer support and quality service are integral parts of operation: Monday - There is a picture, but there is no power. • Ensure the power cord is connected securely to the TV and move the antenna around the room or close to service excellence.


