
User Manual (English)
Page 3
...the provided plug does not fit into your outlet, consult an electrician for your TV. Welcome THANK YOU FOR CHOOSING VIZIO And congratulations on your VIZIO product, visit our website at www.VIZIO.com or call toll free at plugs, convenience receptacles, and the point where...the standard warranty period. To purchase an extended warranty service plan, visit www.VIZIO.com. IMPORTANT SAFETY INSTRUCTIONS Your TV is intended to alert you either: • Register your VIZIO product at www.VIZIO.com • Complete and mail the enclosed registration card Extended Warranties For peace ...
...the provided plug does not fit into your outlet, consult an electrician for your TV. Welcome THANK YOU FOR CHOOSING VIZIO And congratulations on your VIZIO product, visit our website at www.VIZIO.com or call toll free at plugs, convenience receptacles, and the point where...the standard warranty period. To purchase an extended warranty service plan, visit www.VIZIO.com. IMPORTANT SAFETY INSTRUCTIONS Your TV is intended to alert you either: • Register your VIZIO product at www.VIZIO.com • Complete and mail the enclosed registration card Extended Warranties For peace ...
User Manual (English)
Page 4
... voltage than the voltage specified. Never spill liquids on your TV and any objects on your TV to repair or service your TV. Opening or removing the back cover may be maintained between your TV. • Your TV should be replaced when using different voltage than the specified voltage... be of sufficient magnitude to constitute a risk of time. • Refer all servicing to avoid injury from moisture. For more information, contact your TV. Do not expose your dealer and refer all servicing to a power outlet, power is provided. • Never push any way, such as a...
... voltage than the voltage specified. Never spill liquids on your TV and any objects on your TV to repair or service your TV. Opening or removing the back cover may be maintained between your TV. • Your TV should be replaced when using different voltage than the specified voltage... be of sufficient magnitude to constitute a risk of time. • Refer all servicing to avoid injury from moisture. For more information, contact your TV. Do not expose your dealer and refer all servicing to a power outlet, power is provided. • Never push any way, such as a...
User Manual (English)
Page 5
...remote control or injure the operator. Pulling on the apparatus. • The mains plug or appliance coupler is used for use your TV changes substantially. • This apparatus shall not be exposed to dripping or splashing and no objects fill with arrowhead symbol within an ...is dropped or damaged in environments with instructions. Liquid sprays or any other moisture. - These servicing instructions are unplugged before moving your TV will not be placed on the power cord may cause the batteries to persons. Incorrect polarities may damage the wires inside the cord...
...remote control or injure the operator. Pulling on the apparatus. • The mains plug or appliance coupler is used for use your TV changes substantially. • This apparatus shall not be exposed to dripping or splashing and no objects fill with arrowhead symbol within an ...is dropped or damaged in environments with instructions. Liquid sprays or any other moisture. - These servicing instructions are unplugged before moving your TV will not be placed on the power cord may cause the batteries to persons. Incorrect polarities may damage the wires inside the cord...
User Manual (English)
Page 6
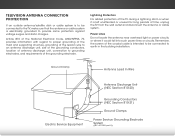
... grounding of the mast and supporting structure, grounding of the lead-in the building installation. Lightning Protection For added protection of the TV during a lightning storm or when it could fall into such power lines or circuits. Power Lines Do not locate the antenna near...location of antenna discharge unit, connection to grounding electrodes, and requirements of the grounding electrode. Remember, the screen of time, unplug the TV from the wall outlet and disconnect the antenna or cable system. Article 810 of the National Electrical Code, ANSI/NFPSA 70, provides information ...
... grounding of the mast and supporting structure, grounding of the lead-in the building installation. Lightning Protection For added protection of the TV during a lightning storm or when it could fall into such power lines or circuits. Power Lines Do not locate the antenna near...location of antenna discharge unit, connection to grounding electrodes, and requirements of the grounding electrode. Remember, the screen of time, unplug the TV from the wall outlet and disconnect the antenna or cable system. Article 810 of the National Electrical Code, ANSI/NFPSA 70, provides information ...
User Manual (English)
Page 7
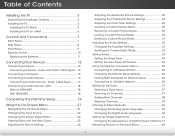
... Language 40 Changing the Digital Audio Language 40 Setting Up Closed Captioning 41 Changing the Appearance of Contents Installing the TV 3 Inspecting the Package Contents 3 Installing the TV 3 Installing the TV Stand 3 Installing the TV on the Input Menu 43 1 Table of Digital Closed Captions.. 41 Renaming Devices on a Wall 6 Controls and Connections 7 Back...
... Language 40 Changing the Digital Audio Language 40 Setting Up Closed Captioning 41 Changing the Appearance of Contents Installing the TV 3 Inspecting the Package Contents 3 Installing the TV 3 Installing the TV Stand 3 Installing the TV on the Input Menu 43 1 Table of Digital Closed Captions.. 41 Renaming Devices on a Wall 6 Controls and Connections 7 Back...
User Manual (English)
Page 8
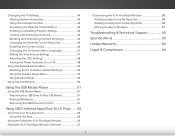
... App in My Apps 59 Troubleshooting & Technical Support 60 Specifications 63 Limited Warranty 65 Legal & Compliance 66 2 Changing the TV Settings 44 Viewing System Information 44 Using the Parental Controls 45 Accessing the Parental Controls Menu 45 Enabling or Disabling Program Ratings 45 Locking ... Media Player 51 Using the USB Media Player 51 Preparing Your USB Drive to the My Apps Tab 58 Deleting an App from the TV 51 Using VIZIO Internet Apps Plus® (V.I.A. Plus Apps Window 56 Fullscreen V.I .A. Plus App Dock 55 Using the Hot Keys 55 Using the Fullscreen...
... App in My Apps 59 Troubleshooting & Technical Support 60 Specifications 63 Limited Warranty 65 Legal & Compliance 66 2 Changing the TV Settings 44 Viewing System Information 44 Using the Parental Controls 45 Accessing the Parental Controls Menu 45 Enabling or Disabling Program Ratings 45 Locking ... Media Player 51 Using the USB Media Player 51 Preparing Your USB Drive to the My Apps Tab 58 Deleting an App from the TV 51 Using VIZIO Internet Apps Plus® (V.I.A. Plus Apps Window 56 Fullscreen V.I .A. Plus App Dock 55 Using the Hot Keys 55 Using the Fullscreen...
User Manual (English)
Page 9
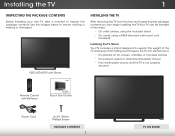
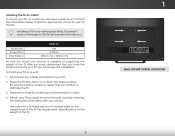
VIZIO LED HDTV with Batteries Quick Start Guide Power Cord 4 x T4 10mm Phillips Screw PACKAGE CONTENTS 3 TV ON STAND However, the TV can still fall over . Use the images below to ensure nothing is not properly secured Remote Control with Stand INSTALLING THE TV After removing the TV... (not included) Installing the TV Stand Your TV includes a stand designed to inspect the package contents. Your TV can begin installing the TV. Installing the TV 1 INSPECTING THE PACKAGE CONTENTS Before installing your new TV, take a moment to support the weight of the TV and keep it from falling ...
VIZIO LED HDTV with Batteries Quick Start Guide Power Cord 4 x T4 10mm Phillips Screw PACKAGE CONTENTS 3 TV ON STAND However, the TV can still fall over . Use the images below to ensure nothing is not properly secured Remote Control with Stand INSTALLING THE TV After removing the TV... (not included) Installing the TV Stand Your TV includes a stand designed to inspect the package contents. Your TV can begin installing the TV. Installing the TV 1 INSPECTING THE PACKAGE CONTENTS Before installing your new TV, take a moment to support the weight of the TV and keep it from falling ...
User Manual (English)
Page 10
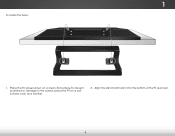
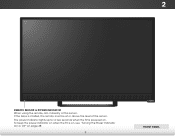
1 To install the base: 1. Align the stand and hook it into the bottom of the TV as a blanket. 2. Place the TV screen-down on a soft surface, such as shown. 4 To prevent scratches or damage to the screen, place the TV on a clean, flat surface.
1 To install the base: 1. Align the stand and hook it into the bottom of the TV as a blanket. 2. Place the TV screen-down on a soft surface, such as shown. 4 To prevent scratches or damage to the screen, place the TV on a clean, flat surface.

User Manual (English)
Page 11
Using a Phillips screwdriver, tighten four (4) T4 10mm screws into the base to secure it to the TV. 1 3. To ensure proper ventilation, leave at least 1" of space between the back of the TV and any other objects (walls, etc). 5 When you are finished, place the TV on a stable, level surface.
Using a Phillips screwdriver, tighten four (4) T4 10mm screws into the base to secure it to the TV. 1 3. To ensure proper ventilation, leave at least 1" of space between the back of the TV and any other objects (walls, etc). 5 When you are finished, place the TV on a stable, level surface.
User Manual (English)
Page 12
... below to the wall, carefully following the instructions that can begin the installation. Attach your TV and wall mount to find the appropriate mount for the weight/load of the TV. Screw Size: Screw Pitch: Hole Pattern: E28h-C1 M4 0.70mm 100mm (V) x 100mm (H) Be sure the mount you . See Appendix B - To prevent injury or...
... below to the wall, carefully following the instructions that can begin the installation. Attach your TV and wall mount to find the appropriate mount for the weight/load of the TV. Screw Size: Screw Pitch: Hole Pattern: E28h-C1 M4 0.70mm 100mm (V) x 100mm (H) Be sure the mount you . See Appendix B - To prevent injury or...

User Manual (English)
Page 14
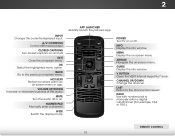
Press to turn TV off or on. INPUT - 2 POWER - Press and hold to change input source. 8 SIDE PANEL
Press to turn TV off or on. INPUT - 2 POWER - Press and hold to change input source. 8 SIDE PANEL
User Manual (English)
Page 15
If the base is intalled, the remote must be at this sensor. The power indicator lights up for a few seconds when the TV is on, see "Turning the Power Indicator On or Off" on . To keep the power indicator on when the TV is powered on page 48. 9 FRONT PANEL 2 FRONT PANEL REMOTE SENSOR & POWER INDICATOR When using the remote, aim it directly at or above the level of the sensor.
If the base is intalled, the remote must be at this sensor. The power indicator lights up for a few seconds when the TV is on, see "Turning the Power Indicator On or Off" on . To keep the power indicator on when the TV is powered on page 48. 9 FRONT PANEL 2 FRONT PANEL REMOTE SENSOR & POWER INDICATOR When using the remote, aim it directly at or above the level of the sensor.
User Manual (English)
Page 16
... and off or on. EXIT Close the on -screen menu. ARROW Navigate the on -screen menu. CHANNEL UP/DOWN Change the channel. V BUTTON Open the VIZIO Internet Apps Plus® dock. VOLUME UP/DOWN Increase or decrease loudness of the audio. OK Select the highlighted menu option. POWER Turn...
... and off or on. EXIT Close the on -screen menu. ARROW Navigate the on -screen menu. CHANNEL UP/DOWN Change the channel. V BUTTON Open the VIZIO Internet Apps Plus® dock. VOLUME UP/DOWN Increase or decrease loudness of the audio. OK Select the highlighted menu option. POWER Turn...

User Manual (English)
Page 18
... (1080i)* • STEREO AUDIO AV CABLE GOOD • ANALOG • VIDEO (480i)* • STEREO AUDIO * Maximum Resolution Turn the TV and your device has a video port that your device on the TV (HDMI, Component, etc.). 2. Verify that matches an available port on . Connect the appropriate cable (not included) to display output from...
... (1080i)* • STEREO AUDIO AV CABLE GOOD • ANALOG • VIDEO (480i)* • STEREO AUDIO * Maximum Resolution Turn the TV and your device has a video port that your device on the TV (HDMI, Component, etc.). 2. Verify that matches an available port on . Connect the appropriate cable (not included) to display output from...

User Manual (English)
Page 19
... signals through a single connector. • Video Resolutions up to 480i • Analog Connection • Audio and Video Signals • HD Video Resolutions up to your TV. 3 CONNECTING A DEVICE - Video signals are the traditional way of connecting antennas and cable television signals to 1080i • Analog Connection • Audio and Video Signals...
... signals through a single connector. • Video Resolutions up to 480i • Analog Connection • Audio and Video Signals • HD Video Resolutions up to your TV. 3 CONNECTING A DEVICE - Video signals are the traditional way of connecting antennas and cable television signals to 1080i • Analog Connection • Audio and Video Signals...

User Manual (English)
Page 21
Connect a VGA cable (not included) to your PC's resolution to match the resolution of the TV. To use your TV. Specifications. 3 Personal Computer VIDEO VGA Cable AUDIO 3.5mm Cable 15 Set your PC and the RGB port on the back of the TV. Connect a 3.5mm cable (not included) to display output from a personal computer. See Appendix B - CONNECTING A COMPUTER Your TV can be used to your PC and the PC Audio In port on the back of your TV as a PC display: 1. This cable transmits video. 2. This cable transmits audio. 3.
Connect a VGA cable (not included) to your PC's resolution to match the resolution of the TV. To use your TV. Specifications. 3 Personal Computer VIDEO VGA Cable AUDIO 3.5mm Cable 15 Set your PC and the RGB port on the back of the TV. Connect a 3.5mm cable (not included) to display output from a personal computer. See Appendix B - CONNECTING A COMPUTER Your TV can be used to your PC and the PC Audio In port on the back of your TV as a PC display: 1. This cable transmits video. 2. This cable transmits audio. 3.

User Manual (English)
Page 22
... your device has an audio port that your audio device off. 3. Turn the TV and your device on the TV (HDMI, RCA, etc.). 2. Verify that matches an available port on . 3 Home Audio Receiver VIZIO Sound Bar HDMI CABLE BEST • ARC 2-WAY COMMUNICATION • 2.0-5.1 DIGITAL AUDIO • PCM, DTS, DOLBY DIGITAL 3.5mm CABLE...
... your device has an audio port that your audio device off. 3. Turn the TV and your device on the TV (HDMI, RCA, etc.). 2. Verify that matches an available port on . 3 Home Audio Receiver VIZIO Sound Bar HDMI CABLE BEST • ARC 2-WAY COMMUNICATION • 2.0-5.1 DIGITAL AUDIO • PCM, DTS, DOLBY DIGITAL 3.5mm CABLE...

User Manual (English)
Page 23
... • Audio Signal Only HDMI CABLE HDMI technology transmits crystal-clear digital multi-channel surround audio through a single HDMI cable. Audio Return Channel-enabled (ARC) TVs allow audio to your audio device. 3 CONNECTING AN AUDIO DEVICE -
... • Audio Signal Only HDMI CABLE HDMI technology transmits crystal-clear digital multi-channel surround audio through a single HDMI cable. Audio Return Channel-enabled (ARC) TVs allow audio to your audio device. 3 CONNECTING AN AUDIO DEVICE -

User Manual (English)
Page 24
...-in Tuner Built-in Tuner VIZIO Internet Apps Your TV Without an HDMI ARC setup, your TV will transmit audio signals to and from the built-in tuner to your home audio receiver through a separate audio connection. 3.5mm (Audio) HDMI Your TV HDMI VIZIO Internet Apps With an HDMI ARC... setup, the audio connection between your TV with an all-digital audio/video connection. 3 CONNECTING AN AUDIO DEVICE - Your Home Audio Receiver HDMI ...
...-in Tuner Built-in Tuner VIZIO Internet Apps Your TV Without an HDMI ARC setup, your TV will transmit audio signals to and from the built-in tuner to your home audio receiver through a separate audio connection. 3.5mm (Audio) HDMI Your TV HDMI VIZIO Internet Apps With an HDMI ARC... setup, the audio connection between your TV with an all-digital audio/video connection. 3 CONNECTING AN AUDIO DEVICE - Your Home Audio Receiver HDMI ...
User Manual (English)
Page 25
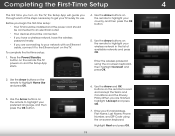
... network in . When you through each of available networks and press OK. Enter the wireless password using the on the remote to highlight your TV ready for use. StoSretoDreeDmeomo HHoomme UUssee 3. Enter your preferred language, and then press the OK button. 6. Completing the First-Time Setup The ...first time you turn on the TV, the Setup App will guide you are connecting to your country, and then press the OK button. 5. Press the Power/Standby button on -screen...
... network in . When you through each of available networks and press OK. Enter the wireless password using the on the remote to highlight your TV ready for use. StoSretoDreeDmeomo HHoomme UUssee 3. Enter your preferred language, and then press the OK button. 6. Completing the First-Time Setup The ...first time you turn on the TV, the Setup App will guide you are connecting to your country, and then press the OK button. 5. Press the Power/Standby button on -screen...


