
E190VA User Manual
Page 3
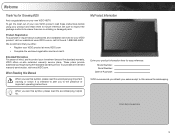
.... It is intended to alert you to the presence of Purchase VIZIO recommends you see this manual for safekeeping. Be sure to inspect the package contents to protect your investment beyond the standard warranty, VIZIO offers on your sales receipt to this symbol, please read these ...Number Serial Number Date of important operating instructions. These plans provide additional coverage during the standard warranty period. When Reading this Manual When you attach your new VIZIO HDTV. To get the most out of mind, and to ensure there are no missing or damaged parts. Welcome &#...
.... It is intended to alert you to the presence of Purchase VIZIO recommends you see this manual for safekeeping. Be sure to inspect the package contents to protect your investment beyond the standard warranty, VIZIO offers on your sales receipt to this symbol, please read these ...Number Serial Number Date of important operating instructions. These plans provide additional coverage during the standard warranty period. When Reading this Manual When you attach your new VIZIO HDTV. To get the most out of mind, and to ensure there are no missing or damaged parts. Welcome &#...
E190VA User Manual
Page 9
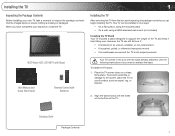
...-standard wall mount (not included) Installing the TV Stand Your TV includes a stand designed to ensure nothing is not properly secured VIZIO Razor LED LCD HDTV with Stand User Manual and Quick Start Guide Remote Control with Batteries Your TV comes in the box with the holes on a clean, flat surface. Installing...
...-standard wall mount (not included) Installing the TV Stand Your TV includes a stand designed to ensure nothing is not properly secured VIZIO Razor LED LCD HDTV with Stand User Manual and Quick Start Guide Remote Control with Batteries Your TV comes in the box with the holes on a clean, flat surface. Installing...
E190VA User Manual
Page 13
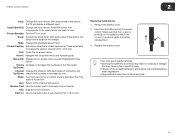
... the Info Window. Remove the battery cover. 2. Insert two AA batteries into the remote control. Sleep: Activate the sleep timer. Dash (-): Use to manually enter a channel. With each press of the button, the sleep timer's duration will display a different input. With each press of the button, the ...change the caption channel (CC1, CC2, etc). With each press of the button, the Up/Down: channel will increase or decrease by one. E190VA / E220VA / E260VA 2 Input: Change the input device. Power/Standby: Turn the TV on or off or on -screen menu. Exit: Close the on . ...
... the Info Window. Remove the battery cover. 2. Insert two AA batteries into the remote control. Sleep: Activate the sleep timer. Dash (-): Use to manually enter a channel. With each press of the button, the sleep timer's duration will display a different input. With each press of the button, the ...change the caption channel (CC1, CC2, etc). With each press of the button, the Up/Down: channel will increase or decrease by one. E190VA / E220VA / E260VA 2 Input: Change the input device. Power/Standby: Turn the TV on or off or on -screen menu. Exit: Close the on . ...

E190VA User Manual
Page 22
5 E190VA / E220VA / E260VA Adjusting the Time for Daylight Savings This setting will automatically ...enabled, you can automatically set the date and time: 1. Use the Arrow buttons to highlight Daylight Saving. 5. To manually set the time and date using this information. The TV Settings menu is displayed. 3. Use the Arrow buttons to ...change the setting to highlight the TV icon and press MENU/OK. Your TV can manually set the date and time. When this menu option, you cannot manually set the TV's date and time. To enable or disable automatic updates: 1. The...
5 E190VA / E220VA / E260VA Adjusting the Time for Daylight Savings This setting will automatically ...enabled, you can automatically set the date and time: 1. Use the Arrow buttons to highlight Daylight Saving. 5. To manually set the time and date using this information. The TV Settings menu is displayed. 3. Use the Arrow buttons to ...change the setting to highlight the TV icon and press MENU/OK. Your TV can manually set the date and time. When this menu option, you cannot manually set the TV's date and time. To enable or disable automatic updates: 1. The...
E190VA User Manual
Page 32
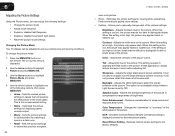
...adjust the following options, then press MENU/OK: • Home - Adaptive Luma - 6 Adjusting the Picture Settings Using the Picture menu, you to manually change the picture mode: 1. When this setting is useful in adjusting the flesh tones in a dark room. • Retail - Reset Picture Setting ...preferences and viewing conditions. Sets the picture settings to OFF. When this setting is set to values that produce a brighter, 24 E190VA / E220VA / E260VA more natural. • Custom - Sharpness - It can be used to values perfect for large areas of the picture to ...
...adjust the following options, then press MENU/OK: • Home - Adaptive Luma - 6 Adjusting the Picture Settings Using the Picture menu, you to manually change the picture mode: 1. When this setting is useful in adjusting the flesh tones in a dark room. • Retail - Reset Picture Setting ...preferences and viewing conditions. Sets the picture settings to OFF. When this setting is set to values that produce a brighter, 24 E190VA / E220VA / E260VA more natural. • Custom - Sharpness - It can be used to values perfect for large areas of the picture to ...
E190VA User Manual
Page 33
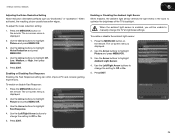
...to highlight Off, Low, Medium, or High, then press MENU/OK. 5. When the ambient light sensor is displayed. 2. Use the Arrow buttons to manually change the setting to Off or On. 5. Enabling or Disabling Fast Response Enabling the Fast Response setting can often improve PC and console gaming experiences... resulting picture usually has softer edges. Use the Left/Right Arrow buttons to change the TV's brightness settings. The on the remote. E190VA / E220VA / E260VA 6 Adjusting the Noise Reduction Setting Noise reduction diminishes artifacts such as "blockiness" or "pixellation".
...to highlight Off, Low, Medium, or High, then press MENU/OK. 5. When the ambient light sensor is displayed. 2. Use the Arrow buttons to manually change the setting to Off or On. 5. Enabling or Disabling Fast Response Enabling the Fast Response setting can often improve PC and console gaming experiences... resulting picture usually has softer edges. Use the Left/Right Arrow buttons to change the TV's brightness settings. The on the remote. E190VA / E220VA / E260VA 6 Adjusting the Noise Reduction Setting Noise reduction diminishes artifacts such as "blockiness" or "pixellation".
E190VA User Manual
Page 38
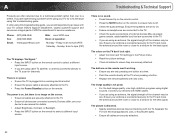
... power cable is off. • Check the audio settings. see your TV, contact VIZIO's Support Department. Ensure your antenna is distorted. • Nearby electrical devices may be interfering with your device's user manual for channels. Connect your TV, try to select a different input source. • If...• Check the audio connections of the channel may be low. Devices differ; The image quality is no headphones are integral parts of VIZIO's commitment to a defect. If you are using an antenna, the signal strength of external devices (Blu-ray player, game console, cable...
... power cable is off. • Check the audio settings. see your TV, contact VIZIO's Support Department. Ensure your antenna is distorted. • Nearby electrical devices may be interfering with your device's user manual for channels. Connect your TV, try to select a different input source. • If...• Check the audio connections of the channel may be low. Devices differ; The image quality is no headphones are integral parts of VIZIO's commitment to a defect. If you are using an antenna, the signal strength of external devices (Blu-ray player, game console, cable...
E190VA Quick Start Guide
Page 2
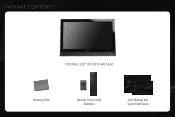
PACKAGE CONTENTS VIZIO Razor LED™ LCD HDTV with Stand Cleaning Cloth Remote Control with Batteries User Manual and Quick Start Guide
PACKAGE CONTENTS VIZIO Razor LED™ LCD HDTV with Stand Cleaning Cloth Remote Control with Batteries User Manual and Quick Start Guide

E190VA Quick Start Guide
Page 3
...Change the channel. With each press of the button, the TV will increase or decrease by one. Sleep: Activate the sleep timer. Press repeatedly to manually enter a channel. Exit: Close the on -screen menu or select highlighted menu option. With each press of the button, the sleep timer's duration... Closed Caption (CC) Exit Arrow Up Arrow Right Arrow Down Channel Up/Down Mute Number Pad Input: Change the input device. Last: Return to manually enter a sub-channel (18-1, 18-2, etc). Press the button that corresponds to the input device you wish to view. With each press of the...
...Change the channel. With each press of the button, the TV will increase or decrease by one. Sleep: Activate the sleep timer. Press repeatedly to manually enter a channel. Exit: Close the on -screen menu or select highlighted menu option. With each press of the button, the sleep timer's duration... Closed Caption (CC) Exit Arrow Up Arrow Right Arrow Down Channel Up/Down Mute Number Pad Input: Change the input device. Last: Return to manually enter a sub-channel (18-1, 18-2, etc). Press the button that corresponds to the input device you wish to view. With each press of the...
E190VA Quick Start Guide
Page 8
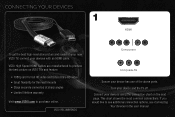
...DEVICES 1 HDMI To get the best high-resolution picture and sound on your new VIZIO TV, connect your device and the TV off. VIZIO High Speed HDMI Cables are manufactured to produce the best picture on VIZIO TVs and feature: • 1080p and for full HD video and future Ultra...-HD video • Great flexibility for thin wall mounts • Stays securely connected at sharp angles • Limited lifetime warranty Visit www.VIZIO.com to see additional connection options, see Connecting Your Devices in the user manual...
...DEVICES 1 HDMI To get the best high-resolution picture and sound on your new VIZIO TV, connect your device and the TV off. VIZIO High Speed HDMI Cables are manufactured to produce the best picture on VIZIO TVs and feature: • 1080p and for full HD video and future Ultra...-HD video • Great flexibility for thin wall mounts • Stays securely connected at sharp angles • Limited lifetime warranty Visit www.VIZIO.com to see additional connection options, see Connecting Your Devices in the user manual...

