
User Manual English
Page 2
...Screen Menu 22 Changing the Input Source 22 Renaming Devices on a Wall 9 Front Panel 10 Enabling the Screen Saver 33 Blanking the Screen... 33 Restoring the TV to Factory Default Settings 47 Enabling and Disabling Smart Interactivity 47 Rear Panel 11 Remote Control Front 12 Using the Network Connection Menu 34 Connecting to a Wireless Network 34 Using the Guided Setup Menu 48 Using the Info Window 48 Replacing...Using the On-Screen Menu 22 Setting... Changing the Screen Aspect Ratio 23 ... On-Screen Menu ...31 Changing the Screen Aspect Ratio 45...
...Screen Menu 22 Changing the Input Source 22 Renaming Devices on a Wall 9 Front Panel 10 Enabling the Screen Saver 33 Blanking the Screen... 33 Restoring the TV to Factory Default Settings 47 Enabling and Disabling Smart Interactivity 47 Rear Panel 11 Remote Control Front 12 Using the Network Connection Menu 34 Connecting to a Wireless Network 34 Using the Guided Setup Menu 48 Using the Info Window 48 Replacing...Using the On-Screen Menu 22 Setting... Changing the Screen Aspect Ratio 23 ... On-Screen Menu ...31 Changing the Screen Aspect Ratio 45...
User Manual English
Page 12
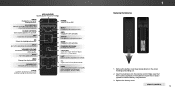
... example, 18-4 or 18-5.) 1 Replacing the Batteries 1. ARROW Navigate the on the batteries match the (+) and (-) symbols inside the battery compartment. 3. DASH Use with number pad to the previous on-screen menu. Make sure that the (+) and (-) symbols on -screen menu. VOLUME UP/DOWN Increase or... decrease loudness of the audio. NUMBER PAD Manually enter a channel. ENTER Confirm channel or passcode entered using the Number Pad. V BUTTON Open the VIZIO Internet Apps Plus...
... example, 18-4 or 18-5.) 1 Replacing the Batteries 1. ARROW Navigate the on the batteries match the (+) and (-) symbols inside the battery compartment. 3. DASH Use with number pad to the previous on-screen menu. Make sure that the (+) and (-) symbols on -screen menu. VOLUME UP/DOWN Increase or... decrease loudness of the audio. NUMBER PAD Manually enter a channel. ENTER Confirm channel or passcode entered using the Number Pad. V BUTTON Open the VIZIO Internet Apps Plus...

User Manual English
Page 31
...transitions between the display image and the accompanying audio track. • Digital Audio Out - VIZIO AUDIO TV Speakers Surround Sound Volume Leveling Balance - Volume leveling uses DTS TruVolume™ ...buttons to highlight Audio and press OK. Press the MENU button on the remote. The on -screen menu is displayed. 3. Digital Audio Out Analog Audio Out Equalizer Delete Audio Mode On On ...remote to select any audio mode as a starting point. 5. To create, modify, or replace the single custom equalizer setting: 1. Use the Arrow buttons on the remote to highlight Equalizer...
...transitions between the display image and the accompanying audio track. • Digital Audio Out - VIZIO AUDIO TV Speakers Surround Sound Volume Leveling Balance - Volume leveling uses DTS TruVolume™ ...buttons to highlight Audio and press OK. Press the MENU button on the remote. The on -screen menu is displayed. 3. Digital Audio Out Analog Audio Out Equalizer Delete Audio Mode On On ...remote to select any audio mode as a starting point. 5. To create, modify, or replace the single custom equalizer setting: 1. Use the Arrow buttons on the remote to highlight Equalizer...

User Manual English
Page 60
...fresh ones. See Adjusting the Audio Settings on the remote to close to change the screen mode. See Adjusting the Picture Settings on page 25. • Press the INPUT button on page 31. The V.I.A. VIZIO recommends selecting Calibrated. • Check all devices are on page 33. • ...the back of the channel may not display correctly. Instructions for details. • Adjust Brightness, Contrast, or Backlight. and + symbols. • Replace the batteries with HDMI cables. • If you are using digital sources. The TV has pixels (dots) that are connected to ensure mute is ...
...fresh ones. See Adjusting the Audio Settings on the remote to close to change the screen mode. See Adjusting the Picture Settings on page 25. • Press the INPUT button on page 31. The V.I.A. VIZIO recommends selecting Calibrated. • Check all devices are on page 33. • ...the back of the channel may not display correctly. Instructions for details. • Adjust Brightness, Contrast, or Backlight. and + symbols. • Replace the batteries with HDMI cables. • If you are using digital sources. The TV has pixels (dots) that are connected to ensure mute is ...

Quickstart Guide English
Page 20
...TV, press MENU > Audio and set to my network. • If you have changed the default Parental Control Passcode, enter it back on -screen menu has guided setup. I am having trouble connecting to On. • If you are connecting wirelessly, try plugging the power cord into a different... power cord is not working . • Be sure your Internet Service Provider (ISP). Set the TV to Factory Defaults. and + symbols. • Replace the batteries with fresh ones. Press MENU, then select Guided Setup. Select Reset. App is not working , call your TV is connected (HDMI-1, HDMI...
...TV, press MENU > Audio and set to my network. • If you have changed the default Parental Control Passcode, enter it back on -screen menu has guided setup. I am having trouble connecting to On. • If you are connecting wirelessly, try plugging the power cord into a different... power cord is not working . • Be sure your Internet Service Provider (ISP). Set the TV to Factory Defaults. and + symbols. • Replace the batteries with fresh ones. Press MENU, then select Guided Setup. Select Reset. App is not working , call your TV is connected (HDMI-1, HDMI...


