Two-Page Specifications Sheet
Page 1
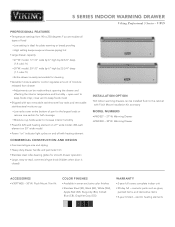
..."W. electric heating elements 5 SERIES INDOOR WARMING DRAWER Viking Professional 5 Series - close vent to increase interior humidity §§Powerful 425-watt heating element on 27" wide model; 450-watt element on 30" wide model §§Power "on" indicator light cycles on and off with heating element COMMERCIAL CONSTRUCTION AND DESIGN §§Commercial-type size and styling §§Heavy-duty drawer handle and perimeter trim §§Stainless steel roller-bearing glides for plate warming...
..."W. electric heating elements 5 SERIES INDOOR WARMING DRAWER Viking Professional 5 Series - close vent to increase interior humidity §§Powerful 425-watt heating element on 27" wide model; 450-watt element on 30" wide model §§Power "on" indicator light cycles on and off with heating element COMMERCIAL CONSTRUCTION AND DESIGN §§Commercial-type size and styling §§Heavy-duty drawer handle and perimeter trim §§Stainless steel roller-bearing glides for plate warming...
Two-Page Specifications Sheet
Page 2
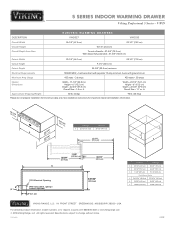
... product information, model numbers, or to change without notice. Specifications subject to request a quote call 1-888-845-4641 or visit vikingrange.com © 2018 Viking Range, LLC All rights reserved. hard wire direct with separate 15-amp minimum 2-wire with ground circuit Maximum Amp Usage 425 watts - 3.6 amps 450 watts - 3.8 amps Interior Dimensions Width - 17-1/4" (43.8 cm) Height - 6" (15.2 cm) Depth - 22-3/4" (57.8 cm) Overall Size - 1.4 cu. ft. 5 SERIES INDOOR WARMING DRAWER Viking Professional 5 Series...
... product information, model numbers, or to change without notice. Specifications subject to request a quote call 1-888-845-4641 or visit vikingrange.com © 2018 Viking Range, LLC All rights reserved. hard wire direct with separate 15-amp minimum 2-wire with ground circuit Maximum Amp Usage 425 watts - 3.6 amps 450 watts - 3.8 amps Interior Dimensions Width - 17-1/4" (43.8 cm) Height - 6" (15.2 cm) Depth - 22-3/4" (57.8 cm) Overall Size - 1.4 cu. ft. 5 SERIES INDOOR WARMING DRAWER Viking Professional 5 Series...

Installation Instructions
Page 1
Installation GUIDE 5 SERIES Warming Drawer VWD527 VWD530 1
Installation GUIDE 5 SERIES Warming Drawer VWD527 VWD530 1
Installation Instructions
Page 2
... local inspector's use power cord supplied with a grounding plug for future reference. latest edition. •The installer must be plugged directly into a properly grounded receptacle. All safety messages will identify the hazard, tell you how to persons, installation work and electrical wiring must conform with the current CSA C22.1 Canadian Electrical Codes Part 1 and/or local codes. In Canada: Installation must leave these instructions completely and carefully. Read...
... local inspector's use power cord supplied with a grounding plug for future reference. latest edition. •The installer must be plugged directly into a properly grounded receptacle. All safety messages will identify the hazard, tell you how to persons, installation work and electrical wiring must conform with the current CSA C22.1 Canadian Electrical Codes Part 1 and/or local codes. In Canada: Installation must leave these instructions completely and carefully. Read...

Installation Instructions
Page 3
Only use power cord supplied with a grounding plug for your protection against shock hazard and should be plugged directly into a properly grounded receptacle. Dimensions 10-1/4" (26.0 cm) VWVDW53D052275-232/4-3"/(46"5(.547c.m8 c)m) Side View VWVDW5D3052279-216/-21"/(27"4(.697c.3mc)m) 2(514-1.0/4c"m) 2(527-3.8/4c"m) 2(654-1.7/2c"m) 1-1/2" (3.8 cm) Rear View 2" (5.1 cm) 25-1/2" (64.8 cm) VWD527 24-3/4" (62.9 cm) VWD530 27...
Only use power cord supplied with a grounding plug for your protection against shock hazard and should be plugged directly into a properly grounded receptacle. Dimensions 10-1/4" (26.0 cm) VWVDW53D052275-232/4-3"/(46"5(.547c.m8 c)m) Side View VWVDW5D3052279-216/-21"/(27"4(.697c.3mc)m) 2(514-1.0/4c"m) 2(527-3.8/4c"m) 2(654-1.7/2c"m) 1-1/2" (3.8 cm) Rear View 2" (5.1 cm) 25-1/2" (64.8 cm) VWD527 24-3/4" (62.9 cm) VWD530 27...

Installation Instructions
Page 4
....6 cm) 10-1/2" (26.7 cm) *When installing in space behind control panel. Outer cabinet edges need to ensure unit remains level and does not tilt forward when opened. Electrical receptacle can be required to be located any where on back cutout. front or rear of handle With drawer fully extended Interior width Interior height Interior depth Electrical requirement Max Amp Usage Approx. shipping wt. Cutout Dimensions VWD527 VWD530 26-1/2" (67.3 cm) 29-1/2" (74...
....6 cm) 10-1/2" (26.7 cm) *When installing in space behind control panel. Outer cabinet edges need to ensure unit remains level and does not tilt forward when opened. Electrical receptacle can be required to be located any where on back cutout. front or rear of handle With drawer fully extended Interior width Interior height Interior depth Electrical requirement Max Amp Usage Approx. shipping wt. Cutout Dimensions VWD527 VWD530 26-1/2" (67.3 cm) 29-1/2" (74...
Installation Instructions
Page 5
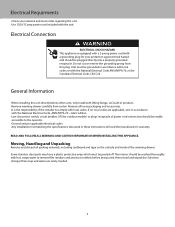
... installing this plug. Electrical Connection WARNING ELECTRICAL SHOCK HAZARD This appliance is the responsibility of power cord connection should be grounded in accordance with local codes or with Viking Range, LLC built-in these instructions will void the manufacturer's warranty. Do not cut or remove the grounding prong from carton. latest edition. •Line disconnect switch, circuit breaker, GFI (for your national and local codes regarding this unit. -Use 120V/15 amp power cord...
... installing this plug. Electrical Connection WARNING ELECTRICAL SHOCK HAZARD This appliance is the responsibility of power cord connection should be grounded in accordance with local codes or with Viking Range, LLC built-in these instructions will void the manufacturer's warranty. Do not cut or remove the grounding prong from carton. latest edition. •Line disconnect switch, circuit breaker, GFI (for your national and local codes regarding this unit. -Use 120V/15 amp power cord...

Installation Instructions
Page 6
... into receptacle in the center of the control panel and plug into the cabinet opening. Pull up on on the right side latch at the same time. Installation 1 Pull out warming drawer pan until fully extended 3 2 2 1 Slide finger along right and left side latch and push down on the left side until you only use the cord provided with the unit. 5 x4 Secure the...
... into receptacle in the center of the control panel and plug into the cabinet opening. Pull up on on the right side latch at the same time. Installation 1 Pull out warming drawer pan until fully extended 3 2 2 1 Slide finger along right and left side latch and push down on the left side until you only use the cord provided with the unit. 5 x4 Secure the...
Installation Instructions
Page 7
... from whom purchased Clearly describe the problem that you continue to have service problems, contact Viking Range, LLC at1-888-845-4641, or write to loosen the material, then use only authorized parts to remove. If it if service is ever required. Service Information If service is required, call your warming drawer Rating/Serial plate is located on the left, rear side. The model and serial number for this material. If you...
... from whom purchased Clearly describe the problem that you continue to have service problems, contact Viking Range, LLC at1-888-845-4641, or write to loosen the material, then use only authorized parts to remove. If it if service is ever required. Service Information If service is required, call your warming drawer Rating/Serial plate is located on the left, rear side. The model and serial number for this material. If you...
Use and Care Manual
Page 1
Use & Care MANUAL 5 SERIES Warming Drawer VWD527 VWD530
Use & Care MANUAL 5 SERIES Warming Drawer VWD527 VWD530
Use and Care Manual
Page 2
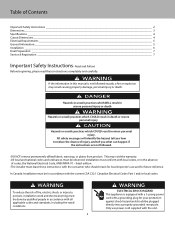
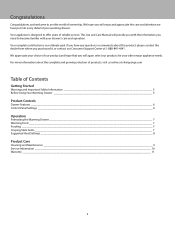
... of Contents Getting Started Warnings and Important Safety Information 3 Before Using Your Warming Drawer 5 Product Controls Drawer Features 6 Control Panel Settings 6 Operation Preheating the Warming Drawer 7 Warming Food 7 Proofing 7 Crisping Stale Items 7 Suggested Heat Settings 8 Product Care Cleaning and Maintenance 9 Service Information 10 Warranty 11 2 We appreciate your choice of our product and hope that you purchased it, or contact our Consumer Support Center at vikingrange.com Table of your drawer's care and operation. For more information...
... of Contents Getting Started Warnings and Important Safety Information 3 Before Using Your Warming Drawer 5 Product Controls Drawer Features 6 Control Panel Settings 6 Operation Preheating the Warming Drawer 7 Warming Food 7 Proofing 7 Crisping Stale Items 7 Suggested Heat Settings 8 Product Care Cleaning and Maintenance 9 Service Information 10 Warranty 11 2 We appreciate your choice of our product and hope that you purchased it, or contact our Consumer Support Center at vikingrange.com Table of your drawer's care and operation. For more information...
Use and Care Manual
Page 3
... the manufacturer about problems or conditions you what can happen if the instructions are not meant to cover all instructions before using this appliance to prevent the potential risk of fire, electric shock, personal injury or damage to the appliance as described in this manual. Read and follow information in this manual exactly to adjust, repair, service, or replace any appliance. 3 follow...
... the manufacturer about problems or conditions you what can happen if the instructions are not meant to cover all instructions before using this appliance to prevent the potential risk of fire, electric shock, personal injury or damage to the appliance as described in this manual. Read and follow information in this manual exactly to adjust, repair, service, or replace any appliance. 3 follow...

Use and Care Manual
Page 4
... or cabinet supplier to be installed in direct contact. WARNING DO NOT use a flexible power-supply cord with all controls are wrapped or placed in plastic containers for may result in the drawer or cover an entire rack with materials such as a space heater to keep foods warm that will not discolor or delaminate and will withstand temperatures up to the thermostat, element, and...
... or cabinet supplier to be installed in direct contact. WARNING DO NOT use a flexible power-supply cord with all controls are wrapped or placed in plastic containers for may result in the drawer or cover an entire rack with materials such as a space heater to keep foods warm that will not discolor or delaminate and will withstand temperatures up to the thermostat, element, and...
Use and Care Manual
Page 5
... appliance that could trap heat underneath them resulting in electric shock or fire. Items contaminated with cooking oils may contribute to children in cabinets above an appliance. Do not let potholders touch hot heating elements located under the drawer. Let hot air or steam escape (open vent) before operating it is in the area when the appliance is normal. 5 Heating Elements •Use only dry potholders...
... appliance that could trap heat underneath them resulting in electric shock or fire. Items contaminated with cooking oils may contribute to children in cabinets above an appliance. Do not let potholders touch hot heating elements located under the drawer. Let hot air or steam escape (open vent) before operating it is in the area when the appliance is normal. 5 Heating Elements •Use only dry potholders...
Use and Care Manual
Page 6
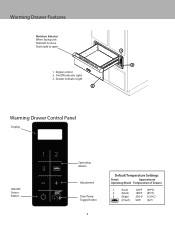
Digital control 2. On/Off Indicator Light 3. Drawer indicator Light 3 1 2 Warming Drawer Control Panel Display ON/OFF Power Button 12 3 Operating Modes Adjustment Time/Temp Toggle Button 6 Default Temperature Settings Preset Approximate Operating Mode Temperature of Drawer 1 (Low) 120ºF (49ºC) 2 (Med) 185ºF (85ºC) 3 (High) 250 ºF (121ºC) (Proof ) 90ºF (32º) Warming Drawer Features Moisture Selector When facing unit: Slide left to close Slide right to open 1.
Digital control 2. On/Off Indicator Light 3. Drawer indicator Light 3 1 2 Warming Drawer Control Panel Display ON/OFF Power Button 12 3 Operating Modes Adjustment Time/Temp Toggle Button 6 Default Temperature Settings Preset Approximate Operating Mode Temperature of Drawer 1 (Low) 120ºF (49ºC) 2 (Med) 185ºF (85ºC) 3 (High) 250 ºF (121ºC) (Proof ) 90ºF (32º) Warming Drawer Features Moisture Selector When facing unit: Slide left to close Slide right to open 1.
Use and Care Manual
Page 7
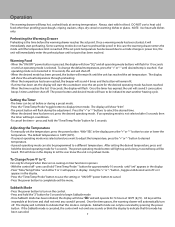
... setting the desired temperature, press and hold the "2" button for the desired operating mode has been reached. The preset operating mode button will light up and a long 2 second beep will be canceled by pressing the power button. To Change From ºF to ºC Can only be set before the warming drawer reaches the set point. Sabbath mode can be changed when there are no cooking or timer functions in the display. -Press the "Time/Temp/Probe" button...
... setting the desired temperature, press and hold the "2" button for the desired operating mode has been reached. The preset operating mode button will light up and a long 2 second beep will be canceled by pressing the power button. To Change From ºF to ºC Can only be set before the warming drawer reaches the set point. Sabbath mode can be changed when there are no cooking or timer functions in the display. -Press the "Time/Temp/Probe" button...
Use and Care Manual
Page 8
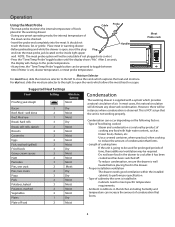
... condensation is open the vents which captures the heat and moisture. Handles -Before preheating and while the drawer is observed. However, there will eliminate any time, the "Time/Temp/Probe" toggle button can be pressed to the probe temperature. -At any observed condensation. Operation Using the Meat Probe Cable Probe The meat probe monitors the internal temperature of foods placed in the warming drawer -During any preset operating mode, the internal temperature of the meat can be...
... condensation is open the vents which captures the heat and moisture. Handles -Before preheating and while the drawer is observed. However, there will eliminate any time, the "Time/Temp/Probe" toggle button can be pressed to the probe temperature. -At any observed condensation. Operation Using the Meat Probe Cable Probe The meat probe monitors the internal temperature of foods placed in the warming drawer -During any preset operating mode, the internal temperature of the meat can be...
Use and Care Manual
Page 9
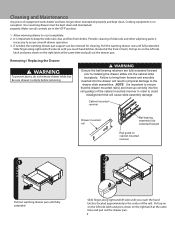
...). Pull up on on the left side latch and press down on the right latch at the same time and pull out the drawer pan. Cleaning and Maintenance Any piece of slide rails and other adjoining parts is necessary to assure smooth drawer operation. 3. Cooking equipment is empty before removing. If needed, the warming drawer pan support can be kept clean and maintained properly. WARNING Ensure the...
...). Pull up on on the left side latch and press down on the right latch at the same time and pull out the drawer pan. Cleaning and Maintenance Any piece of slide rails and other adjoining parts is necessary to assure smooth drawer operation. 3. Cooking equipment is empty before removing. If needed, the warming drawer pan support can be kept clean and maintained properly. WARNING Ensure the...
Use and Care Manual
Page 10
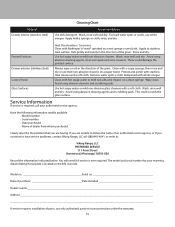
... your warming drawer Rating/Serial plate is ever required. Model no Serial no Date of purchase Date Installed Dealer's name Address If service requires installation of an authorized service agency, or if you are having. For hard water spots or scales, use only authorized parts to insure protection under the warranty. 10 Rub gently and evenly in the direction of the grain. Wash, rinse well and dry. Clean...
... your warming drawer Rating/Serial plate is ever required. Model no Serial no Date of purchase Date Installed Dealer's name Address If service requires installation of an authorized service agency, or if you are having. For hard water spots or scales, use only authorized parts to insure protection under the warranty. 10 Rub gently and evenly in the direction of the grain. Wash, rinse well and dry. Clean...
Use and Care Manual
Page 11
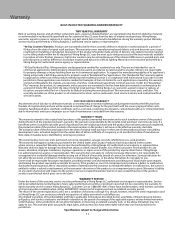
... be covered by serial tag on any claim of any reason, alteration, improper installation, improper operation, or repair service of original retail purchase. Under this warranty. This warranty excludes use of the product in all commercial locations such as differences in product location and natural or artificial lighting. Note date of manufacture is entitled to either certificate of occupancy or 24 months from handling or installation. Owner...
... be covered by serial tag on any claim of any reason, alteration, improper installation, improper operation, or repair service of original retail purchase. Under this warranty. This warranty excludes use of the product in all commercial locations such as differences in product location and natural or artificial lighting. Note date of manufacture is entitled to either certificate of occupancy or 24 months from handling or installation. Owner...


