Two-Page Specifications Sheet
Page 1
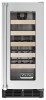
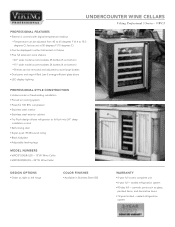
... bottles §§Dual pane and argon-filled Low-E energy-efficient glass doors §§LED display lighting PROFESSIONAL-STYLE CONSTRUCTION §§Undercounter or freestanding installation §§Forced air cooling system §§Powerful 700 BTU compressor §§Stainless steel interior §§Stainless steel exterior cabinet §§Tru-Flush design allows refrigerator to 18.3 degrees C); UNDERCOUNTER WINE CELLARS ® Viking Professional 5 Series...
... bottles §§Dual pane and argon-filled Low-E energy-efficient glass doors §§LED display lighting PROFESSIONAL-STYLE CONSTRUCTION §§Undercounter or freestanding installation §§Forced air cooling system §§Powerful 700 BTU compressor §§Stainless steel interior §§Stainless steel exterior cabinet §§Tru-Flush design allows refrigerator to 18.3 degrees C); UNDERCOUNTER WINE CELLARS ® Viking Professional 5 Series...

Two-Page Specifications Sheet
Page 2
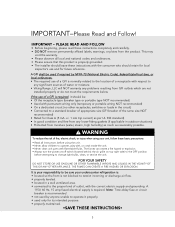
... located (712-9.9/1c6m") Power cord 6-7/16" (16.8 cm) off floor.* 24"W. Models - 15" (38.1 cm) 24"W. clearance for door swing 9re4q.0u°irSedwifnogr pull-out shelf clearance 2(5-.36/1cm6") min. to request a quote call 1-888-845-4641 or visit vikingrange.com © 2014 Viking Range, LLC All rights reserved. F60345 1214 VWCI 15" AND 24"W. A 15"W. UNDERCOUNTER WINE CELLARS ® Viking Professional 5 Series - UNDERCOUNTER WINE CELLAR...
... located (712-9.9/1c6m") Power cord 6-7/16" (16.8 cm) off floor.* 24"W. Models - 15" (38.1 cm) 24"W. clearance for door swing 9re4q.0u°irSedwifnogr pull-out shelf clearance 2(5-.36/1cm6") min. to request a quote call 1-888-845-4641 or visit vikingrange.com © 2014 Viking Range, LLC All rights reserved. F60345 1214 VWCI 15" AND 24"W. A 15"W. UNDERCOUNTER WINE CELLARS ® Viking Professional 5 Series - UNDERCOUNTER WINE CELLAR...
Installation Instructions
Page 3
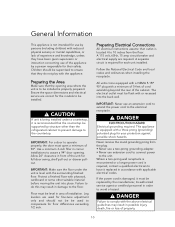
... problems resulting from the product. THE FUMES CAN CREATE A FIRE HAZARD OR EXPLOSION. Note: Time delay fuse or circuit breaker is normally related to the location of a receptacle with the correct electric supply and grounding. WARNING To reduce the risk of water or moisture. • Viking Range, LLC will NOT warranty any significant sources of fire, electric shock, or injury when using the unit...
... problems resulting from the product. THE FUMES CAN CREATE A FIRE HAZARD OR EXPLOSION. Note: Time delay fuse or circuit breaker is normally related to the location of a receptacle with the correct electric supply and grounding. WARNING To reduce the risk of water or moisture. • Viking Range, LLC will NOT warranty any significant sources of fire, electric shock, or injury when using the unit...
Installation Instructions
Page 4
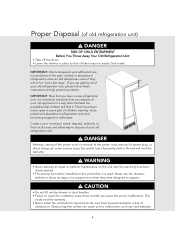
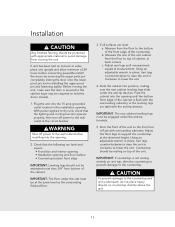
... could void the warranty. • Never install the unit behind closed doors. There have a new refrigeration unit, it is extremely important that you dispose of your old refrigeration unit. DANGER Altering, cutting of the power cord, or removal of the power cord, removal of power plug, or direct wiring can cause unit to support. Be sure front louvered kickplate is used. Junked or abandoned refrigeration units are still dangerous-even...
... could void the warranty. • Never install the unit behind closed doors. There have a new refrigeration unit, it is extremely important that you dispose of your old refrigeration unit. DANGER Altering, cutting of the power cord, or removal of the power cord, removal of power plug, or direct wiring can cause unit to support. Be sure front louvered kickplate is used. Junked or abandoned refrigeration units are still dangerous-even...
Installation Instructions
Page 10
... amp circuit breaker and electrical supply are correct for full door swing, shelf pull-out or drawer pullout. Follow the National Electrical Code and local codes and ordinances when installing the receptacle. DANGER ELECTROCUTION HAZARD Electrical grounding required. IMPORTANT: Make sure the floor under a countertop, it must open a minimum of installation. Leg levelers are used to compensate for each unit installed. If the power cord is...
... amp circuit breaker and electrical supply are correct for full door swing, shelf pull-out or drawer pullout. Follow the National Electrical Code and local codes and ordinances when installing the receptacle. DANGER ELECTROCUTION HAZARD Electrical grounding required. IMPORTANT: Make sure the floor under a countertop, it must open a minimum of installation. Leg levelers are used to compensate for each unit installed. If the power cord is...

Installation Instructions
Page 12
... tipping forward. Refer to provide a secure surface for mounting bracket locations. Anti-Tip Brackets WARNING Unit may require modification to the illustrations below for attaching the brackets. IMPORTANT: If installing on a concrete floor, concrete fasteners are supplied with the anti-tip kit. Anti-tip Bracket ø 3/8" (1.0 cm) 15/16" (2.4 cm) 3/16" (0.5 cm) 13-1/2" (34.3 cm...
... tipping forward. Refer to provide a secure surface for mounting bracket locations. Anti-Tip Brackets WARNING Unit may require modification to the illustrations below for attaching the brackets. IMPORTANT: If installing on a concrete floor, concrete fasteners are supplied with the anti-tip kit. Anti-tip Bracket ø 3/8" (1.0 cm) 15/16" (2.4 cm) 3/16" (0.5 cm) 13-1/2" (34.3 cm...
Installation Instructions
Page 13
... floor to the wall outlet before connecting power.Re-installl the doors by removing the upper pivot pin completely, sliding the door onto the lower pivot pin and re-installing the upper pivot pin and fastening tightly. IMPORTANT: The floor under the unit must be engaged under the anti-tip ... slide under the anti-tip brackets. 5. Adjust the front legs to the wall outlet at the shimmed height. WARNING Shut off power to support the countertop at the circuit breaker. Check that the lighting and cooling function operate properly, then turn off power to top of cabinet, at the same ...
... floor to the wall outlet before connecting power.Re-installl the doors by removing the upper pivot pin completely, sliding the door onto the lower pivot pin and re-installing the upper pivot pin and fastening tightly. IMPORTANT: The floor under the unit must be engaged under the anti-tip ... slide under the anti-tip brackets. 5. Adjust the front legs to the wall outlet at the shimmed height. WARNING Shut off power to support the countertop at the circuit breaker. Check that the lighting and cooling function operate properly, then turn off power to top of cabinet, at the same ...

Installation Instructions
Page 16
...? □ Is the unit level? □ Is the power cord connected directly into a properly grounded 3-prong outlet in accordance with all applicable local codes? □ Has all stainless protection film been removed? □ Are the panel(s) (wood overlays, if used) attached securely and properly? □ Allow the unit to operate for at least 24 hours before loading products or adjusting temperature settings. 16
...? □ Is the unit level? □ Is the power cord connected directly into a properly grounded 3-prong outlet in accordance with all applicable local codes? □ Has all stainless protection film been removed? □ Are the panel(s) (wood overlays, if used) attached securely and properly? □ Allow the unit to operate for at least 24 hours before loading products or adjusting temperature settings. 16
Installation Instructions
Page 17
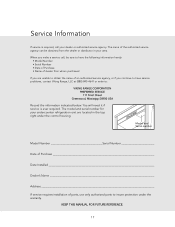
... under the warranty. KEEP THIS MANUAL FOR FUTURE REFERENCE. 17 The name of parts, use only authorized parts to insure protection under the control housing. You will need it if service is required, call , be obtained from whom purchased If you are located in your dealer or authorized service agency. The model and serial number for your undercounter refrigeration unit are unable to : VIKING RANGE CORPORATION PREFERRED SERVICE 111...
... under the warranty. KEEP THIS MANUAL FOR FUTURE REFERENCE. 17 The name of parts, use only authorized parts to insure protection under the control housing. You will need it if service is required, call , be obtained from whom purchased If you are located in your dealer or authorized service agency. The model and serial number for your undercounter refrigeration unit are unable to : VIKING RANGE CORPORATION PREFERRED SERVICE 111...
Use and Care Manual
Page 2
... of reliable service. Congratulations We hope you purchased it, or contact our Consumer Support Center at 1-888-846-4641. If you have any questions or comments about the complete and growing selection of products, contact your new, state-of Contents Important Safety Instructions 3 Electronic Controls 4 Temperature Controls 5 Using the Unit 6 Wine Rack Finishing 7 Interior Light 9 Checking Temperature 9 Winterizing Outdoor Units 10 Preparing for your refrigerator's care and operation.
... of reliable service. Congratulations We hope you purchased it, or contact our Consumer Support Center at 1-888-846-4641. If you have any questions or comments about the complete and growing selection of products, contact your new, state-of Contents Important Safety Instructions 3 Electronic Controls 4 Temperature Controls 5 Using the Unit 6 Wine Rack Finishing 7 Interior Light 9 Checking Temperature 9 Winterizing Outdoor Units 10 Preparing for your refrigerator's care and operation.

Use and Care Manual
Page 3
..., with flammable fluids. A 115V, 60 Hz, 15 amp fused electrical supply is properly grounded. • The installer should leave these instructions with the consumer who should be supervised to operate, play with reduced physical sensory or mental capabilities, or lack of California to change light bulbs, clean, or service the unit. Important Safety Instructions • Before beginning, please read these basic precautions...
..., with flammable fluids. A 115V, 60 Hz, 15 amp fused electrical supply is properly grounded. • The installer should leave these instructions with the consumer who should be supervised to operate, play with reduced physical sensory or mental capabilities, or lack of California to change light bulbs, clean, or service the unit. Important Safety Instructions • Before beginning, please read these basic precautions...

Use and Care Manual
Page 5
Electronic Controls Temperature Control Panel The controller is located inside of the SAB button. Product temperature remains at the end of the alarm condition; • The keyboard will only be displayed. Product Temperature Set Points and Ranges All Refrigerator 38°F Range: 32°F to 39°F Refrigerated Drawer 38°F Range: 32°F to 39°F Beverage Center 42°F Range: 32°F to 48°F Wine Center 55°F Range: 44°F to...
Electronic Controls Temperature Control Panel The controller is located inside of the SAB button. Product temperature remains at the end of the alarm condition; • The keyboard will only be displayed. Product Temperature Set Points and Ranges All Refrigerator 38°F Range: 32°F to 39°F Refrigerated Drawer 38°F Range: 32°F to 39°F Beverage Center 42°F Range: 32°F to 48°F Wine Center 55°F Range: 44°F to...
Use and Care Manual
Page 6
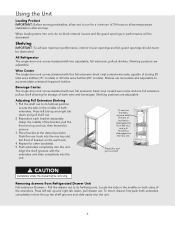
... storing 20 total wine bottles (15" models) or 40 total wine bottles (24" models). Pull the drawer out to its farthest position. Locate the tabs in then line up the shelf grooves and slide easily into the unit. Reposition each bracket separately. Shelving positions are adjustable. Push the rear hook into the unit. Beverage Center The single door unit comes standard with two adjustable, full extension...
... storing 20 total wine bottles (15" models) or 40 total wine bottles (24" models). Pull the drawer out to its farthest position. Locate the tabs in then line up the shelf grooves and slide easily into the unit. Reposition each bracket separately. Shelving positions are adjustable. Push the rear hook into the unit. Beverage Center The single door unit comes standard with two adjustable, full extension...

Use and Care Manual
Page 9
... and replace with a solid door product. After 24 hours, check the temperature of the product stored in direct sun light or near a heat source 9 Your units are pre-set in order to achieve the recommended temperature range when installed in the desired area for 24 hours. To use the display light function with new bulb. Interior Light Interior Light The unit is equipped with a display light function located on the control panel for displaying your Viking Range parts...
... and replace with a solid door product. After 24 hours, check the temperature of the product stored in direct sun light or near a heat source 9 Your units are pre-set in order to achieve the recommended temperature range when installed in the desired area for 24 hours. To use the display light function with new bulb. Interior Light Interior Light The unit is equipped with a display light function located on the control panel for displaying your Viking Range parts...

Use and Care Manual
Page 10
... dust and lint. Turn unit to the unit. Reattach the kickplate. 6. Upon completion, re-install the kickplate. 10 To clean the condenser remove the kickplate and use abrasive cleaners or cloths on lights, controllers, fan motors, and unfinished wood wine rack faces. If not, turn the unit ON. Glass door panels can be cleaned using a vacuum cleaner to the set point temperature in temperature loss or mechanical failure...
... dust and lint. Turn unit to the unit. Reattach the kickplate. 6. Upon completion, re-install the kickplate. 10 To clean the condenser remove the kickplate and use abrasive cleaners or cloths on lights, controllers, fan motors, and unfinished wood wine rack faces. If not, turn the unit ON. Glass door panels can be cleaned using a vacuum cleaner to the set point temperature in temperature loss or mechanical failure...
Use and Care Manual
Page 11
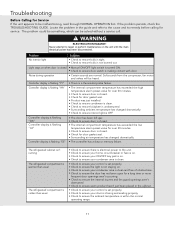
... to repair or perform maintenance on the unit until the main electrical power has been disconnected. Controller display is flashing "P1" • There is closed • Manual ON/OFF light switch is turned ON. • Check to ensure the ambient temperature is OFF. If the problem persists, check the TROUBLESHOOTING GUIDE. The problem could be something, which can be heard. Soft sounds from the compressor, fan motor...
... to repair or perform maintenance on the unit until the main electrical power has been disconnected. Controller display is flashing "P1" • There is closed • Manual ON/OFF light switch is turned ON. • Check to ensure the ambient temperature is OFF. If the problem persists, check the TROUBLESHOOTING GUIDE. The problem could be something, which can be heard. Soft sounds from the compressor, fan motor...
Use and Care Manual
Page 12
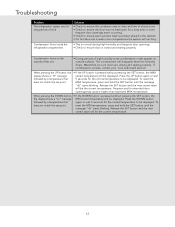
... your local authorized servicer. Press the DOWN button followed by a temperature that again or wait 5 seconds for the normal temperature to ensure door is closed and sealing properly. Release the SET button and the new stored value will be displayed. Meanwhile, be displayed. To reset the MAX temperature, press and hold the SET button until the message "rSt" starts blinking. Troubleshooting Problem The refrigeration system runs for long...
... your local authorized servicer. Press the DOWN button followed by a temperature that again or wait 5 seconds for the normal temperature to ensure door is closed and sealing properly. Release the SET button and the new stored value will be displayed. Meanwhile, be displayed. To reset the MAX temperature, press and hold the SET button until the message "rSt" starts blinking. Troubleshooting Problem The refrigeration system runs for long...
Use and Care Manual
Page 13
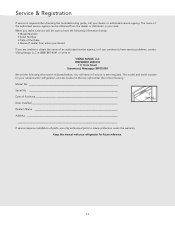
... checking the troubleshooting guide, call , be obtained from whom purchased If you are located in your dealer or authorized service agency. Model No Serial No Date of Purchase Date Installed Model and Serial number Dealer's Name Address _____ If service requires installation of parts, use only authorized parts to : VIKING RANGE, LLC PREFERRED SERVICE 111 Front Street Greenwood, Mississippi 38930 USA Record the following information handy: • Model Number • Serial Number • Date...
... checking the troubleshooting guide, call , be obtained from whom purchased If you are located in your dealer or authorized service agency. Model No Serial No Date of Purchase Date Installed Model and Serial number Dealer's Name Address _____ If service requires installation of parts, use only authorized parts to : VIKING RANGE, LLC PREFERRED SERVICE 111 Front Street Greenwood, Mississippi 38930 USA Record the following information handy: • Model Number • Serial Number • Date...
Use and Care Manual
Page 14
... proof of the product extends beyond normal residential use during the warranty period. Sealed Refrigeration System Components: Compressor, Evaporator, Condenser, Connecting Tubing, Dryer/Strainer TWELVE YEAR LIMITED WARRANTY Any sealed refrigeration system component, as listed above, which fails or is found to applications where use , improper installation, improper operation, or repair or service of original retail purchase. Replacement of a component part includes its component parts contains a defect...
... proof of the product extends beyond normal residential use during the warranty period. Sealed Refrigeration System Components: Compressor, Evaporator, Condenser, Connecting Tubing, Dryer/Strainer TWELVE YEAR LIMITED WARRANTY Any sealed refrigeration system component, as listed above, which fails or is found to applications where use , improper installation, improper operation, or repair or service of original retail purchase. Replacement of a component part includes its component parts contains a defect...
Use and Care Manual
Page 15
... replace, at overtime or premium rates shall not be covered by a factory authorized Viking Range, LLC service agent or representative. FIVE YEAR LIMITED WARRANTY Any sealed refrigeration system component, as listed above, which could affect you should any reason, alteration, outdoor use, improper installation, improper operation, or repair or service of the product by the warrantor to remedy the defect or malfunction, the owner...
... replace, at overtime or premium rates shall not be covered by a factory authorized Viking Range, LLC service agent or representative. FIVE YEAR LIMITED WARRANTY Any sealed refrigeration system component, as listed above, which could affect you should any reason, alteration, outdoor use, improper installation, improper operation, or repair or service of the product by the warrantor to remedy the defect or malfunction, the owner...

