Energy Guide
Page 1
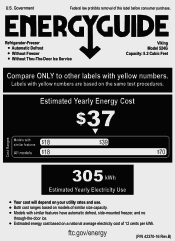
... on models of similar size capacity. ftc.gov/energy (P/N 42370-16 Rev.B) Government Federal law prohibits removal of 12 cents per kWh. Both cost ranges based on a national average electricity cost of this label before consumer purchase. Models with yellow numbers. Labels with similar features $ $29 All models $18 $39 $39$70 Cost Ranges 305 kWh Estimated Yearly Electricity Use Your...
... on models of similar size capacity. ftc.gov/energy (P/N 42370-16 Rev.B) Government Federal law prohibits removal of 12 cents per kWh. Both cost ranges based on a national average electricity cost of this label before consumer purchase. Models with yellow numbers. Labels with similar features $ $29 All models $18 $39 $39$70 Cost Ranges 305 kWh Estimated Yearly Electricity Use Your...

Two-Page Specifications Sheet
Page 1
... blue LED lighting §§ Soft close door with articulating hinge §§ Field reversible door is shipped right-hand hinged §§ Built-in Stainless Steel (SS) WARRANTY §§ 2-year full covers complete unit §§ 6-year full - VUWC515GSS and 24"W. Please do not prepare installation from brochure data only. ft. model: Volume of bottle shapes and sizes and...
... blue LED lighting §§ Soft close door with articulating hinge §§ Field reversible door is shipped right-hand hinged §§ Built-in Stainless Steel (SS) WARRANTY §§ 2-year full covers complete unit §§ 6-year full - VUWC515GSS and 24"W. Please do not prepare installation from brochure data only. ft. model: Volume of bottle shapes and sizes and...
Two-Page Specifications Sheet
Page 2
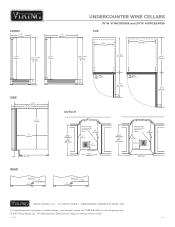
Specifications subject to request a quote call 1-888-845-4641 or visit vikingrange.com © 2019 Viking Range, LLC All rights reserved. FRONT UNDERCOUNTER WINE CELLARS 15"W. F60399 1019 VUWC524GSS TOP SIDE CUTOUT REAR VIKING R ANGE, LLC 111 FRONT STREET GREENWOOD, MISSISSIPPI 38930 USA For detailed product information, model numbers, or to change without notice. VUWC515GSS and 24"W.
Specifications subject to request a quote call 1-888-845-4641 or visit vikingrange.com © 2019 Viking Range, LLC All rights reserved. FRONT UNDERCOUNTER WINE CELLARS 15"W. F60399 1019 VUWC524GSS TOP SIDE CUTOUT REAR VIKING R ANGE, LLC 111 FRONT STREET GREENWOOD, MISSISSIPPI 38930 USA For detailed product information, model numbers, or to change without notice. VUWC515GSS and 24"W.

Installation Instructions
Page 1
Install / Use & Care MANUAL 5 SERIES Undercounter Wine Cellar VUWC515G VUWC524G
Install / Use & Care MANUAL 5 SERIES Undercounter Wine Cellar VUWC515G VUWC524G

Installation Instructions
Page 2
... Support Center at 1-888-845-4641. We appreciate your choice of Contents Safety and Warnng 3 Disposal and Recycling 3 Environmental Requirements 3 Installation _____ 4 Cutout and Product Dimensions 4 Side by Side Installation 5 Anti-Tip Bracket 6 Leveling 7 Grille Installation 7 Door Swing 7 Door Adjust 8 Operating Instructions 9 First Use 9 Control Operation 10 Airflow and Product Loading 10 Interior Adjustments 11 Wine Guide 13 Maintenance 16 Cleaning 16 Cleaning Condenser 17 Extended Non-Use 17 Troubleshooting...
... Support Center at 1-888-845-4641. We appreciate your choice of Contents Safety and Warnng 3 Disposal and Recycling 3 Environmental Requirements 3 Installation _____ 4 Cutout and Product Dimensions 4 Side by Side Installation 5 Anti-Tip Bracket 6 Leveling 7 Grille Installation 7 Door Swing 7 Door Adjust 8 Operating Instructions 9 First Use 9 Control Operation 10 Airflow and Product Loading 10 Interior Adjustments 11 Wine Guide 13 Maintenance 16 Cleaning 16 Cleaning Condenser 17 Extended Non-Use 17 Troubleshooting...
Installation Instructions
Page 3
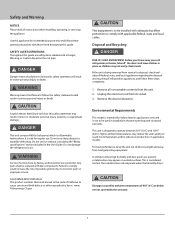
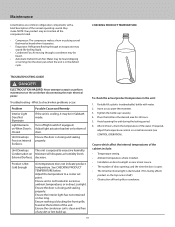
...Any parts shall be used in severe personal injury or death. ! www. Remove all instructions before installing, operating, or servicing the appliance. Remove the door(s)/drawer(s) Environmental Requirements This model is ...outside surfaces. Unplug the electrical cord from its intended purpose only and follow these general precautions with those listed throughout this guide: SAFETY ALERT DEFINITIONS Throughout this safety statement could increase the risk of refrigeration appliances, and follow these steps completely: 1. This unit is a flammable hydrocarbon. DANGER This unit...
...Any parts shall be used in severe personal injury or death. ! www. Remove all instructions before installing, operating, or servicing the appliance. Remove the door(s)/drawer(s) Environmental Requirements This model is ...outside surfaces. Unplug the electrical cord from its intended purpose only and follow these general precautions with those listed throughout this guide: SAFETY ALERT DEFINITIONS Throughout this safety statement could increase the risk of refrigeration appliances, and follow these steps completely: 1. This unit is a flammable hydrocarbon. DANGER This unit...

Installation Instructions
Page 4
...to 34-7⁄8" (886 mm) Preferred location for electrical outlet is required for an electrical connection in , your unit does not require additional air space for top, sides, or rear. When built-in the rear. 14 15⁄16" (379 mm) !...8260;2" for integrated models with 3⁄4" panel installed. Installation Cutout & Product Dimensions FRONT VUWC515 PREPARE SITE Your product has been designed for either free-standing or built-in adjacent cabinet. 5⁄8" (16 mm) 24" (610 mm) 7" (178 mm) 4" (102 mm) 23-7⁄8" PRODUCT DIMENSIONS (607 mm) REAR VUWC515 Power Cord 6 ft (183...
...to 34-7⁄8" (886 mm) Preferred location for electrical outlet is required for an electrical connection in , your unit does not require additional air space for top, sides, or rear. When built-in the rear. 14 15⁄16" (379 mm) !...8260;2" for integrated models with 3⁄4" panel installed. Installation Cutout & Product Dimensions FRONT VUWC515 PREPARE SITE Your product has been designed for either free-standing or built-in adjacent cabinet. 5⁄8" (16 mm) 24" (610 mm) 7" (178 mm) 4" (102 mm) 23-7⁄8" PRODUCT DIMENSIONS (607 mm) REAR VUWC515 Power Cord 6 ft (183...

Installation Instructions
Page 5
... widths listed under Cutout Dimensions in each unit's electrical specifications requirements. Additional space may be maintained between the units. 1/ " (6 mm) 4 4 - 9/16" (116 mm) 5 However, to ensure unobstructed door swing (opening both doors to open to each unit's Installation Guide. Cutout width for a side-by-side installation is required for any knobs, pulls or handles installed. 13/16" (22 mm) Stainless steel models which include the standard stainless handle will require...
... widths listed under Cutout Dimensions in each unit's electrical specifications requirements. Additional space may be maintained between the units. 1/ " (6 mm) 4 4 - 9/16" (116 mm) 5 However, to ensure unobstructed door swing (opening both doors to open to each unit's Installation Guide. Cutout width for a side-by-side installation is required for any knobs, pulls or handles installed. 13/16" (22 mm) Stainless steel models which include the standard stainless handle will require...

Installation Instructions
Page 6
... adjustments. FLOOR MOUNTED ANTI-TIP INSTALLATION (For free-standing applications) 1. Place the unit into the area where it will be installed. Also test to make two starter holes and fasten the antitip brackets to secure the unit CABINET/COUNTER ANTI-TIP INSTALLATION (For built-in step 3 with the kit. 2. Remove the unit. Using a square, extend center line "B" (see chart below to the floor using the screws provided. 7. From...
... adjustments. FLOOR MOUNTED ANTI-TIP INSTALLATION (For free-standing applications) 1. Place the unit into the area where it will be installed. Also test to make two starter holes and fasten the antitip brackets to secure the unit CABINET/COUNTER ANTI-TIP INSTALLATION (For built-in step 3 with the kit. 2. Remove the unit. Using a square, extend center line "B" (see chart below to the floor using the screws provided. 7. From...
Installation Instructions
Page 7
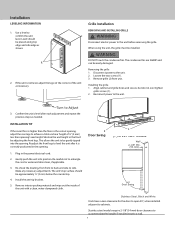
... removing the grille. WARNING Disconnect electric power to the unit. Remove interior packing material and wipe out the inside of the unit as shown. 1 2. Installation LEVELING INFORMATION 1. Stainless steel models require 2-1/8" (54 mm) door clearance to accommodate the handle if installed next to the unit. 2. When using the unit, the grille must be gently tipped into position. Align cabinet and grille holes and secure, but do not over tighten grille screws (1). 2. Disconnect power to a wall...
... removing the grille. WARNING Disconnect electric power to the unit. Remove interior packing material and wipe out the inside of the unit as shown. 1 2. Installation LEVELING INFORMATION 1. Stainless steel models require 2-1/8" (54 mm) door clearance to accommodate the handle if installed next to the unit. 2. When using the unit, the grille must be gently tipped into position. Align cabinet and grille holes and secure, but do not over tighten grille screws (1). 2. Disconnect power to a wall...

Installation Instructions
Page 8
... with that it is not level or not sealing properly. Remove caps from the unit. 2 1 Note: One hinge includes a metal spacer. Using a T-25 Torx bit, loosen each pair of the door. ! Using T-25 Torx bit loosen screw #1 and remove screw #2 on the opposite side. 4. Using #2 Phillips bit, remove the 4 underlying screws. Tighten both the upper and lower hinge plates. 3. Square and align door...
... with that it is not level or not sealing properly. Remove caps from the unit. 2 1 Note: One hinge includes a metal spacer. Using a T-25 Torx bit, loosen each pair of the door. ! Using T-25 Torx bit loosen screw #1 and remove screw #2 on the opposite side. 4. Using #2 Phillips bit, remove the 4 underlying screws. Tighten both the upper and lower hinge plates. 3. Square and align door...
Installation Instructions
Page 9
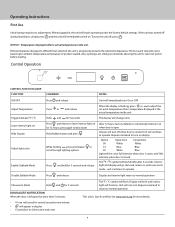
... silence alert and reset Display and interior light return to normal operation This unit is open for 5 seconds DOOR ALERT NOTIFICATION When the door is progressing towards the selected temperature. light will turn on . Operating Instructions First Use Initial startup requires no adjustments. If the unit was turned off during installation, simply press and the unit will go dark and remain so until user resets mode -
... silence alert and reset Display and interior light return to normal operation This unit is open for 5 seconds DOOR ALERT NOTIFICATION When the door is progressing towards the selected temperature. light will turn on . Operating Instructions First Use Initial startup requires no adjustments. If the unit was turned off during installation, simply press and the unit will go dark and remain so until user resets mode -

Installation Instructions
Page 10
no additional clearance around sides, top or rear of red and white bottles are used in poor product performance, product failure, and uneven internal temperatures and may result in Wine Cellars and Beverage Centers. 427⁄...3 27⁄32" (98 mm) 10 Combinations of unit is needed for ventilation • Do not install behind a closed door NOTICE Restricting airflow may freeze contents. Internal • When loading, leave space between internal fans, vents, and side walls to allow air to the following sizes. When determining capacities, refer to circulate freely PRODUCT LOADING ...
no additional clearance around sides, top or rear of red and white bottles are used in poor product performance, product failure, and uneven internal temperatures and may result in Wine Cellars and Beverage Centers. 427⁄...3 27⁄32" (98 mm) 10 Combinations of unit is needed for ventilation • Do not install behind a closed door NOTICE Restricting airflow may freeze contents. Internal • When loading, leave space between internal fans, vents, and side walls to allow air to the following sizes. When determining capacities, refer to circulate freely PRODUCT LOADING ...
Installation Instructions
Page 11
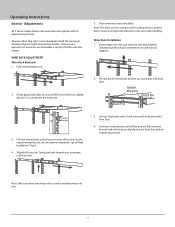
...unit. 11 If only repositioning the rack, do not remove completely - Wine Rack Installation 1. go to hold the maximum number of bottle sizes and shapes WINE RACK ADJUSTMENT Wine Rack Removal 1. Line up 2 back pins with 19 adjustment positions. Pull rack towards you until all four pins are clear of rack will set...pins are fully inserted. Front of the slots. Operating Instructions Interior Adjustments All 5 Series models feature side mounted rack supports with back slots. Remove and reposition as desired to block moisture and provide lubrication. Use care when handling. ...
...unit. 11 If only repositioning the rack, do not remove completely - Wine Rack Installation 1. go to hold the maximum number of bottle sizes and shapes WINE RACK ADJUSTMENT Wine Rack Removal 1. Line up 2 back pins with 19 adjustment positions. Pull rack towards you until all four pins are clear of rack will set...pins are fully inserted. Front of the slots. Operating Instructions Interior Adjustments All 5 Series models feature side mounted rack supports with back slots. Remove and reposition as desired to block moisture and provide lubrication. Use care when handling. ...
Installation Instructions
Page 14
Operating Instructions Common Food and Wine Matches Foods Fish, Shell Fish, Crab, Oysters Beef, Venison Pork, Veal, Lamb and Poultry Fruit Wines Dry White Wines, Light Sparkling or Extra Dry Champagne Full-Bodied Red Wines Light...replace them to be consumed almost immediately. There is in its integrity, read and match the branding on the cork to the late 1800's. A phylloxera (root louse) devastation to the vineyards severely limited the supply of the cork has a rich and fascinating history dating back to the bottle and set... . Restaurateurs would remove labels on Its... caps ...
Operating Instructions Common Food and Wine Matches Foods Fish, Shell Fish, Crab, Oysters Beef, Venison Pork, Veal, Lamb and Poultry Fruit Wines Dry White Wines, Light Sparkling or Extra Dry Champagne Full-Bodied Red Wines Light...replace them to be consumed almost immediately. There is in its integrity, read and match the branding on the cork to the late 1800's. A phylloxera (root louse) devastation to the vineyards severely limited the supply of the cork has a rich and fascinating history dating back to the bottle and set... . Restaurateurs would remove labels on Its... caps ...
Installation Instructions
Page 16
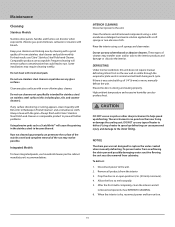
... capture the water created when manually defrosting. When the interior is dry, reconnect power and turn unit on the rear wall or visible through the evaporator plate vents is normal and will remove surface contamination that could lead to rust. Do not clean with Claire® Stainless Steel Polish and Cleaner or comparable product to prevent further problems. Using abrasive pads such as ScotchBrite...
... capture the water created when manually defrosting. When the interior is dry, reconnect power and turn unit on the rear wall or visible through the evaporator plate vents is normal and will remove surface contamination that could lead to rust. Do not clean with Claire® Stainless Steel Polish and Cleaner or comparable product to prevent further problems. Using abrasive pads such as ScotchBrite...
Installation Instructions
Page 17
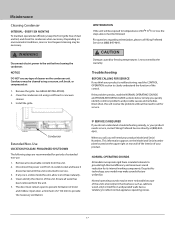
... necessary. ! Install the grille. If the problem persists, read the CONTROL OPERATION section to service. 3. Ensure all consumable content from the unit. 5. Normal operating sounds may be more or less frequent cleaning may make sounds that are recommended for periods of 2" (50 mm) to reflect normal appliance operating noises. 17 Remove the grille. This information appears on the Model and Serial number plate located on the upper right or rear wall of...
... necessary. ! Install the grille. If the problem persists, read the CONTROL OPERATION section to service. 3. Ensure all consumable content from the unit. 5. Normal operating sounds may be more or less frequent cleaning may make sounds that are recommended for periods of 2" (50 mm) to reflect normal appliance operating noises. 17 Remove the grille. This information appears on the Model and Serial number plate located on the upper right or rear wall of...
Installation Instructions
Page 18
... in direct sunlight. Place the bottle in a small increment (see CONTROL OPERATION). After 24 hours, check the temperature of the normal operating sounds they make. If required, adjust the temperature control in the desired area for 24 hours. 5. Never attempt to check when problems occur: Problem Interior Light Does Not Illuminate Light Remains on Moisture will dissipate as humidity levels External Surfaces. What to repair...
... in direct sunlight. Place the bottle in a small increment (see CONTROL OPERATION). After 24 hours, check the temperature of the normal operating sounds they make. If required, adjust the temperature control in the desired area for 24 hours. 5. Never attempt to check when problems occur: Problem Interior Light Does Not Illuminate Light Remains on Moisture will dissipate as humidity levels External Surfaces. What to repair...
Installation Instructions
Page 19
... serial number and model numbers for future reference. 19 If you continue to have service problems, contact Viking Range, LLC at (888) 845-4641 or write to insure protection under the warranty. Service Information If service is ever required. You will need it if service is required, call your wine cellare are located on the upper wall, behind the lighting: Model No Serial No Date of Purchase Date Installed Dealer...
... serial number and model numbers for future reference. 19 If you continue to have service problems, contact Viking Range, LLC at (888) 845-4641 or write to insure protection under the warranty. Service Information If service is ever required. You will need it if service is required, call your wine cellare are located on the upper wall, behind the lighting: Model No Serial No Date of Purchase Date Installed Dealer...
Installation Instructions
Page 20
... household use during the warranty period. *FULL NINETY (90) DAY COSMETIC WARRANTY: Product is longer. Under this warranty. Viking Range, LLC, warrantor, agrees to repair or replace, at overtime or premium rates shall not be covered by this "Residential Plus" warranty, the product, its component part or parts. Products must be performed by a factory authorized Viking Range, LLC service agent or representative. Service will be repaired or replaced, free of...
... household use during the warranty period. *FULL NINETY (90) DAY COSMETIC WARRANTY: Product is longer. Under this warranty. Viking Range, LLC, warrantor, agrees to repair or replace, at overtime or premium rates shall not be covered by this "Residential Plus" warranty, the product, its component part or parts. Products must be performed by a factory authorized Viking Range, LLC service agent or representative. Service will be repaired or replaced, free of...


