
Energy Guide
Page 1
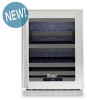
... numbers. Government Federal law prohibits removal of 12 cents per kWh. ftc.gov/energy (P/N 42370-16 Rev.B) Estimated energy cost based on models of similar size capacity. Refrigerator-Freezer Automatic Defrost Without Freezer Without Thru-The-Door Ice Service Viking Model 524G Capacity: 5.2 Cubic Feet Compare ONLY to other labels with similar features have automatic defrost, side-mounted...
... numbers. Government Federal law prohibits removal of 12 cents per kWh. ftc.gov/energy (P/N 42370-16 Rev.B) Estimated energy cost based on models of similar size capacity. Refrigerator-Freezer Automatic Defrost Without Freezer Without Thru-The-Door Ice Service Viking Model 524G Capacity: 5.2 Cubic Feet Compare ONLY to other labels with similar features have automatic defrost, side-mounted...

Two-Page Specifications Sheet
Page 1
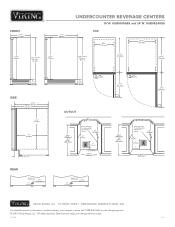
...-hand hinged §§ Built-in Stainless Steel (SS) WARRANTY §§ 2-year full covers complete unit §§ 6-year full - Refrigerated Beverage Center DESIGN OPTIONS §§ Product ships as glass, painted items, and decorative items §§ 12-year limited - field reversible COLOR FINISHES §§ Available in or freestanding §§ Four adjustable leveling legs MODEL NUMBERS §§ VUBV515GSS...
...-hand hinged §§ Built-in Stainless Steel (SS) WARRANTY §§ 2-year full covers complete unit §§ 6-year full - Refrigerated Beverage Center DESIGN OPTIONS §§ Product ships as glass, painted items, and decorative items §§ 12-year limited - field reversible COLOR FINISHES §§ Available in or freestanding §§ Four adjustable leveling legs MODEL NUMBERS §§ VUBV515GSS...
Two-Page Specifications Sheet
Page 2
VUBV515GSS and 24"W. F60398 1019 VUBV524GSS TOP SIDE CUTOUT REAR VIKING R ANGE, LLC 111 FRONT STREET GREENWOOD, MISSISSIPPI 38930 USA For detailed product information, model numbers, or to change without notice. FRONT UNDERCOUNTER BEVERAGE CENTERS 15"W. Specifications subject to request a quote call 1-888-845-4641 or visit vikingrange.com © 2019 Viking Range, LLC All rights reserved.
VUBV515GSS and 24"W. F60398 1019 VUBV524GSS TOP SIDE CUTOUT REAR VIKING R ANGE, LLC 111 FRONT STREET GREENWOOD, MISSISSIPPI 38930 USA For detailed product information, model numbers, or to change without notice. FRONT UNDERCOUNTER BEVERAGE CENTERS 15"W. Specifications subject to request a quote call 1-888-845-4641 or visit vikingrange.com © 2019 Viking Range, LLC All rights reserved.
Installation Instructions
Page 2
... years of Contents Safety and Warnng 3 Disposal and Recycling 3 Environmental Requirements 3 Installation 4 Cutout and Product Dimensions 4 Side by Side Installation 5 Anti-Tip Bracket 6 Leveling 7 Grille Installation 8 Door Swing 8 Door Adjust 9 Operating Instructions 10 First Use 10 Control Operation 10 Airflow and Product Loading 11 Interior Adjustments 12 Wine Guide 15 Food Preservation Guide 18 Maintenance 19 Cleaning 19 Cleaning Condenser 20 Extended Non-Use 20 Troubleshooting 20 Service Information 22 Warranty 23 2
... years of Contents Safety and Warnng 3 Disposal and Recycling 3 Environmental Requirements 3 Installation 4 Cutout and Product Dimensions 4 Side by Side Installation 5 Anti-Tip Bracket 6 Leveling 7 Grille Installation 8 Door Swing 8 Door Adjust 9 Operating Instructions 10 First Use 10 Control Operation 10 Airflow and Product Loading 11 Interior Adjustments 12 Wine Guide 15 Food Preservation Guide 18 Maintenance 19 Cleaning 19 Cleaning Condenser 20 Extended Non-Use 20 Troubleshooting 20 Service Information 22 Warranty 23 2

Installation Instructions
Page 3
... doors and leave shelves in the User Guide. This unit is designed to incorrect parts or improper service. CAUTION Damages caused by the warranty. 3 Do not service without consulting the "R600a specifications" section included in place so children may appear on outside surfaces. DANGER RISK OF CHILD ENTRAPMENT. This is a flammable hydrocarbon. WARNING Service must be replaced with adequate backflow protection to...
... doors and leave shelves in the User Guide. This unit is designed to incorrect parts or improper service. CAUTION Damages caused by the warranty. 3 Do not service without consulting the "R600a specifications" section included in place so children may appear on outside surfaces. DANGER RISK OF CHILD ENTRAPMENT. This is a flammable hydrocarbon. WARNING Service must be replaced with adequate backflow protection to...
Installation Instructions
Page 4
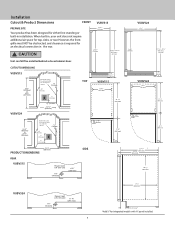
...location for electrical outlet is required for an electrical connection in installation. CUTOUT DIMENSIONS VUBV515 34 1⁄4" (870 mm) to 35 1⁄4" (889 mm) VUBV524 Preferred location for electrical outlet is in an adjacent cabinet. 5&#...Unit can NOT be obstructed, and clearance is in , your unit does not require additional air space for top, sides, or rear. However, the front grille must NOT be installed behind a closed cabinet door. Installation Cutout & Product Dimensions FRONT VUBV515 PREPARE SITE Your product has been designed for either free-standing or built...
...location for electrical outlet is required for an electrical connection in installation. CUTOUT DIMENSIONS VUBV515 34 1⁄4" (870 mm) to 35 1⁄4" (889 mm) VUBV524 Preferred location for electrical outlet is in an adjacent cabinet. 5&#...Unit can NOT be obstructed, and clearance is in , your unit does not require additional air space for top, sides, or rear. However, the front grille must NOT be installed behind a closed cabinet door. Installation Cutout & Product Dimensions FRONT VUBV515 PREPARE SITE Your product has been designed for either free-standing or built...
Installation Instructions
Page 5
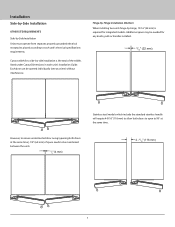
... the total of space needs to each unit's Installation Guide. Cutout width for a side-by-side installation is required for any knobs, pulls or handles installed. 13/16" (22 mm) Stainless steel models which include the standard stainless handle will require 4-9/16" (116 mm) to allow both doors at the same time), 1/4" (6.4 mm) of the widths listed under Cutout Dimensions in each unit's electrical specifications requirements. However, to ensure unobstructed...
... the total of space needs to each unit's Installation Guide. Cutout width for a side-by-side installation is required for any knobs, pulls or handles installed. 13/16" (22 mm) Stainless steel models which include the standard stainless handle will require 4-9/16" (116 mm) to allow both doors at the same time), 1/4" (6.4 mm) of the widths listed under Cutout Dimensions in each unit's electrical specifications requirements. However, to ensure unobstructed...
Installation Instructions
Page 6
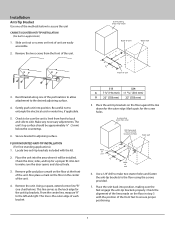
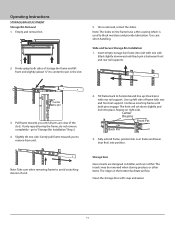
... of unit Back wall B A CL A Front of the unit. Be careful not to adjoining surface. Check the door, sides, and top for the anti-tip brackets. Also place a mark on the floor against the line drawn for the screw holes. Remove the unit. Using a square, extend center line "B" (see chart below). The unit's top surface should be installed. Place the unit into the...
... of unit Back wall B A CL A Front of the unit. Be careful not to adjoining surface. Check the door, sides, and top for the anti-tip brackets. Also place a mark on the floor against the line drawn for the screw holes. Remove the unit. Using a square, extend center line "B" (see chart below). The unit's top surface should be installed. Place the unit into the...

Installation Instructions
Page 7
... cord or water and drain lines, if applicable. 3. Turn to confirm the unit is not level, adjust the legs on the corners of the unit with a clean, water-dampened cloth. 2. Remove interior packing material and wipe out the inside of the unit as needed. INSTALLATION TIP If the room floor is correctly positioned in the cutout opening, adjust the rear legs to level...
... cord or water and drain lines, if applicable. 3. Turn to confirm the unit is not level, adjust the legs on the corners of the unit with a clean, water-dampened cloth. 2. Remove interior packing material and wipe out the inside of the unit as needed. INSTALLATION TIP If the room floor is correctly positioned in the cutout opening, adjust the rear legs to level...
Installation Instructions
Page 8
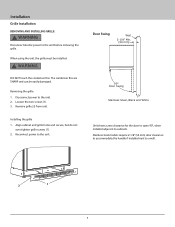
... 90o, when installed adjacent to the unit before removing the grille. Installation Grille Installation REMOVING AND INSTALLING GRILLE ! When using the unit, the grille must be easily damaged. Stainless steel models require 2-1/8" (54 mm) door clearance to accommodate the handle if installed next to the unit. Removing the grille 1. Reconnect power to a wall. 1 2 8 The condenser fins are SHARP and can be installed. ! Remove grille (2) from unit. Align cabinet and grille holes and secure, but do not over tighten grille screws (1). 2. WARNING DO...
... 90o, when installed adjacent to the unit before removing the grille. Installation Grille Installation REMOVING AND INSTALLING GRILLE ! When using the unit, the grille must be easily damaged. Stainless steel models require 2-1/8" (54 mm) door clearance to accommodate the handle if installed next to the unit. Removing the grille 1. Reconnect power to a wall. 1 2 8 The condenser fins are SHARP and can be installed. ! Remove grille (2) from unit. Align cabinet and grille holes and secure, but do not over tighten grille screws (1). 2. WARNING DO...
Installation Instructions
Page 9
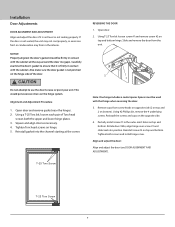
... with the cabinet. Remove caps from the unit. 2 1 Note: One hinge includes a metal spacer. Reinstall screw #2 on the hinge system. Tighten both the upper and lower hinge plates. 3. If the door is not pinched on bottom). CAUTION Do not attempt to use the door ...to ensure that hinge when reversing the door. 3. T-25 Torx Screw REVERSING THE DOOR 1. T-25 Torx Screw 9 Installation Door Adjustments DOOR ALIGNMENT AND ADJUSTMENT Align and adjust the door if it is not level or not sealing properly. Carefully examine the door's gasket to raise or pivot your unit...
... with the cabinet. Remove caps from the unit. 2 1 Note: One hinge includes a metal spacer. Reinstall screw #2 on the hinge system. Tighten both the upper and lower hinge plates. 3. If the door is not pinched on bottom). CAUTION Do not attempt to use the door ...to ensure that hinge when reversing the door. 3. T-25 Torx Screw REVERSING THE DOOR 1. T-25 Torx Screw 9 Installation Door Adjustments DOOR ALIGNMENT AND ADJUSTMENT Align and adjust the door if it is not level or not sealing properly. Carefully examine the door's gasket to raise or pivot your unit...
Installation Instructions
Page 10
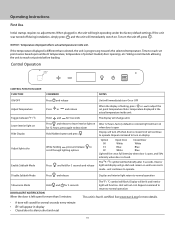
... Light will be lit and interior light will flash. Operating Instructions First Use Initial startup requires no adjustments. If the unit was turned off , press . If the temperature displayed is different than 5 minutes: • A tone will sound for more than selected, the unit is Star-K certified. Time to turn the unit off during installation, simply press and the unit will continue to normal operation This unit...
... Light will be lit and interior light will flash. Operating Instructions First Use Initial startup requires no adjustments. If the unit was turned off , press . If the temperature displayed is different than 5 minutes: • A tone will sound for more than selected, the unit is Star-K certified. Time to turn the unit off during installation, simply press and the unit will continue to normal operation This unit...
Installation Instructions
Page 11
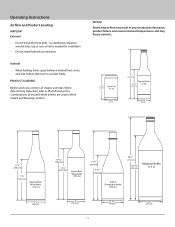
Operating Instructions Airflow and Product Loading AIRFLOW External • Do not block the front grille - When determining capacities, refer to circulate freely PRODUCT LOADING Bottles and cans come in ...clearance around sides, top or rear of red and white bottles are used in Wine Cellars and Beverage Centers. NOTICE Restricting airflow may result in all shapes and sizes. Combinations of unit is needed for ventilation • Do not install behind a closed door Internal • When loading, leave space between internal fans, vents, and side walls to allow air to the following sizes...
Operating Instructions Airflow and Product Loading AIRFLOW External • Do not block the front grille - When determining capacities, refer to circulate freely PRODUCT LOADING Bottles and cans come in ...clearance around sides, top or rear of red and white bottles are used in Wine Cellars and Beverage Centers. NOTICE Restricting airflow may result in all shapes and sizes. Combinations of unit is needed for ventilation • Do not install behind a closed door Internal • When loading, leave space between internal fans, vents, and side walls to allow air to the following sizes...

Installation Instructions
Page 12
...Remove and reposition as desired. Note: The slides on the rack have a thin coating which is between front and rear rail supports. 2. Slightly tilt one side tilted slightly downward until back pin is used to "Rack Installation" Step 2. 4. Operating Instructions Interior Adjustments All 5 Series models feature side mounted rack supports with 2 front slots. 4. Insert... Continue inserting rack until all four pins are clear of rack will set down slightly into the front slots and be locked into unit with one side. Once removed, retract the slides. Use care when ...
...Remove and reposition as desired. Note: The slides on the rack have a thin coating which is between front and rear rail supports. 2. Slightly tilt one side tilted slightly downward until back pin is used to "Rack Installation" Step 2. 4. Operating Instructions Interior Adjustments All 5 Series models feature side mounted rack supports with 2 front slots. 4. Insert... Continue inserting rack until all four pins are clear of rack will set down slightly into the front slots and be locked into unit with one side. Once removed, retract the slides. Use care when ...
Installation Instructions
Page 14
Empty and remove bin. 2. Once removed, retract the slides. Use care when handling. Insert empty storage bin frame into unit with one side. If only repositioning the frame, do not remove completely - The front will set down slightly and lock into position. Clean the storage bins with rear rail support. Operating Instructions STORAGE BIN ADJUSTMENT Storage Bin Removal 1. Slide and Secure Storage Bin Installation 1. Pull frame towards...
Empty and remove bin. 2. Once removed, retract the slides. Use care when handling. Insert empty storage bin frame into unit with one side. If only repositioning the frame, do not remove completely - The front will set down slightly and lock into position. Clean the storage bins with rear rail support. Operating Instructions STORAGE BIN ADJUSTMENT Storage Bin Removal 1. Slide and Secure Storage Bin Installation 1. Pull frame towards...
Installation Instructions
Page 19
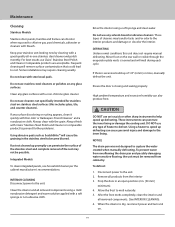
... (2 in -one stainless steel cleaner and polish monthly. When the interior is dry, reconnect power and turn unit on the rear wall or visible through the evaporator plate vents is closing and sealing properly. Clean any surface discoloring or rusting appears, clean it quickly with a non-chlorine glass cleaner. Always clean with bleach. CAUTION DO NOT use household cleaner per the cabinet manufacturer's recommendations...
... (2 in -one stainless steel cleaner and polish monthly. When the interior is dry, reconnect power and turn unit on the rear wall or visible through the evaporator plate vents is closing and sealing properly. Clean any surface discoloring or rusting appears, clean it quickly with a non-chlorine glass cleaner. Always clean with bleach. CAUTION DO NOT use household cleaner per the cabinet manufacturer's recommendations...
Installation Instructions
Page 20
... needs service, contact Viking Preferred Service directly at (888) 845-4641. ! Remove the grille. See GRILLE INSTALLATION). 2. Troubleshooting BEFORE CALLING FOR SERVICE If you will resolve the problem without the need your product is not covered by freezing temperatures is malfunctioning, read the NORMAL OPERATING SOUNDS and TROUBLESHOOTING GUIDE sections below to thaw naturally. 4. Remove all water has been removed from its internal working components. This information appears on the Model and Serial number plate...
... needs service, contact Viking Preferred Service directly at (888) 845-4641. ! Remove the grille. See GRILLE INSTALLATION). 2. Troubleshooting BEFORE CALLING FOR SERVICE If you will resolve the problem without the need your product is not covered by freezing temperatures is malfunctioning, read the NORMAL OPERATING SOUNDS and TROUBLESHOOTING GUIDE sections below to thaw naturally. 4. Remove all water has been removed from its internal working components. This information appears on the Model and Serial number plate...
Installation Instructions
Page 21
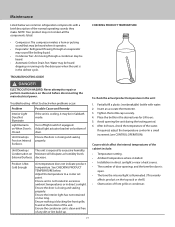
... unit: 1. Maintenance Listed below . Product is clean and free of the normal operating sounds they make. Ensure the interior light has not remained on Moisture will dissipate as humidity levels External Surfaces. Ensure the condenser coil is Not Cold Enough Air temperature does not indicate product temperature. If required, adjust the temperature control in direct sunlight. Ensure the door is exposed to check when problems...
... unit: 1. Maintenance Listed below . Product is clean and free of the normal operating sounds they make. Ensure the interior light has not remained on Moisture will dissipate as humidity levels External Surfaces. Ensure the condenser coil is Not Cold Enough Air temperature does not indicate product temperature. If required, adjust the temperature control in direct sunlight. Ensure the door is exposed to check when problems...
Installation Instructions
Page 22
... unable to obtain the name of an authorized service agency, or if you are located on the upper wall, behind the lighting: Model No Serial No Date of Purchase Date Installed Dealer's Name Address If service requires installation of dealer from whom purchased Clearly describe the problem that you continue to have service problems, contact Viking Range, LLC at (888) 845-4641 or write...
... unable to obtain the name of an authorized service agency, or if you are located on the upper wall, behind the lighting: Model No Serial No Date of Purchase Date Installed Dealer's Name Address If service requires installation of dealer from whom purchased Clearly describe the problem that you continue to have service problems, contact Viking Range, LLC at (888) 845-4641 or write...
Installation Instructions
Page 23
... model and serial number and date of safety arise which fails or is requested. Under this warranty, service must be performed by the warrantor to remedy the defect or malfunction, the owner is warranted to repair or replace, at overtime or premium rates shall not be purchased in kitchen lighting, product locations, and other than an authorized Viking Range, LLC service agency or representative. Replacement...
... model and serial number and date of safety arise which fails or is requested. Under this warranty, service must be performed by the warrantor to remedy the defect or malfunction, the owner is warranted to repair or replace, at overtime or premium rates shall not be purchased in kitchen lighting, product locations, and other than an authorized Viking Range, LLC service agency or representative. Replacement...


