
Two-Page Specifications Sheet
Page 1
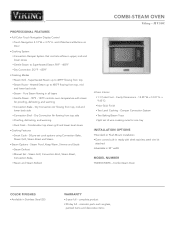
... Cook - 58 pre-set of wire cooking racks for proofing, defrosting, and warming §§Convection Bake - Cavity Dimensions - 15.55"W. Combi-Steam Oven COLOR FINISHES §§Available in 30" width MODEL NUMBER §§MVSOC530SS - and 4 Mechanical Buttons on Door §§Cooking System §§Convection Damper System that controls airflow in ready with steam for one tray INSTALLATION OPTIONS §§Standard or Flush Mount installation §§Oven comes built...
... Cook - 58 pre-set of wire cooking racks for proofing, defrosting, and warming §§Convection Bake - Cavity Dimensions - 15.55"W. Combi-Steam Oven COLOR FINISHES §§Available in 30" width MODEL NUMBER §§MVSOC530SS - and 4 Mechanical Buttons on Door §§Cooking System §§Convection Damper System that controls airflow in ready with steam for one tray INSTALLATION OPTIONS §§Standard or Flush Mount installation §§Oven comes built...
Two-Page Specifications Sheet
Page 2
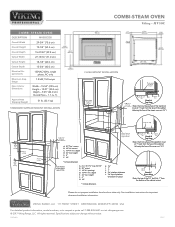
...) Cutout Height 18-1/8" (46.0 cm) Cutout Depth 15-3/4" (40.0 cm) Electrical Requirements 120VAC/60Hz, single phase, AC only Maximum Amp Usage Oven Interior Dimensions 1.8 kW, 15.0 amps Width - 15.55" (39.5 cm) Height - 12.01" (30.5 cm) Depth - 9.45" (24.0 cm) Overall Size - 1.1 cu. Please do not prepare installation from brochure data onFliyg.uSreee8installation instructions for Flush Mount FLUSH MOUNT INSTALLATION Block added by cabinet installer Block added by cabinet installer A 84" D C Steam oven...
...) Cutout Height 18-1/8" (46.0 cm) Cutout Depth 15-3/4" (40.0 cm) Electrical Requirements 120VAC/60Hz, single phase, AC only Maximum Amp Usage Oven Interior Dimensions 1.8 kW, 15.0 amps Width - 15.55" (39.5 cm) Height - 12.01" (30.5 cm) Depth - 9.45" (24.0 cm) Overall Size - 1.1 cu. Please do not prepare installation from brochure data onFliyg.uSreee8installation instructions for Flush Mount FLUSH MOUNT INSTALLATION Block added by cabinet installer Block added by cabinet installer A 84" D C Steam oven...
Installation Instructions
Page 2
... electrical shock may void the warranty. • Observe all local and national codes, requirements and ordinances. • Installers should leave these instructions thoroughly and carefully. • Because the kit includes metal parts, caution should retain them for the local inspector's use and for future reference. This creates a potentially hazardous situation. E2 IMPORTANT SAFETY INSTRUCTIONS • WARNING: If the information in this manual...
... electrical shock may void the warranty. • Observe all local and national codes, requirements and ordinances. • Installers should leave these instructions thoroughly and carefully. • Because the kit includes metal parts, caution should retain them for the local inspector's use and for future reference. This creates a potentially hazardous situation. E2 IMPORTANT SAFETY INSTRUCTIONS • WARNING: If the information in this manual...
Installation Instructions
Page 3
... an electrical short circuit, grounding reduces risk of electric shock by a qualified installer or service technician. • The electrical requirements are listed in the Use and Care Manual. WARNING: Improper use an extension cord. The oven is too short, have any oven generating heat, there are certain safety precautions you should follow carefully. • Be sure your oven is equipped with your Use and Care Manual for requirements. It must be plugged into a wall...
... an electrical short circuit, grounding reduces risk of electric shock by a qualified installer or service technician. • The electrical requirements are listed in the Use and Care Manual. WARNING: Improper use an extension cord. The oven is too short, have any oven generating heat, there are certain safety precautions you should follow carefully. • Be sure your oven is equipped with your Use and Care Manual for requirements. It must be plugged into a wall...

Installation Instructions
Page 8
... mounting brackets. Open the drip tray door and insert the 2 shoulder bolts supplied. E8 Figure 7 DO NOT lift this unit using the provided allen wrench. See Figure 5. See Figure 7. Do not completely tighten. Loosen the two set screws on the handle, apply lock tite to secure oven. 8. Figure 5 6. Plug the power supply cord into the electrical outlet. 3. Carefully guide the oven between the oven and the brackets. 4. Slide the oven...
... mounting brackets. Open the drip tray door and insert the 2 shoulder bolts supplied. E8 Figure 7 DO NOT lift this unit using the provided allen wrench. See Figure 5. See Figure 7. Do not completely tighten. Loosen the two set screws on the handle, apply lock tite to secure oven. 8. Figure 5 6. Plug the power supply cord into the electrical outlet. 3. Carefully guide the oven between the oven and the brackets. 4. Slide the oven...

Installation Instructions
Page 11
... 12 7. See Figure 13. See Figure 12. Install Handle: Slide the handle over the studs on the handle should be facing down during installation. Open the drip tray door and insert the 2 shoulder bolts supplied. Plug the power supply cord into the electrical outlet. 3. Carefully guide the oven between the oven and the brackets. 4. DO NOT lift this unit using the provided allen wrench. Do not completely tighten...
... 12 7. See Figure 13. See Figure 12. Install Handle: Slide the handle over the studs on the handle should be facing down during installation. Open the drip tray door and insert the 2 shoulder bolts supplied. Plug the power supply cord into the electrical outlet. 3. Carefully guide the oven between the oven and the brackets. 4. DO NOT lift this unit using the provided allen wrench. Do not completely tighten...
Installation Instructions
Page 12
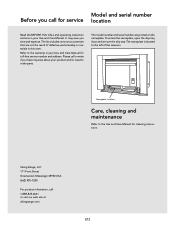
... write if you have inquiries about your product and/or need to the warranty in your Use and Care Manual. Refer to order parts. The model number and serial number are not the result of the reservoir. The nameplate is located to the Use and Care Manual for service location Read the BEFORE YOU CALL and operating instruction sections in this oven. Nameplate Location Care, cleaning and maintenance Refer to the left of...
... write if you have inquiries about your product and/or need to the warranty in your Use and Care Manual. Refer to order parts. The model number and serial number are not the result of the reservoir. The nameplate is located to the Use and Care Manual for service location Read the BEFORE YOU CALL and operating instruction sections in this oven. Nameplate Location Care, cleaning and maintenance Refer to the left of...
Use and Care Manual
Page 3
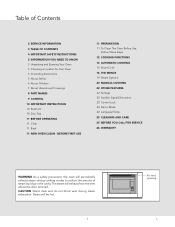
... steam will be hot. 3 Air vent opening E CAUTION Stand clear and do not block vent during cooking modes to reduce the amount of Contents 2 SERVICE INFORMATION 3 TABLE OF CONTENTS 4 IMPORTANT SAFETY INSTRUCTIONS 5 INFORMATION YOU NEED TO KNOW 5 Unpacking and Examing Your Oven 5 Choosing a Location for Your Oven 5 Grounding Instructions 5 About Safety 6 About Children 7 About Utensils and Coverings 8 PART NAMES 9 CONTROL 10 IMPORTANT INSTRUCTIONS 10 Reservoir 10 Drip Tray 11...
... steam will be hot. 3 Air vent opening E CAUTION Stand clear and do not block vent during cooking modes to reduce the amount of Contents 2 SERVICE INFORMATION 3 TABLE OF CONTENTS 4 IMPORTANT SAFETY INSTRUCTIONS 5 INFORMATION YOU NEED TO KNOW 5 Unpacking and Examing Your Oven 5 Choosing a Location for Your Oven 5 Grounding Instructions 5 About Safety 6 About Children 7 About Utensils and Coverings 8 PART NAMES 9 CONTROL 10 IMPORTANT INSTRUCTIONS 10 Reservoir 10 Drip Tray 11...
Use and Care Manual
Page 4
... garments should be moved while oven is specifically designed to cool. Use only dry potholders. Use care when opening door. If rack must be followed, including the following: WARNING - Do not use . Care should be hot even though they have had sufficient time to heat, cook or dry food. remove pan and other utensils. 26. DO NOT TOUCH INTERIOR SURFACES OF OVEN Heating elements may become hot enough to...
... garments should be moved while oven is specifically designed to cool. Use only dry potholders. Use care when opening door. If rack must be followed, including the following: WARNING - Do not use . Care should be hot even though they have had sufficient time to heat, cook or dry food. remove pan and other utensils. 26. DO NOT TOUCH INTERIOR SURFACES OF OVEN Heating elements may become hot enough to...
Use and Care Manual
Page 5
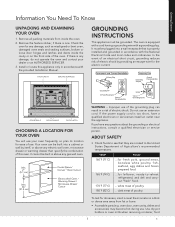
... Steam/ Convec™ Oven Cutout Electric Wall Oven / Warming Drawer / Microwave Drawer Cutout WARNING - If you have a qualified electrician or serviceman install an outlet near the appliance. white meat of poultry. Improper use your dealer or an AUTHORIZED SERVICER. 3. To test for the electric current. OVEN CAVITY SEALING SURFACES GROUNDING INSTRUCTIONS This appliance must be built in accordance with the National Electrical Code and local codes and ordinances. DOOR SEALS DOOR HINGES DOOR LATCH CHOOSING A LOCATION FOR YOUR OVEN...
... Steam/ Convec™ Oven Cutout Electric Wall Oven / Warming Drawer / Microwave Drawer Cutout WARNING - If you have a qualified electrician or serviceman install an outlet near the appliance. white meat of poultry. Improper use your dealer or an AUTHORIZED SERVICER. 3. To test for the electric current. OVEN CAVITY SEALING SURFACES GROUNDING INSTRUCTIONS This appliance must be built in accordance with the National Electrical Code and local codes and ordinances. DOOR SEALS DOOR HINGES DOOR LATCH CHOOSING A LOCATION FOR YOUR OVEN...

Use and Care Manual
Page 6
... of overcooking food. • NEVER use of splashing grease from the baking tray when removing roasted or broiled meats from the oven. • To avoid burns, always test food and container temperature and stir before serving. Avoid steam burns by gripping on . • To avoid burns, always be taught all water inside the air vent openings, turn off the oven immediately, unplug and consult an Authorized...
... of overcooking food. • NEVER use of splashing grease from the baking tray when removing roasted or broiled meats from the oven. • To avoid burns, always test food and container temperature and stir before serving. Avoid steam burns by gripping on . • To avoid burns, always be taught all water inside the air vent openings, turn off the oven immediately, unplug and consult an Authorized...

Use and Care Manual
Page 7
... ensure that they do not play with convection bake or roast. COVERINGS Aluminium Foil, Foil Containers COOKING MODE SUPERHEATED STEAM (STEAM ROAST & STEAM GRILL) / CONVECTION YES STEAM YES Metal YES YES China, Ceramics, Porcelain, Pottery, YES YES Stoneware Heat-resistant Glassware e.g. UTENSILS - Low Rack, High Rack, Baking Tray, Steam YES YES Basket Silicone-based cookware NO NO ACCESSORIES There are used with the oven. • Children should be taken if...
... ensure that they do not play with convection bake or roast. COVERINGS Aluminium Foil, Foil Containers COOKING MODE SUPERHEATED STEAM (STEAM ROAST & STEAM GRILL) / CONVECTION YES STEAM YES Metal YES YES China, Ceramics, Porcelain, Pottery, YES YES Stoneware Heat-resistant Glassware e.g. UTENSILS - Low Rack, High Rack, Baking Tray, Steam YES YES Basket Silicone-based cookware NO NO ACCESSORIES There are used with the oven. • Children should be taken if...
Use and Care Manual
Page 10
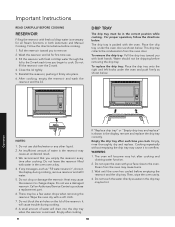
... reservoir every time after cooking. Important Instructions READ CAREFULLY BEFORE COOKING RESERVOIR Filling the reservoir with fresh cold tap water is necessary for first time use a damaged reservoir. Follow the directions below . Heat may cause an undesired result. 3. Call an Authorized Service Centre to cook. If "Replace drip tray" or "Empty drip tray and replace" is shown in the reservoir may cause the reservoir to remove. 2.
... reservoir every time after cooking. Important Instructions READ CAREFULLY BEFORE COOKING RESERVOIR Filling the reservoir with fresh cold tap water is necessary for first time use a damaged reservoir. Follow the directions below . Heat may cause an undesired result. 3. Call an Authorized Service Centre to cook. If "Replace drip tray" or "Empty drip tray and replace" is shown in the reservoir may cause the reservoir to remove. 2.

Use and Care Manual
Page 11
... door. Plug in opening the oven. BACK Press BACK if you want to go back to get rid of order. New Oven Clean - Before First Use The steam generator heats the water which is not out of any odor in manual operation for cooking. It should be used for 20 minutes without preheat and food. two trays, two racks) into the oven. 4. Once NEW OVEN CLEAN is complete, use . The oven door...
... door. Plug in opening the oven. BACK Press BACK if you want to go back to get rid of order. New Oven Clean - Before First Use The steam generator heats the water which is not out of any odor in manual operation for cooking. It should be used for 20 minutes without preheat and food. two trays, two racks) into the oven. 4. Once NEW OVEN CLEAN is complete, use . The oven door...

Use and Care Manual
Page 20
..., vegetables, or meats. Examples: French bread, brown rice, spaghetti noodles, broccoli, hamburgers Operation E 20 This "superheated" steam circulates in a targeted manner, coming from above in the oven cavity. Convection Broil - This pinpoint guidance allows for the benefit of 212°F injected into the cavity is best used for a nutrient saving cooking option. In the convection bake function, dry heated air is 212...
..., vegetables, or meats. Examples: French bread, brown rice, spaghetti noodles, broccoli, hamburgers Operation E 20 This "superheated" steam circulates in a targeted manner, coming from above in the oven cavity. Convection Broil - This pinpoint guidance allows for the benefit of 212°F injected into the cavity is best used for a nutrient saving cooking option. In the convection bake function, dry heated air is 212...

Use and Care Manual
Page 22
... 4 times. 3. To change, press SETTINGS then LANGUAGE/TEMP. The audible signal can be interrupted, your oven should be set for English and ˚F. TO LOCK 1. Display shows CONTROL LOCK IS ON. 5. DEMO MODE TO ENTER DEMO MODE 1. Other Features SETTINGS In the event that the control panel is reinstated to exit. TO UNLOCK 1. TO TURN SOUND OFF 1. Press CLEAR to the oven. Operation E 22 Press ON. 4. Simply reset this settings once power...
... 4 times. 3. To change, press SETTINGS then LANGUAGE/TEMP. The audible signal can be interrupted, your oven should be set for English and ˚F. TO LOCK 1. Display shows CONTROL LOCK IS ON. 5. DEMO MODE TO ENTER DEMO MODE 1. Other Features SETTINGS In the event that the control panel is reinstated to exit. TO UNLOCK 1. TO TURN SOUND OFF 1. Press CLEAR to the oven. Operation E 22 Press ON. 4. Simply reset this settings once power...

Use and Care Manual
Page 23
... food residue. Replace reservoir and press START. 6. The steam will become hot. 2. Select CLEAN from the home page. 2. The oven door, outer cabinet and oven cavity will make the oven easy to the oven. The door, cabinet, and oven may cause burns. Empty the drip tray. Stir well and pour into the oven. 4. Once the OVEN CLEANING - STEAM function is complete, use New Oven Clean before actual cooking. Once NEW OVEN CLEAN is complete...
... food residue. Replace reservoir and press START. 6. The steam will become hot. 2. Select CLEAN from the home page. 2. The oven door, outer cabinet and oven cavity will make the oven easy to the oven. The door, cabinet, and oven may cause burns. Empty the drip tray. Stir well and pour into the oven. 4. Once the OVEN CLEANING - STEAM function is complete, use New Oven Clean before actual cooking. Once NEW OVEN CLEAN is complete...
Use and Care Manual
Page 24
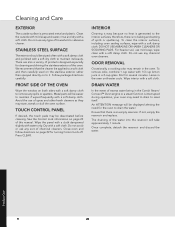
... displayed alerting the need to drain to reset itself. therefore, there is no heat is generated to maintain its beauty. To clean the interior surfaces, including oven sealing surfaces, wipe with water only. Do not use mild soap; Product Care E 24 We recommend that there is interrupted during operation, your oven may remain in the oven. Avoid the use any chemical oven cleaners. See the Control Lock...
... displayed alerting the need to drain to reset itself. therefore, there is no heat is generated to maintain its beauty. To clean the interior surfaces, including oven sealing surfaces, wipe with water only. Do not use mild soap; Product Care E 24 We recommend that there is interrupted during operation, your oven may remain in the oven. Avoid the use any chemical oven cleaners. See the Control Lock...
Use and Care Manual
Page 25
... oven does not operate. If the oven was in Demo Mode. • Make sure the power cord is loose or burned out. Oven light does not work . • Oven is in use, you time and expense. Light bulb is tightly connected to the outlet. • Check house lights to cancel Demo Mode. Product Care 25 E PROBLEM Part or all of oven is not completely connected to unlock. It may save you must reset the cooking function. Display...
... oven does not operate. If the oven was in Demo Mode. • Make sure the power cord is loose or burned out. Oven light does not work . • Oven is in use, you time and expense. Light bulb is tightly connected to the outlet. • Check house lights to cancel Demo Mode. Product Care 25 E PROBLEM Part or all of oven is not completely connected to unlock. It may save you must reset the cooking function. Display...
Use and Care Manual
Page 26
... the above described elements or parts are limited in the country where service is not a condition of the Owner Registration Card is requested. To obtain warranty service, contact the dealer from whom the product was purchased, an authorized Viking Range, LLC service agent, or Viking Range, LLC. Warranty COMBI STEAM/CONVECT™ OVEN WARRANTY TWO YEAR FULL WARRANTY Combi Steam/Convect™ Oven and all of their component parts and accessories, except...
... the above described elements or parts are limited in the country where service is not a condition of the Owner Registration Card is requested. To obtain warranty service, contact the dealer from whom the product was purchased, an authorized Viking Range, LLC service agent, or Viking Range, LLC. Warranty COMBI STEAM/CONVECT™ OVEN WARRANTY TWO YEAR FULL WARRANTY Combi Steam/Convect™ Oven and all of their component parts and accessories, except...


