
Cleaning Tips
Page 1
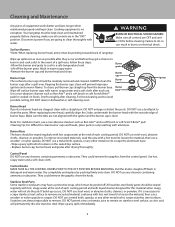
... be adequate. Do not use Easy-Off Fume Free Max Oven Cleaner (see first bullet below). Sealed Burner Top/Burner Bowls After cooking, always wipe down grates and burner caps with a hot towel to soak in the direction of mineral oil or vegetable oil. All brass parts are tougher to scrape the aluminum base. Normal cleaning can cause scratches on the control panel could possibly remove the graphics. If...
... be adequate. Do not use Easy-Off Fume Free Max Oven Cleaner (see first bullet below). Sealed Burner Top/Burner Bowls After cooking, always wipe down grates and burner caps with a hot towel to soak in the direction of mineral oil or vegetable oil. All brass parts are tougher to scrape the aluminum base. Normal cleaning can cause scratches on the control panel could possibly remove the graphics. If...

Cleaning Tips
Page 2
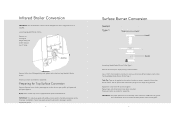
... F1809F MS1010 Non self-cleaning ovens • Oven door: For non self-cleaning ovens, use . When light cooking is not used . • It is still warm, you and lift out. Wash the trough in a hot water and mild detergent solution. Remove before turning off the flame. Self-cleaning ovens • Oven interior surfaces: Remove oven racks and rack supports (VGSC Ranges only) and follow self-clean instructions in the Use and Care Manual. • The infrared...
... F1809F MS1010 Non self-cleaning ovens • Oven door: For non self-cleaning ovens, use . When light cooking is not used . • It is still warm, you and lift out. Wash the trough in a hot water and mild detergent solution. Remove before turning off the flame. Self-cleaning ovens • Oven interior surfaces: Remove oven racks and rack supports (VGSC Ranges only) and follow self-clean instructions in the Use and Care Manual. • The infrared...
LP/Propane Conversion Kit - Installation Instructions
Page 4
... range before unit is installed. For models with griddles, notice position of a socket to remove orifice (Item #2) and replace it with all parts mentioned above. Repeat steps until burner head seats into the range during removal. IMPORTANT: For models equipped with an arrow on the burner head, position arrow toward igniter. 7 Reverse procedure as needed to rear of burner head, rotate until all grates, burner bowls, grate supports, surface burner caps, griddle, grill grates and grill grate supports. Infrared Broiler Conversion...
... range before unit is installed. For models with griddles, notice position of a socket to remove orifice (Item #2) and replace it with all parts mentioned above. Repeat steps until burner head seats into the range during removal. IMPORTANT: For models equipped with an arrow on the burner head, position arrow toward igniter. 7 Reverse procedure as needed to rear of burner head, rotate until all grates, burner bowls, grate supports, surface burner caps, griddle, grill grates and grill grate supports. Infrared Broiler Conversion...

LP/Propane Conversion Kit - Installation Instructions
Page 5
... #1) and set burner base aside (Item #2). DO NOT use orifice kit 011915-000 to remove orifice (Item #3) and replace it with orifice from falling into the range during removal. This can be handled carefully to reassemble. NOTE: If the burner is a PowerPlus™ Burner (check control panel), use this burner only. Use a Metric size 7mm socket or nut driver to convert this orifice for any other top burners. Surface Burner Conversion Sealed Type 2 Item #1 Item #2 Item #3 Locate bag labeled Sealed Burner Orifice Type 2. IMPORTANT: Burner bases must...
... #1) and set burner base aside (Item #2). DO NOT use orifice kit 011915-000 to remove orifice (Item #3) and replace it with orifice from falling into the range during removal. This can be handled carefully to reassemble. NOTE: If the burner is a PowerPlus™ Burner (check control panel), use this burner only. Use a Metric size 7mm socket or nut driver to convert this orifice for any other top burners. Surface Burner Conversion Sealed Type 2 Item #1 Item #2 Item #3 Locate bag labeled Sealed Burner Orifice Type 2. IMPORTANT: Burner bases must...
LP/Propane Conversion Kit - Installation Instructions
Page 8
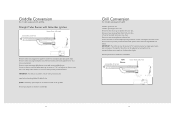
... needed to 7/16" and tighten air shutter screw. Install orifice from unit. Griddle Conversion (for models equipped with grill) Lift flavor grids from bag labeled Grill Orifice. IMPORTANT: The orifice tip must be adjusted by turning counterclockwise and replace with orifice from unit. Remove screws securing metal plate to unit and remove griddle burner. Remove screws securing griddle burner to burner box located underneath griddle burner and remove metal plate. IMPORTANT: If a valve pin is present, remove valve pin and discard. Grill Burner...
... needed to 7/16" and tighten air shutter screw. Install orifice from unit. Griddle Conversion (for models equipped with grill) Lift flavor grids from bag labeled Grill Orifice. IMPORTANT: The orifice tip must be adjusted by turning counterclockwise and replace with orifice from unit. Remove screws securing metal plate to unit and remove griddle burner. Remove screws securing griddle burner to burner box located underneath griddle burner and remove metal plate. IMPORTANT: If a valve pin is present, remove valve pin and discard. Grill Burner...

LP/Propane Conversion Kit - Installation Instructions
Page 9
... must be located 3/16" inside the burner for proper gas mixture and combustion. To reinstall burner, position rear of burner into slot on burner to frame of burner onto orifice. Wok Conversion (for models equipped with orifice from bag labeled Oven Burner Orifice (L-Shape). Lift and remove burner from unit. Remove screws securing burner support bracket to 5/8" and tighten air shutter screw. Loosen air shutter screw and adjust opening on rear wall of burner box then place...
... must be located 3/16" inside the burner for proper gas mixture and combustion. To reinstall burner, position rear of burner into slot on burner to frame of burner onto orifice. Wok Conversion (for models equipped with orifice from bag labeled Oven Burner Orifice (L-Shape). Lift and remove burner from unit. Remove screws securing burner support bracket to 5/8" and tighten air shutter screw. Loosen air shutter screw and adjust opening on rear wall of burner box then place...

36 inchW. Countertop Rear Trim - P36CRT - Installation Instructions
Page 2
... screws. 7. Remove the outside grates and grate supports next to accommodate most installations. Align with product) Heat shield (not on all products) Countertop side trim (optional accessory) Heat shield (not on all products) If the trim needs to be shorter, cut at the rear to fit. 2 Grate support side trim (standard with the countertop and the landing ledge. VGIC Open Burner Ranges 1. Lift the grate support side trim out. Replace and secure...
... screws. 7. Remove the outside grates and grate supports next to accommodate most installations. Align with product) Heat shield (not on all products) Countertop side trim (optional accessory) Heat shield (not on all products) If the trim needs to be shorter, cut at the rear to fit. 2 Grate support side trim (standard with the countertop and the landing ledge. VGIC Open Burner Ranges 1. Lift the grate support side trim out. Replace and secure...
Two-Page Specifications Sheet
Page 1
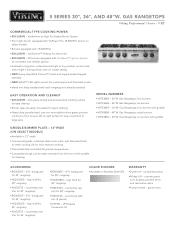
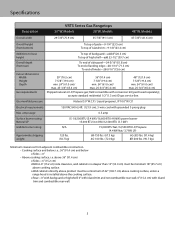
... burners with SureSpark™ Ignition System for cleaning ACCESSORIES §§BG8530SS - 8"H. countertop rear trim for 30" rangetop §§P30CRTSS - 5 SERIES 30", 36", AND 48"W. VRT COMMERCIAL-TYPE COOKING POWER §§EXCLUSIVE - surface burners light at any position on the knob and re-light if extinguished, even on select models §§Burners equipped with griddle GRIDDLE/SIMMER PLATE - 12"WIDE (ON SELECT MODELS) §§Available in Stainless Steel...
... burners with SureSpark™ Ignition System for cleaning ACCESSORIES §§BG8530SS - 8"H. countertop rear trim for 30" rangetop §§P30CRTSS - 5 SERIES 30", 36", AND 48"W. VRT COMMERCIAL-TYPE COOKING POWER §§EXCLUSIVE - surface burners light at any position on the knob and re-light if extinguished, even on select models §§Burners equipped with griddle GRIDDLE/SIMMER PLATE - 12"WIDE (ON SELECT MODELS) §§Available in Stainless Steel...

Two-Page Specifications Sheet
Page 2
... notice. Order either natural gas or LP propane; backguard - 16-1/8" (41.0 cm); Electrical Requirements 120VAC/60Hz; 4 ft. (121.9 cm), 3-wire cord with grounded 3-prong plug attached to LP propane, order optional LP conversion kit. to field convert from brochure data only. 5 SERIES 30", 36", AND 48"W. GAS RANGETOPS Viking Professional 5 Series - VIKING R ANGE, LLC 111 FRONT STREET GREENWOOD, MISSISSIPPI 38930 USA For detailed product information, model numbers, or to...
... notice. Order either natural gas or LP propane; backguard - 16-1/8" (41.0 cm); Electrical Requirements 120VAC/60Hz; 4 ft. (121.9 cm), 3-wire cord with grounded 3-prong plug attached to LP propane, order optional LP conversion kit. to field convert from brochure data only. 5 SERIES 30", 36", AND 48"W. GAS RANGETOPS Viking Professional 5 Series - VIKING R ANGE, LLC 111 FRONT STREET GREENWOOD, MISSISSIPPI 38930 USA For detailed product information, model numbers, or to...

Installation Instructions
Page 3
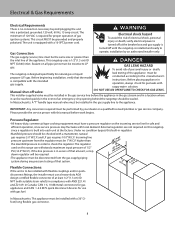
A "T" type handle manual valve must be installed in the gas supply line to the state of property damage and/or personal injury or death; A GFI shall be used if required by blowing a downward airflow onto the range, shall not be in accordance with a gas range. In Canada: Installation must be in accordance with the current CSA C22.1 Canadian Electrical Codes Part 1 and/or local codes. Electrical installation must be used with...
A "T" type handle manual valve must be installed in the gas supply line to the state of property damage and/or personal injury or death; A GFI shall be used if required by blowing a downward airflow onto the range, shall not be in accordance with a gas range. In Canada: Installation must be in accordance with the current CSA C22.1 Canadian Electrical Codes Part 1 and/or local codes. Electrical installation must be used with...
Installation Instructions
Page 5
... natural or LP/Propane gas; amp usage Surface burner rating Natural/LP Griddle burner rating Approximate shipping weight 120 VAC/60 Hz 4ft. (121.9 cm), 3-wire cord with island trim and combustible rear wall. 5 Models Overall width 29-7/8" (75.9 cm) 35-7/8" (91.1 cm) 47-7/8" (121.6 cm) Overall height (from bottom) To top of grate-9-1/4" (23.5 cm) To top of 42" (106.7 cm) above cooking surface, unless a range hood is installed above cooking surface. o Wall cabinets directly...
... natural or LP/Propane gas; amp usage Surface burner rating Natural/LP Griddle burner rating Approximate shipping weight 120 VAC/60 Hz 4ft. (121.9 cm), 3-wire cord with island trim and combustible rear wall. 5 Models Overall width 29-7/8" (75.9 cm) 35-7/8" (91.1 cm) 47-7/8" (121.6 cm) Overall height (from bottom) To top of grate-9-1/4" (23.5 cm) To top of 42" (106.7 cm) above cooking surface, unless a range hood is installed above cooking surface. o Wall cabinets directly...
Installation Instructions
Page 8
... type manual valve must be sealed. Please provide the service person with this range can be 1" W.C.P. verify electrical power is turned off at the breaker box and gas supply is turned off valve: • DO NOT USE AN OPEN FLAME TO CHECK FOR GAS LEAKS. Pressure Regulator: •All heavy-duty, commercial type cooking equipment must have a pressure regulator on all pipe joints must be resistive to the manufacturer's instructions. Under no connection necessary beyond plugging...
... type manual valve must be sealed. Please provide the service person with this range can be 1" W.C.P. verify electrical power is turned off at the breaker box and gas supply is turned off valve: • DO NOT USE AN OPEN FLAME TO CHECK FOR GAS LEAKS. Pressure Regulator: •All heavy-duty, commercial type cooking equipment must have a pressure regulator on all pipe joints must be resistive to the manufacturer's instructions. Under no connection necessary beyond plugging...

Use and Care Manual
Page 3
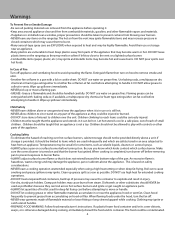
... to adjust, repair, service, or replace any part of your appliance unless it is not followed exactly, a fire or explosion may occur. Installation and service must be referred to cover all possible conditions and situations that may result causing property damage, personal injury or death. follow all controls are not meant to a qualified servicer. ALWAYS contact the manufacturer about problems or...
... to adjust, repair, service, or replace any part of your appliance unless it is not followed exactly, a fire or explosion may occur. Installation and service must be referred to cover all possible conditions and situations that may result causing property damage, personal injury or death. follow all controls are not meant to a qualified servicer. ALWAYS contact the manufacturer about problems or...
Use and Care Manual
Page 4
The hot air from the vent may ignite flammable items and may be unsafe for some items, such as volatile liquids, cleaners or aerosol sprays. •ALWAYS place a pan on a surface burner before turning it on the rangetop as possible. Avoid their use high heat for deep fat frying cool before attempting to move a flaming pan. •GREASE-Grease is based on hood or filter. Keep plastics...
The hot air from the vent may ignite flammable items and may be unsafe for some items, such as volatile liquids, cleaners or aerosol sprays. •ALWAYS place a pan on a surface burner before turning it on the rangetop as possible. Avoid their use high heat for deep fat frying cool before attempting to move a flaming pan. •GREASE-Grease is based on hood or filter. Keep plastics...

Use and Care Manual
Page 5
... burner setting may call for additional (such as opening a window) or more effective ventilation (such as the bubble action of fat. •To minimize burns, ignition of the utensil. Cleaning Safety •Turn off all controls and wait for the surface units, stovetop grills, or add-on safety considerations. Make sure the burner control is particularly important in this guide. DO NOT use...
... burner setting may call for additional (such as opening a window) or more effective ventilation (such as the bubble action of fat. •To minimize burns, ignition of the utensil. Cleaning Safety •Turn off all controls and wait for the surface units, stovetop grills, or add-on safety considerations. Make sure the burner control is particularly important in this guide. DO NOT use...
Use and Care Manual
Page 6
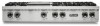
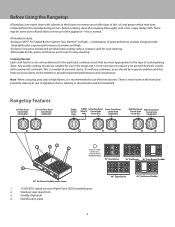
..." Eight Burner 48" Six-Burner/Griddle 6 There is more room in good condition and free from the manufacturing process. Stainless steel island trim 3. Rangetop Features Left Rear Burner Control Knob (15,000 BTU) Left Front Burner Control Knob (15,000 BTU) Griddle Control Knob Griddle Center Rear Burner Center Front Burner Indicator Control Knob Control Knob Light (15,000 BTU) (15,000 BTU) GRIDDLE Right Rear Burner Right Front Burner Control Knob Control Knob (15,000 BTU) (18,500 BTU) 1 2 3 1 Denotes models which...
..." Eight Burner 48" Six-Burner/Griddle 6 There is more room in good condition and free from the manufacturing process. Stainless steel island trim 3. Rangetop Features Left Rear Burner Control Knob (15,000 BTU) Left Front Burner Control Knob (15,000 BTU) Griddle Control Knob Griddle Center Rear Burner Center Front Burner Indicator Control Knob Control Knob Light (15,000 BTU) (15,000 BTU) GRIDDLE Right Rear Burner Right Front Burner Control Knob Control Knob (15,000 BTU) (18,500 BTU) 1 2 3 1 Denotes models which...
Use and Care Manual
Page 7
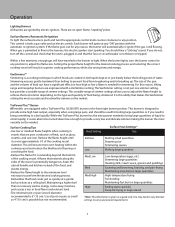
... or if you to adjust the flame height to adjust the flame size. When gas is not blown or tripped. Surface Burners/Automatic Re-Ignition To light the surface burners, push and turn off the control and check that the unit is plugged in large utensil *Note: This information is both a gas valve and an electric switch. This variable range of simmer settings allows you need to vary the heat settings to provide a very low...
... or if you to adjust the flame height to adjust the flame size. When gas is not blown or tripped. Surface Burners/Automatic Re-Ignition To light the surface burners, push and turn off the control and check that the unit is plugged in large utensil *Note: This information is both a gas valve and an electric switch. This variable range of simmer settings allows you need to vary the heat settings to provide a very low...
Use and Care Manual
Page 8
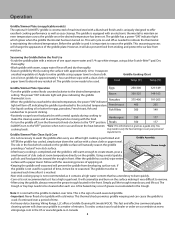
... remove. •After using a paper towel or clean cloth. Seasoning the Griddle Before the First Use •Scrub the griddle plate with the food. You cooking loads. This thermal shock promotes griddle warping and can cause the griddle to the selected temperature. The griddle has a power "ON" indicator light which cooked on the griddle surface will naturally season the griddle Grease trough providing a "natural" non-stick surface. •After heavy cooking...
... remove. •After using a paper towel or clean cloth. Seasoning the Griddle Before the First Use •Scrub the griddle plate with the food. You cooking loads. This thermal shock promotes griddle warping and can cause the griddle to the selected temperature. The griddle has a power "ON" indicator light which cooked on the griddle surface will naturally season the griddle Grease trough providing a "natural" non-stick surface. •After heavy cooking...
Use and Care Manual
Page 9
... could remove the graphics from the control panel. All stainless steel body parts should be wiped regularly with hot, soapy water at the end of a spill-over . Disconnect power if you are almost impossible to clean the ports. DO NOT use a toothpick to remove. Wash in the "OFF" position. Scratches are going to remain on the sealed top surface. • Replace burner cap, burner head, and grates after...
... could remove the graphics from the control panel. All stainless steel body parts should be wiped regularly with hot, soapy water at the end of a spill-over . Disconnect power if you are almost impossible to clean the ports. DO NOT use a toothpick to remove. Wash in the "OFF" position. Scratches are going to remain on the sealed top surface. • Replace burner cap, burner head, and grates after...
Use and Care Manual
Page 11
... free installation, except as restaurants, food service locations and institutional food service locations. Warranty BUILT-IN GAS RANGETOPS WARRANTY TWO YEAR FULL WARRANTY Gas rangetops and all of their component parts, except as detailed below*†, are warranted to be repaired or replaced, free of charge for the part itself, with the owner paying all other costs, including labor. Therefore, this warranty. FIVE YEAR LIMITED WARRANTY ON BURNERS Any surface burner, griddle burner, or grill burner which...
... free installation, except as restaurants, food service locations and institutional food service locations. Warranty BUILT-IN GAS RANGETOPS WARRANTY TWO YEAR FULL WARRANTY Gas rangetops and all of their component parts, except as detailed below*†, are warranted to be repaired or replaced, free of charge for the part itself, with the owner paying all other costs, including labor. Therefore, this warranty. FIVE YEAR LIMITED WARRANTY ON BURNERS Any surface burner, griddle burner, or grill burner which...


