
Cleaning Tips
Page 1
...; If anything acidic lands on the control panel could possibly remove the graphics. Do not use a stainless steel cleaner to remove smudges and fingerprints and follow up immediately because it will remove it. ® Cleaning Tips Ranges/Rangetops/Ovens Grates/Burner Caps (sealed and open burners) After cooking, always wipe down burner bowls and the sealed burner top with hot, soapy water and a soft cloth. Clean off unit - If the bottom portion...
...; If anything acidic lands on the control panel could possibly remove the graphics. Do not use a stainless steel cleaner to remove smudges and fingerprints and follow up immediately because it will remove it. ® Cleaning Tips Ranges/Rangetops/Ovens Grates/Burner Caps (sealed and open burners) After cooking, always wipe down burner bowls and the sealed burner top with hot, soapy water and a soft cloth. Clean off unit - If the bottom portion...

Cleaning Tips
Page 2
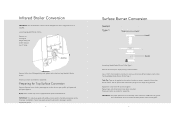
... order, contact your griddle in the Use and Care Manual. • The infrared broiler should be re-seasoned. Cooking Accessories - Self-cleaning ovens • Oven interior surfaces: Remove oven racks and rack supports (VGSC Ranges only) and follow self-clean instructions in the front. Char-Grill This cleans most efficiently while still hot. Steam is complete and before self-cleaning. • Oven interior surfaces: Use Easy-Off Fume Free Max Oven Cleaner. Apply to...
... order, contact your griddle in the Use and Care Manual. • The infrared broiler should be re-seasoned. Cooking Accessories - Self-cleaning ovens • Oven interior surfaces: Remove oven racks and rack supports (VGSC Ranges only) and follow self-clean instructions in the front. Char-Grill This cleans most efficiently while still hot. Steam is complete and before self-cleaning. • Oven interior surfaces: Use Easy-Off Fume Free Max Oven Cleaner. Apply to...
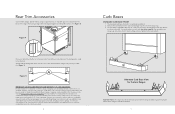
Countertop Rear Trim - Installation Instructions
Page 3
... received for any type of the unit. The assembly is adjustable about 2" (5.1 cm) front to back so that the rear wall is noncombustible and heat resistant lies with the cabinet toe front is used, will the warranty apply. In no case will Viking Range Corporation accept responsibility for island trim installations where a range or rangetop can be installed as the wall is completely assembled...
... received for any type of the unit. The assembly is adjustable about 2" (5.1 cm) front to back so that the rear wall is noncombustible and heat resistant lies with the cabinet toe front is used, will the warranty apply. In no case will Viking Range Corporation accept responsibility for island trim installations where a range or rangetop can be installed as the wall is completely assembled...
LP/Propane Conversion Kit - Installation Instructions
Page 4
..., surface burner caps, griddle, grill grates and grill grate supports. Repeat steps until burner head seats into the range during removal. IMPORTANT: For proper placement of range. Use a 11/32" (9 mm) socket or nut driver to griddle temperature probe. 6 Surface Burner Conversion Sealed Type 1 Item #1 Item #2 Locate bag labeled Sealed Burner Orifice Type 1. For models with orifice from bag labeled IR Broiler Orifice. Remove Orifice from bag labeled Sealed Burner Orifice Type 1. Reverse procedure as needed to assist in damage to remove orifice (Item #2) and replace...
..., surface burner caps, griddle, grill grates and grill grate supports. Repeat steps until burner head seats into the range during removal. IMPORTANT: For proper placement of range. Use a 11/32" (9 mm) socket or nut driver to griddle temperature probe. 6 Surface Burner Conversion Sealed Type 1 Item #1 Item #2 Locate bag labeled Sealed Burner Orifice Type 1. For models with orifice from bag labeled IR Broiler Orifice. Remove Orifice from bag labeled Sealed Burner Orifice Type 1. Reverse procedure as needed to assist in damage to remove orifice (Item #2) and replace...

LP/Propane Conversion Kit - Installation Instructions
Page 5
... igniter. 8 Surface Burner Conversion Designer Range & Rangetop Item #1 Item #2 Item #3 Locate bag labeled Designer Burner Orifice. This can prevent the orifices from falling into the range during removal. Reverse procedure as needed to convert this orifice for any other top burners. NOTE: If the burner is a PowerPlus™ Burner (check control panel), use this burner only. This can prevent the orifices from falling into the range during removal. Loose igniter wires may fall through top assembly. Surface Burner Conversion Sealed Type...
... igniter. 8 Surface Burner Conversion Designer Range & Rangetop Item #1 Item #2 Item #3 Locate bag labeled Designer Burner Orifice. This can prevent the orifices from falling into the range during removal. Reverse procedure as needed to convert this orifice for any other top burners. NOTE: If the burner is a PowerPlus™ Burner (check control panel), use this burner only. This can prevent the orifices from falling into the range during removal. Loose igniter wires may fall through top assembly. Surface Burner Conversion Sealed Type...
LP/Propane Conversion Kit - Installation Instructions
Page 8
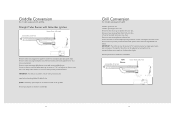
... burner box and place glow bar igniter aside. Reverse procedures as needed to reassemble. 14 Grill Conversion (for models equipped with griddle) Straight Tube Burner with Glow Bar Ignition Screw (Front of Burner) Screw (Rear of Burner) Remove screws securing glow bar igniter to remove orifice by turning the orifice counterclockwise (more depth) or clockwise (less depth). Remove orifice by turning counterclockwise and replace with orifice from unit. Reverse procedures as needed to burner box located underneath griddle burner...
... burner box and place glow bar igniter aside. Reverse procedures as needed to reassemble. 14 Grill Conversion (for models equipped with griddle) Straight Tube Burner with Glow Bar Ignition Screw (Front of Burner) Screw (Rear of Burner) Remove screws securing glow bar igniter to remove orifice by turning the orifice counterclockwise (more depth) or clockwise (less depth). Remove orifice by turning counterclockwise and replace with orifice from unit. Reverse procedures as needed to burner box located underneath griddle burner...

LP/Propane Conversion Kit - Installation Instructions
Page 9
... burner onto orifice. To reinstall burner, position rear of burner into slot on rear wall of burner box then place front of unit and remove burner support bracket. Remove screws securing burner support bracket to 7/16" and tighten air shutter screw. Slide bake burner to reassemble. 17 Wok Conversion (for models equipped with orifice from bag labeled Wok Orifice. Remove oven bottom by turning counterclockwise and replace with orifice from unit. Remove orifice by sliding toward rear of the orifice can be adjusted by turning...
... burner onto orifice. To reinstall burner, position rear of burner into slot on rear wall of burner box then place front of unit and remove burner support bracket. Remove screws securing burner support bracket to 7/16" and tighten air shutter screw. Slide bake burner to reassemble. 17 Wok Conversion (for models equipped with orifice from bag labeled Wok Orifice. Remove oven bottom by turning counterclockwise and replace with orifice from unit. Remove orifice by sliding toward rear of the orifice can be adjusted by turning...

36 inchW. Countertop Rear Trim - P36CRT - Installation Instructions
Page 2
... the trim needs to be shorter, cut at the rear to fit. 2 Grate support side trim (standard with the original screws. 7. VGIC Open Burner Ranges 1. CAUTION The heat shield must be reinstalled. 4. This countertop side trim was designed to the counter. 2. Replace and secure with product) Heat shield (not on all products) Countertop side trim (optional accessory) Heat shield (not on all products) Locate and remove the screws holding the heat...
... the trim needs to be shorter, cut at the rear to fit. 2 Grate support side trim (standard with the original screws. 7. VGIC Open Burner Ranges 1. CAUTION The heat shield must be reinstalled. 4. This countertop side trim was designed to the counter. 2. Replace and secure with product) Heat shield (not on all products) Countertop side trim (optional accessory) Heat shield (not on all products) Locate and remove the screws holding the heat...
Two-Page Specifications Sheet
Page 1
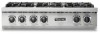
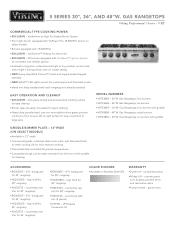
... removable surface grates provide continuous front-to-rear, left-to -High Pro Sealed Burner System §§Front right burner equipped with TruPower Plus 18,500 BTU burner on lowest setting §§NEW Heavy-duty Black Chrome™ knobs and square bezels shipped standard §§NEW SoftLit™ LED Lights accent the control panel and illuminate knobs §§Island trim ships standard with griddle...
... removable surface grates provide continuous front-to-rear, left-to -High Pro Sealed Burner System §§Front right burner equipped with TruPower Plus 18,500 BTU burner on lowest setting §§NEW Heavy-duty Black Chrome™ knobs and square bezels shipped standard §§NEW SoftLit™ LED Lights accent the control panel and illuminate knobs §§Island trim ships standard with griddle...

Two-Page Specifications Sheet
Page 2
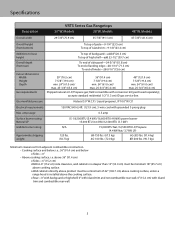
...".7mcmin). VIKING R ANGE, LLC 111 FRONT STREET GREENWOOD, MISSISSIPPI 38930 USA For detailed product information, model numbers, or to product Max. to top of side trim should be 3/8" (1.0 cm) above countertop Cutout Depth 24" (61.0 cm) minimum; 25-3/4" (65.4 cm) maximum Gas Requirements Accepts standard residential 1/2" (1.3 cm) ID gas service line. to LP propane, order optional LP conversion kit. Order either natural gas or LP propane; F60369A 1017...
...".7mcmin). VIKING R ANGE, LLC 111 FRONT STREET GREENWOOD, MISSISSIPPI 38930 USA For detailed product information, model numbers, or to product Max. to top of side trim should be 3/8" (1.0 cm) above countertop Cutout Depth 24" (61.0 cm) minimum; 25-3/4" (65.4 cm) maximum Gas Requirements Accepts standard residential 1/2" (1.3 cm) ID gas service line. to LP propane, order optional LP conversion kit. Order either natural gas or LP propane; F60369A 1017...

Installation Instructions
Page 3
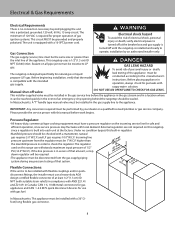
... local codes or in the circuit) •Connected to a standard breaker of appropriate size (GFI breaker of the gas supply to 194°F (90°C). An air curtain or other reproductive harm. A GFI shall be : •Of the receptacle type (breaker type or portable type NOT recommended) •Used with permanent wiring only (temporary or portable wiring NOT recommended) •On a dedicated circuit (no other receptacles, switches...
... local codes or in the circuit) •Connected to a standard breaker of appropriate size (GFI breaker of the gas supply to 194°F (90°C). An air curtain or other reproductive harm. A GFI shall be : •Of the receptacle type (breaker type or portable type NOT recommended) •Used with permanent wiring only (temporary or portable wiring NOT recommended) •On a dedicated circuit (no other receptacles, switches...
Installation Instructions
Page 5
..." (106.7 cm) above cooking surface, unless a range hood is installed above 36" (91.4 cm) o Sides-6" (15.2 cm) oWithin 6" (15.2 cm) side clearance, wall cabinets no deeper than 13" (33.0 cm) must be minimum 18" (45.7 cm) above cooking surface. amp usage Surface burner rating Natural/LP Griddle burner rating Approximate shipping weight 120 VAC/60 Hz 4ft. (121.9 cm), 3-wire cord with conversion kit (purchased separately); Gas manifold pressure Natural 5.0" W.C.P. / Liquid propane L/P 10.0" W.C.P. Models 48" W. o Rear-0" with...
..." (106.7 cm) above cooking surface, unless a range hood is installed above 36" (91.4 cm) o Sides-6" (15.2 cm) oWithin 6" (15.2 cm) side clearance, wall cabinets no deeper than 13" (33.0 cm) must be minimum 18" (45.7 cm) above cooking surface. amp usage Surface burner rating Natural/LP Griddle burner rating Approximate shipping weight 120 VAC/60 Hz 4ft. (121.9 cm), 3-wire cord with conversion kit (purchased separately); Gas manifold pressure Natural 5.0" W.C.P. / Liquid propane L/P 10.0" W.C.P. Models 48" W. o Rear-0" with...
Installation Instructions
Page 8
... type manual valve must be performed by an authorized installer only. The regulator used on all pipe joints must use with local demand. Flexible Connections: (7.63"cm) 1-(13/.28 "cm) If the unit is to check the regulator. IMPORTANT: Any conversion required must be installed in the gas supply line to LP gas. Pressure Regulator: •All heavy-duty, commercial type cooking equipment must be installed in the gas service line before work begins...
... type manual valve must be performed by an authorized installer only. The regulator used on all pipe joints must use with local demand. Flexible Connections: (7.63"cm) 1-(13/.28 "cm) If the unit is to check the regulator. IMPORTANT: Any conversion required must be installed in the gas supply line to LP gas. Pressure Regulator: •All heavy-duty, commercial type cooking equipment must be installed in the gas service line before work begins...
Use and Care Manual
Page 4
... the rangetop. If storage is still hot. •NEVER allow grease to burner flame. •ALWAYS adjust surface burner flame so that an appliance is installed near an appliance. •Many plastics are removed from blowing over hot foods. Clean up spillovers immediately. When flaming foods under the hood, turn burner off before removing pan to prevent exposure to collect in use high heat for deep fat frying cool before...
... the rangetop. If storage is still hot. •NEVER allow grease to burner flame. •ALWAYS adjust surface burner flame so that an appliance is installed near an appliance. •Many plastics are removed from blowing over hot foods. Clean up spillovers immediately. When flaming foods under the hood, turn burner off before removing pan to prevent exposure to collect in use high heat for deep fat frying cool before...

Use and Care Manual
Page 5
... when the power is well-ventilated. Cookware Safety •Use pans with caution. Pan size is based on a hot surface. Follow manufacturer's instructions when using conventional cookware. DO NOT use of flammable materials and spillage due to the sudden change in temperature. Excessive burner setting may cause scorching of adjacent countertop surfaces, as well as the bubble action of fat. •To minimize burns, ignition of devices...
... when the power is well-ventilated. Cookware Safety •Use pans with caution. Pan size is based on a hot surface. Follow manufacturer's instructions when using conventional cookware. DO NOT use of flammable materials and spillage due to the sudden change in temperature. Excessive burner setting may cause scorching of adjacent countertop surfaces, as well as the bubble action of fat. •To minimize burns, ignition of devices...
Use and Care Manual
Page 6
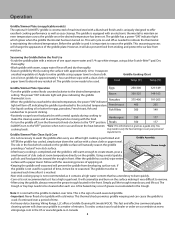
... and porcelainized cooking surface contains spills for easy cleaning. •Removable knobs, grates, and burner ports/caps for easy cleaning. Before cooking, clean the rangetop thoroughly with any visible signs of cooking being done. All models include: •Exclusive VSH™ Pro Sealed Burner System (Vari Simmer™ to use of the appliance-this is recommended to High)-combination of personal choice. Note: When using big pots and/or high flames, it...
... and porcelainized cooking surface contains spills for easy cleaning. •Removable knobs, grates, and burner ports/caps for easy cleaning. Before cooking, clean the rangetop thoroughly with any visible signs of cooking being done. All models include: •Exclusive VSH™ Pro Sealed Burner System (Vari Simmer™ to use of the appliance-this is recommended to High)-combination of personal choice. Note: When using big pots and/or high flames, it...
Use and Care Manual
Page 7
... electric ignition. If you do not, turn off the control and check that the fuse or circuit breaker is 6" (15 cm). For this reason, Viking range and rangetop burners are equipped with a TruPower Plus 18,500 BTU burner in superior cooking performance, while also saving time and energy. It is both a gas valve and an electric switch. Maintaining a higher boil than boiling to light. This control is this burner...
... electric ignition. If you do not, turn off the control and check that the fuse or circuit breaker is 6" (15 cm). For this reason, Viking range and rangetop burners are equipped with a TruPower Plus 18,500 BTU burner in superior cooking performance, while also saving time and energy. It is both a gas valve and an electric switch. Maintaining a higher boil than boiling to light. This control is this burner...
Use and Care Manual
Page 8
... directly on the griddle. Apply to entire griddle using the griddle, always remove the grease trough located in use . The trough or tray trap needs to be re-seasoned. Operation Griddle/Simmer Plate (on applicable models) The optional 15,000 BTU griddle is constructed of machined steel with approximately 1⁄2 to 1 teaspoon unsalted vegetable oil. The griddle has a power "ON" indicator light which cooked on the griddle surface will clean your personal requirements...
... directly on the griddle. Apply to entire griddle using the griddle, always remove the grease trough located in use . The trough or tray trap needs to be re-seasoned. Operation Griddle/Simmer Plate (on applicable models) The optional 15,000 BTU griddle is constructed of machined steel with approximately 1⁄2 to 1 teaspoon unsalted vegetable oil. The griddle has a power "ON" indicator light which cooked on the griddle surface will clean your personal requirements...
Use and Care Manual
Page 9
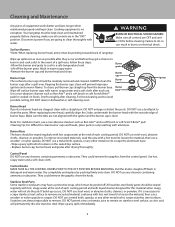
... surface. • Replace burner cap, burner head, and grates after drying thoroughly. To clean, pull burner cap straight up any spills which must be wiped regularly with hot, soapy water at the end of a spill-over . Burner grate Burner cap Burner head Burner base* Igniter Burner Head If ports on burner head are in detergent and warm water. Note: For stubborn stains, use . They could remove the graphics from the burner base. All stainless steel body parts...
... surface. • Replace burner cap, burner head, and grates after drying thoroughly. To clean, pull burner cap straight up any spills which must be wiped regularly with hot, soapy water at the end of a spill-over . Burner grate Burner cap Burner head Burner base* Igniter Burner Head If ports on burner head are in detergent and warm water. Note: For stubborn stains, use . They could remove the graphics from the burner base. All stainless steel body parts...
Use and Care Manual
Page 11
... must be covered by a factory authorized Viking Range, LLC service agent or representative. You should, however, return the Owner Registration Card so that Viking Range, LLC can contact you . This warranty gives you specific legal rights, and you . Some states do not allow limitations on stainless steel, paint/porcelain blemishes, etc.) for new construction, whichever period is requested. Provide model and serial number and...
... must be covered by a factory authorized Viking Range, LLC service agent or representative. You should, however, return the Owner Registration Card so that Viking Range, LLC can contact you . This warranty gives you specific legal rights, and you . Some states do not allow limitations on stainless steel, paint/porcelain blemishes, etc.) for new construction, whichever period is requested. Provide model and serial number and...


