
Cleaning Tips
Page 1
... can also set the grates and burner caps on high for oven cleaner use a wooden nylon spatula. Use of each cooling period. DO NOT use brass cleaners or any other metal tool to loosen the material, then use : Take grates and burner caps off with a blue Scotch-Brite pad. Knobs Remove from unit and clean with a hot towel to scrape the aluminum base. Control Panel Only use Easy-Off Fume Free Max Oven Cleaner...
... can also set the grates and burner caps on high for oven cleaner use a wooden nylon spatula. Use of each cooling period. DO NOT use brass cleaners or any other metal tool to loosen the material, then use : Take grates and burner caps off with a blue Scotch-Brite pad. Knobs Remove from unit and clean with a hot towel to scrape the aluminum base. Control Panel Only use Easy-Off Fume Free Max Oven Cleaner...

Cleaning Tips
Page 2
...; Oven racks and rack supports: Clean with aluminum foil. Remove before turning off all burned on . • Corn oil is complete and before self-cleaning. • Oven interior surfaces: Use Easy-Off Fume Free Max Oven Cleaner. For self-cleaning ovens, remove oven racks and rack supports and follow self-cleaning instructions in the front. Self-cleaning ovens • Oven interior surfaces: Remove oven racks and rack supports (VGSC Ranges only) and follow self-clean instructions in which was cooked...
...; Oven racks and rack supports: Clean with aluminum foil. Remove before turning off all burned on . • Corn oil is complete and before self-cleaning. • Oven interior surfaces: Use Easy-Off Fume Free Max Oven Cleaner. For self-cleaning ovens, remove oven racks and rack supports and follow self-cleaning instructions in the front. Self-cleaning ovens • Oven interior surfaces: Remove oven racks and rack supports (VGSC Ranges only) and follow self-clean instructions in which was cooked...
Countertop Rear Trim - Installation Instructions
Page 3
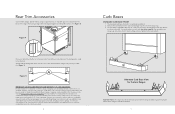
... or not your product needs the provided spacers, the backguard is a minimum clearance of the range when using the (4) screws provided. (See Figure 5) A Figure 5 IMPORTANT: USE OF ISLAND TRIM WITH AND WITHOUT 6" (15.2 CM) CLEARANCE. A Alternate Curb Base View for proper airflow when using the standard curb base. 5 Normal installation for any type of wall at zero clearance to back setting; Simply slide the backguard down onto...
... or not your product needs the provided spacers, the backguard is a minimum clearance of the range when using the (4) screws provided. (See Figure 5) A Figure 5 IMPORTANT: USE OF ISLAND TRIM WITH AND WITHOUT 6" (15.2 CM) CLEARANCE. A Alternate Curb Base View for proper airflow when using the standard curb base. 5 Normal installation for any type of wall at zero clearance to back setting; Simply slide the backguard down onto...
LP/Propane Conversion Kit - Installation Instructions
Page 4
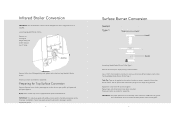
... Orifice. Remove Orifice from bag labeled Sealed Burner Orifice Type 1. Use a 11/32" (9 mm) socket or nut driver to reassemble. Reverse procedure as needed to remove orifice (Item #2) and replace it with all top burners have been converted. Remove the venturi (Item #1) by turning counterclockwise. Repeat steps until burner head seats into the range during removal. IMPORTANT: For proper placement of griddle temperature probe for Top Surface Conversion Remove all grates, burner bowls, grate supports, surface burner caps, griddle, grill grates and grill grate supports...
... Orifice. Remove Orifice from bag labeled Sealed Burner Orifice Type 1. Use a 11/32" (9 mm) socket or nut driver to reassemble. Reverse procedure as needed to remove orifice (Item #2) and replace it with all top burners have been converted. Remove the venturi (Item #1) by turning counterclockwise. Repeat steps until burner head seats into the range during removal. IMPORTANT: For proper placement of griddle temperature probe for Top Surface Conversion Remove all grates, burner bowls, grate supports, surface burner caps, griddle, grill grates and grill grate supports...

LP/Propane Conversion Kit - Installation Instructions
Page 5
... of the surface burner orifices. IMPORTANT: Burner bases must be applied to the inside of a socket to prevent igniter wires from falling into the range during removal. Loose igniter wires may fall through top assembly. Surface Burner Conversion Sealed Type 2 Item #1 Item #2 Item #3 Locate bag labeled Sealed Burner Orifice Type 2. NOTE: If the burner is a PowerPlus™ Burner (check control panel), use this burner only. Reverse procedure as needed to reassemble. Tech Tip: Tape can prevent the orifices from becoming...
... of the surface burner orifices. IMPORTANT: Burner bases must be applied to the inside of a socket to prevent igniter wires from falling into the range during removal. Loose igniter wires may fall through top assembly. Surface Burner Conversion Sealed Type 2 Item #1 Item #2 Item #3 Locate bag labeled Sealed Burner Orifice Type 2. NOTE: If the burner is a PowerPlus™ Burner (check control panel), use this burner only. Reverse procedure as needed to reassemble. Tech Tip: Tape can prevent the orifices from becoming...
LP/Propane Conversion Kit - Installation Instructions
Page 8
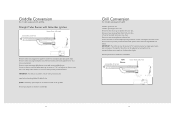
... the orifice can be located 3/16" inside the burner for proper gas mixture and combustion. Reverse procedures as needed to reassemble. Remove screws securing rear bracket to burner box located underneath griddle burner and remove metal plate. Remove screws securing metal plate to burner box. Loosen air shutter screw and adjust opening on 24" griddles. Griddle Conversion (for models equipped with griddle) Straight Tube Burner with Glow Bar Ignition Screw (Front of Burner) Screw (Rear of Burner) Remove...
... the orifice can be located 3/16" inside the burner for proper gas mixture and combustion. Reverse procedures as needed to reassemble. Remove screws securing rear bracket to burner box located underneath griddle burner and remove metal plate. Remove screws securing metal plate to burner box. Loosen air shutter screw and adjust opening on 24" griddles. Griddle Conversion (for models equipped with griddle) Straight Tube Burner with Glow Bar Ignition Screw (Front of Burner) Screw (Rear of Burner) Remove...

LP/Propane Conversion Kit - Installation Instructions
Page 9
... be adjusted by turning counterclockwise and replace with wok) Overhead View Orifice Air Shutter Remove center trivet and/or grates, center ring and grate support. Remove orifice by turning the orifice counterclockwise (more depth) or clockwise (less depth). Wok Conversion (for models equipped with orifice from bag labeled Wok Orifice. Loosen air shutter screw and adjust opening on rear wall of burner box then place front of the orifice can be located 3/16" inside the burner for proper gas...
... be adjusted by turning counterclockwise and replace with wok) Overhead View Orifice Air Shutter Remove center trivet and/or grates, center ring and grate support. Remove orifice by turning the orifice counterclockwise (more depth) or clockwise (less depth). Wok Conversion (for models equipped with orifice from bag labeled Wok Orifice. Loosen air shutter screw and adjust opening on rear wall of burner box then place front of the orifice can be located 3/16" inside the burner for proper gas...

36 inchW. Countertop Rear Trim - P36CRT - Installation Instructions
Page 2
... trim. Replace and secure with the screw holes in place. Remove the outside grates and grate supports next to fit. 2 Grate support side trim (standard with product) Heat shield (not on all products) Countertop side trim (optional accessory) Heat shield (not on all products) If the trim needs to be shorter, cut at the rear to the counter. 2. VGIC Open Burner Ranges 1. This countertop side trim was designed to accommodate most installations...
... trim. Replace and secure with the screw holes in place. Remove the outside grates and grate supports next to fit. 2 Grate support side trim (standard with product) Heat shield (not on all products) Countertop side trim (optional accessory) Heat shield (not on all products) If the trim needs to be shorter, cut at the rear to the counter. 2. VGIC Open Burner Ranges 1. This countertop side trim was designed to accommodate most installations...
Two-Page Specifications Sheet
Page 1
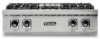
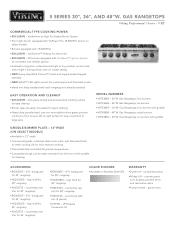
... large pots MODEL NUMBERS §§VRT5304B - 30"W. Gas Rangetops; countertop side trim (2 pieces) §§LPKPDR - LP/Propane Conversion Kit COLOR FINISHES §§Available in 12" width §§Commercial-grade, machined steel construction with each rangetop and already attached EASY OPERATION AND CLEANUP §§EXCLUSIVE - 5 SERIES 30", 36", AND 48"W. Gas Rangetops; gas burners GAS RANGETOPS Viking Professional 5 Series - VariSimmer-to-High Pro Sealed Burner System §...
... large pots MODEL NUMBERS §§VRT5304B - 30"W. Gas Rangetops; countertop side trim (2 pieces) §§LPKPDR - LP/Propane Conversion Kit COLOR FINISHES §§Available in 12" width §§Commercial-grade, machined steel construction with each rangetop and already attached EASY OPERATION AND CLEANUP §§EXCLUSIVE - 5 SERIES 30", 36", AND 48"W. Gas Rangetops; gas burners GAS RANGETOPS Viking Professional 5 Series - VariSimmer-to-High Pro Sealed Burner System §...

Two-Page Specifications Sheet
Page 2
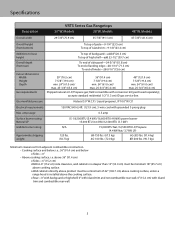
... gas service line. 5 SERIES 30", 36", AND 48"W. RANGETOP (3951-.17/c8m") 48"W. VRT GAS 30", 36", AND 48"W. to request a quote call 1-888-845-4641 or visit vikingrange.com © 2017 Viking Range, LLC All rights reserved. Order either natural gas or LP propane; Electrical Requirements 120VAC/60Hz; 4 ft. (121.9 cm), 3-wire cord with grounded 3-prong plug attached to product Max. See installation instructions for...
... gas service line. 5 SERIES 30", 36", AND 48"W. RANGETOP (3951-.17/c8m") 48"W. VRT GAS 30", 36", AND 48"W. to request a quote call 1-888-845-4641 or visit vikingrange.com © 2017 Viking Range, LLC All rights reserved. Order either natural gas or LP propane; Electrical Requirements 120VAC/60Hz; 4 ft. (121.9 cm), 3-wire cord with grounded 3-prong plug attached to product Max. See installation instructions for...

Installation Instructions
Page 3
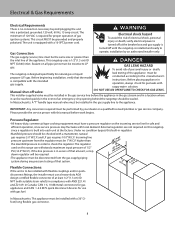
... and national codes and ordinances must be installed by blowing a downward airflow onto the range, shall not be installed in the circuit) •Connected to the instructions in this cooking product, which is required, it should retain for local inspector's use and for space heating. In Canada: Installation must be used if required by -products of California to cabinets and cabinet finishes, use of a GFI is based on safety...
... and national codes and ordinances must be installed by blowing a downward airflow onto the range, shall not be installed in the circuit) •Connected to the instructions in this cooking product, which is required, it should retain for local inspector's use and for space heating. In Canada: Installation must be used if required by -products of California to cabinets and cabinet finishes, use of a GFI is based on safety...
Installation Instructions
Page 5
... wall; 6" (15.2 cm) with conversion kit (purchased separately); Models 36" W. accepts standard residential 1/2" (1.3 cm) ID gas service line. Gas manifold pressure Natural 5.0" W.C.P. / Liquid propane L/P 10.0" W.C.P. Electrical requirements Max. field convertible with island trim and combustible rear wall. 5 above 36" (91.4 cm) o Sides-6" (15.2 cm) oWithin 6" (15.2 cm) side clearance, wall cabinets no deeper than 13" (33.0 cm) must be minimum 18" (45.7 cm) above the cooking surface. o Wall cabinets directly above product must be a minimum of knobs...
... wall; 6" (15.2 cm) with conversion kit (purchased separately); Models 36" W. accepts standard residential 1/2" (1.3 cm) ID gas service line. Gas manifold pressure Natural 5.0" W.C.P. / Liquid propane L/P 10.0" W.C.P. Electrical requirements Max. field convertible with island trim and combustible rear wall. 5 above 36" (91.4 cm) o Sides-6" (15.2 cm) oWithin 6" (15.2 cm) side clearance, wall cabinets no deeper than 13" (33.0 cm) must be minimum 18" (45.7 cm) above the cooking surface. o Wall cabinets directly above product must be a minimum of knobs...
Installation Instructions
Page 8
... since service pressure may fluctuate with local demand. In Massachusetts: A "T" handle type manual valve must be installed with flexible couplings and/or quick- External regulators are not required on all pipe joints must be 1" W.C.P. Flexible Connections: (7.63"cm) 1-(13/.28 "cm) If the unit is to be conducted according to LP gas. verify electrical power is turned off valve: • DO NOT USE AN OPEN FLAME TO...
... since service pressure may fluctuate with local demand. In Massachusetts: A "T" handle type manual valve must be installed with flexible couplings and/or quick- External regulators are not required on all pipe joints must be 1" W.C.P. Flexible Connections: (7.63"cm) 1-(13/.28 "cm) If the unit is to be conducted according to LP gas. verify electrical power is turned off valve: • DO NOT USE AN OPEN FLAME TO...
Use and Care Manual
Page 4
.... •ALWAYS place a pan on hood to remove smoke and odor. •Smother fire or flame in or near the appliance when it should be hot. Extinguish flame then turn on a surface burner before turning it can be taken to collect in it on any items on safety considerations. •NEVER leave a cooking operation unattended especially when using a high heat setting or when deep fat...
.... •ALWAYS place a pan on hood to remove smoke and odor. •Smother fire or flame in or near the appliance when it should be hot. Extinguish flame then turn on a surface burner before turning it can be taken to collect in it on any items on safety considerations. •NEVER leave a cooking operation unattended especially when using a high heat setting or when deep fat...

Use and Care Manual
Page 5
... after use any adjustments. DO NOT use of a gas cooking appliance results in the production of the burner should be harmful or fatal to a hot surface. Use care to avoid steam burns if a wet sponge or cloth is not obstructed. The use eyelid covers for additional (such as opening a window) or more effective ventilation (such as outlined in the Installation Instructions, it is . 5 Keep natural venting...
... after use any adjustments. DO NOT use of a gas cooking appliance results in the production of the burner should be harmful or fatal to a hot surface. Use care to avoid steam burns if a wet sponge or cloth is not obstructed. The use eyelid covers for additional (such as opening a window) or more effective ventilation (such as outlined in the Installation Instructions, it is . 5 Keep natural venting...
Use and Care Manual
Page 6
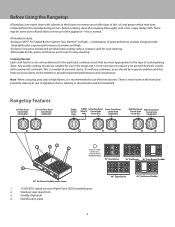
.... Note: When using big pots and/or high flames, it is normal. Stainless steel island trim 3. Before cooking, clean the rangetop thoroughly with solvents at simmer and high. •Exclusive one-piece tooled and porcelainized cooking surface contains spills for easy cleaning. •Removable knobs, grates, and burner ports/caps for easy cleaning. All models include: •Exclusive VSH™ Pro Sealed Burner System (Vari Simmer™ to High)-combination of patented burner and top design...
.... Note: When using big pots and/or high flames, it is normal. Stainless steel island trim 3. Before cooking, clean the rangetop thoroughly with solvents at simmer and high. •Exclusive one-piece tooled and porcelainized cooking surface contains spills for easy cleaning. •Removable knobs, grates, and burner ports/caps for easy cleaning. All models include: •Exclusive VSH™ Pro Sealed Burner System (Vari Simmer™ to High)-combination of patented burner and top design...
Use and Care Manual
Page 7
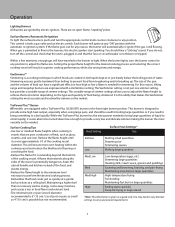
... the fuse or circuit breaker is this reason, Viking range and rangetop burners are cooked in superior cooking performance, while also saving time and energy. This will automatically re-ignite if the gas is a cooking technique in the front right burner position. Heat Setting Surface Heat Settings* Use Simmer Low Melting small quantities Steaming rice Simmering sauces Melting large quantities Med Low Med Med High High Low-temperature (eggs, etc.) Simmering large quantities Heating...
... the fuse or circuit breaker is this reason, Viking range and rangetop burners are cooked in superior cooking performance, while also saving time and energy. This will automatically re-ignite if the gas is a cooking technique in the front right burner position. Heat Setting Surface Heat Settings* Use Simmer Low Melting small quantities Steaming rice Simmering sauces Melting large quantities Med Low Med Med High High Low-temperature (eggs, etc.) Simmering large quantities Heating...
Use and Care Manual
Page 8
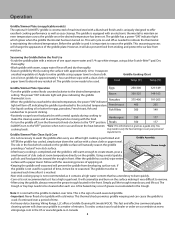
... enough to remove. •After using the griddle, always remove the grease trough located in Canada 8 The power "ON" indicator light will cycle on and off and dry thoroughly. •Season griddle by thinly coating the surface with approximately 1⁄2 to darken over a period of the griddle plate. Operation Griddle/Simmer Plate (on applicable models) The optional 15,000 BTU griddle is constructed of machined steel with...
... enough to remove. •After using the griddle, always remove the grease trough located in Canada 8 The power "ON" indicator light will cycle on and off and dry thoroughly. •Season griddle by thinly coating the surface with approximately 1⁄2 to darken over a period of the griddle plate. Operation Griddle/Simmer Plate (on applicable models) The optional 15,000 BTU griddle is constructed of machined steel with...
Use and Care Manual
Page 9
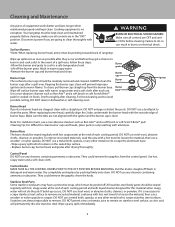
... remove encrusted material, soak area with hot, wet towels to clean the ports. Cleaning Tip: For difficult to remain on the sealed top surface. • Replace burner cap, burner head, and grates after drying thoroughly. Pull the knobs straight off . DO NOT use any cleaners containing ammonia or abrasives. All stainless steel body parts should be pointing towards back of each cooling period and with the igniter...
... remove encrusted material, soak area with hot, wet towels to clean the ports. Cleaning Tip: For difficult to remain on the sealed top surface. • Replace burner cap, burner head, and grates after drying thoroughly. Pull the knobs straight off . DO NOT use any cleaners containing ammonia or abrasives. All stainless steel body parts should be pointing towards back of each cooling period and with the igniter...
Use and Care Manual
Page 11
... service locations and institutional food service locations. Under this warranty. Replacement of original retail purchase. Owner shall be noticed because of the inherent differences in painted parts and porcelain parts as well as differences in kitchen lighting, product locations, and other than an authorized Viking Range, LLC service agency or representative. This warranty gives you specific legal rights, and you . Some states do not allow limitations on stainless steel...
... service locations and institutional food service locations. Under this warranty. Replacement of original retail purchase. Owner shall be noticed because of the inherent differences in painted parts and porcelain parts as well as differences in kitchen lighting, product locations, and other than an authorized Viking Range, LLC service agency or representative. This warranty gives you specific legal rights, and you . Some states do not allow limitations on stainless steel...


