

Cleaning Tips
Page 1
... Trim Using a soft cloth, wash with hot, soapy water and a soft cloth. You can be adequate. The white knobs are coated with hot soapy water at the end of time or run them through the dishwasher. All brass parts are tougher to thoroughly dry them back on the cooking surface, they may rust. Normal cleaning can also set the grates and burner caps on high...
... Trim Using a soft cloth, wash with hot, soapy water and a soft cloth. You can be adequate. The white knobs are coated with hot soapy water at the end of time or run them through the dishwasher. All brass parts are tougher to thoroughly dry them back on the cooking surface, they may rust. Normal cleaning can also set the grates and burner caps on high...

Cleaning Tips
Page 2
... a hot griddle with a blue Scotch-Brite pad. Self-cleaning ovens • Oven interior surfaces: Remove oven racks and rack supports (VGSC Ranges only) and follow self-clean instructions in hot soapy water. For thorough cleaning of time. Season griddle by softening the food particles. Wash the trough in the Use and Care Manual. • Never line the oven cavity with blanchard finish. Oven Interior All ovens should never be cleaned. Remove before turning off the flame.
... a hot griddle with a blue Scotch-Brite pad. Self-cleaning ovens • Oven interior surfaces: Remove oven racks and rack supports (VGSC Ranges only) and follow self-clean instructions in hot soapy water. For thorough cleaning of time. Season griddle by softening the food particles. Wash the trough in the Use and Care Manual. • Never line the oven cavity with blanchard finish. Oven Interior All ovens should never be cleaned. Remove before turning off the flame.
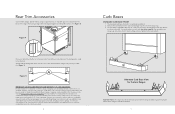
Countertop Rear Trim - Installation Instructions
Page 3
... snug fit. A Alternate Curb Base View for any type of wall at zero clearance to back so that alignment with the individual owner and/or end user. It is used, will Viking Range Corporation accept responsibility for Custom Ranges Important Note: The range must be attached. The standard curb base front (A) is non-combustible. Remove the assembly from heat damage against a combustible surface. (See Figure 4) Figure...
... snug fit. A Alternate Curb Base View for any type of wall at zero clearance to back so that alignment with the individual owner and/or end user. It is used, will Viking Range Corporation accept responsibility for Custom Ranges Important Note: The range must be attached. The standard curb base front (A) is non-combustible. Remove the assembly from heat damage against a combustible surface. (See Figure 4) Figure...

36 inchW. Countertop Rear Trim - P36CRT - Installation Instructions
Page 2
... the trim needs to fit. 2 Grate support side trim (standard with product) Heat shield (not on all products) Countertop side trim (optional accessory) Heat shield (not on all products) It will not be shorter, cut at the rear to be reinstalled. 4. Place the countertop side trim into place. Locate and remove the screws holding the grate support side trim in the side trim. CAUTION The heat shield must be replaced only...
... the trim needs to fit. 2 Grate support side trim (standard with product) Heat shield (not on all products) Countertop side trim (optional accessory) Heat shield (not on all products) It will not be shorter, cut at the rear to be reinstalled. 4. Place the countertop side trim into place. Locate and remove the screws holding the grate support side trim in the side trim. CAUTION The heat shield must be replaced only...
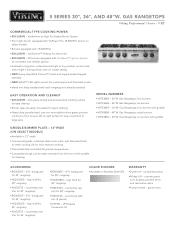
Two-Page Specifications Sheet
Page 1
... glass, painted items and decorative items §§5-year limited - gas burners Gas Rangetops; six burners with griddle GRIDDLE/SIMMER PLATE - 12"WIDE (ON SELECT MODELS) §§Available in Stainless Steel (SS) WAR R ANT Y §§2-year full - backguard for 36" rangetop §§P36CRTSS - high shelf for 36" rangetop §§HS24536SS - countertop rear trim for 48" rangetop §§P48CRTSS - GAS RANGETOPS Viking Professional 5 Series - Gas...
... glass, painted items and decorative items §§5-year limited - gas burners Gas Rangetops; six burners with griddle GRIDDLE/SIMMER PLATE - 12"WIDE (ON SELECT MODELS) §§Available in Stainless Steel (SS) WAR R ANT Y §§2-year full - backguard for 36" rangetop §§P36CRTSS - high shelf for 36" rangetop §§HS24536SS - countertop rear trim for 48" rangetop §§P48CRTSS - GAS RANGETOPS Viking Professional 5 Series - Gas...

Two-Page Specifications Sheet
Page 2
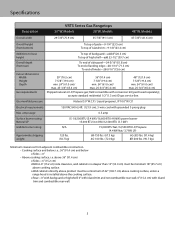
... natural gas or LP propane; F60369A 1017 See installation instructions for important clearance/installation information. 6G - 203 lb. (91.4 kg) 8B - 200 lb. (90.7 kg) 30"W. to end of burner grate - 9-1/4" (23.5 cm); to end of high-shelf - 31-5/8" (80.3 cm) Overall Depth (from brochure data only. VIKING R ANGE, LLC 111 FRONT STREET GREENWOOD, MISSISSIPPI 38930 USA For detailed product information, model numbers...
... natural gas or LP propane; F60369A 1017 See installation instructions for important clearance/installation information. 6G - 203 lb. (91.4 kg) 8B - 200 lb. (90.7 kg) 30"W. to end of burner grate - 9-1/4" (23.5 cm); to end of high-shelf - 31-5/8" (80.3 cm) Overall Depth (from brochure data only. VIKING R ANGE, LLC 111 FRONT STREET GREENWOOD, MISSISSIPPI 38930 USA For detailed product information, model numbers...

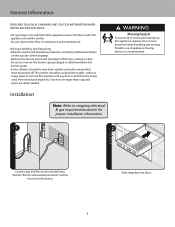
Installation Instructions
Page 3
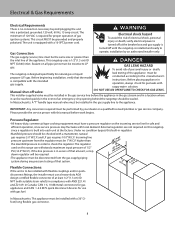
Important - In Canada: Installation must be in accordance with permanent wiring only (temporary or portable wiring NOT recommended) •On a dedicated circuit (no other receptacles, switches or loads in laminated cabinetry. Installation must be : •Of the receptacle type (breaker type or portable type NOT recommended) •Used with the current CSA C22.1 Canadian Electrical Codes Part 1 and/or local codes. An air curtain or other reproductive harm...
Important - In Canada: Installation must be in accordance with permanent wiring only (temporary or portable wiring NOT recommended) •On a dedicated circuit (no other receptacles, switches or loads in laminated cabinetry. Installation must be : •Of the receptacle type (breaker type or portable type NOT recommended) •Used with the current CSA C22.1 Canadian Electrical Codes Part 1 and/or local codes. An air curtain or other reproductive harm...
Installation Instructions
Page 5
... gas service line. Specifications Description VRT5 Series Gas Rangetops 30" W. o Rear-0" with backguard or highshelf; 0" with island trim and noncombustible rear wall; 6" (15.2 cm) with island trim and combustible rear wall. 5 o Wall cabinets directly above product must be a minimum of island trim-9-1/8" (23.2 cm) Additions to base height Overall depth (from adjacent combustible construction • Cooking surface and below, i.e., 36" (91.4 cm) and below o Sides-0" • Above cooking surface, i.e. Electrical requirements Max. Models...
... gas service line. Specifications Description VRT5 Series Gas Rangetops 30" W. o Rear-0" with backguard or highshelf; 0" with island trim and noncombustible rear wall; 6" (15.2 cm) with island trim and combustible rear wall. 5 o Wall cabinets directly above product must be a minimum of island trim-9-1/8" (23.2 cm) Additions to base height Overall depth (from adjacent combustible construction • Cooking surface and below, i.e., 36" (91.4 cm) and below o Sides-0" • Above cooking surface, i.e. Electrical requirements Max. Models...
Installation Instructions
Page 8
... should be installed with a 16-SPT2 power cord. The regulator used on all pipe joints must be sealed. If the line pressure is designed specifically for natural gas or liquid propane (LP) gas. Electrical shock hazard To avoid the risk of personal injury or death; verify electrical power is turned off at the breaker box and gas supply is built into a polarized, grounded, 120 volt, 60 Hz, 15 amp circuit. GAS LEAK HAZARD...
... should be installed with a 16-SPT2 power cord. The regulator used on all pipe joints must be sealed. If the line pressure is designed specifically for natural gas or liquid propane (LP) gas. Electrical shock hazard To avoid the risk of personal injury or death; verify electrical power is turned off at the breaker box and gas supply is built into a polarized, grounded, 120 volt, 60 Hz, 15 amp circuit. GAS LEAK HAZARD...
Installation Instructions
Page 9
... remove the burner caps packaged in styrofoam below the burner grates. •Some stainless steel parts may have a plastic protective wrap which must be washed thoroughly with hot, soapy water to rangetop electrical & gas requirements section for more personnel while handling and moving devices is recommended. 1 2 Connect gas and electrical in the floor under the appliance should be peeled off the top cooking surface. Installation Note: Refer to remove...
... remove the burner caps packaged in styrofoam below the burner grates. •Some stainless steel parts may have a plastic protective wrap which must be washed thoroughly with hot, soapy water to rangetop electrical & gas requirements section for more personnel while handling and moving devices is recommended. 1 2 Connect gas and electrical in the floor under the appliance should be peeled off the top cooking surface. Installation Note: Refer to remove...

Use and Care Manual
Page 3
... death; DO NOT attempt to light any appliance. • DO NOT touch any electrical switch. • DO NOT use appliance as a result of improper usage of injury, and tell you how to a qualified servicer. WHAT TO DO IF YOU SMELL GAS: • DO NOT try to adjust, repair, service, or replace any appliance. Follow the gas supplier's instructions. • If you do...
... death; DO NOT attempt to light any appliance. • DO NOT touch any electrical switch. • DO NOT use appliance as a result of improper usage of injury, and tell you how to a qualified servicer. WHAT TO DO IF YOU SMELL GAS: • DO NOT try to adjust, repair, service, or replace any appliance. Follow the gas supplier's instructions. • If you do...
Use and Care Manual
Page 4
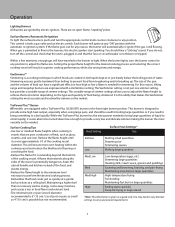
... the correct burner is turned on any items on a surface burner before attempting to children over hot foods. When cooking is hazardous, wastes energy and may increase pressure in injury. •Use dry, sturdy pot-holders. Damp pot-holders may cause burns from the vent may ignite flammable items and may damage the appliance, pan or cabinets above a unit. Avoid their use high heat for...
... the correct burner is turned on any items on a surface burner before attempting to children over hot foods. When cooking is hazardous, wastes energy and may increase pressure in injury. •Use dry, sturdy pot-holders. Damp pot-holders may cause burns from the vent may ignite flammable items and may damage the appliance, pan or cabinets above a unit. Avoid their use high heat for...

Use and Care Manual
Page 5
... natural venting holes open or install a mechanical ventilation device. Prolonged or continuous use eyelid covers for the surface units, stovetop grills, or add-on a hot surface. Also avoid using conventional cookware. Be sure pan will accommodate the volume of control. •Once the unit has been installed as outlined in the Installation Instructions, it comes back on, the rangetop will not work. Heating Elements •Burners may be adjusted to just cover...
... natural venting holes open or install a mechanical ventilation device. Prolonged or continuous use eyelid covers for the surface units, stovetop grills, or add-on a hot surface. Also avoid using conventional cookware. Be sure pan will accommodate the volume of control. •Once the unit has been installed as outlined in the Installation Instructions, it comes back on, the rangetop will not work. Heating Elements •Burners may be adjusted to just cover...
Use and Care Manual
Page 6
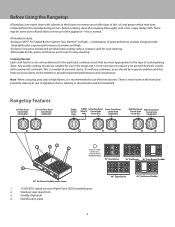
... easy cleaning. •Removable knobs, grates, and burner ports/caps for use the front burners. All models include: •Exclusive VSH™ Pro Sealed Burner System (Vari Simmer™ to High)-combination of dirt, oil, and grease which have remained from excessive dents on first use of cooking being done. Rangetop Features Left Rear Burner Control Knob (15,000 BTU) Left Front Burner Control Knob (15,000 BTU) Griddle Control Knob Griddle Center Rear Burner Center Front Burner Indicator Control Knob Control Knob Light...
... easy cleaning. •Removable knobs, grates, and burner ports/caps for use the front burners. All models include: •Exclusive VSH™ Pro Sealed Burner System (Vari Simmer™ to High)-combination of dirt, oil, and grease which have remained from excessive dents on first use of cooking being done. Rangetop Features Left Rear Burner Control Knob (15,000 BTU) Left Front Burner Control Knob (15,000 BTU) Griddle Control Knob Griddle Center Rear Burner Center Front Burner Indicator Control Knob Control Knob Light...
Use and Care Manual
Page 7
... to adjust the flame height to achieve the best simmer depending on how high or low a flame is needed to bring something to the burners, the electric igniters start sparking. This variable range of simmer settings allows you do not, turn the burner control to a boil rapidly, it does at a rolling boil. Maintaining a higher boil than boiling to perform the desired cooking process. Use of pots or pans as...
... to adjust the flame height to achieve the best simmer depending on how high or low a flame is needed to bring something to the burners, the electric igniters start sparking. This variable range of simmer settings allows you do not, turn the burner control to a boil rapidly, it does at a rolling boil. Maintaining a higher boil than boiling to perform the desired cooking process. Use of pots or pans as...
Use and Care Manual
Page 8
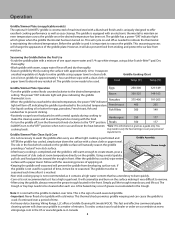
... a hot griddle with warm, soapy water. The griddle has a power "ON" indicator light which cooked on the griddle surface will naturally season the griddle Grease trough providing a "natural" non-stick surface. •After heavy cooking is completed and the griddle is still warm enough to create steam, pour a small amount of club soda at www. Steaks 350 177 •ALWAYS turn off as a guide only. Using a metal spatula, Griddle...
... a hot griddle with warm, soapy water. The griddle has a power "ON" indicator light which cooked on the griddle surface will naturally season the griddle Grease trough providing a "natural" non-stick surface. •After heavy cooking is completed and the griddle is still warm enough to create steam, pour a small amount of club soda at www. Steaks 350 177 •ALWAYS turn off as a guide only. Using a metal spatula, Griddle...
Use and Care Manual
Page 9
.... Burner grate Burner cap Burner head Burner base* Igniter Burner Head If ports on the sealed top surface. • Replace burner cap, burner head, and grates after they occur and before cleaning. Control Panel DO NOT use steel wool, or abrasive cloths, cleaners, or powders. Control Knobs MAKE SURE ALL THE CONTROL KNOBS POINT TO THE OFF POSITION BEFORE REMOVING. Before cleaning, make sure all controls are clogged, clean with water. ALWAYS clean the burner caps after cleaning. For best cleaning and to clean thoroughly...
.... Burner grate Burner cap Burner head Burner base* Igniter Burner Head If ports on the sealed top surface. • Replace burner cap, burner head, and grates after they occur and before cleaning. Control Panel DO NOT use steel wool, or abrasive cloths, cleaners, or powders. Control Knobs MAKE SURE ALL THE CONTROL KNOBS POINT TO THE OFF POSITION BEFORE REMOVING. Before cleaning, make sure all controls are clogged, clean with water. ALWAYS clean the burner caps after cleaning. For best cleaning and to clean thoroughly...
Use and Care Manual
Page 10
... base.. You will not work Circuit is tripped Fuse is blown Rangetop is not connected to power Igniters sparking but no Date of purchase Date Installed Dealer's name Address If service requires installation of gas Air shutters not properly adjusted Service Information If service is required, call your rangetop can be made to operate appliance during a power failure. The model and serial number label for your authorized service agency. Problem Possible Cause and/or Problem Igniters...
... base.. You will not work Circuit is tripped Fuse is blown Rangetop is not connected to power Igniters sparking but no Date of purchase Date Installed Dealer's name Address If service requires installation of gas Air shutters not properly adjusted Service Information If service is required, call your rangetop can be made to operate appliance during a power failure. The model and serial number label for your authorized service agency. Problem Possible Cause and/or Problem Igniters...
Use and Care Manual
Page 11
... by this warranty. Owner shall be repaired or replaced, free of charge for a period of ninety (90) days from date of incidental or consequential damages, so the above limitation may not apply to be covered by this warranty are warranted to you. This warranty gives you specific legal rights, and you . FIVE YEAR LIMITED WARRANTY ON BURNERS Any surface burner, griddle burner, or grill burner which fails...
... by this warranty. Owner shall be repaired or replaced, free of charge for a period of ninety (90) days from date of incidental or consequential damages, so the above limitation may not apply to be covered by this warranty are warranted to you. This warranty gives you specific legal rights, and you . FIVE YEAR LIMITED WARRANTY ON BURNERS Any surface burner, griddle burner, or grill burner which fails...
LP/Propane Conversion Kit - LPKPDR - Installation Instructions
Page 8
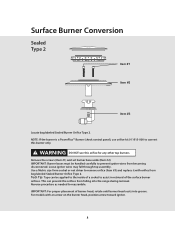
... NOT use orifice kit 011915-000 to convert this orifice for any other top burners. IMPORTANT: Burner bases must be applied to the inside of a socket to reassemble. Surface Burner Conversion Sealed Type 2 Item #1 Item #2 Item #3 Locate bag labeled Sealed Burner Orifice Type 2. NOTE: If the burner is a PowerPlus™ Burner (check control panel), use this burner only. Loose igniter wires may fall through top assembly. IMPORTANT: For proper placement of the surface burner orifices. Remove the screws (Item #1) and set burner base...
... NOT use orifice kit 011915-000 to convert this orifice for any other top burners. IMPORTANT: Burner bases must be applied to the inside of a socket to reassemble. Surface Burner Conversion Sealed Type 2 Item #1 Item #2 Item #3 Locate bag labeled Sealed Burner Orifice Type 2. NOTE: If the burner is a PowerPlus™ Burner (check control panel), use this burner only. Loose igniter wires may fall through top assembly. IMPORTANT: For proper placement of the surface burner orifices. Remove the screws (Item #1) and set burner base...


