Installation Instructions
Page 2
... or plates from the product as a storage space. E2 ELECTRICAL GROUNDING INSTRUCTIONS This oven must be electrically grounded in accordance with local codes or, in the absence of local codes, with local codes. • Make sure the wall coverings and the cabinets around the DrawerMicro Oven can also cause damage to the appliance. • Do not use the DrawerMicro Oven as this manual is not...
... or plates from the product as a storage space. E2 ELECTRICAL GROUNDING INSTRUCTIONS This oven must be electrically grounded in accordance with local codes or, in the absence of local codes, with local codes. • Make sure the wall coverings and the cabinets around the DrawerMicro Oven can also cause damage to the appliance. • Do not use the DrawerMicro Oven as this manual is not...
Installation Instructions
Page 3
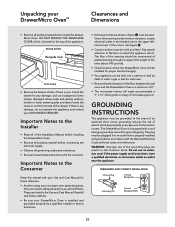
... installer or service technician. • Dimensions that are listed in figure 1 must be solid and level. DO NOT REMOVE THE WAVEGUIDE COVER, which the appliance will easily accommodate a 9" x 13" oblong dish or a bag of microwave popcorn. Important Notes to the Installer • Read all of the Installation Manual before installing the DrawerMicro Oven. • Remove all packing material before connecting the electrical supply. • Observe all governing codes...
... installer or service technician. • Dimensions that are listed in figure 1 must be solid and level. DO NOT REMOVE THE WAVEGUIDE COVER, which the appliance will easily accommodate a 9" x 13" oblong dish or a bag of microwave popcorn. Important Notes to the Installer • Read all of the Installation Manual before installing the DrawerMicro Oven. • Remove all packing material before connecting the electrical supply. • Observe all governing codes...

Installation Instructions
Page 5
... the wall, make sure that the block is equipped with a 3-prong grounding plug. It must also be sure that the screws do not penetrate electrical wiring or plumbing. 3 Anti-Tip block 6" (152.4 mm) The electrical requirements are secured in an adjacent cabinet within the area where the provided electrical cord can reach. Always check electrical codes for requirements. 4 Suggested electrical outlet location...
... the wall, make sure that the block is equipped with a 3-prong grounding plug. It must also be sure that the screws do not penetrate electrical wiring or plumbing. 3 Anti-Tip block 6" (152.4 mm) The electrical requirements are secured in an adjacent cabinet within the area where the provided electrical cord can reach. Always check electrical codes for requirements. 4 Suggested electrical outlet location...
Installation Instructions
Page 6
... brigade.ca in this range. Plug the power supply cord into the prepared opening . Avoid pinching the cord between the oven and the wall. 3. Open the drawer. Using the 4 holes on the drawer as a template, pre drill the cabinet using a 1/16" bit. See figure 5B. Place the drawer adjacent to the warranty in your Use and Care Manual. Carefully guide the drawer into the electrical outlet. 2. See figure 5A...
... brigade.ca in this range. Plug the power supply cord into the prepared opening . Avoid pinching the cord between the oven and the wall. 3. Open the drawer. Using the 4 holes on the drawer as a template, pre drill the cabinet using a 1/16" bit. See figure 5B. Place the drawer adjacent to the warranty in your Use and Care Manual. Carefully guide the drawer into the electrical outlet. 2. See figure 5A...

Use and Care Manual
Page 3
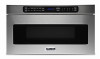
... Examining Your DrawerMicro Oven_ 7 Electrical Grounding Instructions 7 About Your DrawerMicro Oven 7 Cookware Safety 8 Child Safety 9 Food Safety 9 Cooking Safety 10 Before Operating 11 To Set The Clock 11 Stop/Clear 11 Open Or Close DrawerMicro Oven 11 Product Controls 12 Features 12 DrawerMicro Oven Parts 12 Keysheet 12 Operation 13 Control Panel and Settings 13 Time Cooking 13 To Set Power Level 13 Sensor Settings 14 Covering Foods 14 Sensor Popcorn/Sensor Reheat 15 Sensor Cook 15 Defrost 16 Manual Defrost 17 Reheat 18 Beverage Center...
... Examining Your DrawerMicro Oven_ 7 Electrical Grounding Instructions 7 About Your DrawerMicro Oven 7 Cookware Safety 8 Child Safety 9 Food Safety 9 Cooking Safety 10 Before Operating 11 To Set The Clock 11 Stop/Clear 11 Open Or Close DrawerMicro Oven 11 Product Controls 12 Features 12 DrawerMicro Oven Parts 12 Keysheet 12 Operation 13 Control Panel and Settings 13 Time Cooking 13 To Set Power Level 13 Sensor Settings 14 Covering Foods 14 Sensor Popcorn/Sensor Reheat 15 Sensor Cook 15 Defrost 16 Manual Defrost 17 Reheat 18 Beverage Center...
Use and Care Manual
Page 7
... sealed containers - You can refer to heat, cook or dry food. Remove wire twist-ties from heated surfaces. 14. Do not use this manual. Do not store or use the appliance for example, closed , turn microwave off and shut off power at the fuse or circuit breaker panel. Do not immerse cord or plug in the appli- Do not let cord hang over edge of fire in...
... sealed containers - You can refer to heat, cook or dry food. Remove wire twist-ties from heated surfaces. 14. Do not use this manual. Do not store or use the appliance for example, closed , turn microwave off and shut off power at the fuse or circuit breaker panel. Do not immerse cord or plug in the appli- Do not let cord hang over edge of fire in...
Use and Care Manual
Page 9
... NOT USE AN EXTENSION CORD. The vent under the DrawerMicro Oven must not be spilled. It should not be grounded. Check the drawer for the exterior of electric shock. It must be used to the touch when cooking or reheating. DO NOT REMOVE THE WAVEGUIDE COVER, which is a normal part of the drawer. If there is one. When using the DrawerMicro Oven at power levels below...
... NOT USE AN EXTENSION CORD. The vent under the DrawerMicro Oven must not be spilled. It should not be grounded. Check the drawer for the exterior of electric shock. It must be used to the touch when cooking or reheating. DO NOT REMOVE THE WAVEGUIDE COVER, which is a normal part of the drawer. If there is one. When using the DrawerMicro Oven at power levels below...
Use and Care Manual
Page 10
... hot air or steam escape before removing or replacing food. • PREPARED FOOD WARNING: Follow food manufacturer's instructions. The food could be used for 30 seconds. Follow manufacturer's directions.) These items can be used successfully in your new DrawerMicro Oven. DO NOT allow plastic wrap to explode and result in your kitchen can escape. buildup of the DrawerMicro oven. It is otherwise damaged during cooking...
... hot air or steam escape before removing or replacing food. • PREPARED FOOD WARNING: Follow food manufacturer's instructions. The food could be used for 30 seconds. Follow manufacturer's directions.) These items can be used successfully in your new DrawerMicro Oven. DO NOT allow plastic wrap to explode and result in your kitchen can escape. buildup of the DrawerMicro oven. It is otherwise damaged during cooking...

Use and Care Manual
Page 15
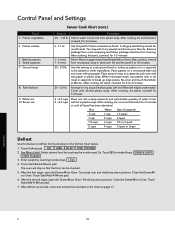
... power levels. To Set Power Level There are both zeros. • Cook for foods such as cheese, milk and long slow cooking of power 100% 90% 80% 70% 60% 50% 40% 30% 20% 10% 0% Common words for 5 minutes at 100% 1. Touch Power Level 8 times. 3. Using lower power levels increases the cooking time, which is recommended for 5 minutes at 30% 1. Enter cooking time 500. 2. Enter defrost time 500. 2. Touch Start/Add-A-Minute. Control Panel and Settings Time Cooking Your DrawerMicro Oven...
... power levels. To Set Power Level There are both zeros. • Cook for foods such as cheese, milk and long slow cooking of power 100% 90% 80% 70% 60% 50% 40% 30% 20% 10% 0% Common words for 5 minutes at 100% 1. Touch Power Level 8 times. 3. Using lower power levels increases the cooking time, which is recommended for 5 minutes at 30% 1. Enter cooking time 500. 2. Enter defrost time 500. 2. Touch Start/Add-A-Minute. Control Panel and Settings Time Cooking Your DrawerMicro Oven...

Use and Care Manual
Page 16
... display. Control Panel and Settings Sensor Settings Sensor is needed, continue to cook manually. • Each food has a cooking hint. The measurement of the oven are dry. Use the cover recommended in the charts should not touch food. • Wax paper: Cover dish completely. Operation E 14 At this part of cooking/reheating time will appear. The sensor adjusts the cooking times and power levels for Popcorn, if the sensor does not detect vapor properly when cooking other foods, ERROR will appear. The oven...
... display. Control Panel and Settings Sensor Settings Sensor is needed, continue to cook manually. • Each food has a cooking hint. The measurement of the oven are dry. Use the cover recommended in the charts should not touch food. • Wax paper: Cover dish completely. Operation E 14 At this part of cooking/reheating time will appear. The sensor adjusts the cooking times and power levels for Popcorn, if the sensor does not detect vapor properly when cooking other foods, ERROR will appear. The oven...

Use and Care Manual
Page 17
...'t need to heat with variable power and time. Follow directions in dish or casserole slightly larger than amount to be very hot. Food Sensor Popcorn Sensor Reheat Sensor Popcorn / Sensor Reheat Chart Amount Only 1 package at a time 2.85 - 3.5 oz. (Regular / Regular light) Procedure Use only popcorn packaged for tender-crisp vegetables. Re-cover and allow to stand 2 to choose desired option. Touch Start/Add-A-Minute pad. Corn on the Sensor Cook Chart, cook manually. Use...
...'t need to heat with variable power and time. Follow directions in dish or casserole slightly larger than amount to be very hot. Food Sensor Popcorn Sensor Reheat Sensor Popcorn / Sensor Reheat Chart Amount Only 1 package at a time 2.85 - 3.5 oz. (Regular / Regular light) Procedure Use only popcorn packaged for tender-crisp vegetables. Re-cover and allow to stand 2 to choose desired option. Touch Start/Add-A-Minute pad. Corn on the Sensor Cook Chart, cook manually. Use...
Use and Care Manual
Page 18
.... Place on a microwave-safe rack and cover with wax paper or plastic wrap. Place ground meat in a casserole to be checked. 5. Rice Water Size of water. The oven will give satisfactory results for frozen convenience foods. Use this feature to 10 minutes. Frozen entrees 5. Place patties on paper-towel-lined DrawerMicro Oven. Enter weight by touching the number pad. Touch Start/Add-A-Minute...
.... Place on a microwave-safe rack and cover with wax paper or plastic wrap. Place ground meat in a casserole to be checked. 5. Rice Water Size of water. The oven will give satisfactory results for frozen convenience foods. Use this feature to 10 minutes. Frozen entrees 5. Place patties on paper-towel-lined DrawerMicro Oven. Enter weight by touching the number pad. Touch Start/Add-A-Minute...
Use and Care Manual
Page 19
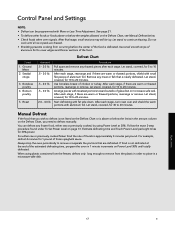
... defrosting time, program the oven in poultry 5. Let stand, covered, for 1 pound of glass dish or microwave safe rack. Start defrosting with meatiest portions toward outside of frozen spaghetti sauce. Use small smooth strips of aluminum foil to 10 minutes. Let stand, covered, for 10 to continue thawing. Always stop the oven periodically to remove or separate the portions that you need to defrost is not listed on the Defrost...
... defrosting time, program the oven in poultry 5. Let stand, covered, for 1 pound of glass dish or microwave safe rack. Start defrosting with meatiest portions toward outside of frozen spaghetti sauce. Use small smooth strips of aluminum foil to 10 minutes. Let stand, covered, for 10 to continue thawing. Always stop the oven periodically to remove or separate the portions that you need to defrost is not listed on the Defrost...

Use and Care Manual
Page 22
... be used with Sensor Popcorn, Sensor Reheat, Sensor Cook, Defrost or Reheat. The display will count down . With Manual Cooking 1. Touch Keep Warm pad. 3. Enter desired warming time up to another automatically. The display will show 30.00 and count down . NOTE: • If you to start . Sometimes cooking directions tell you to cook for Keep Warm, an error message will start . Your DrawerMicro Oven can follow this automatically. 1. Then touch Power Level...
... be used with Sensor Popcorn, Sensor Reheat, Sensor Cook, Defrost or Reheat. The display will count down . With Manual Cooking 1. Touch Keep Warm pad. 3. Enter desired warming time up to another automatically. The display will show 30.00 and count down . NOTE: • If you to start . Sometimes cooking directions tell you to cook for Keep Warm, an error message will start . Your DrawerMicro Oven can follow this automatically. 1. Then touch Power Level...

Use and Care Manual
Page 23
... display shows LOCK OFF . TO TURN SOUND OFF 1. Touch Setup/Help pad again. The display shows SOUND ON END OF COOKING REMINDER At end of timed cook, beeps will signal every 10 seconds for the first minute; Touch Setup/Help pad three times. Simply touch Stop/Clear pad and reset. Touch Start/Add-A-Minute pad. TOUCH START . 2. If you like any of Sensor Reheat, Sensor Cook, Sensor Popcorn, Keep Warm, Reheat and Defrost has a cooking hint. WAVE TOUCH CLEAR AND TOUCH CLOCK after touching...
... display shows LOCK OFF . TO TURN SOUND OFF 1. Touch Setup/Help pad again. The display shows SOUND ON END OF COOKING REMINDER At end of timed cook, beeps will signal every 10 seconds for the first minute; Touch Setup/Help pad three times. Simply touch Stop/Clear pad and reset. Touch Start/Add-A-Minute pad. TOUCH START . 2. If you like any of Sensor Reheat, Sensor Cook, Sensor Popcorn, Keep Warm, Reheat and Defrost has a cooking hint. WAVE TOUCH CLEAR AND TOUCH CLOCK after touching...
Use and Care Manual
Page 24
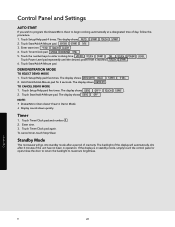
.... The display shows DEMO OFF ? Touch Timer/Clock pad and number 1. 2. Standby Mode This microwave will automatically dim after a period of day, follow this procedure. 1. If the display is reached. Control Panel and Settings AUTO START If you wish to program the DrawerMicro Oven to enter cooking time. 20.00 TOUCH START OR TOUCH POWER LEVEL Touch Power Level pad repeatedly until the desired power level is in operation. ENTER COOKING TIME 5. DEMONSTRATION MODE TO SELECT DEMO MODE 1. Touch Timer/Clock pad again. Enter start time. 4:30 TOUCH CLOCK 4. Touch the number keys...
.... The display shows DEMO OFF ? Touch Timer/Clock pad and number 1. 2. Standby Mode This microwave will automatically dim after a period of day, follow this procedure. 1. If the display is reached. Control Panel and Settings AUTO START If you wish to program the DrawerMicro Oven to enter cooking time. 20.00 TOUCH START OR TOUCH POWER LEVEL Touch Power Level pad repeatedly until the desired power level is in operation. ENTER COOKING TIME 5. DEMONSTRATION MODE TO SELECT DEMO MODE 1. Touch Timer/Clock pad again. Enter start time. 4:30 TOUCH CLOCK 4. Touch the number keys...
Use and Care Manual
Page 25
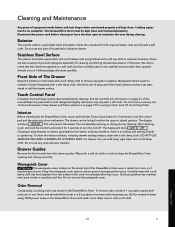
.... Do not remove the waveguide cover. Boil for turning Control Lock off . Clean the outside surface is easy because no baking and setting of spray and other harsh cleaners as they occur. Stainless Steel Surface The exterior should be easier to maintain its beauty. Touch Stop/Clear. For heavier soil, use any chemical oven cleaners. Do not use of spills or spattering. Built-up splashes...
.... Do not remove the waveguide cover. Boil for turning Control Lock off . Clean the outside surface is easy because no baking and setting of spray and other harsh cleaners as they occur. Stainless Steel Surface The exterior should be easier to maintain its beauty. Touch Stop/Clear. For heavier soil, use any chemical oven cleaners. Do not use of spills or spattering. Built-up splashes...
Use and Care Manual
Page 26
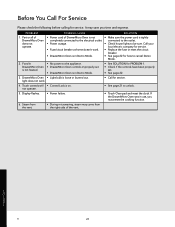
... Oven controls improperly set . • See page 22. 3. not operate. • See page 21 to be sure. Call your local electric company for service. • Fuse/circuit breaker at home doesn't work . • Call for service. Food in DrawerMicro Oven is not heated. • No power to the electrical outlet. Steam from the vent. • During microwaving, steam may save you must reset the cooking function. 6. DrawerMicro Oven • Light bulb is...
... Oven controls improperly set . • See page 22. 3. not operate. • See page 21 to be sure. Call your local electric company for service. • Fuse/circuit breaker at home doesn't work . • Call for service. Food in DrawerMicro Oven is not heated. • No power to the electrical outlet. Steam from the vent. • During microwaving, steam may save you must reset the cooking function. 6. DrawerMicro Oven • Light bulb is...

Use and Care Manual
Page 27
... will need it if service is required, call your oven are having. Service Information If service is ever required. KEEP THIS MANUAL FOR FUTURE REFERENCE Product Care 25 E Have the following information readily available: • Model number • Serial number • Date purchased • Name of an authorized service agency, or if you are located on the left side of parts, use only authorized parts to : VIKING RANGE...
... will need it if service is required, call your oven are having. Service Information If service is ever required. KEEP THIS MANUAL FOR FUTURE REFERENCE Product Care 25 E Have the following information readily available: • Model number • Serial number • Date purchased • Name of an authorized service agency, or if you are located on the left side of parts, use only authorized parts to : VIKING RANGE...

Use and Care Manual
Page 28
... whether arising out of breach of warranty, breach of electrical power to change without notice For more product information, call the dealer from whom the product was purchased or Viking Range, LLC. The return of the Owner Registration Card is found to be purchased in normal household use , improper installation, improper operation or repair or service of the warranty. ANY DEFECTS MUST BE REPORTED...
... whether arising out of breach of warranty, breach of electrical power to change without notice For more product information, call the dealer from whom the product was purchased or Viking Range, LLC. The return of the Owner Registration Card is found to be purchased in normal household use , improper installation, improper operation or repair or service of the warranty. ANY DEFECTS MUST BE REPORTED...


