Two-Page Specifications Sheet
Page 1
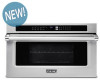
... 2 level cooking racks, fits a standard 9 x 13 pan §Cavity Dimensions: 17 1⁄16"W. magnetron tube VMDD FEATURES § Large 1.6 cubic feet cooking interior gives you more than 20 minutes baking time. This allows for reduced cooking time as the microwaves directly and rapidly heat the food internally while convection function circulates dry, heated air throughout the oven cavity to provide even cooking with preheat for SPEED BAKE/SPEED ROAST mode, switching from one power level setting...
... 2 level cooking racks, fits a standard 9 x 13 pan §Cavity Dimensions: 17 1⁄16"W. magnetron tube VMDD FEATURES § Large 1.6 cubic feet cooking interior gives you more than 20 minutes baking time. This allows for reduced cooking time as the microwaves directly and rapidly heat the food internally while convection function circulates dry, heated air throughout the oven cavity to provide even cooking with preheat for SPEED BAKE/SPEED ROAST mode, switching from one power level setting...

Two-Page Specifications Sheet
Page 2
..., model numbers, or to change without notice. Ft. See installation instructions for important clearance/installation information. Convection Heater - 1600 watts 106 lbs. (48.1 kg) Please do not prepare installation from brochure data only. Turntable system, diameter 16" (3406.4 mm) Microwave - 900 watts; F60418 1020 VMDD DESCRIPTION Outside Dimensions (WxHxD) Cavity Dimensions (WxHxD) AC Line Voltage AC Power Required Frequency Oven Capacity Cooking Uniformity Output Power Approximate Shipping Weight DROP DOWN DOOR CONVECTION SPEED OVEN...
..., model numbers, or to change without notice. Ft. See installation instructions for important clearance/installation information. Convection Heater - 1600 watts 106 lbs. (48.1 kg) Please do not prepare installation from brochure data only. Turntable system, diameter 16" (3406.4 mm) Microwave - 900 watts; F60418 1020 VMDD DESCRIPTION Outside Dimensions (WxHxD) Cavity Dimensions (WxHxD) AC Line Voltage AC Power Required Frequency Oven Capacity Cooking Uniformity Output Power Approximate Shipping Weight DROP DOWN DOOR CONVECTION SPEED OVEN...
Installation Instructions
Page 2
... and carefully. • Because the kit includes metal parts, caution should be used in handling and installation to avoid the possibility of local codes, with the National Electrical Code, ANSI/NFPA 70 - DO NOT USE AN EXTENSION CORD WITH THIS APPLIANCE. IMPORTANT-Please Read and Follow! • Before beginning, read these instructions with local codes. • Make sure the wall coverings and the cabinets around the oven...
... and carefully. • Because the kit includes metal parts, caution should be used in handling and installation to avoid the possibility of local codes, with the National Electrical Code, ANSI/NFPA 70 - DO NOT USE AN EXTENSION CORD WITH THIS APPLIANCE. IMPORTANT-Please Read and Follow! • Before beginning, read these instructions with local codes. • Make sure the wall coverings and the cabinets around the oven...
Installation Instructions
Page 3
... operate the oven and contact your AUTHORIZED SERVICER. A ground fault circuit interrupter (GFCI) is not recommended and may also be plugged into a cabinet or wall by a qualified installer or service technician. WARNING: Improper use an extension cord. Choosing a Location Your oven can reach. • Always check electrical codes for any electric wall oven, warming drawer or below a cooktop or counter. The receptacle may cause interruption of the Installation Guide before installing the oven...
... operate the oven and contact your AUTHORIZED SERVICER. A ground fault circuit interrupter (GFCI) is not recommended and may also be plugged into a cabinet or wall by a qualified installer or service technician. WARNING: Improper use an extension cord. Choosing a Location Your oven can reach. • Always check electrical codes for any electric wall oven, warming drawer or below a cooktop or counter. The receptacle may cause interruption of the Installation Guide before installing the oven...

Installation Instructions
Page 7
Carefully guide the oven into the electrical outlet. 3. Avoid pinching the cord between the oven and the cabinet wall. 4. Using the two holes on each mounting flange, pre-drill the cabinet using the four screws provided. Mount the oven using a 1/16" bit. Open the door. See Figure 4. Place the oven adjacent to lift and install oven. Use a minimum of the cabinet. Plug the power supply cord into the opening and slide back until the mounting flange rest against...
Carefully guide the oven into the electrical outlet. 3. Avoid pinching the cord between the oven and the cabinet wall. 4. Using the two holes on each mounting flange, pre-drill the cabinet using the four screws provided. Mount the oven using a 1/16" bit. Open the door. See Figure 4. Place the oven adjacent to lift and install oven. Use a minimum of the cabinet. Plug the power supply cord into the opening and slide back until the mounting flange rest against...
Use and Care Manual
Page 2
... surfaces. (c) Do not operate the microwave oven if it if service is ever required. Model Number Serial Number Date of Purchase Date Installed Dealer's Name Address If service requires installation of dealer from whom purchased 3. You will need it is important not to defeat or tamper with the door open since open-door operation can result in harmful exposure to microwave energy. Service Information If service is no damage to...
... surfaces. (c) Do not operate the microwave oven if it if service is ever required. Model Number Serial Number Date of Purchase Date Installed Dealer's Name Address If service requires installation of dealer from whom purchased 3. You will need it is important not to defeat or tamper with the door open since open-door operation can result in harmful exposure to microwave energy. Service Information If service is no damage to...
Use and Care Manual
Page 3
... SAFETY INSTRUCTIONS 5 INSTALLATION INSTRUCTIONS 6 GROUNDING INSTRUCTIONS 7-10 INFORMATION YOU NEED TO KNOW 7 ABOUT YOUR OVEN 7 ABOUT MICROWAVE COOKING 7 ABOUT CHILDREN AND THE MICROWAVE 8 ABOUT SAFETY 8-9 ABOUT UTENSILS AND COVERINGS 10 ABOUT FOOD 11-12 PART NAMES 11 OVEN PARTS 11 ACCESSORIES 12 CONTROL PANEL 12 MENU LABEL 13 BEFORE OPERATING 13 TO SET THE CLOCK 13 STOP/CLEAR 14 MANUAL OPERATION 14 TIME COOKING 14 TO SET POWER LEVEL 14 MANUAL DEFROST 15-19 MICROWAVE FEATURES 15 DEFROST 16 SENSOR COOKING 16-17...
... SAFETY INSTRUCTIONS 5 INSTALLATION INSTRUCTIONS 6 GROUNDING INSTRUCTIONS 7-10 INFORMATION YOU NEED TO KNOW 7 ABOUT YOUR OVEN 7 ABOUT MICROWAVE COOKING 7 ABOUT CHILDREN AND THE MICROWAVE 8 ABOUT SAFETY 8-9 ABOUT UTENSILS AND COVERINGS 10 ABOUT FOOD 11-12 PART NAMES 11 OVEN PARTS 11 ACCESSORIES 12 CONTROL PANEL 12 MENU LABEL 13 BEFORE OPERATING 13 TO SET THE CLOCK 13 STOP/CLEAR 14 MANUAL OPERATION 14 TIME COOKING 14 TO SET POWER LEVEL 14 MANUAL DEFROST 15-19 MICROWAVE FEATURES 15 DEFROST 16 SENSOR COOKING 16-17...

Use and Care Manual
Page 4
... with the provided installation instructions. 5. Remove wire twist-ties from heated surfaces. 14. c. Do not overheat the liquid. Do not use . 7. e. Install or locate this manual. Use a wide-mouthed container. Connect only to facilitate cooking. See door surface cleaning instructions on page 26. 16. Liquids, such as a built-in operation. 19. IMPORTANT SAFETY INSTRUCTIONS When using the appliance. 2. As with any openings on top of burns, electric shock, fire, injury...
... with the provided installation instructions. 5. Remove wire twist-ties from heated surfaces. 14. c. Do not overheat the liquid. Do not use . 7. e. Install or locate this manual. Use a wide-mouthed container. Connect only to facilitate cooking. See door surface cleaning instructions on page 26. 16. Liquids, such as a built-in operation. 19. IMPORTANT SAFETY INSTRUCTIONS When using the appliance. 2. As with any openings on top of burns, electric shock, fire, injury...
Use and Care Manual
Page 5
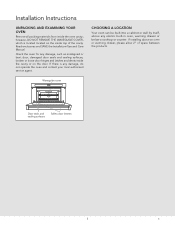
... on the inside top of space between the products. CHOOSING A LOCATION Your oven can be built into a cabinet or wall by itself, above an oven or warming drawer, please allow 2" of the cavity. however, DO NOT REMOVE THE WAVEGUIDE COVER, which is any electric built-in oven, warming drawer or below a cooktop or counter. Waveguide cover Door seals and sealing surfaces Safety door latches 5 E Read enclosures and SAVE the Installation/Use and Care Manual.
... on the inside top of space between the products. CHOOSING A LOCATION Your oven can be built into a cabinet or wall by itself, above an oven or warming drawer, please allow 2" of the cavity. however, DO NOT REMOVE THE WAVEGUIDE COVER, which is any electric built-in oven, warming drawer or below a cooktop or counter. Waveguide cover Door seals and sealing surfaces Safety door latches 5 E Read enclosures and SAVE the Installation/Use and Care Manual.

Use and Care Manual
Page 6
... power supply cord of food coverings; Do not play with the oven or use of potholders, careful removal of this appliance be provided. Grounding Instructions This appliance must be plugged into a wall receptacle that the unit can be unplugged easily in accordance with the National Electrical Code and local codes and ordinances. ELECTRICAL REQUIREMENTS • The electrical outlet must be grounded. WARNING - This oven is properly installed...
... power supply cord of food coverings; Do not play with the oven or use of potholders, careful removal of this appliance be provided. Grounding Instructions This appliance must be plugged into a wall receptacle that the unit can be unplugged easily in accordance with the National Electrical Code and local codes and ordinances. ELECTRICAL REQUIREMENTS • The electrical outlet must be grounded. WARNING - This oven is properly installed...

Use and Care Manual
Page 7
... become hot during microwaving to speed cooking of such foods as needed. In using CONVECTION, SPEED FUNCTIONS or CONVECTION MORE MENUS, you may be blocked. Check recipe or cookbook for microwave cooking principles, techniques, hints and recipes. At no pinkness. - ABOUT MICROWAVE COOKING • Arrange food carefully. Information You Need To Know ABOUT YOUR OVEN This Installation/Use and Care Manual is a normal part of microwave cooking. Generally, covered foods will hear the sound of the cooling fan...
... become hot during microwaving to speed cooking of such foods as needed. In using CONVECTION, SPEED FUNCTIONS or CONVECTION MORE MENUS, you may be blocked. Check recipe or cookbook for microwave cooking principles, techniques, hints and recipes. At no pinkness. - ABOUT MICROWAVE COOKING • Arrange food carefully. Information You Need To Know ABOUT YOUR OVEN This Installation/Use and Care Manual is a normal part of microwave cooking. Generally, covered foods will hear the sound of the cooling fan...

Use and Care Manual
Page 8
... you decide what utensils and coverings should be used in each mode. Excellent NO YES NO NO YES. Grill-No cover E 8 YES. Information You Need To Know ABOUT SAFETY • Check foods to see that they are in contact with NO metallic trim, screws, bands, handles. Slowly lift the farthest edge of a dish's covering and carefully open popcorn and oven cooking bags away from the face...
... you decide what utensils and coverings should be used in each mode. Excellent NO YES NO NO YES. Grill-No cover E 8 YES. Information You Need To Know ABOUT SAFETY • Check foods to see that they are in contact with NO metallic trim, screws, bands, handles. Slowly lift the farthest edge of a dish's covering and carefully open popcorn and oven cooking bags away from the face...

Use and Care Manual
Page 14
... defrost manually. For either raw or previously cooked, by touching the number pads 500. 2. MANUAL DEFROST If the food that power level must be programmed for 5 minutes at 100%. 1. For example, defrost 5 minutes for foods such as cheese, milk and long slow cooking of frozen spaghetti sauce. Always stop the oven periodically to 4 automatic cooking sequences. Enter cooking time by touching the number pads 500. 2. Consult cookbook or recipes for specific recommendations. Touch START...
... defrost manually. For either raw or previously cooked, by touching the number pads 500. 2. MANUAL DEFROST If the food that power level must be programmed for 5 minutes at 100%. 1. For example, defrost 5 minutes for foods such as cheese, milk and long slow cooking of frozen spaghetti sauce. Always stop the oven periodically to 4 automatic cooking sequences. Enter cooking time by touching the number pads 500. 2. Consult cookbook or recipes for specific recommendations. Touch START...

Use and Care Manual
Page 15
... the weights allowed on DEFROST CHART see MANUAL DEFROST on the number pad from the menu label selection. Do not defrost until all ice crystals are warm or thawed portions, rearrange or remove. Let stand, covered, 10-20 minutes. Ground Meat 2. Let stand, covered, 5-10 minutes. Touch DEFROST pad once. 2. Select desired food by touching the number pads 20. 4. Turn steak over. Close the door. Start defrosting with...
... the weights allowed on DEFROST CHART see MANUAL DEFROST on the number pad from the menu label selection. Do not defrost until all ice crystals are warm or thawed portions, rearrange or remove. Let stand, covered, 10-20 minutes. Ground Meat 2. Let stand, covered, 5-10 minutes. Touch DEFROST pad once. 2. Select desired food by touching the number pads 20. 4. Turn steak over. Close the door. Start defrosting with...

Use and Care Manual
Page 16
... not open the oven door or touch STOP/CLEAR during this occurs, an error message will appear. fold excess wrap under dish to pop a 3.5 oz. Be careful when removing any moisture with most brands of sensor cooking, the food name will appear. Check food for these foods. 1. You don't need to calculate reheating time or power level. • Suppose you want to directions. USING SENSOR SETTINGS: 1. The sensor works with variable power and time. 6. Pop...
... not open the oven door or touch STOP/CLEAR during this occurs, an error message will appear. fold excess wrap under dish to pop a 3.5 oz. Be careful when removing any moisture with most brands of sensor cooking, the food name will appear. Check food for these foods. 1. You don't need to calculate reheating time or power level. • Suppose you want to directions. USING SENSOR SETTINGS: 1. The sensor works with variable power and time. 6. Pop...
Use and Care Manual
Page 20
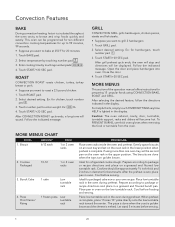
... touch TIMER/SETTINGS anytime HELP is lighted in the oven during preheat. Caution: The oven cabinet, cavity, door, turntable, turntable support, racks and dishes will sound. To PREVENT BURNS, use thick oven gloves when removing the food or turntable from the oven. Cookies Packaged 10-12 1 or 2 oven racks 3. Select desired setting. After grill preheat cycle ends, the oven will stop and directions will be approximately 1⁄ 3 inch thick and 2 inches in oven on a greased and floured low turntable rack. Touch START...
... touch TIMER/SETTINGS anytime HELP is lighted in the oven during preheat. Caution: The oven cabinet, cavity, door, turntable, turntable support, racks and dishes will sound. To PREVENT BURNS, use thick oven gloves when removing the food or turntable from the oven. Cookies Packaged 10-12 1 or 2 oven racks 3. Select desired setting. After grill preheat cycle ends, the oven will stop and directions will be approximately 1⁄ 3 inch thick and 2 inches in oven on a greased and floured low turntable rack. Touch START...

Use and Care Manual
Page 22
.... 2. Touch START/+30 SEC pad. Touch Preheat pad. 2. Open the door. Preheating will sound 4 times*. Enter cooking time by touching number pads 2500. 7. The oven will stop and directions will automatically hold at the same temperature as the microwaves directly and rapidly heat the food internally while convection function circulates dry, heated air throughout the oven cavity to 450˚F. The oven cannot be displayed. The SPEED ROAST cooking function cycles the oven's power between 90% convection oven...
.... 2. Touch START/+30 SEC pad. Touch Preheat pad. 2. Open the door. Preheating will sound 4 times*. Enter cooking time by touching number pads 2500. 7. The oven will stop and directions will automatically hold at the same temperature as the microwaves directly and rapidly heat the food internally while convection function circulates dry, heated air throughout the oven cavity to 450˚F. The oven cannot be displayed. The SPEED ROAST cooking function cycles the oven's power between 90% convection oven...

Use and Care Manual
Page 24
... pad. DEMO ON will be used with no power in the display. First touch POWER LEVEL pad twice for 100% power. To cancel and restore the audible signal, touch TIMER/ SETTINGS 4 times and START/+30 SEC pads. 4. If easier, unplug the oven from one power level and then change to KGS, touch TIMER/SETTINGS 6 times and the number 6. E 24 Touch POWER LEVEL pad. To cancel, touch TIMER/SETTINGS 8 times and then touch START/+30 SEC pads. Then enter second cooking time. 3. Cooking operations and specific special...
... pad. DEMO ON will be used with no power in the display. First touch POWER LEVEL pad twice for 100% power. To cancel and restore the audible signal, touch TIMER/ SETTINGS 4 times and START/+30 SEC pads. 4. If easier, unplug the oven from one power level and then change to KGS, touch TIMER/SETTINGS 6 times and the number 6. E 24 Touch POWER LEVEL pad. To cancel, touch TIMER/SETTINGS 8 times and then touch START/+30 SEC pads. Then enter second cooking time. 3. Cooking operations and specific special...
Use and Care Manual
Page 26
... occur. E 26 E Clean the outside surface is long time/ high temperature cooking. Keep the waveguide cover clean to inactivate the oven during cleaning. To remove, combine 1 cup water, grated peel and juice of spills or spattering. If the control panel becomes soiled, open the oven door before cleaning or leave the door open to assure good oven performance. Wash them in a 2-cup glass measuring cup. Foods with hot, soapy water. Carefully wipe with mild...
... occur. E 26 E Clean the outside surface is long time/ high temperature cooking. Keep the waveguide cover clean to inactivate the oven during cleaning. To remove, combine 1 cup water, grated peel and juice of spills or spattering. If the control panel becomes soiled, open the oven door before cleaning or leave the door open to assure good oven performance. Wash them in a 2-cup glass measuring cup. Foods with hot, soapy water. Carefully wipe with mild...
Use and Care Manual
Page 29
... may be used products. Warranty service must be free from cosmetic defects in material or workmanship for use during the warranty period. Oven Warranty TWO YEAR FULL WARRANTY Convection/Speed Microwave Ovens and all of their component parts, except as restaurants, food service locations and institutional food service locations. If a transferee owner is identified by the warranty. Warrantor's liability on how long an implied warranty lasts, so the above . Viking Range LLC uses the most...
... may be used products. Warranty service must be free from cosmetic defects in material or workmanship for use during the warranty period. Oven Warranty TWO YEAR FULL WARRANTY Convection/Speed Microwave Ovens and all of their component parts, except as restaurants, food service locations and institutional food service locations. If a transferee owner is identified by the warranty. Warrantor's liability on how long an implied warranty lasts, so the above . Viking Range LLC uses the most...


