Viking VGWTO5241 Support and Manuals
Get Help and Manuals for this Viking item

View All Support Options Below
Free Viking VGWTO5241 manuals!
Problems with Viking VGWTO5241?
Ask a Question
Free Viking VGWTO5241 manuals!
Problems with Viking VGWTO5241?
Ask a Question
Popular Viking VGWTO5241 Manual Pages
Outdoor Kitchen Planning Guide - Page 8
...;§Outer corner filler strip used to connect two back panels at a 90°
angle and add countertop support §§Shipping wt. 40 lb (18.1 kg) VOCF135 §§Each side is 4"W. §&#...;Outer corner filler strip used to connect two back panels at a 135°
angle and add countertop support §§Shipping wt. 40 lb (18.1 kg)
CABINET SIDE PANELS
§§Heavy-duty stainless...
Outdoor Kitchen Planning Guide - Page 13
... shims (not included) to install the appliance (grill, side burner, wok) flush to account for the 8" minimum the rotisserie motor requires for a minimum adjustment of 34-1/4" and a maximum of 36". back panel (VBPFLR4) along with the VSP30 to insure meeting the grill specifications. Locally supplied countertops must be set on uneven surfaces. Each...
Outdoor Kitchen Planning Guide - Page 15
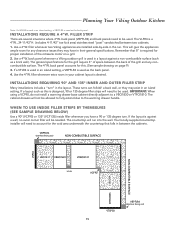
... 135° INNER AND OUTER FILLER STRIP
Many installations include a "turn . WHEN TO USE INSIDE FILLER STRIPS BY THEMSELVES (SEE SAMPLE DRAWING BELOW)
Use a 90° (VCF90) or 135° (VCF135) inside filler whenever you have in an island setting.
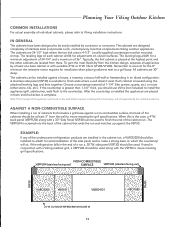
INSTALLATIONS REQUIRE A 4"W. Use a 4"W. The general specifications for any noncombustible surface. Use the 4"W.
a back wall...
Outdoor Kitchen Planning Guide - Page 16
...
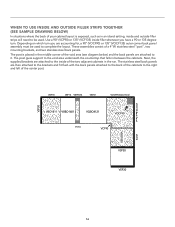
VOCF90
VFLR4
VCF90
VBO1830
VSP30 VSP30
VBP18
16 The post is exposed, such as in an island setting, inside and outside filler strips will need to be used . The stainless steel back panels are ...center post. Depending on which turn you have a 90 or 135 degree turn. The post gives support to the right and left of the two adjacent cabinets in between the cabinets. Next, the supplied...
Two-Page Specifications Sheet - Page 2

...installation instructions.... Specifications subject...service line LP/Propane: standard residential 1/2" (1.3 cm) ID gas service...model numbers, or to end of grill.
5 SERIES OUTDOOR GAS WOK/COOKER
®
Viking Professional 5 Series - unit is not field-convertible.
.08 amps
27,500 BTU NAT./27,500 BTU LP/Propane
Approximate Shipping Weight
160 lb (72.0 kg)
Please do not prepare installation...
Installation Instructions - Page 3

... show the location of this manual. All servicing should be installed by covering utensil completely with baking soda or, if available, a multipurpose dry chemical or foam type extinguisher.
5. Smother flaming pan by a qualified technician. If you know where and how to repair or replace any adjustments or conversions to local codes. Wear proper apparel. Never use...
Installation Instructions - Page 5

... wide by 1/2" deep notch cutout on each side of grill. IMPORTANT: Gas fittings, regulator, and installer supplied shut-off valve must be maintained from the sides must be 3/8" (.95 cm) above the ... tank is going to adjacent vertical combustible construction. Built-in Installation
1. The tank can not tip over . The support must also allow the LP/Propane tank to withstand a horizontal tipping...
Installation Instructions - Page 6

...codes, the installation must be installed in accordance with that system at test pressures in excess of local codes, with local codes and/or ordinances. All installer supplied parts must conform to local codes, or in accordance with National Fuel Gas Code...closing its individual manual shut-off valve must comply with ANSI Z21.75/ CSA 6.27.
In the absence of installation. The wok/...
Installation Instructions - Page 7

... 1/2" ID gas service line - 1/2" NPT male with a 7/8" (2.2 cm) female flare adaptor to the the 1/2" (1.3 cm) male flare on installing gas supply lines. Nat. 6" to comply with 1/2" female adapter or GHS12
Installer supplied shut-off valve must be easily accessible
7 Check with your local gas utility company or with local codes for instructions on the regulator...
Installation Instructions - Page 8

... 11" to check on installing gas supply lines. LP. LP/PROPANE Fixed Piping Connection
Connection: Operating Pressure: Supply Pressure:
Standard Residential 1/2" ID gas service line - 1/2" NPT male with a 3/8" female flare adaptor to the 3/8" male flare adaptor to the regulator assembly. The connection must comply with local codes for instructions on type and size of...
Installation Instructions - Page 9

..." high which
Regulator Assembly
must be some type of support (braces, cut-out, etc.) to LP/Propane regulator...lb. Each tank is disconnected as part of dust cap on the outdoor cooking appliance. Only install the type of its safety feature,...overfilling protection device). Only install the type of caps or plugs may result in accordance
with the Specifications for all leaks have ...
Installation Instructions - Page 10

... should be necessary for proper mixture of gas and air for the nearest authorized service agency in place.
3.
Field adjustments may be adjusted by a qualified technician. When the unit is connected to the high position.
4. Replace the grate support and grate. If none are tested before leaving the factory. Light the burner and...
Installation Instructions - Page 11

...Your New Wok/Cooker
All products are wiped clean with solvents at any "on medium setting until the feet on the trivet grate rests inside surface with a paper towel. ...clicking" sound. To use the trivet grate, place the small grate in the center of the large grate. Setting the proper height for use corn oil) to the burners, the electric igniters start sparking.
Wipe off the ...
Installation Instructions - Page 14

... required after checking the troubleshooting guide: 1. If you continue to have service problems, contact Viking Range, LLC at (888) 845-4641 or write to ensure protection under the warranty. Have the following information readily available:
Model Number Serial Number Date of Purchase Name of parts, use only authorized parts to :
VIKING RANGE, LLC PREFERRED SERVICE
111 Front Street...
Installation Instructions - Page 15

... PRODUCT SHALL BE THE REMEDIES SET FORTH ABOVE. Some states do not allow limitations on stainless steel, porcelain blemishes, etc.) for the part itself , with the owner paying all other than an authorized Viking Range, LLC service agency or representative. Under the terms of electrical power to be repaired or replaced, free of charge for...
Viking VGWTO5241 Reviews
We have not received any reviews for Viking yet.