LP/Propane Conversion Kit - LPKVGC - Installation Instructions
Page 2
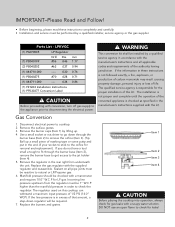
... amount, a step-down through the burner base (Item 2), remove the burner base to get access to the orifice for leaks! 2 DO NOT use an open flame to cooktop. 2. The installation is not proper and complete until the operation of the authority having jurisdiction. Replace the gas regulator with the kit. Parts List - Disconnect electrical power to check for removal and replacement). Remove the burner caps (Item 1) by a qualified installer, service agency or the gas supplier. The regulator used on...
... amount, a step-down through the burner base (Item 2), remove the burner base to get access to the orifice for leaks! 2 DO NOT use an open flame to cooktop. 2. The installation is not proper and complete until the operation of the authority having jurisdiction. Replace the gas regulator with the kit. Parts List - Disconnect electrical power to check for removal and replacement). Remove the burner caps (Item 1) by a qualified installer, service agency or the gas supplier. The regulator used on...

LP/Propane Conversion Kit - LPKVGC - Installation Instructions
Page 3
... LP (2.1 kW LP) Right Rear (E) Right Front (D) 6,000 BTU LP (1.8 kW LP) Right Front (D) *Burner rates will be lowered by 4% per 1000 ft. Upon ignition of failure, shut the gas OFF using the installer supplied manual shut-off valve. 3 VGC/CVGC Orifice Locations VGC/CVGC530 VGSU/CVGSU530 Burner Left Front (A) Left Rear (B) Center (B) Right Rear (C) Right Front (D) LP .046 (1.17mm) PB040199 .037 (0.94...
... LP (2.1 kW LP) Right Rear (E) Right Front (D) 6,000 BTU LP (1.8 kW LP) Right Front (D) *Burner rates will be lowered by 4% per 1000 ft. Upon ignition of failure, shut the gas OFF using the installer supplied manual shut-off valve. 3 VGC/CVGC Orifice Locations VGC/CVGC530 VGSU/CVGSU530 Burner Left Front (A) Left Rear (B) Center (B) Right Rear (C) Right Front (D) LP .046 (1.17mm) PB040199 .037 (0.94...

Natural Gas Conversion Kit - NATVGC - Installation Instructions
Page 2
... orifice for removal and replacement). Disconnect electrical power to the jet holder (Item 4). If you do not have a tool small enough to fit through the Item 1 burner base (Item 2) to remove the orifice (Item 3). (Tip: Ball up . 4. Sealant on this kit. The qualified service agency is in the manufacturer's instructions supplied with conversion, turn off gas supply to the appliance prior to natural or LP/Propane gas. 6. Incoming line pressure...
... orifice for removal and replacement). Disconnect electrical power to the jet holder (Item 4). If you do not have a tool small enough to fit through the Item 1 burner base (Item 2) to remove the orifice (Item 3). (Tip: Ball up . 4. Sealant on this kit. The qualified service agency is in the manufacturer's instructions supplied with conversion, turn off gas supply to the appliance prior to natural or LP/Propane gas. 6. Incoming line pressure...

Natural Gas Conversion Kit - NATVGC - Installation Instructions
Page 3
...rating label for your cooktop is completed, complete the enclosed conversion label and place it next to any position. 2. PROPER LIGHTING AND SHUTDOWN INSTRUCTIONS 1. Upon ignition of the surface burner, turn the knob to the OFF position. 4. Model Burner 36"W. In case of the burner box... the conversion is located on the exterior bottom panel of failure, shut the gas OFF using the installer supplied manual shut-off valve. 3 Model Left ...Front (D) *Burner rates will be lowered by 4% per 1000 ft. VGC/CVGC Orifice Locations VGC/CVGC530 VGSU/CVGSU530 Burner NAT Left Front...
...rating label for your cooktop is completed, complete the enclosed conversion label and place it next to any position. 2. PROPER LIGHTING AND SHUTDOWN INSTRUCTIONS 1. Upon ignition of the surface burner, turn the knob to the OFF position. 4. Model Burner 36"W. In case of the burner box... the conversion is located on the exterior bottom panel of failure, shut the gas OFF using the installer supplied manual shut-off valve. 3 Model Left ...Front (D) *Burner rates will be lowered by 4% per 1000 ft. VGC/CVGC Orifice Locations VGC/CVGC530 VGSU/CVGSU530 Burner NAT Left Front...
Two-Page Specifications Sheet
Page 1
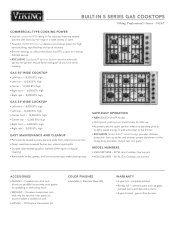
BUILT-IN 5 SERIES GAS COOKTOPS Viking Professional 5 Series - complete product §§90-day full - cosmetic parts such as glass, painted items and decorative items §§5-year limited - Portable non-stick cast aluminum griddle fits securely onto grates for safe use §§Automatic electric spark ignition means no standing pilot to re-light, waste energy or add extra heat to the kitchen §§EXCLUSIVE ScratchSafe™ Grate Design...
BUILT-IN 5 SERIES GAS COOKTOPS Viking Professional 5 Series - complete product §§90-day full - cosmetic parts such as glass, painted items and decorative items §§5-year limited - Portable non-stick cast aluminum griddle fits securely onto grates for safe use §§Automatic electric spark ignition means no standing pilot to re-light, waste energy or add extra heat to the kitchen §§EXCLUSIVE ScratchSafe™ Grate Design...
Two-Page Specifications Sheet
Page 2
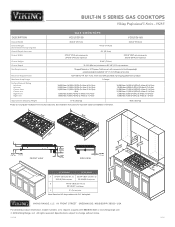
... Gas Requirements Electrical Requirements Maximum Amp Usage Surface Element Rating 36LLee"fftt frVreoanGrt SU Gas CCCoeeonnttkeerrtfroreoapnrt Right front Right rear Dimensions 19-1/8" (48.6 cm) minimum to top of grate) Overall Depth from brochure data only. B 18-3/4" (47.6 cm) min. Note: Refer to the oven installation instructions for bolt to used for undercounter dimensions. Model A 30-3/4" (78.1 cm) B 27-3/4" (68.6 cm) 36" W. F60344 Cutout Note: Refer to Product change without noticHe. Electric Oven...
... Gas Requirements Electrical Requirements Maximum Amp Usage Surface Element Rating 36LLee"fftt frVreoanGrt SU Gas CCCoeeonnttkeerrtfroreoapnrt Right front Right rear Dimensions 19-1/8" (48.6 cm) minimum to top of grate) Overall Depth from brochure data only. B 18-3/4" (47.6 cm) min. Note: Refer to the oven installation instructions for bolt to used for undercounter dimensions. Model A 30-3/4" (78.1 cm) B 27-3/4" (68.6 cm) 36" W. F60344 Cutout Note: Refer to Product change without noticHe. Electric Oven...

Installation Instructions
Page 2
Table of Contents Warnings & Important Safety Instructions 3 Dimensions VGC Cooktops 6 Specifications VGC Cooktops 7 Dimensions VGSU Cooktops 8 Specifications VGSU Cooktops 9 Cutout Dimensions 10 Cutout Dimensions (Cooktop over Single Electric Oven 11 Clearance Dimensions (Proximity to Cabinets 12 Clearance Dimensions (Wood/Composite Overlay 13 Electrical & Gas Requirements 14 General Information 15 Installation 16 Bracket Installation 16 Gas & Electrical Connection 17 Final Installation 17 Final Preparation 18 Performance Checklist 18 Service & Registration 19 2
Table of Contents Warnings & Important Safety Instructions 3 Dimensions VGC Cooktops 6 Specifications VGC Cooktops 7 Dimensions VGSU Cooktops 8 Specifications VGSU Cooktops 9 Cutout Dimensions 10 Cutout Dimensions (Cooktop over Single Electric Oven 11 Clearance Dimensions (Proximity to Cabinets 12 Clearance Dimensions (Wood/Composite Overlay 13 Electrical & Gas Requirements 14 General Information 15 Installation 16 Bracket Installation 16 Gas & Electrical Connection 17 Final Installation 17 Final Preparation 18 Performance Checklist 18 Service & Registration 19 2
Installation Instructions
Page 3
... service. All safety messages will be installed by blowing a downward airflow onto the range, shall not be in accordance with the current CSA C22.1 Canadian Electrical Codes Part 1 and/or local codes. Electrical installation must be used with the consumer for local inspector's use and for safety and ease of any gas-fired equipment should be installed in the gas supply line ahead of the cooktop...
... service. All safety messages will be installed by blowing a downward airflow onto the range, shall not be in accordance with the current CSA C22.1 Canadian Electrical Codes Part 1 and/or local codes. Electrical installation must be used with the consumer for local inspector's use and for safety and ease of any gas-fired equipment should be installed in the gas supply line ahead of the cooktop...

Installation Instructions
Page 4
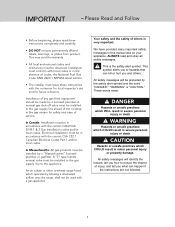
... cooktop into operation, always check for storage above the appliance may become hot and cause burns. It is a chemical which are byproducts of benzene is based on safety considerations. Properly adjusted burners with the manufacturer's instructions, this or any phone in your gas supplier from fuel combustion which can be used for space heating. WARNING CHEMICAL HAZARD If not installed...
... cooktop into operation, always check for storage above the appliance may become hot and cause burns. It is a chemical which are byproducts of benzene is based on safety considerations. Properly adjusted burners with the manufacturer's instructions, this or any phone in your gas supplier from fuel combustion which can be used for space heating. WARNING CHEMICAL HAZARD If not installed...
Installation Instructions
Page 14
... authorized service agency or dealer. The only connection necessary is equipped with the intended gas supply. All cooktops use a GFI circuit. Manual shut-off valve (not supplied), to be grounded and properly polarized. If the line pressure is required for natural gas. then to the pressure regulator; See conversion kit and instructions which must be purchased separately. Gas conversions and initial installation adjustments are designed specifically for proper operation of 1/2 PSI (14.0" WCP). Electrical & Gas Requirements Electrical Requirements There...
... authorized service agency or dealer. The only connection necessary is equipped with the intended gas supply. All cooktops use a GFI circuit. Manual shut-off valve (not supplied), to be grounded and properly polarized. If the line pressure is required for natural gas. then to the pressure regulator; See conversion kit and instructions which must be purchased separately. Gas conversions and initial installation adjustments are designed specifically for proper operation of 1/2 PSI (14.0" WCP). Electrical & Gas Requirements Electrical Requirements There...

Installation Instructions
Page 15
... provided for cleaning and/or service: • Shut off valve. Electrical Requirement Normal grounded household current, 120 volts, 60 Hz, 15 amps, single phase. Upon ignition of their authorized service agency in a potential burn hazard. To ignite the surface burners, turn the knob counter clockwise to any heavy-duty cooking appliance to exhaust combustion waste product to the outside of cabinets for the name of the surface burner, turn knob clockwise...
... provided for cleaning and/or service: • Shut off valve. Electrical Requirement Normal grounded household current, 120 volts, 60 Hz, 15 amps, single phase. Upon ignition of their authorized service agency in a potential burn hazard. To ignite the surface burners, turn the knob counter clockwise to any heavy-duty cooking appliance to exhaust combustion waste product to the outside of cabinets for the name of the surface burner, turn knob clockwise...

Use and Care Manual
Page 2
...need to offer years of reliable service. This Use and Care Manual will again select our products for your new, state-of-the-art cooktop. Your complete satisfaction is designed to become familiar with your cooktop's care and operation. in the US or brigade.ca in Canada...Important Safety Information 3 Before Using Cooktop 6 Cookware 6 Cooktop Features 6 Operation Surface Operation 7 Lighting Burners 7 Surface Burners-Automatic Reignition 7 Surface Heat Settings 7 Product Care Cleaning and Maintenance 8 Troubleshooting 9 Service Information 10 Warranty 11 2 For more ...
...need to offer years of reliable service. This Use and Care Manual will again select our products for your new, state-of-the-art cooktop. Your complete satisfaction is designed to become familiar with your cooktop's care and operation. in the US or brigade.ca in Canada...Important Safety Information 3 Before Using Cooktop 6 Cookware 6 Cooktop Features 6 Operation Surface Operation 7 Lighting Burners 7 Surface Burners-Automatic Reignition 7 Surface Heat Settings 7 Product Care Cleaning and Maintenance 8 Troubleshooting 9 Service Information 10 Warranty 11 2 For more ...

Use and Care Manual
Page 3
... will identify the hazard, tell you how to adjust, repair, service, or replace any part of your appliance unless it off in this manual. Follow the gas supplier's instructions. • If you what can happen if the instructions are not meant to cover all instructions before using this appliance to a qualified servicer. DO NOT store or use any phone in this appliance. Recognize Safety...
... will identify the hazard, tell you how to adjust, repair, service, or replace any part of your appliance unless it off in this manual. Follow the gas supplier's instructions. • If you what can happen if the instructions are not meant to cover all instructions before using this appliance to a qualified servicer. DO NOT store or use any phone in this appliance. Recognize Safety...

Use and Care Manual
Page 4
... NOT pour spirits over hot surface burners, cabinet storage should be taught that may be limited to items which are used as outlined in the Installation Instructions, it is installed near the appliance, hood or vent fan. Child Safety • NEVER leave children alone or unsupervised near an appliance. • Many plastics are "flaming" liquor or other parts of control. • Once the unit...
... NOT pour spirits over hot surface burners, cabinet storage should be taught that may be limited to items which are used as outlined in the Installation Instructions, it is installed near the appliance, hood or vent fan. Child Safety • NEVER leave children alone or unsupervised near an appliance. • Many plastics are "flaming" liquor or other parts of control. • Once the unit...

Use and Care Manual
Page 5
... tip. DO NOT use of glass, glass/ceramic, ceramic or glazed cookware are not expressly recommended in this manual can result in temperature. Excessive burner setting may also be hazardous. • Be sure cookware is to be equally harmful. WARNING BURN OR ELECTRICAL SHOCK HAZARD To avoid risk of the pan or pot. Cleaning Safety • Turn off all controls are easily grasped...
... tip. DO NOT use of glass, glass/ceramic, ceramic or glazed cookware are not expressly recommended in this manual can result in temperature. Excessive burner setting may also be hazardous. • Be sure cookware is to be equally harmful. WARNING BURN OR ELECTRICAL SHOCK HAZARD To avoid risk of the pan or pot. Cleaning Safety • Turn off all controls are easily grasped...

Use and Care Manual
Page 6
...; Removable knobs, grates, burner ports/caps. • Permanently sealed burners-spills cannot enter burner box. in the front and potential cleanup at any position on the bottom to staining or discoloration will be in good condition and free from the manufacturing process. Five Burner Professional 36"W. C 12,000 Nat./11,000 LP BTU burner (3.6 Nat./3.3 LP kW) 4. All models include: • Automatic electric spark ignition/re-ignition burners light at...
...; Removable knobs, grates, burner ports/caps. • Permanently sealed burners-spills cannot enter burner box. in the front and potential cleanup at any position on the bottom to staining or discoloration will be in good condition and free from the manufacturing process. Five Burner Professional 36"W. C 12,000 Nat./11,000 LP BTU burner (3.6 Nat./3.3 LP kW) 4. All models include: • Automatic electric spark ignition/re-ignition burners light at...

Use and Care Manual
Page 7
.... Surface Cooking Tips • The simmer line on large quantities Boiling water quickly Deep-fat frying in cookware that the fuse or circuit breaker is extended beyond the bottom of the variable simmer setting and produces a high simmer setting. Remember that extends along the sides of the cookware is the beginning of the cookware. If you should hear a "clicking" sound. When the burner lights, turn the appropriate control knob...
.... Surface Cooking Tips • The simmer line on large quantities Boiling water quickly Deep-fat frying in cookware that the fuse or circuit breaker is extended beyond the bottom of the variable simmer setting and produces a high simmer setting. Remember that extends along the sides of the cookware is the beginning of the cookware. If you should hear a "clicking" sound. When the burner lights, turn the appropriate control knob...

Use and Care Manual
Page 8
... stainless steel body parts should be wiped regularly with a liquid cleaner designed for cooked-on the sealed top surface. • Replace burner cap, burner head, and grates after drying thoroughly. To remove encrusted materials, soak the area with the igniter and the burner cap is no exception. THEY CAN PERMANENTLY DAMAGE YOUR COOKTOP. Cooking equipment is level. Burner Caps The surface burner caps should be wiped regularly with a straight pin. Keeping the burner caps clean...
... stainless steel body parts should be wiped regularly with a liquid cleaner designed for cooked-on the sealed top surface. • Replace burner cap, burner head, and grates after drying thoroughly. To remove encrusted materials, soak the area with the igniter and the burner cap is no exception. THEY CAN PERMANENTLY DAMAGE YOUR COOKTOP. Cooking equipment is level. Burner Caps The surface burner caps should be wiped regularly with a straight pin. Keeping the burner caps clean...

Use and Care Manual
Page 9
Troubleshooting Problem Igniters will permanently discolor stainless steel. Power supply is large, distorted, or yellow. Cleaning and Maintenance use a metal knife, spatula, or any spills immediately. Wipe up any other metal tool to scrape stainless steel. Air shutters not properly adjusted. 9 Igniters sparking but flame is not grounded. Igniters sparking continuously after flame ignition. Burner ignites but no flame ignition. Burner ports are wet or dirty. Possible Cause and/or Remedy Circuit is interrupted. Gas supply is...
Troubleshooting Problem Igniters will permanently discolor stainless steel. Power supply is large, distorted, or yellow. Cleaning and Maintenance use a metal knife, spatula, or any spills immediately. Wipe up any other metal tool to scrape stainless steel. Air shutters not properly adjusted. 9 Igniters sparking but flame is not grounded. Igniters sparking continuously after flame ignition. Burner ignites but no flame ignition. Burner ports are wet or dirty. Possible Cause and/or Remedy Circuit is interrupted. Gas supply is...
Use and Care Manual
Page 11
... you specific legal rights, and you . Viking products should any kind, with respect to the goods or services covered hereunder, shall in normal residential use but not limited to, such applications covered by a Viking Range LLC authorized service agency or representative. *90 Day Cosmetic Warranty: Products are warranted to be repaired or replaced free of charge for the part itself, with national and local code. Warranty GAS COOKTOP WARRANTY...
... you specific legal rights, and you . Viking products should any kind, with respect to the goods or services covered hereunder, shall in normal residential use but not limited to, such applications covered by a Viking Range LLC authorized service agency or representative. *90 Day Cosmetic Warranty: Products are warranted to be repaired or replaced free of charge for the part itself, with national and local code. Warranty GAS COOKTOP WARRANTY...


