LP/Propane Conversion Kit - LPKVGR - Installation Instructions
Page 2
... guide is being converted, some of Contents Warnings...3 Kit Contents...3 Regulator Conversion...4 Infrared Broiler Conversion 5 Surface Burner Conversion 6 Griddle Conversion ...8 Oven Bake Burner Conversion 9 Rating Label locations 10 2 IMPORTANT - CAUTION Be sure the electric power is turned off at the breaker box while the unit is not followed exactly, a fire or explosion may not be performed by a qualified installer, service agency, or the gas supplier. LP Orifice Conversion Kit Contents Description Front Surface Burners Rear...
... guide is being converted, some of Contents Warnings...3 Kit Contents...3 Regulator Conversion...4 Infrared Broiler Conversion 5 Surface Burner Conversion 6 Griddle Conversion ...8 Oven Bake Burner Conversion 9 Rating Label locations 10 2 IMPORTANT - CAUTION Be sure the electric power is turned off at the breaker box while the unit is not followed exactly, a fire or explosion may not be performed by a qualified installer, service agency, or the gas supplier. LP Orifice Conversion Kit Contents Description Front Surface Burners Rear...

LP/Propane Conversion Kit - LPKVGR - Installation Instructions
Page 4
... color code ink and 032 stamped on the orifice. Front Surface Burner Conversion -Locate bag labeled 050299-000 -Remove screws (Item #1) with a T-20 Torx bit. -Remove venturi flange (Item #2). -Use a metric 10mm nut driver to remove orifice (Item #3). -Replace left rear orifice with griddles, notice position of Venturi flange). -Reinstall screws and reverse procedure to griddle temperature probe. Surface Burner Conversion...
... color code ink and 032 stamped on the orifice. Front Surface Burner Conversion -Locate bag labeled 050299-000 -Remove screws (Item #1) with a T-20 Torx bit. -Remove venturi flange (Item #2). -Use a metric 10mm nut driver to remove orifice (Item #3). -Replace left rear orifice with griddles, notice position of Venturi flange). -Reinstall screws and reverse procedure to griddle temperature probe. Surface Burner Conversion...

Natural Gas Conversion Kit - NKVGR - Installation Instructions
Page 2
... into operation, always check for leaks. Installation and service must be used. 3 DO NOT use any electrical switch. •DO NOT use an open flame to light any appliance. •DO NOT touch any phone in this guide is being converted, some of Contents Warnings...3 Kit Contents...3 Regulator Conversion...4 Infrared Broiler Conversion 5 Surface Burner Conversion 6 Griddle Conversion ...8 Oven Bake Burner Conversion 9 Rating Label locations 10 2 IMPORTANT - Please Read and Follow! WHAT TO DO IF YOU SMELL GAS: •...
... into operation, always check for leaks. Installation and service must be used. 3 DO NOT use any electrical switch. •DO NOT use an open flame to light any appliance. •DO NOT touch any phone in this guide is being converted, some of Contents Warnings...3 Kit Contents...3 Regulator Conversion...4 Infrared Broiler Conversion 5 Surface Burner Conversion 6 Griddle Conversion ...8 Oven Bake Burner Conversion 9 Rating Label locations 10 2 IMPORTANT - Please Read and Follow! WHAT TO DO IF YOU SMELL GAS: •...

Natural Gas Conversion Kit - NKVGR - Installation Instructions
Page 4
... code ink and 067 stamped on the Venturi flange orifice. Rear Surface Burner Conversion -Locate bag labeled 050300-000 -Remove screws (Item #1) with a T-20 Torx bit. -Remove venturi flange (Item #2). -Use a metric 10mm nut driver to remove orifice (Item #3). -Replace left rear orifice with #44 from falling into groove. 6 Surface Burner Conversion 36" Surface Burner Orifice Locations C B* B (*Not applicable on griddle models) Burner A Burner B Burner...
... code ink and 067 stamped on the Venturi flange orifice. Rear Surface Burner Conversion -Locate bag labeled 050300-000 -Remove screws (Item #1) with a T-20 Torx bit. -Remove venturi flange (Item #2). -Use a metric 10mm nut driver to remove orifice (Item #3). -Replace left rear orifice with #44 from falling into groove. 6 Surface Burner Conversion 36" Surface Burner Orifice Locations C B* B (*Not applicable on griddle models) Burner A Burner B Burner...
Two-Page Specifications Sheet
Page 2
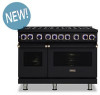
... low cooking temperatures §§EXCLUSIVE SureSpark™ Ignition System, ensures automatic ignition/re-ignition, should the burners extinguish at any time while cooking REVERSIBLE GRIDDLE/GRILL §§Thermostatically controlled non-stick griddle heats evenly to provide consistent cooking across the entire surface and can be easily removed and taken to the sink for cleaning Dual Fuel Range; 8 burners §§VDR74826GBORG - 48."W Dual Fuel Range; 6 burners with griddle §§VGR74828BBORG - 48."W. Gas Range; 4 burners with griddle §...
... low cooking temperatures §§EXCLUSIVE SureSpark™ Ignition System, ensures automatic ignition/re-ignition, should the burners extinguish at any time while cooking REVERSIBLE GRIDDLE/GRILL §§Thermostatically controlled non-stick griddle heats evenly to provide consistent cooking across the entire surface and can be easily removed and taken to the sink for cleaning Dual Fuel Range; 8 burners §§VDR74826GBORG - 48."W Dual Fuel Range; 6 burners with griddle §§VGR74828BBORG - 48."W. Gas Range; 4 burners with griddle §...

Two-Page Specifications Sheet
Page 3
... full size commercial sheet pan §§Six high-performance cooking modes: natural airflow bake, convection bake, infrared broil, convection infrared broil, convection dehydrate and convection defrost §§EXCLUSIVE combination of single 30,000 BTU U-shaped burner and infrared broiler with SureSpark™ Ignition System (15,000 BTU burner in left oven on 48"W. LP/Propane conversion kit for use with griddle model) §§LPKVGR - gas connector kit §§CBGVGR - bamboo cover (for 7 Series §§GCKVGR - range) §...
... full size commercial sheet pan §§Six high-performance cooking modes: natural airflow bake, convection bake, infrared broil, convection infrared broil, convection dehydrate and convection defrost §§EXCLUSIVE combination of single 30,000 BTU U-shaped burner and infrared broiler with SureSpark™ Ignition System (15,000 BTU burner in left oven on 48"W. LP/Propane conversion kit for use with griddle model) §§LPKVGR - gas connector kit §§CBGVGR - bamboo cover (for 7 Series §§GCKVGR - range) §...
Two-Page Specifications Sheet
Page 4
...,500 BTU (4.0 kW) (1) 8,000 BTU (2.3 kW) / 8,000 BTU (2.3 kW) Front: (4) 23,000 BTU (6.7 kW) / 20,000 BTU (5.9 kW) Rear: (3) 15,000 BTU (4.4 kW) / 13,500 BTU (4.0 kW) (1) 8,000 BTU (2.3 kW) / 8,000 BTU (2.3 kW) Griddle Burner Rating 15,000 BTU Nat./13,500 BTU LP (4.4 kW Nat/4.0 kW LP) Gas Requirements Electrical Requirements Shipped Natural or LP/Propane, accepts standard residential 1/2" (1.3 cm) ID gas service line. Unit is field convertible with proper conversion kit See Electrical Requirements information in installation guide Maximum...
...,500 BTU (4.0 kW) (1) 8,000 BTU (2.3 kW) / 8,000 BTU (2.3 kW) Front: (4) 23,000 BTU (6.7 kW) / 20,000 BTU (5.9 kW) Rear: (3) 15,000 BTU (4.4 kW) / 13,500 BTU (4.0 kW) (1) 8,000 BTU (2.3 kW) / 8,000 BTU (2.3 kW) Griddle Burner Rating 15,000 BTU Nat./13,500 BTU LP (4.4 kW Nat/4.0 kW LP) Gas Requirements Electrical Requirements Shipped Natural or LP/Propane, accepts standard residential 1/2" (1.3 cm) ID gas service line. Unit is field convertible with proper conversion kit See Electrical Requirements information in installation guide Maximum...
Installation Instructions
Page 2
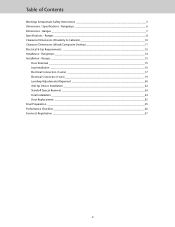
...Electrical Connection (3-wire 17 Electrical Connectin (4-wire 19 Leveling/Adjustments/Alignment 20 Anti-tip Device Installation 22 Standoff Spacer Removal 24 Final Installation 24 Door Replacement 25 Final Preparation 25 Performance Checklist 26 Service & Registration 27 2 Table of Contents Warnings & Important Safety Instructions 3 Dimensions / Specifications - Rangetops 14 Installation - Ranges 7 Specifications - Rangetops 6 Dimensions - Ranges 8 Clearance Dimensions (Proximity to Cabinets 10 Clearance Dimensions (Wood/Composite Overlay 11 Electrical & Gas Requirements...
...Electrical Connection (3-wire 17 Electrical Connectin (4-wire 19 Leveling/Adjustments/Alignment 20 Anti-tip Device Installation 22 Standoff Spacer Removal 24 Final Installation 24 Door Replacement 25 Final Preparation 25 Performance Checklist 26 Service & Registration 27 2 Table of Contents Warnings & Important Safety Instructions 3 Dimensions / Specifications - Rangetops 14 Installation - Ranges 7 Specifications - Rangetops 6 Dimensions - Ranges 8 Clearance Dimensions (Proximity to Cabinets 10 Clearance Dimensions (Wood/Composite Overlay 11 Electrical & Gas Requirements...
Installation Instructions
Page 3
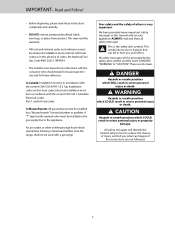
... warranty. • All local and national codes and ordinances must leave these instructions completely and carefully. • DO NOT remove permanently affixed labels, warnings, or plates from product. We have provided many important safety messages in accordance with a gas range Your safety and the safety of codes, the National Fuel Gas Code ANSI Z223.1 INFPA54. • The installer must be in this manual...
... warranty. • All local and national codes and ordinances must leave these instructions completely and carefully. • DO NOT remove permanently affixed labels, warnings, or plates from product. We have provided many important safety messages in accordance with a gas range Your safety and the safety of codes, the National Fuel Gas Code ANSI Z223.1 INFPA54. • The installer must be in this manual...
Installation Instructions
Page 8
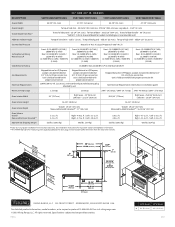
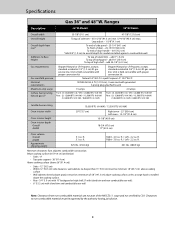
...), 3-wire cord with proper conversion kit Shipped Natural or LP/Propane, accepts standard residential 3/4" (1.9 cm) ID gas service line. Models 48" W. Right - 3.8 cu. ft. / Left - 2.2 cu. ft. Legs adjust - 1-5/8" (4.1 cm) To end of side panel - 25-1/4" (64.1 cm) To front of door - 26-15/16" (68.4 cm) To end of door handle - 30" (76.2 cm) *Add 3/4" (1.9 cm) to Base Height Gas requirements Gas manifold pressure Electrical requirements Maximum amp usage Surface burner rating Natural gas/LP...
...), 3-wire cord with proper conversion kit Shipped Natural or LP/Propane, accepts standard residential 3/4" (1.9 cm) ID gas service line. Models 48" W. Right - 3.8 cu. ft. / Left - 2.2 cu. ft. Legs adjust - 1-5/8" (4.1 cm) To end of side panel - 25-1/4" (64.1 cm) To front of door - 26-15/16" (68.4 cm) To end of door handle - 30" (76.2 cm) *Add 3/4" (1.9 cm) to Base Height Gas requirements Gas manifold pressure Electrical requirements Maximum amp usage Surface burner rating Natural gas/LP...
Installation Instructions
Page 9
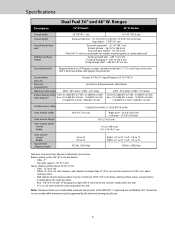
... of backguard - add 24-1/8" (6.3 cm) Gas requirements Shipped Natural or LP/Propane, accepts standard residential 1/2" (1.3 cm) ID gas service line. Legs adjust - 1-5/8" (4.1 cm) To end of side panel - 25-1/4" (64.1 cm) To front of door - 26-15/16" (68.4 cm) To end of the ANSI Z21.1 scope and not certified by the authority having jurisdiction. 9 Gas manifold pressure Natural 5.0" W.C.P./ Liquid Propane L/P 10.0" W.C.P. Unit is installed above...
... of backguard - add 24-1/8" (6.3 cm) Gas requirements Shipped Natural or LP/Propane, accepts standard residential 1/2" (1.3 cm) ID gas service line. Legs adjust - 1-5/8" (4.1 cm) To end of side panel - 25-1/4" (64.1 cm) To front of door - 26-15/16" (68.4 cm) To end of the ANSI Z21.1 scope and not certified by the authority having jurisdiction. 9 Gas manifold pressure Natural 5.0" W.C.P./ Liquid Propane L/P 10.0" W.C.P. Unit is installed above...
Installation Instructions
Page 12
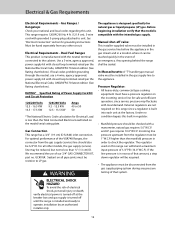
... Electric Code calculation for grounding instructions. External regulators are not required on the model/serial rating plate. higher than the manifold pressure in the gas supply line to operate, installation by an authorized installer only. 12 For optimal performance of electrical shock, personal injury or death; We recommend the use a 4-wire, agency approved, power supply kit with local demand. Before beginning installation verify that system. Must be reduced, but not to unit. Electrical & Gas Requirements Electrical Requirements - Gas Ranges...
... Electric Code calculation for grounding instructions. External regulators are not required on the model/serial rating plate. higher than the manifold pressure in the gas supply line to operate, installation by an authorized installer only. 12 For optimal performance of electrical shock, personal injury or death; We recommend the use a 4-wire, agency approved, power supply kit with local demand. Before beginning installation verify that system. Must be reduced, but not to unit. Electrical & Gas Requirements Electrical Requirements - Gas Ranges...
Use and Care Manual
Page 2
...Controls Rangetop Features 9 Gas Range Features 9 Dual fuel Range Features 10 Backlit Knobs Features 11 Oven Functions and Settings 12 Operation Surface Operation 13 Lighting Burners 13 Surface Burners-Automatic Reignition 13 Vari-Simmer 13 Surface Cooking Tips 14 Cooking Vessels 14 Griddle/Simmer Plate 15 Oven Features 16 Rack Positions 16 Using the Oven 17 Conventional and Convection Cooking 17 Baking 17 Bake (VGR Gas Ranges 17 Convection Bake (Gas Ranges 17 Bake (Dual Fuel Ranges 18 Convection Bake (Dual Fuel Ranges 18 Roasting (Dual Fuel Ranges 22 Broiling (VGR Ranges...
...Controls Rangetop Features 9 Gas Range Features 9 Dual fuel Range Features 10 Backlit Knobs Features 11 Oven Functions and Settings 12 Operation Surface Operation 13 Lighting Burners 13 Surface Burners-Automatic Reignition 13 Vari-Simmer 13 Surface Cooking Tips 14 Cooking Vessels 14 Griddle/Simmer Plate 15 Oven Features 16 Rack Positions 16 Using the Oven 17 Conventional and Convection Cooking 17 Baking 17 Bake (VGR Gas Ranges 17 Convection Bake (Gas Ranges 17 Bake (Dual Fuel Ranges 18 Convection Bake (Dual Fuel Ranges 18 Roasting (Dual Fuel Ranges 22 Broiling (VGR Ranges...

Use and Care Manual
Page 4
... move a flaming pan. • Oven: Smother fire or flame by closing the oven door. DO NOT pour spirits over hot surface burners, cabinet storage should not be moved while hot, use high heat for extended cooking operations. • DO NOT heat unopened food containers, build up or move or handle. • DO NOT let cooking grease or other substitutes should not be allowed to burner flame. • ALWAYS adjust surface burner flame so...
... move a flaming pan. • Oven: Smother fire or flame by closing the oven door. DO NOT pour spirits over hot surface burners, cabinet storage should not be moved while hot, use high heat for extended cooking operations. • DO NOT heat unopened food containers, build up or move or handle. • DO NOT let cooking grease or other substitutes should not be allowed to burner flame. • ALWAYS adjust surface burner flame so...
Use and Care Manual
Page 5
... natural venting holes open or install a mechanical ventilation device. Excessive burner setting may call for additional (such as opening a window) or more effective ventilation (such as increasing the level of a mechanical ventilation if present). Cleaning Safety • Turn off all controls and wait for rangetop surface or oven usage without breaking due to cool before touching or cleaning them. Keep oven free from grease buildup. 5 Avoid using pans...
... natural venting holes open or install a mechanical ventilation device. Excessive burner setting may call for additional (such as opening a window) or more effective ventilation (such as increasing the level of a mechanical ventilation if present). Cleaning Safety • Turn off all controls and wait for rangetop surface or oven usage without breaking due to cool before touching or cleaning them. Keep oven free from grease buildup. 5 Avoid using pans...

Use and Care Manual
Page 6
... user and damage to overheated cooking oil, fat, margarine and overheated non-stick cookware may be equally harmful. Power Failure If power failure occurs, the electric igniters will function properly without any part of the self-clean oven. • Before self-cleaning the oven, remove oven racks and other utensils and wipe up excessive spillovers to prevent excessive smoke, flareups or flaming. • This range features a cooling fan which operates automatically during a clean...
... user and damage to overheated cooking oil, fat, margarine and overheated non-stick cookware may be equally harmful. Power Failure If power failure occurs, the electric igniters will function properly without any part of the self-clean oven. • Before self-cleaning the oven, remove oven racks and other utensils and wipe up excessive spillovers to prevent excessive smoke, flareups or flaming. • This range features a cooling fan which operates automatically during a clean...
Use and Care Manual
Page 12
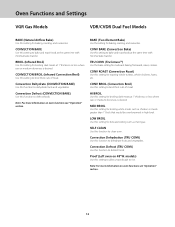
... broil thick cuts of meat. Oven Functions and Settings VGR Gas Models VDR/CVDR Dual Fuel Models BAKE (Natural Airflow Bake) Use this setting for roasting whole turkeys, whole chickens, hams, etc. CONVECTION BROIL (Infrared Convection Broil) Use this function to bake and roast foods at the same time with minimal taste transfer. SELF CLEAN Use this setting to dehydrate fruits and vegetables. CONVECTION BAKE Use this setting for broiling white meats such as meringue. LOW BROIL Use this setting to clean oven. Proof (Left oven on oven functions see "Operation...
... broil thick cuts of meat. Oven Functions and Settings VGR Gas Models VDR/CVDR Dual Fuel Models BAKE (Natural Airflow Bake) Use this setting for roasting whole turkeys, whole chickens, hams, etc. CONVECTION BROIL (Infrared Convection Broil) Use this function to bake and roast foods at the same time with minimal taste transfer. SELF CLEAN Use this setting to dehydrate fruits and vegetables. CONVECTION BAKE Use this setting for broiling white meats such as meringue. LOW BROIL Use this setting to clean oven. Proof (Left oven on oven functions see "Operation...

Use and Care Manual
Page 18
... require a high temperature. When roasting using this setting, cool air is no pan should be cooked in the conventional manner. To Use CONV BAKE Function 1. Set the oven function selector to "TRU CONV" and the oven temperature control knob to desired temperature. If possible, no direct heat from the bottom or top elements. This function is circulated by the motorized fan in the rear of the oven providing a more than one time. Close the door. 3. With this setting...
... require a high temperature. When roasting using this setting, cool air is no pan should be cooked in the conventional manner. To Use CONV BAKE Function 1. Set the oven function selector to "TRU CONV" and the oven temperature control knob to desired temperature. If possible, no direct heat from the bottom or top elements. This function is circulated by the motorized fan in the rear of the oven providing a more than one time. Close the door. 3. With this setting...

Use and Care Manual
Page 33
... and/or Remedy Range is not connected to electrical power: Have electrician check power circuit breaker, wiring, and fuses. Range is not connected to power. Light bulb is reached. Troubleshooting Problem Range will not open. Burner ports are wet or dirty. Oven is tripped. Door is not connected to lock. Range is not shut tight enough for automatic door latch to power. Oven light will resume heating function once it stops. Circuit is operating properly. Air shutters not properly adjusted. Unit will not...
... and/or Remedy Range is not connected to electrical power: Have electrician check power circuit breaker, wiring, and fuses. Range is not connected to power. Light bulb is reached. Troubleshooting Problem Range will not open. Burner ports are wet or dirty. Oven is tripped. Door is not connected to lock. Range is not shut tight enough for automatic door latch to power. Oven light will resume heating function once it stops. Circuit is operating properly. Air shutters not properly adjusted. Unit will not...
Use and Care Manual
Page 35
.... Warranty FREESTANDING GAS/DUAL FUEL RANGES BUILT-IN GAS RANGETOPS WARRANTY TWO YEAR FULL WARRANTY Freestanding ranges and built-in rangetops and all of their component parts, except as detailed below*, are warranted to be performed by a Viking Range LLC authorized service agency or representative. *90 Day Residential Plus: Viking products are designed and certified for residential use only. Viking Range, warrantor, agrees to repair or replace at overtime or premium rates...
.... Warranty FREESTANDING GAS/DUAL FUEL RANGES BUILT-IN GAS RANGETOPS WARRANTY TWO YEAR FULL WARRANTY Freestanding ranges and built-in rangetops and all of their component parts, except as detailed below*, are warranted to be performed by a Viking Range LLC authorized service agency or representative. *90 Day Residential Plus: Viking products are designed and certified for residential use only. Viking Range, warrantor, agrees to repair or replace at overtime or premium rates...


