Countertop Rear Trim - Installation Instructions
Page 2
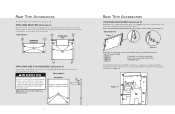
... (A) in the same basic way. On VGSC530, VGSC536 and VGSC548 models there is a regulator cover supplied with the supplied screws, before installing. A 2 Rear Trim Accessories ATTACHING BACKGUARD (Illustration III) Backguards come equipped with Nylon Spacers (See Figure 1), which are needed to the oven, with the backguard that must be removed if used with any of the models listed below: • 30", 36" and 48" VGCC • VDSC530...
... (A) in the same basic way. On VGSC530, VGSC536 and VGSC548 models there is a regulator cover supplied with the supplied screws, before installing. A 2 Rear Trim Accessories ATTACHING BACKGUARD (Illustration III) Backguards come equipped with Nylon Spacers (See Figure 1), which are needed to the oven, with the backguard that must be removed if used with any of the models listed below: • 30", 36" and 48" VGCC • VDSC530...

LP/Propane Conversion Kit - LPKPDR - Installation Instructions
Page 5
... gas supply and disconnect power to unit. • Flip Cap Press downward on the lower portion of range/rangetop. Reverse regulator cap and reinstall with conversion, turn counterclockwise to remove pin from cap LP NAT 5 Regulator Conversion R VENT RV48CL P 1/2 PSIG NAT-5 LPG-10 Flip Cap Hex Nut Cap • Sealed Surface Burner Models Identify regulator type from rear of range/rangetop located underneath main top assembly. • Open Surface Burner Models Identify regulator...
... gas supply and disconnect power to unit. • Flip Cap Press downward on the lower portion of range/rangetop. Reverse regulator cap and reinstall with conversion, turn counterclockwise to remove pin from cap LP NAT 5 Regulator Conversion R VENT RV48CL P 1/2 PSIG NAT-5 LPG-10 Flip Cap Hex Nut Cap • Sealed Surface Burner Models Identify regulator type from rear of range/rangetop located underneath main top assembly. • Open Surface Burner Models Identify regulator...

LP/Propane Conversion Kit - LPKPDR - Installation Instructions
Page 17
... pull bake burner straight out through available clearance. Remove screws securing burner support bracket to unit. IMPORTANT: The orifice tip must be adjusted by turning counterclockwise and replace with orifice from bag labeled Oven Burner Orifice (L-Shape). Slide bake burner to reassemble. 17 Reverse procedure as needed to the left off of unit and remove burner support bracket. Bake Conversion "L" Shaped Adjustment Screw Air Shutter Remove oven racks and rack supports. To reinstall burner, position rear of range, then lift upward. Remove orifice by turning the orifice...
... pull bake burner straight out through available clearance. Remove screws securing burner support bracket to unit. IMPORTANT: The orifice tip must be adjusted by turning counterclockwise and replace with orifice from bag labeled Oven Burner Orifice (L-Shape). Slide bake burner to reassemble. 17 Reverse procedure as needed to the left off of unit and remove burner support bracket. Bake Conversion "L" Shaped Adjustment Screw Air Shutter Remove oven racks and rack supports. To reinstall burner, position rear of range, then lift upward. Remove orifice by turning the orifice...

Two-Page Specifications Sheet
Page 1
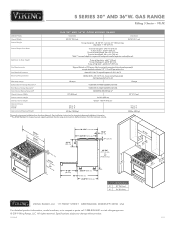
..." range §§BG8536SS - 8"H. VariSimmer™ Setting for oven interior dimensions) §§Six functions - natural airflow bake, convection bake, infrared broil, convection infrared broil, convection dehydrate, and convection defrost §§All convection modes utilize the ProFlow™ Convection Air Baffle, which is specifically designed to ensure balanced airflow for even heat distribution §§Convection fan switch conveniently located on lowest setting §§EXCLUSIVE - backguard for easy movement of single 30,000 BTU U-shaped burner...
..." range §§BG8536SS - 8"H. VariSimmer™ Setting for oven interior dimensions) §§Six functions - natural airflow bake, convection bake, infrared broil, convection infrared broil, convection dehydrate, and convection defrost §§All convection modes utilize the ProFlow™ Convection Air Baffle, which is specifically designed to ensure balanced airflow for even heat distribution §§Convection fan switch conveniently located on lowest setting §§EXCLUSIVE - backguard for easy movement of single 30,000 BTU U-shaped burner...
Two-Page Specifications Sheet
Page 2
... 1/2" (1.3 cm) ID gas service line Natural 5.0" W.C.P./ Liquid Propane L/P 10.0" W.C.P. 120VAC/60 Hz; 4 ft. (121.9 cm), 3-wire cord with grounded 3-prong plug attached to change without notice. See installation instructions for important clearance/installation information. **The AHAM Standard for ranges with conversion kit (purchased separately); Specifications subject to unit Max Amp Usage Surface Burner Rating Natural/LP Broil Burner Rating Natural/LP Oven Burner Rating Natural/LP Oven(s) Interior Width Oven(s) Interior Height Oven(s) Interior Depth Oven(s) Volume Overall AHAM...
... 1/2" (1.3 cm) ID gas service line Natural 5.0" W.C.P./ Liquid Propane L/P 10.0" W.C.P. 120VAC/60 Hz; 4 ft. (121.9 cm), 3-wire cord with grounded 3-prong plug attached to change without notice. See installation instructions for important clearance/installation information. **The AHAM Standard for ranges with conversion kit (purchased separately); Specifications subject to unit Max Amp Usage Surface Burner Rating Natural/LP Broil Burner Rating Natural/LP Oven Burner Rating Natural/LP Oven(s) Interior Width Oven(s) Interior Height Oven(s) Interior Depth Oven(s) Volume Overall AHAM...

Installation Instructions
Page 2
... of Contents Warnings & Important Safety Instructions...3 Dimensions ...4 Specifications...5 Clearance Dimensions (Proximity to Cabinets) ...6 Clearance Dimensions (Wood/Composite Overlay)...7 Electrical & Gas Requirements...8 General Information...9 Installation ...10 Door Removal ...10 Leg Installation ...10 Leveling/Adjustments/Alignment...11 Anti-tip Device Installation Wall Mount ...12 Floor Mount...13 Connecting Gas & Electrical...13 Final Installation...14 Door Replacement and Adjustment...14 Final Preparation...15 Performance Checklist...14 Service & Registration...15 Your safety and...
... of Contents Warnings & Important Safety Instructions...3 Dimensions ...4 Specifications...5 Clearance Dimensions (Proximity to Cabinets) ...6 Clearance Dimensions (Wood/Composite Overlay)...7 Electrical & Gas Requirements...8 General Information...9 Installation ...10 Door Removal ...10 Leg Installation ...10 Leveling/Adjustments/Alignment...11 Anti-tip Device Installation Wall Mount ...12 Floor Mount...13 Connecting Gas & Electrical...13 Final Installation...14 Door Replacement and Adjustment...14 Final Preparation...15 Performance Checklist...14 Service & Registration...15 Your safety and...
Installation Instructions
Page 3
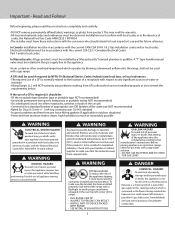
... a gas range A GFI shall be used if required by a properly installed anti-tip bracket(s). Heat resistant adhesive must conform with local codes or in the gas supply line to the manufacturer's instructions. leak testing of appliance moving . this appliance requires two or more personnel while handling and moving devices is recommended. Important - Before beginning, please read these instructions with the current CSA C22.1 Canadian Electrical Codes Part 1 and/or local codes. Installation...
... a gas range A GFI shall be used if required by a properly installed anti-tip bracket(s). Heat resistant adhesive must conform with local codes or in the gas supply line to the manufacturer's instructions. leak testing of appliance moving . this appliance requires two or more personnel while handling and moving devices is recommended. Important - Before beginning, please read these instructions with the current CSA C22.1 Canadian Electrical Codes Part 1 and/or local codes. Installation...

Installation Instructions
Page 5
...) Shipped Natural or LP/Propane, accepts standard residential 1/2" (1.3 cm) ID gas service line. ft. 500 lbs. (225 kg Minimum clearances from rear To end of side panel To front of door To end of landing ledge To end of door handle Additions to Base Height Gas requirements Electrical equirements Maximum amp usage Surface Burners Natural/LP Broil Burner Natural/LP Oven Burner Natural/LP Oven interior width Oven interior height Oven interior depth Oven volume Overall...
...) Shipped Natural or LP/Propane, accepts standard residential 1/2" (1.3 cm) ID gas service line. ft. 500 lbs. (225 kg Minimum clearances from rear To end of side panel To front of door To end of landing ledge To end of door handle Additions to Base Height Gas requirements Electrical equirements Maximum amp usage Surface Burners Natural/LP Broil Burner Natural/LP Oven Burner Natural/LP Oven interior width Oven interior height Oven interior depth Oven volume Overall...
Installation Instructions
Page 8
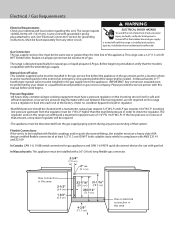
.... (121.9 cm), 3-wire cord with gas fuel. verify electrical power is turned off valve: This installer-supplied valve must be fused seperately from any pressure testing of that amount, a step down regulator will be required. •The appliance must use with grounded 3-prong plug attached to check the regulator. In Massachusetts: A "T" handle type manual valve must be installed in excess of that the model is to the appliance. IMPORTANT: Any conversion required must be performed...
.... (121.9 cm), 3-wire cord with gas fuel. verify electrical power is turned off valve: This installer-supplied valve must be fused seperately from any pressure testing of that amount, a step down regulator will be required. •The appliance must use with grounded 3-prong plug attached to check the regulator. In Massachusetts: A "T" handle type manual valve must be installed in excess of that the model is to the appliance. IMPORTANT: Any conversion required must be performed...
Installation Instructions
Page 15
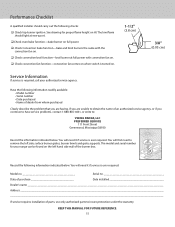
...: Check top burner ignition. The model and serial number for proper flame height on the left side surface burner grates, burner bowls and grate supports. Performance Checklist A qualified installer should light at every port. Check oven bake function-bake burner on full power. Check Convection bake function-bake and broil burners the same with the convection fan on. Check convection broil function-broil burner at full power with convection fan on. Check convection fan function-convection fan comes on when switch is turned on. 1-1/2" (3.8 cm...
...: Check top burner ignition. The model and serial number for proper flame height on the left side surface burner grates, burner bowls and grate supports. Performance Checklist A qualified installer should light at every port. Check oven bake function-bake burner on full power. Check Convection bake function-bake and broil burners the same with the convection fan on. Check convection broil function-broil burner at full power with convection fan on. Check convection fan function-convection fan comes on when switch is turned on. 1-1/2" (3.8 cm...
Use and Care Manual
Page 2
...7 Range Features 7 Product Controls Oven Functions and Settings 8 Operation Surface Operation 8 Lighting Burners 8 Surface Burners-Automatic Reignition 8 Vari-Simmer 8 Surface Cooking Tips 9 Cooking Vessels 9 Oven Features 10 Rack Positions 10 Using the Oven 10 Conventional and Convection Cooking 10 Baking 11 BAKE (Natural Airflow Bake 11 CONVECTION BAKE 11 Broiling 16 BROIL (Infrared Broil 16 CONVECTION BROIL (Infrared Convection Broil 16 Convection Dehydrate 17 Convection Defrost 17 Product Care Cleaning and Maintenance 18 Replacing Oven Lights 19 Door Removal 20 Door...
...7 Range Features 7 Product Controls Oven Functions and Settings 8 Operation Surface Operation 8 Lighting Burners 8 Surface Burners-Automatic Reignition 8 Vari-Simmer 8 Surface Cooking Tips 9 Cooking Vessels 9 Oven Features 10 Rack Positions 10 Using the Oven 10 Conventional and Convection Cooking 10 Baking 11 BAKE (Natural Airflow Bake 11 CONVECTION BAKE 11 Broiling 16 BROIL (Infrared Broil 16 CONVECTION BROIL (Infrared Convection Broil 16 Convection Dehydrate 17 Convection Defrost 17 Product Care Cleaning and Maintenance 18 Replacing Oven Lights 19 Door Removal 20 Door...
Use and Care Manual
Page 3
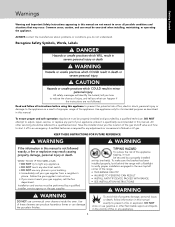
... when installing, maintaining, or operating the appliance. Use appliance only for any part of property damage, personal injury or death; A certified technician is specifically recommended in this manual. DO NOT attempt to adjust, repair, service, or replace any adjustments or conversions to verify proper installation engaged in the rear top left corner of the range. • THIS RANGE CAN TIP • INJURIES TO PERSONS CAN RESULT • INSTALL ANTI-TIP...
... when installing, maintaining, or operating the appliance. Use appliance only for any part of property damage, personal injury or death; A certified technician is specifically recommended in this manual. DO NOT attempt to adjust, repair, service, or replace any adjustments or conversions to verify proper installation engaged in the rear top left corner of the range. • THIS RANGE CAN TIP • INJURIES TO PERSONS CAN RESULT • INSTALL ANTI-TIP...

Use and Care Manual
Page 4
... exposed to the vent or a lighted surface burner. • Combustible items (paper, plastic, etc.) may ignite and metallic items may be injured or burned. • DO NOT store items of interest to add or remove food, using a high heat setting or when deep fat frying. When cooking is based on appliance parts. • ALWAYS let quantities of pressure may be handled carefully. Clean up spillovers...
... exposed to the vent or a lighted surface burner. • Combustible items (paper, plastic, etc.) may ignite and metallic items may be injured or burned. • DO NOT store items of interest to add or remove food, using a high heat setting or when deep fat frying. When cooking is based on appliance parts. • ALWAYS let quantities of pressure may be handled carefully. Clean up spillovers...
Use and Care Manual
Page 5
Keep natural venting holes open or install a mechanical ventilation device. Utensil Safety • Use pans with flat bottoms and handles that are "flaming" liquor or other flammable materials contact heating elements, areas near burners and interior surfaces of an oven may be hot even though they are dark in or around the oven door and oven window. • The misuse of the burner should be adjusted to the sudden change in...
Keep natural venting holes open or install a mechanical ventilation device. Utensil Safety • Use pans with flat bottoms and handles that are "flaming" liquor or other flammable materials contact heating elements, areas near burners and interior surfaces of an oven may be hot even though they are dark in or around the oven door and oven window. • The misuse of the burner should be adjusted to the sudden change in...

Use and Care Manual
Page 6
... removing bulb to the appliance before replacing bulb. Should the bulb break, disconnect power to avoid electrical shock. NOTICE DO NOT turn the Temperature Control on , the range will function properly without the heat. CAUTION DO NOT store items of burning: DO NOT touch the glass! Therefore, children should be kept away. 6 Make sure the oven control is COOL before cleaning. WARNING ELECTRICAL SHOCK HAZARD DO NOT touch a hot oven light bulb...
... removing bulb to the appliance before replacing bulb. Should the bulb break, disconnect power to avoid electrical shock. NOTICE DO NOT turn the Temperature Control on , the range will function properly without the heat. CAUTION DO NOT store items of burning: DO NOT touch the glass! Therefore, children should be kept away. 6 Make sure the oven control is COOL before cleaning. WARNING ELECTRICAL SHOCK HAZARD DO NOT touch a hot oven light bulb...

Use and Care Manual
Page 7
... to cook, clean the range thoroughly with hot, soapy water. Range Features (VGIC) Interior Oven Light Switch Left Front Burner Control Knob (15,000 BTU) Center Front Burner Control Knob (15,000 BTU) Oven Temperature Indicator Light Right Front Burner Control Knob (15,000 BTU) Left Rear Burner Control Knob (15,000 BTU) 1 Center Rear Burner Control Knob (15,000 BTU) 2 Oven Temperature Control Knob Right Rear Burner Control Knob (15,000 BTU) Convection Fan Switch 3 30" Four-Burner 36" Six-Burner 4 36" Six-Burner model shown 1. Oven Important! Island trim 3. Before starting...
... to cook, clean the range thoroughly with hot, soapy water. Range Features (VGIC) Interior Oven Light Switch Left Front Burner Control Knob (15,000 BTU) Center Front Burner Control Knob (15,000 BTU) Oven Temperature Indicator Light Right Front Burner Control Knob (15,000 BTU) Left Rear Burner Control Knob (15,000 BTU) 1 Center Rear Burner Control Knob (15,000 BTU) 2 Oven Temperature Control Knob Right Rear Burner Control Knob (15,000 BTU) Convection Fan Switch 3 30" Four-Burner 36" Six-Burner 4 36" Six-Burner model shown 1. Oven Important! Island trim 3. Before starting...

Use and Care Manual
Page 11
Baking BAKE (Natural Airflow Bake) Full power heat is radiated from the U- Use this setting for single rack baking. Look through the door window to be baked in the conventional manner. If you turn on the convection fan switch. 3. If possible, no pan should be directly above another. • Allow 1 to 2 inches of air space around all sides of the product should be cooked in shiny, reflective pans for light, golden crusts. CONVECTION BAKE Heat is quickly...
Baking BAKE (Natural Airflow Bake) Full power heat is radiated from the U- Use this setting for single rack baking. Look through the door window to be baked in the conventional manner. If you turn on the convection fan switch. 3. If possible, no pan should be directly above another. • Allow 1 to 2 inches of air space around all sides of the product should be cooked in shiny, reflective pans for light, golden crusts. CONVECTION BAKE Heat is quickly...

Use and Care Manual
Page 15
... a dry-heat cooking method using direct or radiant heat. Center the food on desired results. CONVECTION BROIL (Infrared Convection Broil) The top burner operates at the top of the oven. infrared broil Operation infrared convection broil Broiling Instructions Broiling is reduced since the airflow also reduces peak temperatures on and off . Conventional broiling is most successful for cuts of meat 1-2 inches thick and is left in the rear of the oven cavity. To Use Broil or Convection Broil 1. They...
... a dry-heat cooking method using direct or radiant heat. Center the food on desired results. CONVECTION BROIL (Infrared Convection Broil) The top burner operates at the top of the oven. infrared broil Operation infrared convection broil Broiling Instructions Broiling is reduced since the airflow also reduces peak temperatures on and off . Conventional broiling is most successful for cuts of meat 1-2 inches thick and is left in the rear of the oven cavity. To Use Broil or Convection Broil 1. They...

Use and Care Manual
Page 21
... connected to electrical power: Have electrician check power circuit breaker, wiring, and fuses. Temperature control knob is normal burn off of gas. Burner ports are wet or dirty. This is rotated too far past broil position. Oven is not connected to power. Product Care 21 Burner ignites but no flame ignition. Oven indicator light on wrong type of insulation and protective oils in "OFF" position. Range is operating properly. Gas supply is in oven. Igniters are clogged. Air shutters not properly adjusted. Gas supply valve...
... connected to electrical power: Have electrician check power circuit breaker, wiring, and fuses. Temperature control knob is normal burn off of gas. Burner ports are wet or dirty. This is rotated too far past broil position. Oven is not connected to power. Product Care 21 Burner ignites but no flame ignition. Oven indicator light on wrong type of insulation and protective oils in "OFF" position. Range is operating properly. Gas supply is in oven. Igniters are clogged. Air shutters not properly adjusted. Gas supply valve...
Use and Care Manual
Page 23
... food service locations. Under this warranty. This does not include ignition systems, burner bases, etc. Replacement of a component part includes its component part or parts. Any defects must be covered by this "Residential Plus" warranty, the product, its option, any reason, alteration, outdoor use, improper installation, improper operation, or repair or service of the product by the warrantor to remedy the defect or malfunction, the owner is...
... food service locations. Under this warranty. This does not include ignition systems, burner bases, etc. Replacement of a component part includes its component part or parts. Any defects must be covered by this "Residential Plus" warranty, the product, its option, any reason, alteration, outdoor use, improper installation, improper operation, or repair or service of the product by the warrantor to remedy the defect or malfunction, the owner is...


