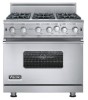
Countertop Rear Trim - Installation Instructions
Page 1
Viking Installation Guide Viking Range Corporation 111 Front Street Greenwood, Mississippi 38930 USA (662) 455-1200 For product information call 1-888-VIKING1 (845-4641) or visit the Viking Web site at vikingrange.com F1448K EN Range/Rangetop Rear Trim Accessories & Range Curb Base Fronts (020211)
Countertop Rear Trim - Installation Instructions
Page 2
ATTACHING REAR TRIM (Illustration I ) B RANGETOP REAR VIEW B RANGE REAR B VIEW B A A ATTACHING SHELF ON HIGH-SHELF (Illustration II) Place the top rolled edge (X) over the front lip of the high-shelf back trim and ... outside and inside parts of these spacers can be removed. (See Figure 2) (Illustration III) Figure 1 Figure 2 These spacers can also be attached to space the range off a combustible wall a prescribed safe distance. Rear Trim Accessories All rear trim devices are installed in the same basic way.
Countertop Rear Trim - Installation Instructions
Page 3
...The standard curb base front (A) is also truly heat-resistant. 4 Curb Bases STANDARD CURB BASE FRONT 1. Clip assembly onto range legs; In no case will Viking Range Corporation accept responsibility for ensuring that the rear wall is used, will the warranty apply. The assembly is adjustable about 2" (5.1...with a backguard against a rear wall, including cosmetic damage. remove, tighten bolts, and reattach. Only in the range installation guide for island trim installations where a range or rangetop can be installed at the rear of the unit. It is the total responsibility of the owner/...
Countertop Rear Trim - Installation Instructions
Page 4
...custom curb base. Attach rear trim to back so that alignment with enclosed screws. Fronts taller than 3-1/8" (7.9 cm) tall. Clip assembly onto range legs; Loosen brackets on the back of island trim near the top. 2. Curb Bases COUNTERTOP REAR TRIM 1. determine front to the mounting ...assembly (B) and simply clip onto the front range legs. Locate screw hole openings (A) on back of the island trim. 3. Remove the front (A) from the carton. 2. The assembly is adjustable about...
LP/Propane Conversion Kit - Installation Instructions
Page 2
... NOT touch any phone in the vicinity of Contents Warnings 3 Kit Contents 4 Regulator Conversion 5 Infrared Broiler Conversion 6 Surface Burner Conversion Sealed Type 1 7 Sealed Type 2 8 Designer Range & Rangetop 9 Orifice Locations 10 Open Type 3 11 Griddle Conversion U-Shape Burner with Spark Ignition 12 Straight Tube Burner with Spark Ignition 13 Straight Tube Burner...
LP/Propane Conversion Kit - Installation Instructions
Page 3
... nut from top of plunger. NOTE: Regulator cap is marked "Nat" and "LP". Unsnap plastic plunger from far left side of range/rangetop. Reverse plunger and reinstall onto brass hex nut by removing grates, burner bowls and grate support from brass hex nut. Reinstall hex...at 1-888-845-4641. 4 Regulator Conversion Flip Cap Hex Nut Cap • Sealed Surface Burner Models Identify regulator type from rear of range/rangetop located underneath main top assembly. • Open Surface Burner Models Identify regulator type from front of unit by pressing firmly. For information...
LP/Propane Conversion Kit - Installation Instructions
Page 4
... to remove orifice (Item #2) and replace it with an arrow on the burner head, position arrow toward igniter. 7 For models with orifice from rear of range before unit is installed. Use a 11/32" (9 mm) socket or nut driver to reassemble. Repeat steps until burner head seats into the... range during removal. Remove nut securing 90 degree fitting and broiler tubing to reassemble. NOTE: Some models may not be equipped with orifice from 90 degree ...
LP/Propane Conversion Kit - Installation Instructions
Page 5
...Burner Orifice Type 2. Remove the screws (Item #1) and set burner base aside (Item #2). For models with orifice from falling into the range during removal. This can prevent the orifices from bag labeled Designer Burner Orifice. Remove the screws (Item #1) and set burner base aside (... to remove orifice (Item #3) and replace it with an arrow on the burner head, position arrow toward igniter. 8 Surface Burner Conversion Designer Range & Rangetop Item #1 Item #2 Item #3 Locate bag labeled Designer Burner Orifice. NOTE: If the burner is a PowerPlus™ Burner (check...
LP/Propane Conversion Kit - Installation Instructions
Page 9
... mixture and combustion. Remove oven bottom by turning the orifice counterclockwise (more depth) or clockwise (less depth). Remove screws securing toe grille to frame of range, then lift upward. To reinstall burner, position rear of burner into slot on rear wall of burner box then place front of orifice and pull...
LP/Propane Conversion Kit - Installation Instructions
Page 10
... of the orifice can be located 3/16" inside the burner for proper gas mixture and combustion. Reverse procedure as follows: Professional Open Burner Range & Rangetop - Designer Sealed Burner Range & Rangetop - Bake Conversion "U" Shaped Air Shutter Air Shutter Set Screw Orifice Hood Remove oven racks and rack supports. Remove screws securing bake burner... orifice counterclockwise (more depth) or clockwise (less depth). Under the control panel. 19 Remove screws securing bake igniter to oven burner box. Professional Sealed Burner Range & Rangetop -
36 inchW. Countertop Rear Trim - P36CRT - Installation Instructions
Page 2
... (not on all products) Countertop side trim (optional accessory) Heat shield (not on all products) Lift the grate support side trim out. VGIC Open Burner Ranges 1. Locate and remove the screws holding the heat shield in the side trim. Lift the heat shield out and set aside for reuse. 6. Align with...
36 inchW. Countertop Rear Trim - P36CRT - Installation Instructions
Page 3
... holes and remove template. Place the countertop side trim into the side of the range or rangetop. RDSCG/RDSCD/RDSCE D3 Ranges RD24CSTSS - 24" D. 3 Series RVGR/RVDR/RVER Ranges Place the countertop side trim template against the side of the range or rangetop. Installation (Side Trim) For Models: P24CSTSS - 24" D. 5 Series VGCC/VGSC/VDSC...
36 inchW. Countertop Rear Trim - P36CRT - Installation Instructions
Page 4
VGRT Rangetops Countertop Rear Trim 4 VGCC, VGSC, VDSC Ranges and 5 Series 36" W. VGRT and VERT Rangetops 5 Series 48" W. VGRT Rangetops 3 Series 30" W. VGCC and VDSC Ranges and 5 Series 60" W. RVGR, RVDR, RVER Ranges 5 Series 36" W. VGRT Rangetops 5 Series 60" W. VGCC, VGSC, VDSC, VESC, VISC Ranges and 5 Series 30" W. P36CRTSS P48CRTSS P60CRTSS - 5 Series 30" W. VGCC, VGSC, VDSC Ranges and 5 Series 48" W. Installation (Rear Trim) For Models: P30CRTSS -
36 inchW. Countertop Rear Trim - P36CRT - Installation Instructions
Page 8
Viking Range, LLC 111 Front Street Greenwood, Mississippi MS 38930 (662) 455-1200 For more product informations, visit our website at www.vikingrange.com in the US or brigade.ca in Canada F1226G (013015)
Two-Page Specifications Sheet
Page 1
...167;§2-year full - GAS RANGES ® Viking Professional 5 Series - Stainless steel open burners with stainless steel finish shipped standard §§EXCLUSIVE - Gas Range; countertop rear trim for 30" range §§P36CBF4SS - VGIC ...range §§P36BG8SS - 8"H. curb base and custom curb base front for 36" range §§P30CBF4SS - cosmetic parts such as glass, painted items and decorative items §§5-year limited - 5 SERIES 30" AND 36"W. countertop rear trim for 36" range §§LPKPDR - gas burners four burners § VGIC53616B...
Two-Page Specifications Sheet
Page 2
... with grounded 3-prong plug attached to request a quote call 1-888-845-4641 or visit vikingrange.com © 2015 Viking Range, LLC All rights reserved. ft. 4.6 cu. OPEN BURNER RANGE VGIC5301 29-7/8" (75.9 cm) To top of high shelf - add 1" (2.5 cm) To top of island trim...25-3/4" (65.4 cm) 45-1/8" (114.6 cm) 24-5/16" (61.8 cm) 1-5/8" (4.1 cm) 1" (2.5 cm) 35-7/8" (91.1 cm) min. GAS RANGE ® Viking Professional 5 Series - Additions to Base Height Gas Requirements Gas Manifold Pressure Electrical Requirements Max Amp Usage Surface Burner Rating Natural/LP Broil Burner Rating Natural...
Installation Instructions
Page 1
Installation Professional Freestanding Open Burner Ranges VGIC5301, CVGIC5301, VGIC5361, CVGIC5361
Installation Instructions
Page 3
... Gas Installation codes and/or local codes. This symbol alerts you and others is the safety alert symbol. An air curtain or other overhead range hood which COULD result in severe personal injury or death CAUTION Hazards or unsafe practices which operates by the safety alert symbol and the word... "DANGER," "WARNING" or "CAUTION." All safety messages will be preceded by blowing a downward airflow onto the range, shall not be in this manual and on your appliance. All safety messages will identify the hazard, tell you how to hazards that can happen...
Installation Instructions
Page 4
...°C). IMPORTANT-Read and Follow! Heat resistant adhesive must be used if the product is normally related to the location of water or moisture. • Viking Range, LLC will withstand temperatures up to light any appliance. -DO NOT touch any significant sources of a receptacle with permanent wiring only (temporary or portable wiring...
Installation Instructions
Page 5
... injury or death; To reduce the risk from substances in the fuel or from tipping over. • This range can result. • Install anti-tip device packed with local codes or in accordance with range. • See installation instructions. WARNING MOVING HAZARD To avoid risk of the gas supply to the instructions...