Countertop Rear Trim - Installation Instructions
Page 1
Viking Installation Guide Viking Range Corporation 111 Front Street Greenwood, Mississippi 38930 USA (662) 455-1200 For product information call 1-888-VIKING1 (845-4641) or visit the Viking Web site at vikingrange.com F1448K EN Range/Rangetop Rear Trim Accessories & Range Curb Base Fronts (020211)
Viking Installation Guide Viking Range Corporation 111 Front Street Greenwood, Mississippi 38930 USA (662) 455-1200 For product information call 1-888-VIKING1 (845-4641) or visit the Viking Web site at vikingrange.com F1448K EN Range/Rangetop Rear Trim Accessories & Range Curb Base Fronts (020211)
Countertop Rear Trim - Installation Instructions
Page 2
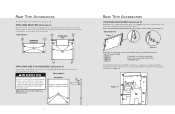
...be attached to the oven, with the supplied screws, before installing. Rear Trim Accessories All rear trim devices are needed to space the range off a combustible wall a prescribed safe distance. WARNING (Illustration II) To reduce the risk of fire or injury to HIGH SHELF persons,... VGSC548 models there is already installed on each end and carefully place in each end. ATTACHING REAR TRIM (Illustration I ) B RANGETOP REAR VIEW B RANGE REAR B VIEW B A A ATTACHING SHELF ON HIGH-SHELF (Illustration II) Place the top rolled edge (X) over the front lip of the rear trim...
...be attached to the oven, with the supplied screws, before installing. Rear Trim Accessories All rear trim devices are needed to space the range off a combustible wall a prescribed safe distance. WARNING (Illustration II) To reduce the risk of fire or injury to HIGH SHELF persons,... VGSC548 models there is already installed on each end and carefully place in each end. ATTACHING REAR TRIM (Illustration I ) B RANGETOP REAR VIEW B RANGE REAR B VIEW B A A ATTACHING SHELF ON HIGH-SHELF (Illustration II) Place the top rolled edge (X) over the front lip of the rear trim...
Countertop Rear Trim - Installation Instructions
Page 3
... applications is possible. determine front to any claims which may result from the carton and simply clip onto the front range legs. 3. remove, tighten bolts, and reattach. It is used, will Viking Range Corporation accept responsibility for proper airflow when using the (4) screws provided. (See Figure 5) A Figure 5 IMPORTANT: USE OF ISLAND TRIM WITH...
... applications is possible. determine front to any claims which may result from the carton and simply clip onto the front range legs. 3. remove, tighten bolts, and reattach. It is used, will Viking Range Corporation accept responsibility for proper airflow when using the (4) screws provided. (See Figure 5) A Figure 5 IMPORTANT: USE OF ISLAND TRIM WITH...

Countertop Rear Trim - Installation Instructions
Page 4
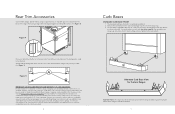
... obstruct the airflow. 4. determine front to the mounting assembly (B) and simply clip onto the front range legs. B C Important Note: The range must not be installed as specified in the range installation guide for proper airflow when using the custom curb base. Attach rear trim to back so that... alignment with enclosed screws. Clip assembly onto range legs; The assembly is adjustable about 2" (5.1 cm) front to island trim with the cabinet toe front is possible. remove, tighten ...
... obstruct the airflow. 4. determine front to the mounting assembly (B) and simply clip onto the front range legs. B C Important Note: The range must not be installed as specified in the range installation guide for proper airflow when using the custom curb base. Attach rear trim to back so that... alignment with enclosed screws. Clip assembly onto range legs; The assembly is adjustable about 2" (5.1 cm) front to island trim with the cabinet toe front is possible. remove, tighten ...
Specs
Page 1
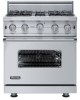
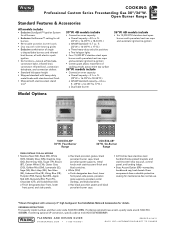
...open burners with porcelain/cast iron caps and automatic ignition/re-ignition Model Options VGIC530-4B* 30"W. Four-Burner Range VGIC536-6B* 36"W. ORDERING INSTRUCTIONS First specify model number, and then color code (VGIC530-4BSS). COOKING Professional Custom Series Freestanding Gas 30"/36"W. x 16-1⁄8"H. ...Cotton White (CW), Oyster Gray (OG), Golden Mist (GM), Lemonade (LE), Sage (SA), Mint Julep (MJ), Sea Glass (SE), Iridescent Blue (IB), Viking Blue (VB), Pumpkin (PM), Racing Red (RR), Apple Red (AR), Burgundy (BU), Plum (PL), Chocolate (CH), and Cobalt Blue (CB). See ...
...open burners with porcelain/cast iron caps and automatic ignition/re-ignition Model Options VGIC530-4B* 30"W. Four-Burner Range VGIC536-6B* 36"W. ORDERING INSTRUCTIONS First specify model number, and then color code (VGIC530-4BSS). COOKING Professional Custom Series Freestanding Gas 30"/36"W. x 16-1⁄8"H. ...Cotton White (CW), Oyster Gray (OG), Golden Mist (GM), Lemonade (LE), Sage (SA), Mint Julep (MJ), Sea Glass (SE), Iridescent Blue (IB), Viking Blue (VB), Pumpkin (PM), Racing Red (RR), Apple Red (AR), Burgundy (BU), Plum (PL), Chocolate (CH), and Cobalt Blue (CB). See ...
Specs
Page 2
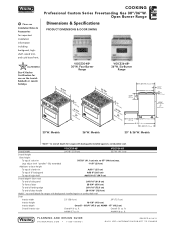
...to 37" (94 cm) max. 19-3/8" (49.2 cm) 25-3/4" (65.4 cm) 45-1/8" (114.6 cm) 24-5/16" (61.8 cm) 30"W. VGIC530-4B VGIC536-6B Overall width 29-7/8" (75.9 cm) 35-7/8" (91.1 cm) Overall height Base height To top of door handle 28-11/16" (72.9... Overall 4.0 cu. AHAM 4.6 cu. % Please see Installation Notes & Accessories for use on the Jewish Sabbath or Jewish holidays VGIC530-4B* 30"W. Open Burner Range Dimensions & Specifications PRODUCT DIMENSIONS & DOOR SWING ALL MODELS Star-K Kosher Certification for important installation information including backguard, highshelf, island trim...
...to 37" (94 cm) max. 19-3/8" (49.2 cm) 25-3/4" (65.4 cm) 45-1/8" (114.6 cm) 24-5/16" (61.8 cm) 30"W. VGIC530-4B VGIC536-6B Overall width 29-7/8" (75.9 cm) 35-7/8" (91.1 cm) Overall height Base height To top of door handle 28-11/16" (72.9... Overall 4.0 cu. AHAM 4.6 cu. % Please see Installation Notes & Accessories for use on the Jewish Sabbath or Jewish holidays VGIC530-4B* 30"W. Open Burner Range Dimensions & Specifications PRODUCT DIMENSIONS & DOOR SWING ALL MODELS Star-K Kosher Certification for important installation information including backguard, highshelf, island trim...

Specs
Page 3
... tall appliances, or other side vertical surfaces above cooking surface • Use range only with backguard or high- This range may be installed directly adjacent to such combustible surfaces above the range cooking surface for sealed top burners above 36" (91.4 cm) high. ...height. 3. PLANNING AND DESIGN GUIDE VIKINGRANGE.COM • 1-888-VIKING1 REVISED 4/26/11 ©2011 VRC-INFORMATION SUBJECT TO CHANGE Wall cabinets above the range must be a minimum of 6" (15.2 cm) side clearance from adjacent combustible construction • Cooking surface and below, i.e., 36" (91.4 cm)...
... tall appliances, or other side vertical surfaces above cooking surface • Use range only with backguard or high- This range may be installed directly adjacent to such combustible surfaces above the range cooking surface for sealed top burners above 36" (91.4 cm) high. ...height. 3. PLANNING AND DESIGN GUIDE VIKINGRANGE.COM • 1-888-VIKING1 REVISED 4/26/11 ©2011 VRC-INFORMATION SUBJECT TO CHANGE Wall cabinets above the range must be a minimum of 6" (15.2 cm) side clearance from adjacent combustible construction • Cooking surface and below, i.e., 36" (91.4 cm)...
Specs
Page 4
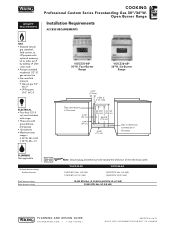
o LP/Propane 10.0" W.C.P. Four-Burner Range VGIC536-6B* 36"W. VGIC530-4B VGIC536-6B 15,000 BTU Nat....; 1-888-VIKING1 REVISED 4/26/11 ©2011 VRC-INFORMATION SUBJECT TO CHANGE Open Burner Range Installation Requirements ACCESS REQUIREMENTS GAS • Shipped natural gas standard; field convert to LP/propane...residential 1/2" ID gas service line • Gas manifold pressure o Natural gas 5.0" W.C.P. o 30"W. 4B-0.83 o 36"W. 6B-1.5 VGIC530-4B* 30"W. Six-Burner Range 2-3/4" (7.0 cm) Dia. 2" (5.1 cm) Gas connection in this area 2-1/2" (6.4 cm) 1-3/4" (4.4 cm) 23-7/16" 31-1/...
o LP/Propane 10.0" W.C.P. Four-Burner Range VGIC536-6B* 36"W. VGIC530-4B VGIC536-6B 15,000 BTU Nat....; 1-888-VIKING1 REVISED 4/26/11 ©2011 VRC-INFORMATION SUBJECT TO CHANGE Open Burner Range Installation Requirements ACCESS REQUIREMENTS GAS • Shipped natural gas standard; field convert to LP/propane...residential 1/2" ID gas service line • Gas manifold pressure o Natural gas 5.0" W.C.P. o 30"W. 4B-0.83 o 36"W. 6B-1.5 VGIC530-4B* 30"W. Six-Burner Range 2-3/4" (7.0 cm) Dia. 2" (5.1 cm) Gas connection in this area 2-1/2" (6.4 cm) 1-3/4" (4.4 cm) 23-7/16" 31-1/...

Specs
Page 5
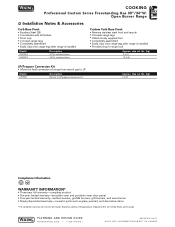
ranges Model P30TII P36TII Description 30"W. ship wt. backguard 36"W. lbs. (kg) 14 (6.3) 17 (7.7) High-shelf • Stainless Steel (SS) • Coordinates with all finishes • ...; Coordinates with all installations. backguard Approx. high-shelf 36"W. countertop rear trim Approx. ship wt. COOKING Professional Custom Series Freestanding Gas 30"/36"W. Open Burner Range % Installation Notes & Accessories A backguard, high-shelf, or island trim must be used for all finishes • One pair of trim • Installs on side of...
ranges Model P30TII P36TII Description 30"W. ship wt. backguard 36"W. lbs. (kg) 14 (6.3) 17 (7.7) High-shelf • Stainless Steel (SS) • Coordinates with all finishes • ...; Coordinates with all installations. backguard Approx. high-shelf 36"W. countertop rear trim Approx. ship wt. COOKING Professional Custom Series Freestanding Gas 30"/36"W. Open Burner Range % Installation Notes & Accessories A backguard, high-shelf, or island trim must be used for all finishes • One pair of trim • Installs on side of...
Specs
Page 6
... • Remove stainless steel front and recycle • Conceals range legs • Attach locally supplied trim • Completely assembled • Easily clips onto range legs after range is installed • Provides drop-in range look Approx. curb base front 36"W. lbs. (kg) 9... with all finishes • Front only • Conceals range legs • Completely assembled • Easily clips onto range legs after range is installed Model P30CBF4 P36CBF4 Description 30"W. Warranty valid on Viking products shipped within the United States and Canada. COOKING Professional...
... • Remove stainless steel front and recycle • Conceals range legs • Attach locally supplied trim • Completely assembled • Easily clips onto range legs after range is installed • Provides drop-in range look Approx. curb base front 36"W. lbs. (kg) 9... with all finishes • Front only • Conceals range legs • Completely assembled • Easily clips onto range legs after range is installed Model P30CBF4 P36CBF4 Description 30"W. Warranty valid on Viking products shipped within the United States and Canada. COOKING Professional...
Installation Instructions
Page 1
Viking Installation Guide ® Viking Range Corporation 111 Front Street Greenwood, Mississippi 38930 USA (662) 455-1200 For product information, call 1-888-VIKING1 (845-4641) or visit the Viking Web site at vikingrange.com F20706 EN (020210) Professional Freestanding Gas Open Burner Ranges
Viking Installation Guide ® Viking Range Corporation 111 Front Street Greenwood, Mississippi 38930 USA (662) 455-1200 For product information, call 1-888-VIKING1 (845-4641) or visit the Viking Web site at vikingrange.com F20706 EN (020210) Professional Freestanding Gas Open Burner Ranges
Installation Instructions
Page 3
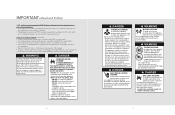
...) • Connected to a standard breaker of appropriate size (GFI breaker of water or moisture. • Viking Range Corporation will withstand temperatures up to the location of a receptacle with range. • See installation instructions. DANGER GAS LEAK HAZARD To avoid risk of property damage or personal injury;...and which are not installed properly or do not meet these requirements. verify your gas supplier from tipping over. • This range can tip. • Injuries to a small amount of codes, with local codes or in this or any electrical switch; ANSI/NFPA ...
...) • Connected to a standard breaker of appropriate size (GFI breaker of water or moisture. • Viking Range Corporation will withstand temperatures up to the location of a receptacle with range. • See installation instructions. DANGER GAS LEAK HAZARD To avoid risk of property damage or personal injury;...and which are not installed properly or do not meet these requirements. verify your gas supplier from tipping over. • This range can tip. • Injuries to a small amount of codes, with local codes or in this or any electrical switch; ANSI/NFPA ...

Installation Instructions
Page 4
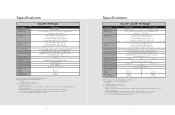
Ranges 8-1/8" (20.6 cm) 28-1/16" (71.2 cm) 26-7/16" (67.2 cm) 1-5/8" (4.1 cm) 1" (2.5 cm) 35-7/8" (91.1 cm) min. Note: Unit shown with standard island trim. 7 Ranges (3951-.17/c8m") ((22673905--..6977//cc88mm"")) 1" (2.5 cm) ((99413..0153c-ct7m7mo/"))8mm"ainx.. to 37" (94.0 cm) max. 19-3/8" (49.2 cm) 25-3/4" (65.4 cm) 45-1/8" (114.6 cm) 24-5/16" (61.8 cm) Note: Unit shown with standard island trim. 6 Dimensions Gas 24", 30" and 36" W. Dimensions Gas 24", 30" and 36" W.
Ranges 8-1/8" (20.6 cm) 28-1/16" (71.2 cm) 26-7/16" (67.2 cm) 1-5/8" (4.1 cm) 1" (2.5 cm) 35-7/8" (91.1 cm) min. Note: Unit shown with standard island trim. 7 Ranges (3951-.17/c8m") ((22673905--..6977//cc88mm"")) 1" (2.5 cm) ((99413..0153c-ct7m7mo/"))8mm"ainx.. to 37" (94.0 cm) max. 19-3/8" (49.2 cm) 25-3/4" (65.4 cm) 45-1/8" (114.6 cm) 24-5/16" (61.8 cm) Note: Unit shown with standard island trim. 6 Dimensions Gas 24", 30" and 36" W. Dimensions Gas 24", 30" and 36" W.
Installation Instructions
Page 5
... cabinets directly above product must be a minimum of door handle - 28-11/16" (72.9 cm) *Add 1" to overall depth for ranges with conversion kit (purchased separately); ft. 395 lbs. (177.8 kg) Minimum clearances from rear* To end of side panel - 24-5/16....7 cm) Gas Requirements Shipped Natural or LP/Propane, field convert with grounded 3-prong plug attached to Base Height To top of high shelf - Ranges Description Overall width Overall height 24" W. accepts standard residential 1/2" (1.3 cm) ID gas service line Gas Manifold Pressure Natural 5.0" W.C.P./ Liquid Propane...
... cabinets directly above product must be a minimum of door handle - 28-11/16" (72.9 cm) *Add 1" to overall depth for ranges with conversion kit (purchased separately); ft. 395 lbs. (177.8 kg) Minimum clearances from rear* To end of side panel - 24-5/16....7 cm) Gas Requirements Shipped Natural or LP/Propane, field convert with grounded 3-prong plug attached to Base Height To top of high shelf - Ranges Description Overall width Overall height 24" W. accepts standard residential 1/2" (1.3 cm) ID gas service line Gas Manifold Pressure Natural 5.0" W.C.P./ Liquid Propane...

Installation Instructions
Page 6
...be a minimum of cabinets. Note: Minimum clearance for additional information. There must be a minimum of 6" (15.2 cm) clearance from the range to such combustible surfaces above the 36" (91.4 cm) counter height. • Within the 6" (15.2 cm) side clearance to be...WoodO/Cveormlapyosite ((7611268672""t..mmo69 accinmmx..)) ((631822..o0647r""ccmm)) (00c"m) 33((796061""..t24mmoccaimmnx.)). Clearance Dimensions (Proximity to Cabinets) • This range may become hot and cause burns. Combustible items may ignite, metallic items may be 18" (45.7 cm) above the appliance may ...
...be a minimum of cabinets. Note: Minimum clearance for additional information. There must be a minimum of 6" (15.2 cm) clearance from the range to such combustible surfaces above the 36" (91.4 cm) counter height. • Within the 6" (15.2 cm) side clearance to be...WoodO/Cveormlapyosite ((7611268672""t..mmo69 accinmmx..)) ((631822..o0647r""ccmm)) (00c"m) 33((796061""..t24mmoccaimmnx.)). Clearance Dimensions (Proximity to Cabinets) • This range may become hot and cause burns. Combustible items may ignite, metallic items may be 18" (45.7 cm) above the appliance may ...

Installation Instructions
Page 7
...operate, installation by your national and local codes regarding this built-in compliance with a manometer, natural gas requires 5.0" W.C.P. The range is designed specifically for safe and efficient operation, since a regulator is built into each unit at the breaker box and gas .... Electrical & Gas Requirements Electrical Requirements Check your dealer or a qualified licensed plumber or gas service company. Sealant on this range since service pressure may fluctuate with the intended gas supply. Manual shut-off at the factory. External regulators are not required ...
...operate, installation by your national and local codes regarding this built-in compliance with a manometer, natural gas requires 5.0" W.C.P. The range is designed specifically for safe and efficient operation, since a regulator is built into each unit at the breaker box and gas .... Electrical & Gas Requirements Electrical Requirements Check your dealer or a qualified licensed plumber or gas service company. Sealant on this range since service pressure may fluctuate with the intended gas supply. Manual shut-off at the factory. External regulators are not required ...

Installation Instructions
Page 8
..., in damage to ensure that it is not operating or you observe unusual or excessive noise coming from the cooling fan, contact a Viking Authorized Service Center before installation to the oven or surrounding cabinets. Failure to remove the burner caps packaged in the floor under the appliance... must be washed thoroughly with the range. DO NOT lift or carry the door by your dealer, a qualified licensed plumber, or certified gas installer. Identify right and left ...
..., in damage to ensure that it is not operating or you observe unusual or excessive noise coming from the cooling fan, contact a Viking Authorized Service Center before installation to the oven or surrounding cabinets. Failure to remove the burner caps packaged in the floor under the appliance... must be washed thoroughly with the range. DO NOT lift or carry the door by your dealer, a qualified licensed plumber, or certified gas installer. Identify right and left ...

Installation Instructions
Page 9
..., level unit with metal shims only, as they are packed in the leg. 4 Move unit into couplings on wood blocks. Raise unit about a foot. Lower range gently to keep any undue strain from couplings. 4 Screw legs into opening . 17 1 1 2 Lift unit and prop on all four corners. Side trim of opening...
..., level unit with metal shims only, as they are packed in the leg. 4 Move unit into couplings on wood blocks. Raise unit about a foot. Lower range gently to keep any undue strain from couplings. 4 Screw legs into opening . 17 1 1 2 Lift unit and prop on all four corners. Side trim of opening...

Installation Instructions
Page 10
...and 22-1/4" (56.5 cm) from floor to bottom of the anit-tip opening located on rear wall with mounting hardware provided. Level range to electrical and gas requirements section for proper installation information. 1 Connect gas and electrical. Before placing appliance in operation, always check ...right side of the appliance must be performed by your dealer, a qualified licensed plumber, or gas service company. 19 leak testing of range (facing range) is 3/8" (0.95 cm) above countertop. Connecting Gas & Electric DANGER GAS LEAK HAZARD To avoid risk of property damage or personal ...
...and 22-1/4" (56.5 cm) from floor to bottom of the anit-tip opening located on rear wall with mounting hardware provided. Level range to electrical and gas requirements section for proper installation information. 1 Connect gas and electrical. Before placing appliance in operation, always check ...right side of the appliance must be performed by your dealer, a qualified licensed plumber, or gas service company. 19 leak testing of range (facing range) is 3/8" (0.95 cm) above countertop. Connecting Gas & Electric DANGER GAS LEAK HAZARD To avoid risk of property damage or personal ...

Installation Instructions
Page 11
Place burner grate over burner cap and on top of "Leveling/Adjustments/Alignment" section. 20 Door Replacement and Adjustment 1 2 Reattach door to range. 3 Open door completely. The side trim must be adjusted, loosen hinge trim screws located in step 2. Place burner bowl in grate support and ... allen wrench. Reattach hinge trim. 4 Remove pins from hole in hinges. 5 Close door. After adjustment, tighten hinge trim screws. 21 Final Installation 1 2 Slide range into the anti-tip opening. 3 Burner caps and burner bowls are packed in styrofoam top pack with the grates.
Place burner grate over burner cap and on top of "Leveling/Adjustments/Alignment" section. 20 Door Replacement and Adjustment 1 2 Reattach door to range. 3 Open door completely. The side trim must be adjusted, loosen hinge trim screws located in step 2. Place burner bowl in grate support and ... allen wrench. Reattach hinge trim. 4 Remove pins from hole in hinges. 5 Close door. After adjustment, tighten hinge trim screws. 21 Final Installation 1 2 Slide range into the anti-tip opening. 3 Burner caps and burner bowls are packed in styrofoam top pack with the grates.


