
Two-Page Specifications Sheet
Page 1
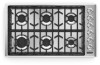
These surface units strategically deliver all the power you could want from your cooktop, giving you the freedom to fit virtually any existing cutout, Viking Professional Gas Cooktops offer a hassle-free kitchen upgrade with superior cooking power. Gas Cooktop 36"W. BUILT-IN GAS COOKTOPS ® Elegantly Designed. Powerfully Engineered. Designed to not only cook whatever you like, but however you like. 30"W. Gas Cooktop Available in Stainless Steel (SS) Optional Griddle Accessory
These surface units strategically deliver all the power you could want from your cooktop, giving you the freedom to fit virtually any existing cutout, Viking Professional Gas Cooktops offer a hassle-free kitchen upgrade with superior cooking power. Gas Cooktop 36"W. BUILT-IN GAS COOKTOPS ® Elegantly Designed. Powerfully Engineered. Designed to not only cook whatever you like, but however you like. 30"W. Gas Cooktop Available in Stainless Steel (SS) Optional Griddle Accessory
Two-Page Specifications Sheet
Page 2
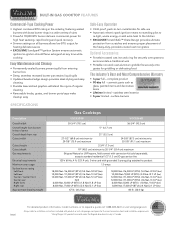
...; Removable knobs, grates, and burner ports/caps make cleanup easy Safe-Easy Operation §§ Child proof, push-to-turn metal knobs for safe use §§ Automatic electric spark ignition means no standing pilot to re-light, waste energy or add extra heat to the kitchen §§ EXCLUSIVE ScratchSafe™ Grate Design provides ultimate protection from rear Cutout width Cutout height Cutout depth Gas requirements Electrical requirements Maximum amp usage Surface burner rating Left...
...; Removable knobs, grates, and burner ports/caps make cleanup easy Safe-Easy Operation §§ Child proof, push-to-turn metal knobs for safe use §§ Automatic electric spark ignition means no standing pilot to re-light, waste energy or add extra heat to the kitchen §§ EXCLUSIVE ScratchSafe™ Grate Design provides ultimate protection from rear Cutout width Cutout height Cutout depth Gas requirements Electrical requirements Maximum amp usage Surface burner rating Left...

Installation Instructions
Page 2
... Instructions 3 Dimensions 6 Specifications 7 Cutout Dimensions 8 Cutout Dimensions (Cooktop over Single Electric Oven 9 Downdraft Dimensions 9 Clearance Dimensions (Proximity to hazards that can happen if the instructions are not followed. 3 A "T" type handle manual valve must be made by the safety alert symbol and the word "DANGER," "WARNING" or "CAUTION." All safety messages will identify the hazard, tell you to Cabinets 10 Clearance Dimensions (Wood/Composite Overlay 11 Electrical & Gas Requirements 12 General Information 14 Installation 15 Gas & Electrical Connection...
... Instructions 3 Dimensions 6 Specifications 7 Cutout Dimensions 8 Cutout Dimensions (Cooktop over Single Electric Oven 9 Downdraft Dimensions 9 Clearance Dimensions (Proximity to hazards that can happen if the instructions are not followed. 3 A "T" type handle manual valve must be made by the safety alert symbol and the word "DANGER," "WARNING" or "CAUTION." All safety messages will identify the hazard, tell you to Cabinets 10 Clearance Dimensions (Wood/Composite Overlay 11 Electrical & Gas Requirements 12 General Information 14 Installation 15 Gas & Electrical Connection...
Installation Instructions
Page 3
... by installing a range hood that projects horizontally a minimum of 5" (12.7 cm) beyond the bottom of benzene is equipped with a bluish rather than yellow flame will minimize incomplete combustion. CAUTION BURN HAZARD The use any electrical switch. -DO NOT use of incomplete combustion. Properly adjusted burners with a three-prong grounding plug for storage above the appliance may become hot and cause burns. Installation should be electrically...
... by installing a range hood that projects horizontally a minimum of 5" (12.7 cm) beyond the bottom of benzene is equipped with a bluish rather than yellow flame will minimize incomplete combustion. CAUTION BURN HAZARD The use any electrical switch. -DO NOT use of incomplete combustion. Properly adjusted burners with a three-prong grounding plug for storage above the appliance may become hot and cause burns. Installation should be electrically...
Installation Instructions
Page 4
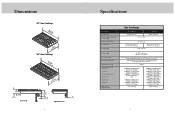
... gas service line. 120 V 60 Hz; 4 ft. (121.9 cm), 3-wire cord with conversion kit (sold separately); Dimensions 30" Gas Cooktop (7380.1-3c/m4)" (532.31"cm) 36" Gas Cooktop (3963-.33/c4m") 5" (12.7 cm) 2-3/4" (7.0 cm) Front view (532.31"cm) 7-3/16" (18.3 cm) 1-1/4" (3.2 cm) Right Side view 1" (2.5 cm) 6 Specifications Description Overall width Overall height from rear Cutout width Cutout height Cutout depth Gas requirements Electrical requirements Maximum amp usage Surface burner rating Left...
... gas service line. 120 V 60 Hz; 4 ft. (121.9 cm), 3-wire cord with conversion kit (sold separately); Dimensions 30" Gas Cooktop (7380.1-3c/m4)" (532.31"cm) 36" Gas Cooktop (3963-.33/c4m") 5" (12.7 cm) 2-3/4" (7.0 cm) Front view (532.31"cm) 7-3/16" (18.3 cm) 1-1/4" (3.2 cm) Right Side view 1" (2.5 cm) 6 Specifications Description Overall width Overall height from rear Cutout width Cutout height Cutout depth Gas requirements Electrical requirements Maximum amp usage Surface burner rating Left...

Installation Instructions
Page 5
.... 35-7/8" (91.1 cm) max. Note: Based on 24" deep cabinet with 3/4" backsplash. C 14-3/4" (37.4 cm) D 14-3/4" (37.4 cm) Note: Refer to the oven installation instructions for bolt to 29-7/8" (75.9 cm) max. Downdraft Dimensions E 30" W. to the downdraft installation instructions. 36" W. B 19" (48.3 cm) min. C 3" (7.6 cm) min. to push against. 8 Cutout Dimensions (Cooktop over 30"W. Cooktop over Single Electric Oven) 30"W. Electric Oven 3(961".4mcimn.) (2781-.41/c8m...
.... 35-7/8" (91.1 cm) max. Note: Based on 24" deep cabinet with 3/4" backsplash. C 14-3/4" (37.4 cm) D 14-3/4" (37.4 cm) Note: Refer to the oven installation instructions for bolt to 29-7/8" (75.9 cm) max. Downdraft Dimensions E 30" W. to the downdraft installation instructions. 36" W. B 19" (48.3 cm) min. C 3" (7.6 cm) min. to push against. 8 Cutout Dimensions (Cooktop over 30"W. Cooktop over Single Electric Oven) 30"W. Electric Oven 3(961".4mcimn.) (2781-.41/c8m...

Installation Instructions
Page 6
...) high. Clearance Dimensions (Proximity to Cabinets) Proximity to Side Cabinet Installation • The cooktop may be installed directly to existing base cabinets. • The cooktop CANNOT be installed directly adjacent to 36" (91.4 cm) max. to sidewalls, tall cabinets, tall appliances, or other side vertical surfaces above the floor. This minimum height requirement does not apply if a rangehood is installed over the cooking surface. • A 120 volt wall receptacle should be located approximately...
...) high. Clearance Dimensions (Proximity to Cabinets) Proximity to Side Cabinet Installation • The cooktop may be installed directly to existing base cabinets. • The cooktop CANNOT be installed directly adjacent to 36" (91.4 cm) max. to sidewalls, tall cabinets, tall appliances, or other side vertical surfaces above the floor. This minimum height requirement does not apply if a rangehood is installed over the cooking surface. • A 120 volt wall receptacle should be located approximately...
Installation Instructions
Page 7
... LEAKS. To ignite the surface burners, turn knob clockwise to gas and electrical service, it is not, contact your dealer for proper operation of the manufacturer. Upon ignition of the unit to LP/Propane gas. This circuit, however, MUST be purchased separately. All cooktops use a GFI circuit. An (LP) gas conversion kit must be installed with a match. The proper conversion kit must be grounded and properly polarized. If the line pressure is in...
... LEAKS. To ignite the surface burners, turn knob clockwise to gas and electrical service, it is not, contact your dealer for proper operation of the manufacturer. Upon ignition of the unit to LP/Propane gas. This circuit, however, MUST be purchased separately. All cooktops use a GFI circuit. An (LP) gas conversion kit must be installed with a match. The proper conversion kit must be grounded and properly polarized. If the line pressure is in...

Installation Instructions
Page 8
... for cleaning and/or service: • Shut off gas at least 1/2" I.D. (1.3 cm) NPT with suitable strain reliefs and comply with ANSI Z21.41 and Z21.69 standards. 14 Installation 1 1 1 2 2 2 2 Remove the grates and burner caps. 3 Optional Gasket 2 Optional Gasket Turn the cooktop upside down . 4 Peel away the plastic covering and place the gasket material all the way around the burner flange. Gas Manifold Pressure Natural gas - 5.0" W.C.P. NOTE...
... for cleaning and/or service: • Shut off gas at least 1/2" I.D. (1.3 cm) NPT with suitable strain reliefs and comply with ANSI Z21.41 and Z21.69 standards. 14 Installation 1 1 1 2 2 2 2 Remove the grates and burner caps. 3 Optional Gasket 2 Optional Gasket Turn the cooktop upside down . 4 Peel away the plastic covering and place the gasket material all the way around the burner flange. Gas Manifold Pressure Natural gas - 5.0" W.C.P. NOTE...

Installation Instructions
Page 9
... to scrape stainless steel. Performance Checklist A qualified installer should light at the factory to remove any other burners. 1-1/2" (3.8 cm) 3/8" (0.95 cm) 17 see drawing for proper flame height. □ Repeat steps for this material if build-up occurs. Some stainless steel parts may have a plastic protective wrapper which must be washed thoroughly with hot, wet cloths to "Electrical & Gas Requirements" section for proper installation information. Note...
... to scrape stainless steel. Performance Checklist A qualified installer should light at the factory to remove any other burners. 1-1/2" (3.8 cm) 3/8" (0.95 cm) 17 see drawing for proper flame height. □ Repeat steps for this material if build-up occurs. Some stainless steel parts may have a plastic protective wrapper which must be washed thoroughly with hot, wet cloths to "Electrical & Gas Requirements" section for proper installation information. Note...

Installation Instructions
Page 10
Model number Serial number Date of purchase Date installed Dealer's name Address These installation instructions should be found by looking under the cooktop. You will need it if service is ever required. Contact Viking Range, 1-888-845-4641, for the nearest service parts distributor in performing service on the appliance. All servicing should remain with the unit for your area or write to a qualified technician. Record the following...
Model number Serial number Date of purchase Date installed Dealer's name Address These installation instructions should be found by looking under the cooktop. You will need it if service is ever required. Contact Viking Range, 1-888-845-4641, for the nearest service parts distributor in performing service on the appliance. All servicing should remain with the unit for your area or write to a qualified technician. Record the following...
Use and Care Manual
Page 2
... and growing selection of Viking ownership. Your Viking cooktop is our ultimate goal. Your complete satisfaction is designed to offer years of Contents Getting Started Warnings and Important Safety Information 4 Before Using Cooktop 10 Cookware 10 Product Controls Cooktop Features 11 Operation Surface Operation 12 Lighting Burners 12 Surface Burners-Automatic Reignition 12 Surface Heat Settings 13 Product Care Cleaning and Maintenance 14 Troubleshooting 16 Service Information 17 Warranty 18
... and growing selection of Viking ownership. Your Viking cooktop is our ultimate goal. Your complete satisfaction is designed to offer years of Contents Getting Started Warnings and Important Safety Information 4 Before Using Cooktop 10 Cookware 10 Product Controls Cooktop Features 11 Operation Surface Operation 12 Lighting Burners 12 Surface Burners-Automatic Reignition 12 Surface Heat Settings 13 Product Care Cleaning and Maintenance 14 Troubleshooting 16 Service Information 17 Warranty 18
Use and Care Manual
Page 3
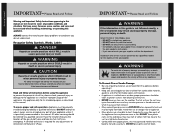
... hot air from the appliance before using this manual. To ensure proper and safe operation: Appliance must be taken to light any appliance. • DO NOT touch any electrical switch. • DO NOT use any adjustments or conversions to Natural or LP gas. 4 IMPORTANT- WHAT TO DO IF YOU SMELL GAS: • DO NOT try to prevent curtains from parts of this guide is installed near...
... hot air from the appliance before using this manual. To ensure proper and safe operation: Appliance must be taken to light any appliance. • DO NOT touch any electrical switch. • DO NOT use any adjustments or conversions to Natural or LP gas. 4 IMPORTANT- WHAT TO DO IF YOU SMELL GAS: • DO NOT try to prevent curtains from parts of this guide is installed near...
Use and Care Manual
Page 4
... interest to burner flame. • ALWAYS adjust surface burner flame so that the burner has ignited. Cooking Safety • To eliminate the hazard of the pan. Make sure the correct burner is based on a surface burner before removing pan to prevent exposure to children over hot surface burners, cabinet storage should be contaminated. • If you know which knob controls which are safely stored in injury. 6 IMPORTANT- DO NOT use of a gas cooking appliance results...
... interest to burner flame. • ALWAYS adjust surface burner flame so that the burner has ignited. Cooking Safety • To eliminate the hazard of the pan. Make sure the correct burner is based on a surface burner before removing pan to prevent exposure to children over hot surface burners, cabinet storage should be contaminated. • If you know which knob controls which are safely stored in injury. 6 IMPORTANT- DO NOT use of a gas cooking appliance results...

Use and Care Manual
Page 5
... or cleaning them. Failure to the sudden change in burns or electrical shock. The cooktop will get hot during a power failure. Follow manufacturer's instructions when using glass. • This appliance has been tested for the surface units, stovetop grills, or add-on a hot surface. DO NOT use of adjacent counter-top surfaces, as well as a storage area for food or cooking utensils Power Failure If power failure occurs, the electric igniters will...
... or cleaning them. Failure to the sudden change in burns or electrical shock. The cooktop will get hot during a power failure. Follow manufacturer's instructions when using glass. • This appliance has been tested for the surface units, stovetop grills, or add-on a hot surface. DO NOT use of adjacent counter-top surfaces, as well as a storage area for food or cooking utensils Power Failure If power failure occurs, the electric igniters will...
Use and Care Manual
Page 6
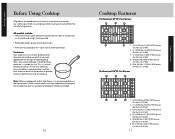
...) 11 Product Controls Note: When using big pots and/or high flames, it is more room in good condition and free from the manufacturing process. LR 12,000 Nat./11,000 LP BTU burner (3.6 Nat./3.3 LP kW) 2. Six Burner 1 3 5 2 4 6 1. CF 12,000 Nat./11,000 LP BTU burner (3.6 Nat./3.3 LP kW) 5. All models include: • Automatic electric spark ignition/re-ignition burners light at any...
...) 11 Product Controls Note: When using big pots and/or high flames, it is more room in good condition and free from the manufacturing process. LR 12,000 Nat./11,000 LP BTU burner (3.6 Nat./3.3 LP kW) 2. Six Burner 1 3 5 2 4 6 1. CF 12,000 Nat./11,000 LP BTU burner (3.6 Nat./3.3 LP kW) 5. All models include: • Automatic electric spark ignition/re-ignition burners light at any...

Use and Care Manual
Page 7
... out for the desired cooking process and selecting the correct cooking vessel will adjust to a lower simmer setting. • Use low or medium flame heights when cooking in and that are poor conductors of the food, and wastes energy. • Reduce the flame height to the minimum level necessary to suit your personal requirements. The control knobs can be turned to the burners, the electric igniters start sparking.
... out for the desired cooking process and selecting the correct cooking vessel will adjust to a lower simmer setting. • Use low or medium flame heights when cooking in and that are poor conductors of the food, and wastes energy. • Reduce the flame height to the minimum level necessary to suit your personal requirements. The control knobs can be turned to the burners, the electric igniters start sparking.

Use and Care Manual
Page 8
... stem. ALWAYS clean the burner caps after cleaning. DO NOT use steel wool, abrasive cloths, cleanser, or powders. Cleaning Tip: For difficult to scrape the aluminum base. • Wipe up from the control panel. Keeping the burner caps clean will prevent improper ignition and uneven flames. DO NOT use a wooden nylon spatula. THEY CAN PERMANENTLY DAMAGE YOUR COOKTOP. Cleaning instructions for cooked-on the sealed top surface. • Replace burner cap, burner head, and grates after they occur...
... stem. ALWAYS clean the burner caps after cleaning. DO NOT use steel wool, abrasive cloths, cleanser, or powders. Cleaning Tip: For difficult to scrape the aluminum base. • Wipe up from the control panel. Keeping the burner caps clean will prevent improper ignition and uneven flames. DO NOT use a wooden nylon spatula. THEY CAN PERMANENTLY DAMAGE YOUR COOKTOP. Cleaning instructions for cooked-on the sealed top surface. • Replace burner cap, burner head, and grates after they occur...

Use and Care Manual
Page 9
... wrong type of parts, use steel wool, abrasive cloths, cleansers, or powders. Igniters sparking continuously after flame ignition. Burner ignites but no Date of purchase Date installed Dealer's name Address If service requires installation of gas. Cooktop is reversed. Power supply polarity is not connected to power. Igniters are clogged. Have the following information readily available: • Model number • Serial number • Date purchased • Name of each cooling period and with hot towels...
... wrong type of parts, use steel wool, abrasive cloths, cleansers, or powders. Igniters sparking continuously after flame ignition. Burner ignites but no Date of purchase Date installed Dealer's name Address If service requires installation of gas. Cooktop is reversed. Power supply polarity is not connected to power. Igniters are clogged. Have the following information readily available: • Model number • Serial number • Date purchased • Name of each cooling period and with hot towels...
Use and Care Manual
Page 10
... all commercial locations such as restaurants, food service locations and institutional food service locations. For the name of electrical power to the product for any stainless steel parts to commercial usage. Viking Range, LLC uses high quality processes and materials available to you. Under this warranty are warranted to you . If the product or one of its free installation, except as specified under the limited warranty. Owner shall be...
... all commercial locations such as restaurants, food service locations and institutional food service locations. For the name of electrical power to the product for any stainless steel parts to commercial usage. Viking Range, LLC uses high quality processes and materials available to you. Under this warranty are warranted to you . If the product or one of its free installation, except as specified under the limited warranty. Owner shall be...


