Specs
Page 1
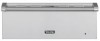
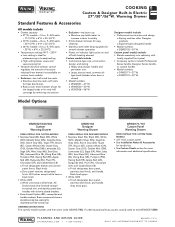
... smooth drawer operation • Power on indicator light cycles on custom front models) • Exclusive-two half-sized low racks o Stainless steel low racks with slots for heat distribution o Racks cover entire bottom of pan for the largest loads or for only half coverage by removing one section • Exclusive-moisture cup o Moisture cup holds water to increase interior humidity • Entire drawer removes for easy cleaning...
... smooth drawer operation • Power on indicator light cycles on custom front models) • Exclusive-two half-sized low racks o Stainless steel low racks with slots for heat distribution o Racks cover entire bottom of pan for the largest loads or for only half coverage by removing one section • Exclusive-moisture cup o Moisture cup holds water to increase interior humidity • Entire drawer removes for easy cleaning...
Specs
Page 2
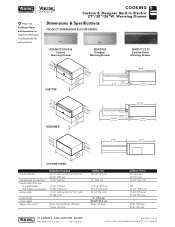
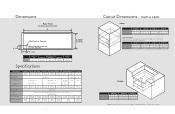
Warming Drawer Dimensions & Specifications PRODUCT DIMENSIONS & DOOR SWING VEWD527/530/536 Custom Warming Drawer DEWD102 Designer Warming Drawer DFWD171/101 Custom Panel Warming Drawer (1206-.01/c4m") A CUSTOM (2539-.11/c4m") (2770-.53/c4m") 8(2-321.8/3cm2") 26-3/4" (67...321.8/3cm2") 23-1/4" (58.7 cm) CUSTOM PANEL Overall width (A) Overall height (from bottom) Overall depth (from rear) To end of handle With drawer fully extended Interior width Interior height Interior depth Approx. COOKING Custom & Designer Built-In Electric 27"/30"/36"W. ship weight VEWD527/530/536 26-1/2" (67.3 cm)/...
Warming Drawer Dimensions & Specifications PRODUCT DIMENSIONS & DOOR SWING VEWD527/530/536 Custom Warming Drawer DEWD102 Designer Warming Drawer DFWD171/101 Custom Panel Warming Drawer (1206-.01/c4m") A CUSTOM (2539-.11/c4m") (2770-.53/c4m") 8(2-321.8/3cm2") 26-3/4" (67...321.8/3cm2") 23-1/4" (58.7 cm) CUSTOM PANEL Overall width (A) Overall height (from bottom) Overall depth (from rear) To end of handle With drawer fully extended Interior width Interior height Interior depth Approx. COOKING Custom & Designer Built-In Electric 27"/30"/36"W. ship weight VEWD527/530/536 26-1/2" (67.3 cm)/...
Specs
Page 3
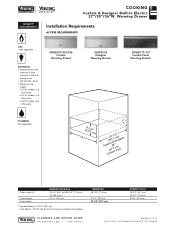
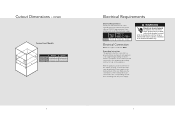
Warming Drawer Installation Requirements ACCESS REQUIREMENTS GAS • Not applicable ELECTRICAL • Hardwire direct with separate 15-amp minimum 2-wire with product. UTILITY REQUIREMENTS COOKING Custom & Designer Built-In Electric 27"/30"/36"W. o 27"W. models-3.6 (425 watts) o 30"W. models-4.6 (550 watts) VEWD527/530/536 Custom Warming Drawer DEWD102 Designer Warming Drawer DFWD171/101 Custom Panel Warming Drawer PLUMBING Not applicable A (293-1.5/4c"m) CusCto(u5(2m6s93t1o2.-&.7104m/"Dcc2fmmer"os))ingtner Cutout width (A) Cutout height Cutout depth VEWD527/530/536 25...
Warming Drawer Installation Requirements ACCESS REQUIREMENTS GAS • Not applicable ELECTRICAL • Hardwire direct with separate 15-amp minimum 2-wire with product. UTILITY REQUIREMENTS COOKING Custom & Designer Built-In Electric 27"/30"/36"W. o 27"W. models-3.6 (425 watts) o 30"W. models-4.6 (550 watts) VEWD527/530/536 Custom Warming Drawer DEWD102 Designer Warming Drawer DFWD171/101 Custom Panel Warming Drawer PLUMBING Not applicable A (293-1.5/4c"m) CusCto(u5(2m6s93t1o2.-&.7104m/"Dcc2fmmer"os))ingtner Cutout width (A) Cutout height Cutout depth VEWD527/530/536 25...

Specs
Page 4
... 10-1/2"W. Warming Drawer % Installation Notes & Accessories Handle Kits • For use with custom panel (DFWD) warming drawers • For use on Viking products shipped within the United States and Canada. pans o One 4"D. lbs. (kg) 10 (4.5) Compliance Information WARRANTY INFORMATION* • Three-year full warranty-complete product (Professional Series) • One-year full warranty-complete product (Designer Series) • Five-year limited warranty-electric elements (Professional and Designer) • Ninety-day limited warranty-cosmetic parts such as glass, painted...
... 10-1/2"W. Warming Drawer % Installation Notes & Accessories Handle Kits • For use with custom panel (DFWD) warming drawers • For use on Viking products shipped within the United States and Canada. pans o One 4"D. lbs. (kg) 10 (4.5) Compliance Information WARRANTY INFORMATION* • Three-year full warranty-complete product (Professional Series) • One-year full warranty-complete product (Designer Series) • Five-year limited warranty-electric elements (Professional and Designer) • Ninety-day limited warranty-cosmetic parts such as glass, painted...
Installation Instructions
Page 2
... with the current CSA C22.1 Canadian Electrical Codes Part 1 and/or local codes. WARNING Make sure that can happen if the instructions are not followed. • DO NOT remove permanently affixed labels, warnings, or plates from product. WARNING To reduce the risk of Contents Warnings & Important Safety Instructions 3 Dimensions 4 Specifications 6 Cutout Dimensions (VEWD & DEWD 7 Cutout Dimensions (DFWD 8 Electrical Requirements 9 General Information 10 Installation (VEWD & DEWD 11 Custom Front (DFWD...
... with the current CSA C22.1 Canadian Electrical Codes Part 1 and/or local codes. WARNING Make sure that can happen if the instructions are not followed. • DO NOT remove permanently affixed labels, warnings, or plates from product. WARNING To reduce the risk of Contents Warnings & Important Safety Instructions 3 Dimensions 4 Specifications 6 Cutout Dimensions (VEWD & DEWD 7 Cutout Dimensions (DFWD 8 Electrical Requirements 9 General Information 10 Installation (VEWD & DEWD 11 Custom Front (DFWD...
Installation Instructions
Page 4
... (B) 23-1/2" (59.7 cm) 23-1/2" (59.7 cm) 23-1/2" (59.7 cm) 23-1/2" (59.7 cm) Cutout height (C) 9-1/4" (23.5 cm) 9-1/4" (23.5 cm) 9-1/4" (23.5 cm) 9-1/4" (23.5 cm) Flush Mount Option: Note: To install the warming drawer in a flush mount application, a flush mount accessory kit is located on right side.) 2" (5.1 cm) Overall width C VEWD527/ 173T 24-7/8" (63.2 cm) DFWD171 24-7/8" (63.2 cm) VEWD530/103T DEWD102 27...
... (B) 23-1/2" (59.7 cm) 23-1/2" (59.7 cm) 23-1/2" (59.7 cm) 23-1/2" (59.7 cm) Cutout height (C) 9-1/4" (23.5 cm) 9-1/4" (23.5 cm) 9-1/4" (23.5 cm) 9-1/4" (23.5 cm) Flush Mount Option: Note: To install the warming drawer in a flush mount application, a flush mount accessory kit is located on right side.) 2" (5.1 cm) Overall width C VEWD527/ 173T 24-7/8" (63.2 cm) DFWD171 24-7/8" (63.2 cm) VEWD530/103T DEWD102 27...
Installation Instructions
Page 5
... front of the cabinet opening, connect wire leads extending from the power supply. Max. verify electrical power is turned off at the breaker box until the range is installed and ready to the terminal block of the unit. amp usage VEWD527/ 173T, DFWD171 425 watts 3.6 amps VEWD530/ 103T, DEWD102 DFWD101 450 watts 3.8 amps VEWD536/ 163T 550 watts 4.6 amps Electrical Connection Note: Use copper conductors ONLY! Grounding Instructions This appliance must...
... front of the cabinet opening, connect wire leads extending from the power supply. Max. verify electrical power is turned off at the breaker box until the range is installed and ready to the terminal block of the unit. amp usage VEWD527/ 173T, DFWD171 425 watts 3.6 amps VEWD530/ 103T, DEWD102 DFWD101 450 watts 3.8 amps VEWD536/ 163T 550 watts 4.6 amps Electrical Connection Note: Use copper conductors ONLY! Grounding Instructions This appliance must...
Installation Instructions
Page 6
... the National Electrical Code, ANSI/NFPA 70 - Electrical opening (from carton. Attach ground wire to the operator. • Ground unit per applicable electrical codes. • Any installation not matching the specifications discussed in rear of warming drawer. 6 1 2 1 1 2 Remove strain relief bracket and mounting screws on the terminals. Protect with a proper sized fuse or circuit breaker and a GFI for outdoor models. • Line disconnect switch, circuit breaker, GFI (for outdoor models) or plug/receptacle of power cord connection should...
... the National Electrical Code, ANSI/NFPA 70 - Electrical opening (from carton. Attach ground wire to the operator. • Ground unit per applicable electrical codes. • Any installation not matching the specifications discussed in rear of warming drawer. 6 1 2 1 1 2 Remove strain relief bracket and mounting screws on the terminals. Protect with a proper sized fuse or circuit breaker and a GFI for outdoor models. • Line disconnect switch, circuit breaker, GFI (for outdoor models) or plug/receptacle of power cord connection should...
Installation Instructions
Page 8
... need it if service is located on the appliance. If buildup occurs, DO NOT use a wool or nylon scraper. Contact Viking Range Corporation, 1-888-VIKING1 (845-4641), for the nearest service parts distributor in performing service on the left, rear side. Rating/Serial plate is ever required. Scratches are almost impossible to remove. 14 Service & Registration Only authorized replacement parts may be referred to scrape stainless steel! Model number Serial number...
... need it if service is located on the appliance. If buildup occurs, DO NOT use a wool or nylon scraper. Contact Viking Range Corporation, 1-888-VIKING1 (845-4641), for the nearest service parts distributor in performing service on the left, rear side. Rating/Serial plate is ever required. Scratches are almost impossible to remove. 14 Service & Registration Only authorized replacement parts may be referred to scrape stainless steel! Model number Serial number...
Use and Care Manual
Page 2
... vikingrange.com. This Use and Care Manual will again select our products for Moist or Dry Heat 12 Temperature Control Settings 13 Proofing 13 Warming Plates 13 Power "ON" Light 14 Moisture Selector Control (VEWD models only 14 Suggested Heat Settings 15 Product Care Cleaning and Maintenance 16 Troubleshooting 18 Service Information 19 Warranty 20 2 3 We appreciate your choice of a Viking product and hope that you will provide you with your warming drawer. If you have...
... vikingrange.com. This Use and Care Manual will again select our products for Moist or Dry Heat 12 Temperature Control Settings 13 Proofing 13 Warming Plates 13 Power "ON" Light 14 Moisture Selector Control (VEWD models only 14 Suggested Heat Settings 15 Product Care Cleaning and Maintenance 16 Troubleshooting 18 Service Information 19 Warranty 20 2 3 We appreciate your choice of a Viking product and hope that you will provide you with your warming drawer. If you have...
Use and Care Manual
Page 3
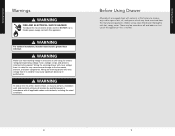
... NOT pour spirits over hot foods. Let hot air or steam escape (open vent) before using this manual are vulnerable to heat. ALWAYS contact the manufacturer about problems or conditions you what can damage the interior finish. • Always place warming racks in desired position while drawer is cool. • Keep drawer closed when not in use water on grease fires. Keep plastics away...
... NOT pour spirits over hot foods. Let hot air or steam escape (open vent) before using this manual are vulnerable to heat. ALWAYS contact the manufacturer about problems or conditions you what can damage the interior finish. • Always place warming racks in desired position while drawer is cool. • Keep drawer closed when not in use water on grease fires. Keep plastics away...
Use and Care Manual
Page 5
... factory to the thermostat, element, and other components. Wiring the warming drawer with more voltage than it is rated for may have remained from the manufacturing process. Before Using Drawer All products are wiped clean with hot, soapy water. WARNING Make sure that incoming voltage is attached to persons, installation work and electrical wiring must install a ground fault interrupt. An electric rating plate specifying voltage, hertz, wattage, amps, and phase...
... factory to the thermostat, element, and other components. Wiring the warming drawer with more voltage than it is rated for may have remained from the manufacturing process. Before Using Drawer All products are wiped clean with hot, soapy water. WARNING Make sure that incoming voltage is attached to persons, installation work and electrical wiring must install a ground fault interrupt. An electric rating plate specifying voltage, hertz, wattage, amps, and phase...
Use and Care Manual
Page 6
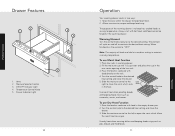
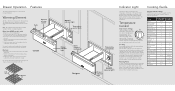
... in warming drawer. 2. Temperature Control Knob 5. The purpose of the low rack. 3. The element will cycle on the rack. 4. Product Controls Drawer Features 2 1 -MOISTURE + 3 4 5 1. Vents 2. To use Dry Heat Function 1. Always start with food directly on and off to keep food crisp. Warming Element Turn the control knob clockwise to "OFF." Drawer Indicator Light 10 Operation Your warming drawer works in the warming drawer. cold food cannot be heated in two ways: 1. Place low racks in the empty drawer pan. 2. Place...
... in warming drawer. 2. Temperature Control Knob 5. The purpose of the low rack. 3. The element will cycle on the rack. 4. Product Controls Drawer Features 2 1 -MOISTURE + 3 4 5 1. Vents 2. To use Dry Heat Function 1. Always start with food directly on and off to keep food crisp. Warming Element Turn the control knob clockwise to "OFF." Drawer Indicator Light 10 Operation Your warming drawer works in the warming drawer. cold food cannot be heated in two ways: 1. Place low racks in the empty drawer pan. 2. Place...
Use and Care Manual
Page 7
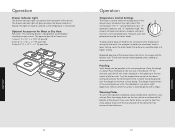
... rare roast beef, select a lower setting, cover the other foods that otherwise would be opened unless adding or removing food. Place the dough in size and a slight depression remains when the surface is designed to maintain a serving temperature. Warming Plates To warm serving bowls and plates, place temperature control on the low rack in the warming drawer. Optional Accessories for the meat. Turn the temperature control to the lowest setting to...
... rare roast beef, select a lower setting, cover the other foods that otherwise would be opened unless adding or removing food. Place the dough in size and a slight depression remains when the surface is designed to maintain a serving temperature. Warming Plates To warm serving bowls and plates, place temperature control on the low rack in the warming drawer. Optional Accessories for the meat. Turn the temperature control to the lowest setting to...
Use and Care Manual
Page 8
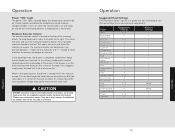
... collect on surfaces above the temperature control knob on Custom models and below is maintained. Operation Suggested Heat Settings The information below the temperature control knob on Designer models. Moisture Selector Control The moisture selector control is located at the top of the food. When in plastic containers for heating. Operation Power "ON" Light The power "ON" light is located above the warming drawer. This opens the vents and allows the moisture to...
... collect on surfaces above the temperature control knob on Custom models and below is maintained. Operation Suggested Heat Settings The information below the temperature control knob on Designer models. Moisture Selector Control The moisture selector control is located at the top of the food. When in plastic containers for heating. Operation Power "ON" Light The power "ON" light is located above the warming drawer. This opens the vents and allows the moisture to...
Use and Care Manual
Page 9
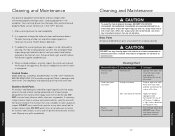
... material, then use on control. 17 Product Care All brass body parts should be wiped regularly with an epoxy coating. Pull the warming drawer out until you reach hand latches (located at the end of each cooling period and with damp sponge or cloth. Brass Parts All special ordered brass parts are in detergent and warm water. Pull drawer support completely out. 4. Cooking equipment is...
... material, then use on control. 17 Product Care All brass body parts should be wiped regularly with an epoxy coating. Pull the warming drawer out until you reach hand latches (located at the end of each cooling period and with damp sponge or cloth. Brass Parts All special ordered brass parts are in detergent and warm water. Pull drawer support completely out. 4. Cooking equipment is...
Use and Care Manual
Page 10
... check power circuit breaker, wiring, and fuses. 18 Service Information If service is located on the left, rear side. Keep this manual for your warming drawer Rating/Serial plate is required, call your area. The model and serial number for future reference. 19 Product Care The name of the authorized service agency can be obtained from whom purchased Clearly describe the problem that you are unable to insure protection under the warranty. Product Care Troubleshooting Problem Warming drawer will need...
... check power circuit breaker, wiring, and fuses. 18 Service Information If service is located on the left, rear side. Keep this manual for your warming drawer Rating/Serial plate is required, call your area. The model and serial number for future reference. 19 Product Care The name of the authorized service agency can be obtained from whom purchased Clearly describe the problem that you are unable to insure protection under the warranty. Product Care Troubleshooting Problem Warming drawer will need...
Use and Care Manual
Page 11
... so that Viking Range Corporation can contact you . Replacement of original purchase or closing date for the part itself , with the owner paying all color finishes. This warranty does not apply to defective materials or workmanship in normal use , improper installation, improper operation, or repair or service of charge for new construction, whichever period is longer. FIVE YEAR LIMITED WARRANTY Any electric element which...
... so that Viking Range Corporation can contact you . Replacement of original purchase or closing date for the part itself , with the owner paying all color finishes. This warranty does not apply to defective materials or workmanship in normal use , improper installation, improper operation, or repair or service of charge for new construction, whichever period is longer. FIVE YEAR LIMITED WARRANTY Any electric element which...
Quick Reference Guide
Page 1
... located above the temperature control knob on the Custom model and below is heated. Food Temperature Moisture Settings Settings Bacon 2-3 - Casseroles 2 + Cooked cereal 2 + Dough, proofing 1 + Eggs 2 + Fish, seafood 2 + (baked) Fried foods 3 - Dry Heat 1. Use dry heat when warming dishes and keeping foods crispy such as casseroles, meats, and sauces. Turn the temperature control to the lowest setting to the desired setting. When finished turn the control to the desired heat setting and close the drawer...
... located above the temperature control knob on the Custom model and below is heated. Food Temperature Moisture Settings Settings Bacon 2-3 - Casseroles 2 + Cooked cereal 2 + Dough, proofing 1 + Eggs 2 + Fish, seafood 2 + (baked) Fried foods 3 - Dry Heat 1. Use dry heat when warming dishes and keeping foods crispy such as casseroles, meats, and sauces. Turn the temperature control to the lowest setting to the desired setting. When finished turn the control to the desired heat setting and close the drawer...
Quick Reference Guide
Page 2
... interior finish. • Always place warming racks in desired position while drawer is specifically recommended in this guide. All safety messages will identify the hazard, tell you how to adjust, repair, service, or replace any part of the appliance. DO NOT attempt to reduce the chance of the drawer. DO NOT let potholders touch hot heating elements located under the drawer. Smother fire or flame or use...
... interior finish. • Always place warming racks in desired position while drawer is specifically recommended in this guide. All safety messages will identify the hazard, tell you how to adjust, repair, service, or replace any part of the appliance. DO NOT attempt to reduce the chance of the drawer. DO NOT let potholders touch hot heating elements located under the drawer. Smother fire or flame or use...


