
Countertop Rear Trim - Installation Instructions
Page 2
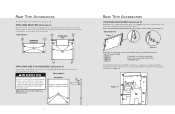
...screws. (Illustration I ) Grasp the trim on Designer models. MAKE SURE ALL CORRUGATED MATERIAL IS REMOVED FROM INSIDE THE HIGH SHELF. Note: If the back wall is already installed on each end and carefully place in the channels (B) located at each end of the trim device with the holes (A) in the... or injury to HIGH SHELF persons, check to make sure all packaging X has been removed from the outside and inside parts of the rear trim device before the backguard is a regulator cover supplied with the backguard that must be removed if used with any of the models listed below: •...
...screws. (Illustration I ) Grasp the trim on Designer models. MAKE SURE ALL CORRUGATED MATERIAL IS REMOVED FROM INSIDE THE HIGH SHELF. Note: If the back wall is already installed on each end and carefully place in the channels (B) located at each end of the trim device with the holes (A) in the... or injury to HIGH SHELF persons, check to make sure all packaging X has been removed from the outside and inside parts of the rear trim device before the backguard is a regulator cover supplied with the backguard that must be removed if used with any of the models listed below: •...

Countertop Rear Trim - Installation Instructions
Page 3
... the front range legs. 3. remove, tighten bolts, and reattach. Loosen brackets on either a range or rangetop is in those cases where the island trim is installed with 6" (15.2 cm) of minimum clearance to a rear wall, or when a truly non-combustible material is used, will Viking Range Corporation accept responsibility for Custom Ranges Important Note: The range must be attached. A Alternate Curb Base View for any type of...
... the front range legs. 3. remove, tighten bolts, and reattach. Loosen brackets on either a range or rangetop is in those cases where the island trim is installed with 6" (15.2 cm) of minimum clearance to a rear wall, or when a truly non-combustible material is used, will Viking Range Corporation accept responsibility for Custom Ranges Important Note: The range must be attached. A Alternate Curb Base View for any type of...

Countertop Rear Trim - Installation Instructions
Page 4
... mounting assembly (B). 3. Curb Bases COUNTERTOP REAR TRIM 1. A 6 7 Remove the front (A) from the carton. 2. Attach locally supplied front (C) to back setting; Important Note: The locally supplied front must be any taller than 3-1/8" (7.9 cm) could obstruct the airflow. 4. Clip assembly onto range legs; B C Important Note: The range must not be installed as specified in the range installation guide for proper airflow when using the custom curb base...
... mounting assembly (B). 3. Curb Bases COUNTERTOP REAR TRIM 1. A 6 7 Remove the front (A) from the carton. 2. Attach locally supplied front (C) to back setting; Important Note: The locally supplied front must be any taller than 3-1/8" (7.9 cm) could obstruct the airflow. 4. Clip assembly onto range legs; B C Important Note: The range must not be installed as specified in the range installation guide for proper airflow when using the custom curb base...

36 inchW. Countertop Rear Trim - P36CRT - Installation Instructions
Page 2
... counter. 2. It will not be shorter, cut at the rear to be reinstalled. 4. CAUTION The heat shield must be replaced only if it is part of the original product. 8. Keep the screws for reuse. 3. Replace the heat shield and align the slotted screw holes with the original screws. 7. VGIC Open Burner Ranges 1. Remove the outside grates and grate supports next to accommodate most installations...
... counter. 2. It will not be shorter, cut at the rear to be reinstalled. 4. CAUTION The heat shield must be replaced only if it is part of the original product. 8. Keep the screws for reuse. 3. Replace the heat shield and align the slotted screw holes with the original screws. 7. VGIC Open Burner Ranges 1. Remove the outside grates and grate supports next to accommodate most installations...

Two-Page Specifications Sheet
Page 1
...; Center front - 7" 1,800-watt element § Center rear - 7" 1,800-watt element § High infrared transmission for griddling with optional accessory § Left front - 6 1/2" 1,500-watt element § Left rear (dual element) - 9" 3,000-watt element/6" 1,400-watt element § 36"W. countertop rear trim for 30"W. 5 SERIES ELECTRIC RANGETOPS Viking 5 Series - VERT COMMERCIAL-TYPE SURFACE POWER § QuickCook™ Surface Elements utilize ribbon technology - elements reach full power in Stainless Steel (SS) WARRANTY § 2-year full - backguard...
...; Center front - 7" 1,800-watt element § Center rear - 7" 1,800-watt element § High infrared transmission for griddling with optional accessory § Left front - 6 1/2" 1,500-watt element § Left rear (dual element) - 9" 3,000-watt element/6" 1,400-watt element § 36"W. countertop rear trim for 30"W. 5 SERIES ELECTRIC RANGETOPS Viking 5 Series - VERT COMMERCIAL-TYPE SURFACE POWER § QuickCook™ Surface Elements utilize ribbon technology - elements reach full power in Stainless Steel (SS) WARRANTY § 2-year full - backguard...

Two-Page Specifications Sheet
Page 2
See installation instructions for important clearance/installation information. VERT530 VERT536 VIKING RANGE, LLC 111 FRONT STREET GREENWOOD, MISSISSIPPI 38930 USA For detailed product information, model numbers, or to change without notice. Amp Usage Surface Burner Rating Natural Gas/LP Approximate Shipping Weight VERT53014B VERT53616B 29-7/8" (75.9 cm) 35-7/8" (90.6 cm) To top of coking surface - 8-1/8" (20.6 cm) To end of side panel - 24-5/16" (61.8 cm) To end...
See installation instructions for important clearance/installation information. VERT530 VERT536 VIKING RANGE, LLC 111 FRONT STREET GREENWOOD, MISSISSIPPI 38930 USA For detailed product information, model numbers, or to change without notice. Amp Usage Surface Burner Rating Natural Gas/LP Approximate Shipping Weight VERT53014B VERT53616B 29-7/8" (75.9 cm) 35-7/8" (90.6 cm) To top of coking surface - 8-1/8" (20.6 cm) To end of side panel - 24-5/16" (61.8 cm) To end...
Installation Instructions
Page 2
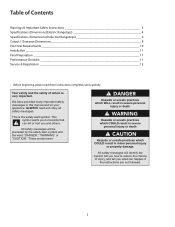
... or property damage. Your safety and the safety of others . ALWAYS read these instructions completely and carefully. This symbol alerts you to reduce the chance of injury, and tell you and...practices which COULD result in this manual and on your appliance. Table of Contents Warnings & Important Safety Instructions 3 Specifications /Dimensions (Electric Rangetops 4 Specifications /Dimensions (Induction Rangetops 6 Cutout / Clearance Dimensions 8 Electrical Requirements 10 Installation 11 Final Preparation 11 Performance Checklist 11 Service & Registration 12 • Before ...
... or property damage. Your safety and the safety of others . ALWAYS read these instructions completely and carefully. This symbol alerts you to reduce the chance of injury, and tell you and...practices which COULD result in this manual and on your appliance. Table of Contents Warnings & Important Safety Instructions 3 Specifications /Dimensions (Electric Rangetops 4 Specifications /Dimensions (Induction Rangetops 6 Cutout / Clearance Dimensions 8 Electrical Requirements 10 Installation 11 Final Preparation 11 Performance Checklist 11 Service & Registration 12 • Before ...

Installation Instructions
Page 3
... burn hazard. Such use and for future reference. • Installation must conform with the power supply, type RAC03-24SC/277, manufactured by installing a range hood that projects horizontally a minimum of 5" (12.7 cm) beyond the bottom of codes, the National Electrical Code, ANSI/NFPA 70-latest edition. This may result in all local and national codes and ordinances. In Canada: Electrical installation must be in serious...
... burn hazard. Such use and for future reference. • Installation must conform with the power supply, type RAC03-24SC/277, manufactured by installing a range hood that projects horizontally a minimum of 5" (12.7 cm) beyond the bottom of codes, the National Electrical Code, ANSI/NFPA 70-latest edition. This may result in all local and national codes and ordinances. In Canada: Electrical installation must be in serious...

Installation Instructions
Page 4
... To end of side panel To end of landing ledge To end of knobs VERT Electric Rangetop 30" W. - 76 cm Wide 29-7/8" (76.0cm) 36" W. - 91 cm Wide 35-7/8" (91.2 cm) 8" (20.4 cm) 24-5/16" (61.8 cm) 27-15/16" (71.0 cm) 28-3/16" (71.6 cm) Cutout width Cutout depth Cutout Height Electrical requirements Maximum amp usage Surface element rating (watts) Left front...
... To end of side panel To end of landing ledge To end of knobs VERT Electric Rangetop 30" W. - 76 cm Wide 29-7/8" (76.0cm) 36" W. - 91 cm Wide 35-7/8" (91.2 cm) 8" (20.4 cm) 24-5/16" (61.8 cm) 27-15/16" (71.0 cm) 28-3/16" (71.6 cm) Cutout width Cutout depth Cutout Height Electrical requirements Maximum amp usage Surface element rating (watts) Left front...
Installation Instructions
Page 8
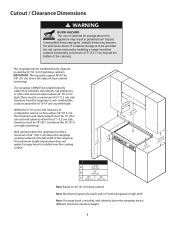
... grate support MUST be 3/8" (.95 cm) above the adjacent base cabinet countertop. • The rangetop CANNOT be installed directly adjacent to combustible vertical surfaces above 36" (91.4 cm), the maximum wall cabinet depth must be 13" (33.0 cm) and wall cabinets within this 6" (15.2 cm) side clearance must be 18" (45.7 cm) above the 36" (91.4 cm) high countertop. • Wall cabinets above the rangetop must be a minimum...
... grate support MUST be 3/8" (.95 cm) above the adjacent base cabinet countertop. • The rangetop CANNOT be installed directly adjacent to combustible vertical surfaces above 36" (91.4 cm), the maximum wall cabinet depth must be 13" (33.0 cm) and wall cabinets within this 6" (15.2 cm) side clearance must be 18" (45.7 cm) above the 36" (91.4 cm) high countertop. • Wall cabinets above the rangetop must be a minimum...

Installation Instructions
Page 10
...) minimum Electrical connection in serious injury or death. It must not be fused separately. Electrical Connection When making the wire connections, use may result in accordance with local codes. WARNING The electrical power to a suitable ground. Electrical Requirements Electrical Requirements Check your local codes regarding this appliance. House wiring and fusing must be shut off while line connections are applicable, wire in fire, electrical shock, or other personal injury. The junction box should be connected...
...) minimum Electrical connection in serious injury or death. It must not be fused separately. Electrical Connection When making the wire connections, use may result in accordance with local codes. WARNING The electrical power to a suitable ground. Electrical Requirements Electrical Requirements Check your local codes regarding this appliance. House wiring and fusing must be shut off while line connections are applicable, wire in fire, electrical shock, or other personal injury. The junction box should be connected...

Installation Instructions
Page 11
NOTE: For an existing 4-wire connection, the white (neutral) wire on . Check hot surface indicator lights-glow red when corresponding element is necessary to scrape stainless steel to remove encrusted materials, soak with hot, wet cloths to loosen the material, then use a wool or nylon scraper. DO NOT use steel wool, abrasive cloths, cleansers, or powders. Scratches are almost impossible to scrape stainless steel! Installation 1 2 Ground Green Red...
NOTE: For an existing 4-wire connection, the white (neutral) wire on . Check hot surface indicator lights-glow red when corresponding element is necessary to scrape stainless steel to remove encrusted materials, soak with hot, wet cloths to loosen the material, then use a wool or nylon scraper. DO NOT use steel wool, abrasive cloths, cleansers, or powders. Scratches are almost impossible to scrape stainless steel! Installation 1 2 Ground Green Red...
Installation Instructions
Page 12
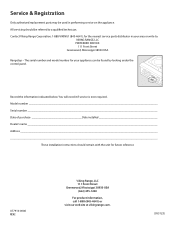
Model number Serial number Date of purchase Date installed Dealer's name Address These installation instructions should be used in your appliance can be found by looking under the control panel. All servicing should remain with the unit for your area or write to a qualified technician. The serial number and model number for future reference 077916-000A REV 2 Viking Range, LLC 111 Front Street Greenwood, Mississippi 38930 USA (662...
Model number Serial number Date of purchase Date installed Dealer's name Address These installation instructions should be used in your appliance can be found by looking under the control panel. All servicing should remain with the unit for your area or write to a qualified technician. The serial number and model number for future reference 077916-000A REV 2 Viking Range, LLC 111 Front Street Greenwood, Mississippi 38930 USA (662...
Use and Care Manual
Page 2
...problems or conditions you purchased it, or contact our Consumer Support Center at www.vikingrange.com Table of -the-art self-cleaning range. This Use and Care Manual will identify the hazard, tell you what can happen if the instructions... Warnings and Important Safety Instructions 3 Before Using Range 6 Product Controls Range Features 7 Surface Operation Cookware 8 Elements / Indicator Lights 9 Surface Cooking Tips 11 Surface Heat Settings 11 Cleaning and Maintenance 13 Service Information 14 Warranty 15 Warning and Important Safety Instructions appearing in minor personal ...
...problems or conditions you purchased it, or contact our Consumer Support Center at www.vikingrange.com Table of -the-art self-cleaning range. This Use and Care Manual will identify the hazard, tell you what can happen if the instructions... Warnings and Important Safety Instructions 3 Before Using Range 6 Product Controls Range Features 7 Surface Operation Cookware 8 Elements / Indicator Lights 9 Surface Cooking Tips 11 Surface Heat Settings 11 Cleaning and Maintenance 13 Service Information 14 Warranty 15 Warning and Important Safety Instructions appearing in minor personal ...
Use and Care Manual
Page 4
... highly flammable. Damp pot-holders may cause container to prevent grease from steam. Clean hood frequently to burst resulting in temperature. Pans that is installed near the appliance when it on hood or filter. Pan size is particularly important in this could cause the flames to smother fire or flame. ALWAYS turn on appliance parts. •ALWAYS let quantities of control. Follow manufacturer's instructions when using glass...
... highly flammable. Damp pot-holders may cause container to prevent grease from steam. Clean hood frequently to burst resulting in temperature. Pans that is installed near the appliance when it on hood or filter. Pan size is particularly important in this could cause the flames to smother fire or flame. ALWAYS turn on appliance parts. •ALWAYS let quantities of control. Follow manufacturer's instructions when using glass...

Use and Care Manual
Page 5
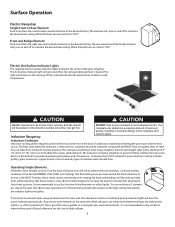
... during an oven self-cleaning cycle may cause harmful interference to correct the interference by turning the unit off all controls and wait for appliance parts to birds. Warnings Heating Elements and Glass Ceramic Cooking Surfaces •Surface areas on a hot surface. Important notice regarding pet birds: NEVER keep pet birds in the kitchen or in a particular installation. Cleaning Safety •Turn off and on, the user is encouraged...
... during an oven self-cleaning cycle may cause harmful interference to correct the interference by turning the unit off all controls and wait for appliance parts to birds. Warnings Heating Elements and Glass Ceramic Cooking Surfaces •Surface areas on a hot surface. Important notice regarding pet birds: NEVER keep pet birds in the kitchen or in a particular installation. Cleaning Safety •Turn off and on, the user is encouraged...
Use and Care Manual
Page 9
... using a griddle or rectangular pan over -rotating the knob and holding until the element has cooled to a safe temperature. Front and Bridge Element Push in and turn the control knob counterclockwise to the high setting indicated by over both elements. You can get the same power which reacts with a diameter of liquid, otherwise use this function for 10 minutes then automatically reduces to the desired setting. Induction Cookware Induction cooking...
... using a griddle or rectangular pan over -rotating the knob and holding until the element has cooled to a safe temperature. Front and Bridge Element Push in and turn the control knob counterclockwise to the high setting indicated by over both elements. You can get the same power which reacts with a diameter of liquid, otherwise use this function for 10 minutes then automatically reduces to the desired setting. Induction Cookware Induction cooking...
Use and Care Manual
Page 12
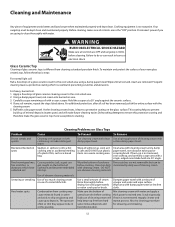
... paper towel or lint free cloth. Rinse thoroughly before cooking. Wipe area with cleaning cream and a damp paper towel, non-abrasive nylon pad or scouring brush. Before cleaning, make sure all controls are removed. To maintain and protect the surface of your new glass ceramic top, follow these basic steps: For normal light soil: Rub a few drops of glass ceramic cleaning cream to prevent build...
... paper towel or lint free cloth. Rinse thoroughly before cooking. Wipe area with cleaning cream and a damp paper towel, non-abrasive nylon pad or scouring brush. Before cleaning, make sure all controls are removed. To maintain and protect the surface of your new glass ceramic top, follow these basic steps: For normal light soil: Rub a few drops of glass ceramic cleaning cream to prevent build...

Use and Care Manual
Page 13
... pan indicator will flash and the unit will not cycle on , the rangetop will not do the job. Cleaning and Maintenance Control Panel DO NOT use steel wool, abrasive cloths, cleansers, or powders. If necessary, scrape stainless steel to remain on how severe the power loss is interrupted. The rangetop is affected only when the power is . Wash in the "OFF" position. Use hot...
... pan indicator will flash and the unit will not cycle on , the rangetop will not do the job. Cleaning and Maintenance Control Panel DO NOT use steel wool, abrasive cloths, cleansers, or powders. If necessary, scrape stainless steel to remain on how severe the power loss is interrupted. The rangetop is affected only when the power is . Wash in the "OFF" position. Use hot...
Use and Care Manual
Page 15
..., natural disaster, loss of electrical power to the product for use of the product in "Residential Plus "applications. Some jurisdictions do not allow the exclusion or limitation of incidental or consequential damages, so the above described burner assemblies, infrared rotisserie burners, grill grates, and stainless steel parts are limited in commercial applications. Viking products should any reason, alteration, improper installation, improper operation, or repair service...
..., natural disaster, loss of electrical power to the product for use of the product in "Residential Plus "applications. Some jurisdictions do not allow the exclusion or limitation of incidental or consequential damages, so the above described burner assemblies, infrared rotisserie burners, grill grates, and stainless steel parts are limited in commercial applications. Viking products should any reason, alteration, improper installation, improper operation, or repair service...


