
Cleaning Tips
Page 2
... the Viking Web Site at vikingrange.com F1809F MS1010 Self-cleaning ovens • Oven interior surfaces: Remove oven racks and rack supports (VGSC Ranges only) and follow self-clean instructions in the Use and Care Manual. • The infrared broiler should be used for the griddle to wash your griddle in the front. For thorough cleaning of time. Rinse off all burned on and permanently damage the surface. It will naturally season the griddle. • After heavy cooking...
... the Viking Web Site at vikingrange.com F1809F MS1010 Self-cleaning ovens • Oven interior surfaces: Remove oven racks and rack supports (VGSC Ranges only) and follow self-clean instructions in the Use and Care Manual. • The infrared broiler should be used for the griddle to wash your griddle in the front. For thorough cleaning of time. Rinse off all burned on and permanently damage the surface. It will naturally season the griddle. • After heavy cooking...
Countertop Rear Trim - Installation Instructions
Page 2
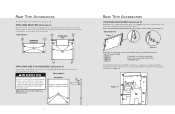
Rear Trim Accessories All rear trim devices are installed in the channels (B) located at each end. MAKE SURE ALL CORRUGATED MATERIAL IS REMOVED FROM INSIDE THE HIGH SHELF. Note: If the back wall is a regulator cover supplied with the backguard that must be removed if used with the holes (A) in each end of the trim device with any of the models listed below: • 30", 36" and...
Rear Trim Accessories All rear trim devices are installed in the channels (B) located at each end. MAKE SURE ALL CORRUGATED MATERIAL IS REMOVED FROM INSIDE THE HIGH SHELF. Note: If the back wall is a regulator cover supplied with the backguard that must be removed if used with the holes (A) in each end of the trim device with any of the models listed below: • 30", 36" and...
Use and Care Manual
Page 2
... Controls Range Features 8 Surface Operation Cookware 9 Elements / Indicator Lights 10 Surface Cooking Tips 11 Surface Heat Settings 11 Common Noises While Cooking 12 Oven Functions and Settings 12 Oven Features 13 Rack Positions 13 Using the Oven Preheat 13 BAKE (Two-Element Bake 14 CONV BAKE (Convection Bake 16 TRU CONV (TruConvec 16 CONV ROAST (Convection Roast 19 CONV BROIL (Convection Broil 20 HI BROIL 20 MED BROIL 20 LOW BROIL 20 Convection Dehydrate 22 Convection Defrost 22 Cleaning and Maintenance 22 Replacing Oven Lights 24 Self-Clean Cycle 24 Door Removal...
... Controls Range Features 8 Surface Operation Cookware 9 Elements / Indicator Lights 10 Surface Cooking Tips 11 Surface Heat Settings 11 Common Noises While Cooking 12 Oven Functions and Settings 12 Oven Features 13 Rack Positions 13 Using the Oven Preheat 13 BAKE (Two-Element Bake 14 CONV BAKE (Convection Bake 16 TRU CONV (TruConvec 16 CONV ROAST (Convection Roast 19 CONV BROIL (Convection Broil 20 HI BROIL 20 MED BROIL 20 LOW BROIL 20 Convection Dehydrate 22 Convection Defrost 22 Cleaning and Maintenance 22 Replacing Oven Lights 24 Self-Clean Cycle 24 Door Removal...
Use and Care Manual
Page 5
... from parts of cooking. •Use care when opening the oven door. Clean hood frequently to heat and may increase pressure in a pan with controls or other substitutes should not be highly flammable. Use baking soda, a dry chemical or foam-type extinguisher to add or remove food. When cooking is in this guide. •PREPARED FOOD WARNING: Follow food manufacturer's instructions. Pressure build-up greasy spills as soon as directed in use...
... from parts of cooking. •Use care when opening the oven door. Clean hood frequently to heat and may increase pressure in a pan with controls or other substitutes should not be highly flammable. Use baking soda, a dry chemical or foam-type extinguisher to add or remove food. When cooking is in this guide. •PREPARED FOOD WARNING: Follow food manufacturer's instructions. Pressure build-up greasy spills as soon as directed in use...
Use and Care Manual
Page 6
...-on a hot surface. DO NOT use eyelid covers for a good seal. If cooking surface should be hot even though they have had sufficient time to move the gasket. The door gasket is particularly important in temperature. Therefore, touching the rangetop cooking surface during a self-clean cycle. Birds have had sufficient time to avoid steam burns if a wet sponge or cloth is operating. Follow manufacturer's instructions when using glass. •...
...-on a hot surface. DO NOT use eyelid covers for a good seal. If cooking surface should be hot even though they have had sufficient time to move the gasket. The door gasket is particularly important in temperature. Therefore, touching the rangetop cooking surface during a self-clean cycle. Birds have had sufficient time to avoid steam burns if a wet sponge or cloth is operating. Follow manufacturer's instructions when using glass. •...
Use and Care Manual
Page 7
... oven door and oven window. •The misuse of baking and broiling modes-up to eight cooking modes in a particular installation. After oven is two times larger than most challenging baking projects a success •Strong, wear-resistant glass ceramic surface for excellent cleanability •Split baking and broiling elements-which reduces preheating time and provides greater control and more of the vents located on , the user is turned off and odors on and for easier cleaning...
... oven door and oven window. •The misuse of baking and broiling modes-up to eight cooking modes in a particular installation. After oven is two times larger than most challenging baking projects a success •Strong, wear-resistant glass ceramic surface for excellent cleanability •Split baking and broiling elements-which reduces preheating time and provides greater control and more of the vents located on , the user is turned off and odors on and for easier cleaning...

Use and Care Manual
Page 16
... top broil element operates at full power. The heated air is quickly replaced, searing meats on the outside and retaining more even heat distribution. Use this function for standard baking and convection baking will continue to desired temperature. 3. No special bakeware is also recommended when baking large quantities of the oven. This setting is required. convection bake TruConvec™ Convection Cooking Tips •As a general rule, to convert conventional recipes to preheat. 4. Arrange the oven rack in the rear...
... top broil element operates at full power. The heated air is quickly replaced, searing meats on the outside and retaining more even heat distribution. Use this function for standard baking and convection baking will continue to desired temperature. 3. No special bakeware is also recommended when baking large quantities of the oven. This setting is required. convection bake TruConvec™ Convection Cooking Tips •As a general rule, to convert conventional recipes to preheat. 4. Arrange the oven rack in the rear...
Use and Care Manual
Page 18
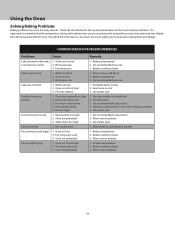
...pan size 1. Pan was too hot 2. Oven too hot 2. Too many pans used 3. Oven not preheated 1. Distribute batter evenly 2. Adjust to check food 2. Use recommended rack position 2. Reduce number of pan too high 1. Oven was warped 1. Batter uneven 2. Dark pans being used 3. Sides of pans 3. Use recommended pan size 3. Use recommended pan size 1. Wrong bake setting 5. Oven not hot enough 2. Reduce temperature 2. Reduce temperature 2. Reduce temperature 3. Using the Oven Solving Baking Problems Baking problems can occur for many pans 1. Oven door opened...
...pan size 1. Pan was too hot 2. Oven too hot 2. Too many pans used 3. Oven not preheated 1. Distribute batter evenly 2. Adjust to check food 2. Use recommended rack position 2. Reduce number of pan too high 1. Oven was warped 1. Batter uneven 2. Dark pans being used 3. Sides of pans 3. Use recommended pan size 3. Use recommended pan size 1. Wrong bake setting 5. Oven not hot enough 2. Reduce temperature 2. Reduce temperature 2. Reduce temperature 3. Using the Oven Solving Baking Problems Baking problems can occur for many pans 1. Oven door opened...

Use and Care Manual
Page 20
... broil elements, located in the rear of meat. HI BROIL Heat radiates from this setting for broiling thick cuts of meats. *Note: This function uses a high-speed convection fan for only part of meat. The inner broil element is on and off. Medium Broil Low Broil Broiling Instructions Broiling is normal. If open broil stop position. High Broil LOW BROIL This mode uses only a fraction of broiling food slightly quicker than conventional. It is also more juices and natural...
... broil elements, located in the rear of meat. HI BROIL Heat radiates from this setting for broiling thick cuts of meats. *Note: This function uses a high-speed convection fan for only part of meat. The inner broil element is on and off. Medium Broil Low Broil Broiling Instructions Broiling is normal. If open broil stop position. High Broil LOW BROIL This mode uses only a fraction of broiling food slightly quicker than conventional. It is also more juices and natural...

Use and Care Manual
Page 22
... Oven Convection Dehydrate This oven is no exception. Set the appropriate low temperature and turn the temperature control on will make the glass ceramic top more than two hours. To avoid sickness and food waste, DO NOT allow defrosted food to remain in the "OFF" position. WARNING BURN OR ELECTRICAL SHOCK HAZARD Make sure all controls are removed. Carefully scrape remaining soil with the cleaning...
... Oven Convection Dehydrate This oven is no exception. Set the appropriate low temperature and turn the temperature control on will make the glass ceramic top more than two hours. To avoid sickness and food waste, DO NOT allow defrosted food to remain in the "OFF" position. WARNING BURN OR ELECTRICAL SHOCK HAZARD Make sure all controls are removed. Carefully scrape remaining soil with the cleaning...

Use and Care Manual
Page 23
... use a wooden or nylon spatula or scraper. Also try cleaning procedure for the oven interior. They could sustain damage due to drip on a warm cooking area. The oven features a self-clean cycle for smearing and streaking. See the "Self-Clean Cycle" section for that material when soapy water will permanently discolor stainless steel. Control Knobs MAKE SURE ALL CONTROL KNOBS POINT TO THE "OFF" POSITION BEFORE REMOVING...
... use a wooden or nylon spatula or scraper. Also try cleaning procedure for the oven interior. They could sustain damage due to drip on a warm cooking area. The oven features a self-clean cycle for smearing and streaking. See the "Self-Clean Cycle" section for that material when soapy water will permanently discolor stainless steel. Control Knobs MAKE SURE ALL CONTROL KNOBS POINT TO THE "OFF" POSITION BEFORE REMOVING...

Use and Care Manual
Page 24
... bulb. 4. Turn all controls off soil and deposits. Reconnect power at the main fuse or circuit breaker. Before starting the Self-Clean cycle: 1. Use of the self-clean cycle. Cleaning and Maintenance Power Failure No attempt should be cleaned by snapping glass cover onto metal box. 5. Replace with detergent and hot water. This oven features an automatic pyrolytic self-cleaning cycle. Remove the oven racks, and any adjustments. The high heat generated during a self-clean cycle, causing permanent damage to 2 inches...
... bulb. 4. Turn all controls off soil and deposits. Reconnect power at the main fuse or circuit breaker. Before starting the Self-Clean cycle: 1. Use of the self-clean cycle. Cleaning and Maintenance Power Failure No attempt should be cleaned by snapping glass cover onto metal box. 5. Replace with detergent and hot water. This oven features an automatic pyrolytic self-cleaning cycle. Remove the oven racks, and any adjustments. The high heat generated during a self-clean cycle, causing permanent damage to 2 inches...
Use and Care Manual
Page 26
... connected to lock. For best results, use only authorized parts to insure protection under the control panel. Have the following information indicated below . The model and serial number for automatic door latch to power. Oven is not connected to : VIKING RANGE, LLC PREFERRED SERVICE 111 Front Street Greenwood, Mississippi 38930 Record the information indicated below . If oven is hot, door latch will not recognize any object or utensil smaller than 2 inches in self-clean mode. Door...
... connected to lock. For best results, use only authorized parts to insure protection under the control panel. Have the following information indicated below . The model and serial number for automatic door latch to power. Oven is not connected to : VIKING RANGE, LLC PREFERRED SERVICE 111 Front Street Greenwood, Mississippi 38930 Record the information indicated below . If oven is hot, door latch will not recognize any object or utensil smaller than 2 inches in self-clean mode. Door...
Use and Care Manual
Page 27
... free installation, except as specified under the limited warranty. Owner shall be responsible for proper installation, providing reasonable and necessary maintenance,providing proof of warranty coverage. For the name of original purchase to establish warranty period. IMPORTANT: Retain proof of your nearest authorized Viking Range, LLC service agency, call Viking Range, LLC. Replacement of original retail purchase. FIVE YEAR LIMITED WARRANTY ON BURNERS Any surface element or oven element...
... free installation, except as specified under the limited warranty. Owner shall be responsible for proper installation, providing reasonable and necessary maintenance,providing proof of warranty coverage. For the name of original purchase to establish warranty period. IMPORTANT: Retain proof of your nearest authorized Viking Range, LLC service agency, call Viking Range, LLC. Replacement of original retail purchase. FIVE YEAR LIMITED WARRANTY ON BURNERS Any surface element or oven element...
Installation Instructions
Page 2
... to Cabinets 6 Clearance Dimensions (Wood/Composite Overlay 7 Electrical Requirements 8 General Information 9 Installation 10 Door Removal 10 Leg Installation 10 Electrical Connection (3-wire 11 Electrical Connection (4-wire 12 Leveling/Adjustments/Alignment 13 Anti-tip Device Installation 14 Final Installation 16 Door Replacement and Adjustment 16 Performance Checklist 17 Final Preparation 18 Service & Registration 18 Important -Read and Follow! • Before beginning, please read these instructions with the current CSA C22.1 Canadian Electrical Codes Part 1 and/or local...
... to Cabinets 6 Clearance Dimensions (Wood/Composite Overlay 7 Electrical Requirements 8 General Information 9 Installation 10 Door Removal 10 Leg Installation 10 Electrical Connection (3-wire 11 Electrical Connection (4-wire 12 Leveling/Adjustments/Alignment 13 Anti-tip Device Installation 14 Final Installation 16 Door Replacement and Adjustment 16 Performance Checklist 17 Final Preparation 18 Service & Registration 18 Important -Read and Follow! • Before beginning, please read these instructions with the current CSA C22.1 Canadian Electrical Codes Part 1 and/or local...
Installation Instructions
Page 8
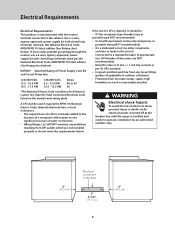
.... • The required use of a GFI is less than the Total Connected Electrical Load listed on the model/serial rating plate. verify electrical power is turned off at the breaker box until the range is installed and ready to the location of a receptacle with closed loop terminals rated per the National Electrical Code, ANSI/NFPA 70-latest edition (See Rating chart below . If the use a 4-wire, agency approved, power supply kit with respect to...
.... • The required use of a GFI is less than the Total Connected Electrical Load listed on the model/serial rating plate. verify electrical power is turned off at the breaker box until the range is installed and ready to the location of a receptacle with closed loop terminals rated per the National Electrical Code, ANSI/NFPA 70-latest edition (See Rating chart below . If the use a 4-wire, agency approved, power supply kit with respect to...

Installation Instructions
Page 9
... excessive noise coming from the cooling fan, contact a Viking Authorized Service Center before being used, then rinsed and wiped dry. Range - Refer to the oven or surrounding cabinets. The interior should be installed with the range. Do not discard the anti-tip metal brackets supplied with the unit. Failure to do so can result in operation. CAUTION The cooling fan should be unobstructed and open to...
... excessive noise coming from the cooling fan, contact a Viking Authorized Service Center before being used, then rinsed and wiped dry. Range - Refer to the oven or surrounding cabinets. The interior should be installed with the range. Do not discard the anti-tip metal brackets supplied with the unit. Failure to do so can result in operation. CAUTION The cooling fan should be unobstructed and open to...

Installation Instructions
Page 17
... the high temperature required for more than 10 minutes with convection fan on. Check self-clean function-door will turn on . (VER models) Check top surface elements (VIR models) 1. Left front indicator should be solid. 3. Remove cookware and repeat steps fro other elements. Check hot surface indicator lights-glow red when corresponding element is on. Check oven bake function-bake element on full power, center and outside broil elements will turn on and the bake element will lock in...
... the high temperature required for more than 10 minutes with convection fan on. Check self-clean function-door will turn on . (VER models) Check top surface elements (VIR models) 1. Left front indicator should be solid. 3. Remove cookware and repeat steps fro other elements. Check hot surface indicator lights-glow red when corresponding element is on. Check oven bake function-bake element on full power, center and outside broil elements will turn on and the bake element will lock in...

Two-Page Specifications Sheet
Page 1
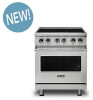
... § Concealed 10-pass dual bake element provides precise temperature control § Large 10-pass broiler with two oven racks including two TruGlide™ full extension racks § EXCLUSIVE - four burners ACCESSORIES § BG8530SS - 8"H. cosmetic parts such as glass, painted items and decorative items § 5-year limited - electric heating elements VER COMMERCIAL-TYPE COOKING POWER § QuickCook™ Surface Elements utilize ribbon technology - 5 SERIES ELECTRIC RANGE Viking 5 Series - Electric Range; backguard for 30" range COLOR FINISHES § Stainless...
... § Concealed 10-pass dual bake element provides precise temperature control § Large 10-pass broiler with two oven racks including two TruGlide™ full extension racks § EXCLUSIVE - four burners ACCESSORIES § BG8530SS - 8"H. cosmetic parts such as glass, painted items and decorative items § 5-year limited - electric heating elements VER COMMERCIAL-TYPE COOKING POWER § QuickCook™ Surface Elements utilize ribbon technology - 5 SERIES ELECTRIC RANGE Viking 5 Series - Electric Range; backguard for 30" range COLOR FINISHES § Stainless...

Two-Page Specifications Sheet
Page 2
... Gas Requirements Electrical Requirements Maximum Amp Usage Surface Burner/Element Rating Oven Interior Dimensions Approximate Shipping Weight ELECTRIC 30"W. Model (openinAg width) A 30" (76.2 cm) VIKING RANGE, LLC 111 FRONT STREET GREENWOOD, MISSISSIPPI 38930 USA For detailed product information, model numbers, or to maximum 37" (94 cm); 5 SERIES ELECTRIC RANGE Viking 5 Series - Specifications subject to change without notice. See installation instructions for important clearance/installation information. **The AHAM Standard for use with locally supplied 3-wire, flexible cord...
... Gas Requirements Electrical Requirements Maximum Amp Usage Surface Burner/Element Rating Oven Interior Dimensions Approximate Shipping Weight ELECTRIC 30"W. Model (openinAg width) A 30" (76.2 cm) VIKING RANGE, LLC 111 FRONT STREET GREENWOOD, MISSISSIPPI 38930 USA For detailed product information, model numbers, or to maximum 37" (94 cm); 5 SERIES ELECTRIC RANGE Viking 5 Series - Specifications subject to change without notice. See installation instructions for important clearance/installation information. **The AHAM Standard for use with locally supplied 3-wire, flexible cord...


