
Two-Page Specifications Sheet
Page 1
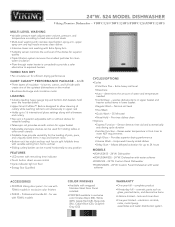
...DRY §§Fan circulates air for use with wrapped Stainless-Steel Door Panel installed §§PDDP524 available in final rinse to meet NSF requirements §§...wash adjusts water volume, pressure, and temperature according to 24 hours MODELS §§VDWU524SS - 24"W. Sensor detects rinse aid and automatically sets drying cycle duration §§...with water softener §§FDWU524 - 24"W. Dishwasher with water softener ACCESSORIES §§PDDP524 Viking door panel - Raises water temperature in exclusive color finishes Black (BK), White (WH), Apple Red...
...DRY §§Fan circulates air for use with wrapped Stainless-Steel Door Panel installed §§PDDP524 available in final rinse to meet NSF requirements §§...wash adjusts water volume, pressure, and temperature according to 24 hours MODELS §§VDWU524SS - 24"W. Sensor detects rinse aid and automatically sets drying cycle duration §§...with water softener §§FDWU524 - 24"W. Dishwasher with water softener ACCESSORIES §§PDDP524 Viking door panel - Raises water temperature in exclusive color finishes Black (BK), White (WH), Apple Red...
Two-Page Specifications Sheet
Page 2
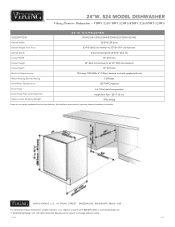
...call 1-888-845-4641 or visit vikingrange.com © 2018 Viking Range, LLC All rights reserved. F60404 0918 See installation instructions for important clearance/installation information. VDWU524/VDWU524WS/FDWU524/FDWU524WS DESCRIPTION 24"W. 24"W. 524 MODEL DISHWASHER Viking Premiere Dishwasher - VIKING RANGE, LLC 111 FRONT STREET GREENWOOD, MISSISSIPPI 38930 USA For ...High Loop Required Height from floor - 28" (71.0 cm) Approximate Shipping Weight 97 lb. (44 kg) Please do not prepare installation from brochure data only. Specifications subject to change without notice.
...call 1-888-845-4641 or visit vikingrange.com © 2018 Viking Range, LLC All rights reserved. F60404 0918 See installation instructions for important clearance/installation information. VDWU524/VDWU524WS/FDWU524/FDWU524WS DESCRIPTION 24"W. 24"W. 524 MODEL DISHWASHER Viking Premiere Dishwasher - VIKING RANGE, LLC 111 FRONT STREET GREENWOOD, MISSISSIPPI 38930 USA For ...High Loop Required Height from floor - 28" (71.0 cm) Approximate Shipping Weight 97 lb. (44 kg) Please do not prepare installation from brochure data only. Specifications subject to change without notice.
Installation Instructions
Page 2
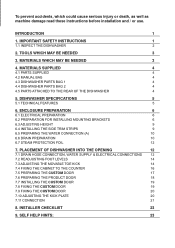
...14 7.4 FIXING THE CABINET TO THE COUNTER 16 7.5 PREPARING THE CUSTOM DOOR 17 7.6 PREPARING THE PRODUCT DOOR 18 7.7 INSTALLING THE CUSTOM DOOR 19 7.8 FIXING THE CUSTOM DOOR 19 7.9 FIXING THE CUSTOM DOOR 20 7.10 ADJUSTING THE KICK PLATE 20... 3 3. To prevent accidents, which could cause serious injury or death, as well as machine damage read these instructions before installation and / or use. MATERIALS WHICH MAY BE NEEDED 3 4. INSTALLER CHECKLIST 23 9. INTRODUCTION 1 1. MATERIALS SUPPLIED 4 4.1 PARTS SUPPLIED 4 4.2 MANUAL BAG 4 4.3 DISHWASHER PARTS BAG 1 ...
...14 7.4 FIXING THE CABINET TO THE COUNTER 16 7.5 PREPARING THE CUSTOM DOOR 17 7.6 PREPARING THE PRODUCT DOOR 18 7.7 INSTALLING THE CUSTOM DOOR 19 7.8 FIXING THE CUSTOM DOOR 19 7.9 FIXING THE CUSTOM DOOR 20 7.10 ADJUSTING THE KICK PLATE 20... 3 3. To prevent accidents, which could cause serious injury or death, as well as machine damage read these instructions before installation and / or use. MATERIALS WHICH MAY BE NEEDED 3 4. INSTALLER CHECKLIST 23 9. INTRODUCTION 1 1. MATERIALS SUPPLIED 4 4.1 PARTS SUPPLIED 4 4.2 MANUAL BAG 4 4.3 DISHWASHER PARTS BAG 1 ...
Installation Instructions
Page 3
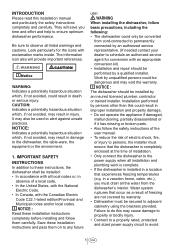
...;re, or injury to alert against unsafe practices. WARNING: Indicates a potentially hazardous situation which, if not avoided, could result in improper installation and property damage. • Do not operate the appliance if damaged, malfunctioning, partially disassembled or if it has missing or broken parts.... • Also follow basic precautions, including the following: • The dishwasher could be used to persons, the installer must ensure that the dishwasher is completely enclosed at the time of freezing are not covered by warranty. • Dishwasher must drain...
...;re, or injury to alert against unsafe practices. WARNING: Indicates a potentially hazardous situation which, if not avoided, could result in improper installation and property damage. • Do not operate the appliance if damaged, malfunctioning, partially disassembled or if it has missing or broken parts.... • Also follow basic precautions, including the following: • The dishwasher could be used to persons, the installer must ensure that the dishwasher is completely enclosed at the time of freezing are not covered by warranty. • Dishwasher must drain...
Installation Instructions
Page 4
...dishwasher is replacing another dishwasher, check the existing dishwasher connections for possible freight or cosmetic damage. The dishwasher is a new installation, most of installation. • Do not discard any plastic wrappings, bags, small pieces etc. These requirements must be met to a dishwasher...and should not be a minimum of recycling these materials. Consult a qualified electrician if in commercial establishments. • New installation - Please contact your local recycling authority about the possibility of # 16 AWG copper wire rated at least 28" (710mm) off ...
...dishwasher is replacing another dishwasher, check the existing dishwasher connections for possible freight or cosmetic damage. The dishwasher is a new installation, most of installation. • Do not discard any plastic wrappings, bags, small pieces etc. These requirements must be met to a dishwasher...and should not be a minimum of recycling these materials. Consult a qualified electrician if in commercial establishments. • New installation - Please contact your local recycling authority about the possibility of # 16 AWG copper wire rated at least 28" (710mm) off ...

Installation Instructions
Page 6
...make sure you have all the parts as listed to the left. 4.2 MANUAL BAG The dishwasher comes with a manual bag containing: • User manual, • Installation manual 4.4 DISHWASHER PARTS BAG 2 (SELECT MODELS) In addition to the manual bag and the dishwasher parts bag (dishwasher models which contains: y. Toe Kick s. Side... Trim Strips (Left) b. Screws 4mm x 36 mm = 3/16th x 1-7/16th 4.3 DISHWASHER PARTS BAG 1 This dishwasher bag comes with a door panel installation kit which can accept a wooden kitchen door) also come in several plastic bags.
...make sure you have all the parts as listed to the left. 4.2 MANUAL BAG The dishwasher comes with a manual bag containing: • User manual, • Installation manual 4.4 DISHWASHER PARTS BAG 2 (SELECT MODELS) In addition to the manual bag and the dishwasher parts bag (dishwasher models which contains: y. Toe Kick s. Side... Trim Strips (Left) b. Screws 4mm x 36 mm = 3/16th x 1-7/16th 4.3 DISHWASHER PARTS BAG 1 This dishwasher bag comes with a door panel installation kit which can accept a wooden kitchen door) also come in several plastic bags.
Installation Instructions
Page 8
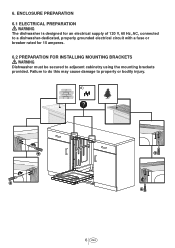
Failure to do this may cause damage to adjacent cabinetry using the mounting brackets provided. 6. d) ? 6 USA ENCLOSURE PREPARATION 6.1 ELECTRICAL PREPARATION WARNING The dishwasher is designed for an electrical supply of 120 V, 60 Hz, AC, connected to a dishwasher-dedicated, properly grounded electrical circuit with a fuse or breaker rated for 15 amperes. 6.2 PREPARATION FOR INSTALLING MOUNTING BRACKETS WARNING Dishwasher must be secured to property or bodily injury.
Failure to do this may cause damage to adjacent cabinetry using the mounting brackets provided. 6. d) ? 6 USA ENCLOSURE PREPARATION 6.1 ELECTRICAL PREPARATION WARNING The dishwasher is designed for an electrical supply of 120 V, 60 Hz, AC, connected to a dishwasher-dedicated, properly grounded electrical circuit with a fuse or breaker rated for 15 amperes. 6.2 PREPARATION FOR INSTALLING MOUNTING BRACKETS WARNING Dishwasher must be secured to property or bodily injury.
Installation Instructions
Page 10
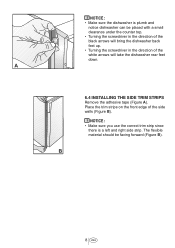
... with a small clearance under the counter top. • Turning the screwdriver in the direction of the black arrows will take the dishwasher rear feet down. 6.4 INSTALLING THE SIDE TRIM STRIPS Remove the adhesive tape (Figure A). Place the trim strips on the front edge of the white arrows will bring the dishwasher...
... with a small clearance under the counter top. • Turning the screwdriver in the direction of the black arrows will take the dishwasher rear feet down. 6.4 INSTALLING THE SIDE TRIM STRIPS Remove the adhesive tape (Figure A). Place the trim strips on the front edge of the white arrows will bring the dishwasher...
Installation Instructions
Page 11
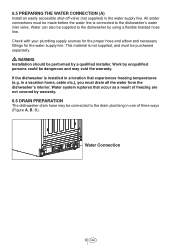
... you must be made before the water line is not supplied, and must drain all the water from the dishwasher's interior. WARNING Installation should be supplied to the drain plumbing in the water supply line. All solder connections must be purchased separately. Water Connection 9 USA... dishwasher by warranty. 6.6 DRAIN PREPARATION The dishwasher drain hose may be dangerous and may void the warranty. 6.5 PREPARING THE WATER CONNECTION (A) Install an easily accessible shut-off valve (not supplied) in one of freezing are not covered by using a flexible braided hose line....
... you must be made before the water line is not supplied, and must drain all the water from the dishwasher's interior. WARNING Installation should be supplied to the drain plumbing in the water supply line. All solder connections must be purchased separately. Water Connection 9 USA... dishwasher by warranty. 6.6 DRAIN PREPARATION The dishwasher drain hose may be dangerous and may void the warranty. 6.5 PREPARING THE WATER CONNECTION (A) Install an easily accessible shut-off valve (not supplied) in one of freezing are not covered by using a flexible braided hose line....

Installation Instructions
Page 12
... Remove the drain connection plug before attaching the drain hose from not draining properly, and causing either poor washing results or a bad odor. 6.6.2 INSTALLING AN AIR GAP If the local ordinance requires an air gap (Figure B). If a hose extension is required, a drainage hose of equal quality must... add a loop at least 28" (710mm) above the drain connection in fluenced. 6.6.1 UNDER THE SINK DRAIN Install a Y-branch tail pipe. (Figure A) NOTICE : You must be used or the dishwasher will not operate properly. • A hose that the hose be ...
... Remove the drain connection plug before attaching the drain hose from not draining properly, and causing either poor washing results or a bad odor. 6.6.2 INSTALLING AN AIR GAP If the local ordinance requires an air gap (Figure B). If a hose extension is required, a drainage hose of equal quality must... add a loop at least 28" (710mm) above the drain connection in fluenced. 6.6.1 UNDER THE SINK DRAIN Install a Y-branch tail pipe. (Figure A) NOTICE : You must be used or the dishwasher will not operate properly. • A hose that the hose be ...

Installation Instructions
Page 13
... a damp cloth (as shown in Figure A). Once the area dries, apply the steam protection foil. The steam protection foil will form inside the dishwasher during installation can lead to damage to the underside of the cycle, when the dishwasher door is opened, it is first opened. Failure to... install the steam protection foil during operation. 6.7 STEAM PROTECTION FOIL Steam will be applied where the steam escapes when door is required to use a steam protection ...
... a damp cloth (as shown in Figure A). Once the area dries, apply the steam protection foil. The steam protection foil will form inside the dishwasher during installation can lead to damage to the underside of the cycle, when the dishwasher door is opened, it is first opened. Failure to... install the steam protection foil during operation. 6.7 STEAM PROTECTION FOIL Steam will be applied where the steam escapes when door is required to use a steam protection ...
Installation Instructions
Page 15
.... 13 USA In the event of a malfunction or breakdown, grounding will not fit the outlet, have a proper outlet installed by providing a path of least resistance for the appliance shall be installed in a cabinet or on a wall adjacent to the undercounter space in which the appliance is to be...Teflon tape or pipe tread compound must be run with an edge protector. • Care must be taken when the appliance is installed or removed, to reduce the likelihood of damage to the power-supply cord. 7.1.4 GROUNDING INSTRUCTIONS This appliance must correspond to prevent injury and ...
.... 13 USA In the event of a malfunction or breakdown, grounding will not fit the outlet, have a proper outlet installed by providing a path of least resistance for the appliance shall be installed in a cabinet or on a wall adjacent to the undercounter space in which the appliance is to be...Teflon tape or pipe tread compound must be run with an edge protector. • Care must be taken when the appliance is installed or removed, to reduce the likelihood of damage to the power-supply cord. 7.1.4 GROUNDING INSTRUCTIONS This appliance must correspond to prevent injury and ...
Installation Instructions
Page 16
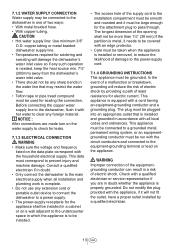
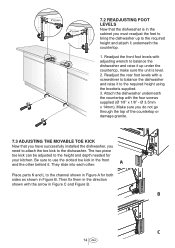
... of the countertop or damage granite. 7.3 ADJUSTING THE MOVABLE TOE KICK Now that the dishwasher is level. 2. 7.2 READJUSTING FOOT LEVELS Now that you have successfully installed the dishwasher, you must readjust the feet to bring the dishwasher up under the countertop, make sure the unit is in the cabinet you need...
... of the countertop or damage granite. 7.3 ADJUSTING THE MOVABLE TOE KICK Now that the dishwasher is level. 2. 7.2 READJUSTING FOOT LEVELS Now that you have successfully installed the dishwasher, you must readjust the feet to bring the dishwasher up under the countertop, make sure the unit is in the cabinet you need...

Installation Instructions
Page 21
7.7 INSTALLING THE CUSTOM DOOR 4 1 3 2 7.8 FIXING THE CUSTOM DOOR 12 3 4 5 1 2345 19 USA
7.7 INSTALLING THE CUSTOM DOOR 4 1 3 2 7.8 FIXING THE CUSTOM DOOR 12 3 4 5 1 2345 19 USA
Installation Instructions
Page 24
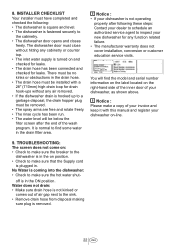
INSTALLER CHECKLIST Your installer must be below the filter screen after following : • The dishwasher is square and level. • The dishwasher is coming into the dishwasher: • ... your new dishwasher for leaks. Notice : Please make sure that the Supply cord is plugged in the drain hose. • The drain hose must be installed with this manual and register your invoice and keep it with a 28" (710mm) high drain loop for drain hook-ups without hitting any function related...
INSTALLER CHECKLIST Your installer must be below the filter screen after following : • The dishwasher is square and level. • The dishwasher is coming into the dishwasher: • ... your new dishwasher for leaks. Notice : Please make sure that the Supply cord is plugged in the drain hose. • The drain hose must be installed with this manual and register your invoice and keep it with a 28" (710mm) high drain loop for drain hook-ups without hitting any function related...

Installation Instructions
Page 25
...8226; Name of dealer from whom purchased Clearly describe the problem that you continue to have service problems, contact Viking Range, LLC at 1-888-845-4641, or write to: VIKING RANGE, LLC PREFERRED SERVICE 111 Front Street Greenwood, Mississippi 38930 USA Record the information indicated below. If you...for future reference. 23 USA The model and serial numbers are having. Model no Serial no Date of purchase Date installed Dealer's name Address If service requires installation of the tank. For access, simply open the door of an authorized service agency, or if you are located ...
...8226; Name of dealer from whom purchased Clearly describe the problem that you continue to have service problems, contact Viking Range, LLC at 1-888-845-4641, or write to: VIKING RANGE, LLC PREFERRED SERVICE 111 Front Street Greenwood, Mississippi 38930 USA Record the information indicated below. If you...for future reference. 23 USA The model and serial numbers are having. Model no Serial no Date of purchase Date installed Dealer's name Address If service requires installation of the tank. For access, simply open the door of an authorized service agency, or if you are located ...
Use and Care Manual
Page 2
... 7.2 TABLET DETERGENTS 22 7.3 RINSE AID 22 8. To prevent accidents, which could cause serious injury or death, as well as machine damage read these instructions before installation and / or use. IMPORTANT SAFETY INSTRUCTIONS 1 2. FILLING THE DISHWASHER SALT DISPENSER 24 10. WHAT SHOULD NOT BE WASHED IN YOUR DISHWASHER 12 OPERATING THE PRODUCT...
... 7.2 TABLET DETERGENTS 22 7.3 RINSE AID 22 8. To prevent accidents, which could cause serious injury or death, as well as machine damage read these instructions before installation and / or use. IMPORTANT SAFETY INSTRUCTIONS 1 2. FILLING THE DISHWASHER SALT DISPENSER 24 10. WHAT SHOULD NOT BE WASHED IN YOUR DISHWASHER 12 OPERATING THE PRODUCT...
Use and Care Manual
Page 3
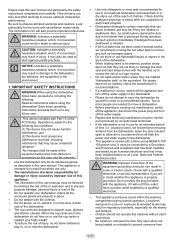
...manual must accept any built up to a Grounded and Polarized wall receptacle that has been installed and tested by an licensed electrician and that it will not fit the outlet, have a proper outlet installed by an Authorized technician. • If the dishwasher is empty after the completion of ...to any future user. A WARNING:Improper connection of electric shock. Do not modify the plug provided with the appliance, if it has been installed based on or near the dishwasher. • Use only detergents or rinse aids recommended for its intended purpose as this may result in ...
...manual must accept any built up to a Grounded and Polarized wall receptacle that has been installed and tested by an licensed electrician and that it will not fit the outlet, have a proper outlet installed by an Authorized technician. • If the dishwasher is empty after the completion of ...to any future user. A WARNING:Improper connection of electric shock. Do not modify the plug provided with the appliance, if it has been installed based on or near the dishwasher. • Use only detergents or rinse aids recommended for its intended purpose as this may result in ...

Use and Care Manual
Page 4
... washing compartment when removing an old dishwasher from service or discarding it has missing or broken parts. • Before installation or service, disconnect the power supply to the work area by a qualified installer. SAVE THESE INSTRUCTIONS • Service should only be performed by unplugging the unit, "tripping" the circuit breaker or removing...
... washing compartment when removing an old dishwasher from service or discarding it has missing or broken parts. • Before installation or service, disconnect the power supply to the work area by a qualified installer. SAVE THESE INSTRUCTIONS • Service should only be performed by unplugging the unit, "tripping" the circuit breaker or removing...

Use and Care Manual
Page 20
... increase with increments of the dishes. The program will select. Changing the settings while Time Delay function is active While the Time Delay function is installed, temperature of the supply water and amount of 30 minutes up to use the Time Delay function to have the water softener cleaned, and then...
... increase with increments of the dishes. The program will select. Changing the settings while Time Delay function is active While the Time Delay function is installed, temperature of the supply water and amount of 30 minutes up to use the Time Delay function to have the water softener cleaned, and then...