
Installation Instructions
Page 2
... CUSTOM DOOR 19 7.9 FIXING THE CUSTOM DOOR 20 7.10 ADJUSTING THE KICK PLATE 20 7.11 CONNECTION 21 8. SELF HELP HINTS: 23 MATERIALS SUPPLIED 4 4.1 PARTS SUPPLIED 4 4.2 MANUAL BAG 4 4.3 DISHWASHER PARTS BAG 1 4 4.4 DISHWASHER PARTS BAG 2 4 4.5 PARTS ATTACHED TO THE REAR OF THE DISHWASHER 4 5. INTRODUCTION 1 1. ENCLOSURE PREPARATION 6 6.1 ELECTRICAL PREPARATION 6 6.2 PREPARATION FOR INSTALLING MOUNTING BRACKETS...
... CUSTOM DOOR 19 7.9 FIXING THE CUSTOM DOOR 20 7.10 ADJUSTING THE KICK PLATE 20 7.11 CONNECTION 21 8. SELF HELP HINTS: 23 MATERIALS SUPPLIED 4 4.1 PARTS SUPPLIED 4 4.2 MANUAL BAG 4 4.3 DISHWASHER PARTS BAG 1 4 4.4 DISHWASHER PARTS BAG 2 4 4.5 PARTS ATTACHED TO THE REAR OF THE DISHWASHER 4 5. INTRODUCTION 1 1. ENCLOSURE PREPARATION 6 6.1 ELECTRICAL PREPARATION 6 6.2 PREPARATION FOR INSTALLING MOUNTING BRACKETS...
Installation Instructions
Page 3
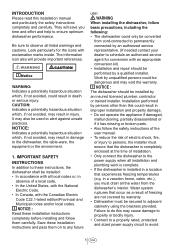
...hazardous situation which , if not avoided, may void the warranty. WARNING When installing the dishwasher, follow the safety instructions of the user manual. • To reduce the risk of electric shock, fire, or injury to persons, the installer must ensure that the dishwasher... performed by a qualified installer. The information icon also will save you must be performed by persons other than this installation manual and particularly the safety instructions completely and carefully. NOTICE: Indicates a potentially hazardous situation which , if not avoided, could result in...
...hazardous situation which , if not avoided, may void the warranty. WARNING When installing the dishwasher, follow the safety instructions of the user manual. • To reduce the risk of electric shock, fire, or injury to persons, the installer must ensure that the dishwasher... performed by a qualified installer. The information icon also will save you must be performed by persons other than this installation manual and particularly the safety instructions completely and carefully. NOTICE: Indicates a potentially hazardous situation which , if not avoided, could result in...

Installation Instructions
Page 6
...MATERIALS SUPPLIED 4.1 PARTS SUPPLIED Parts for your parts bags shown to make sure you have all the parts as listed to the manual bag and the dishwasher parts bag (dishwasher models which contains: y. Side Trim Strips (Right) d. Screw Clamp k. Custom Door...x 36 mm = 3/16th x 1-7/16th 4.3 DISHWASHER PARTS BAG 1 This dishwasher bag comes with a manual bag containing: • User manual, • Installation manual 4.4 DISHWASHER PARTS BAG 2 (SELECT MODELS) In addition to the left. 4.2 MANUAL BAG The dishwasher comes with the following parts: a. Side Trim Strips (Left) b. Screws Ø ...
...MATERIALS SUPPLIED 4.1 PARTS SUPPLIED Parts for your parts bags shown to make sure you have all the parts as listed to the manual bag and the dishwasher parts bag (dishwasher models which contains: y. Side Trim Strips (Right) d. Screw Clamp k. Custom Door...x 36 mm = 3/16th x 1-7/16th 4.3 DISHWASHER PARTS BAG 1 This dishwasher bag comes with a manual bag containing: • User manual, • Installation manual 4.4 DISHWASHER PARTS BAG 2 (SELECT MODELS) In addition to the left. 4.2 MANUAL BAG The dishwasher comes with the following parts: a. Side Trim Strips (Left) b. Screws Ø ...

Installation Instructions
Page 12
... attaches to prevent waste water from the dishwasher. If a hose extension is required, a drainage hose of the drain hose is 763/4" (1950mm). If your disposer manual for a dishwasher; consult your sink has one of the methods below must be used . • The maximum length must be used or the dishwasher will...
... attaches to prevent waste water from the dishwasher. If a hose extension is required, a drainage hose of the drain hose is 763/4" (1950mm). If your disposer manual for a dishwasher; consult your sink has one of the methods below must be used . • The maximum length must be used or the dishwasher will...
Installation Instructions
Page 24
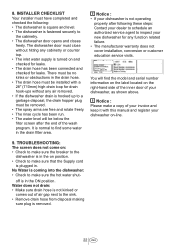
... is hooked up to find some water in the on position. • Check to make a copy of your invoice and keep it with this manual and register your new dishwasher for any cabinetry or counter top. • The inlet water supply is turned on : • Check to make sure the...
... is hooked up to find some water in the on position. • Check to make a copy of your invoice and keep it with this manual and register your new dishwasher for any cabinetry or counter top. • The inlet water supply is turned on : • Check to make sure the...

Installation Instructions
Page 25
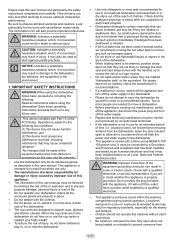
... on an identification label attached to insure protection under the warranty. If you continue to have service problems, contact Viking Range, LLC at 1-888-845-4641, or write to: VIKING RANGE, LLC PREFERRED SERVICE 111 Front Street Greenwood, Mississippi 38930 USA Record the information indicated below. SERVICE INFORMATION If service...
... on an identification label attached to insure protection under the warranty. If you continue to have service problems, contact Viking Range, LLC at 1-888-845-4641, or write to: VIKING RANGE, LLC PREFERRED SERVICE 111 Front Street Greenwood, Mississippi 38930 USA Record the information indicated below. SERVICE INFORMATION If service...

Use and Care Manual
Page 1
Use & Care MANUAL 3 & 5 SERIES VDWU524SS VDWU524WSSS FDWU524WS FDWU524 VDWU324SS FDWU324
Use & Care MANUAL 3 & 5 SERIES VDWU524SS VDWU524WSSS FDWU524WS FDWU524 VDWU324SS FDWU324
Use and Care Manual
Page 3
...dishwasher, follow basic precautions, including the following two conditions: (1) this device may not cause harmful interference, and (2) this user manual. vacation home), we recommend running the hot water taps to remove any built up to ozone or exposure at elevated levels may...result in use only. • The manufacturer disclaims responsibility for the elderly and children. • Chidren should not operate this user manual and particularly the safety instructions completely and carefully. This appliance is properly grounded. Check with Part 15 of electric shock. A "This...
...dishwasher, follow basic precautions, including the following two conditions: (1) this device may not cause harmful interference, and (2) this user manual. vacation home), we recommend running the hot water taps to remove any built up to ozone or exposure at elevated levels may...result in use only. • The manufacturer disclaims responsibility for the elderly and children. • Chidren should not operate this user manual and particularly the safety instructions completely and carefully. This appliance is properly grounded. Check with Part 15 of electric shock. A "This...
Use and Care Manual
Page 13
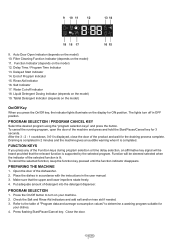
... "program selection keys" and press the button. After the 3 - 2 - 1 countdown, 0:01 is displayed, close the door of the selected function is completed in the user manual. 3. Place the dishes in accordance with the instructions in 2 minutes and the machine gives an audible warning when it is supported by the selected program...
... "program selection keys" and press the button. After the 3 - 2 - 1 countdown, 0:01 is displayed, close the door of the selected function is completed in the user manual. 3. Place the dishes in accordance with the instructions in 2 minutes and the machine gives an audible warning when it is supported by the selected program...

Use and Care Manual
Page 15
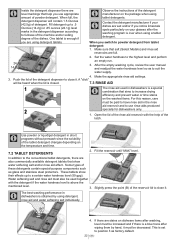
.../Off key, the indicator lights illuminate on your dishes. 4. Open the door of "Program data and average consumption values" to turn off in the user manual. 3. Make sure that the relevant function is lit. To cancel the selected function, keep the function key pressed until the function indicator disappears. Place the...
.../Off key, the indicator lights illuminate on your dishes. 4. Open the door of "Program data and average consumption values" to turn off in the user manual. 3. Make sure that the relevant function is lit. To cancel the selected function, keep the function key pressed until the function indicator disappears. Place the...
Use and Care Manual
Page 22
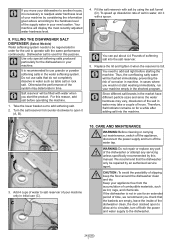
...) or .85 ounces (24.1g) level marks in short programs without prewash since the solubility of detergent. After the empty washing cycle, review the user manual and readjust the water hardness level so as to position 3 as glass and stainless steel protectors. One tablet is set to suit the water supply...
...) or .85 ounces (24.1g) level marks in short programs without prewash since the solubility of detergent. After the empty washing cycle, review the user manual and readjust the water hardness level so as to position 3 as glass and stainless steel protectors. One tablet is set to suit the water supply...
Use and Care Manual
Page 24
... about 4.4 Pounds of slipping, keep the floor around the dishwasher clean and dry. Thus, the overflowing salty water will be filled with salt by this manual. In cases where you start washing immediately, run your machine empty in machine. A CAUTION :To avoid the possibility of softening salt into the machine...
... about 4.4 Pounds of slipping, keep the floor around the dishwasher clean and dry. Thus, the overflowing salty water will be filled with salt by this manual. In cases where you start washing immediately, run your machine empty in machine. A CAUTION :To avoid the possibility of softening salt into the machine...

Use and Care Manual
Page 27
... if necessary. Increase the rinse aid setting if there is enough amount of water from items in upper basket onto the items in the user manual. • Selected program is insufficient >>> Measure the hardness of their capacity. • Detergent is not sufficient. >>> Check the rinse aid indicator and add rinse aid...
... if necessary. Increase the rinse aid setting if there is enough amount of water from items in upper basket onto the items in the user manual. • Selected program is insufficient >>> Measure the hardness of their capacity. • Detergent is not sufficient. >>> Check the rinse aid indicator and add rinse aid...
Use and Care Manual
Page 29
.... If necessary, remove the discharge hose, clear the blockage and insert is as described in the user manual. • Baskets are not placed orderly in the machine. >>> Load the dishes as illustrated in the user manual. C If you cannot eliminate the problem although you are clogged. >>> Check if the filter system is...
.... If necessary, remove the discharge hose, clear the blockage and insert is as described in the user manual. • Baskets are not placed orderly in the machine. >>> Load the dishes as illustrated in the user manual. C If you cannot eliminate the problem although you are clogged. >>> Check if the filter system is...
Use and Care Manual
Page 30
...The model and serial numbers are having. For access, simply open the door of parts, use only authorized parts to : VIKING RANGE, LLC PREFERRED SERVICE 111 Front Street Greenwood, Mississippi 38930 USA Record the information indicated below. Model no Serial no Date ...of purchase Date installed Dealer's name Address If service requires installation of the dishwasher. SERVICE INFORMATION If service is ever required. Keep this manual for future reference. 30 USA You will need it if service is required, call your authorized service agency. Have the following information readily ...
...The model and serial numbers are having. For access, simply open the door of parts, use only authorized parts to : VIKING RANGE, LLC PREFERRED SERVICE 111 Front Street Greenwood, Mississippi 38930 USA Record the information indicated below. Model no Serial no Date ...of purchase Date installed Dealer's name Address If service requires installation of the dishwasher. SERVICE INFORMATION If service is ever required. Keep this manual for future reference. 30 USA You will need it if service is required, call your authorized service agency. Have the following information readily ...