
Cleaning Tips
Page 2
... remove the grease trough located in the Use and Care Manual. • Never line the oven cavity with aluminum foil. Griddle/Simmer Plate Constructed of machined steel with approximately 1⁄2 to darken over a period of time. Season griddle by softening the food particles. When light cooking is created as the water contacts the hot grate. This fast and easy commercial grade cleaning system will naturally...
... remove the grease trough located in the Use and Care Manual. • Never line the oven cavity with aluminum foil. Griddle/Simmer Plate Constructed of machined steel with approximately 1⁄2 to darken over a period of time. Season griddle by softening the food particles. When light cooking is created as the water contacts the hot grate. This fast and easy commercial grade cleaning system will naturally...
Installation Instructions
Page 2
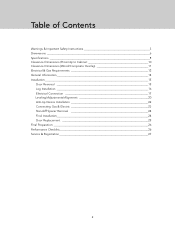
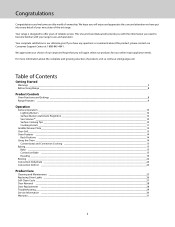
Table of Contents Warnings & Important Safety Instructions 3 Dimensions 6 Specifications 8 Clearance Dimensions (Proximity to Cabinet 10 Clearance Dimensions (Wood/Composite Overlay 11 Electrical & Gas Requirements 12 General Information 14 Installation 15 Door Removal 15 Leg Installation 16 Electrical Connection 17 Leveling/Adjustments/Alignment 20 Anti-tip Device Installation 22 Connecting Gas & Electric 23 Standoff Spacer Removal 24 Final Installation 24 Door Replacement 25 Final Preparation 26 Performance Checklist 26 Service & Registration 27 2
Table of Contents Warnings & Important Safety Instructions 3 Dimensions 6 Specifications 8 Clearance Dimensions (Proximity to Cabinet 10 Clearance Dimensions (Wood/Composite Overlay 11 Electrical & Gas Requirements 12 General Information 14 Installation 15 Door Removal 15 Leg Installation 16 Electrical Connection 17 Leveling/Adjustments/Alignment 20 Anti-tip Device Installation 22 Connecting Gas & Electric 23 Standoff Spacer Removal 24 Final Installation 24 Door Replacement 25 Final Preparation 26 Performance Checklist 26 Service & Registration 27 2
Installation Instructions
Page 3
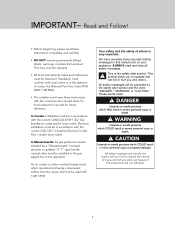
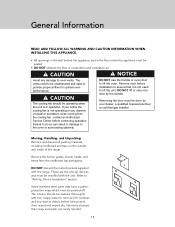
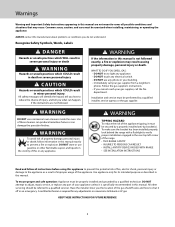
... chance of others . An air curtain or other overhead range hood which COULD result in the gas supply line to the appliance. This is very important. These words mean: DANGER Hazards or unsafe practices which COULD result in this manual and on your appliance. Installation must leave these instructions completely and carefully. • DO NOT remove permanently affixed labels, warnings, or...
... chance of others . An air curtain or other overhead range hood which COULD result in the gas supply line to the appliance. This is very important. These words mean: DANGER Hazards or unsafe practices which COULD result in this manual and on your appliance. Installation must leave these instructions completely and carefully. • DO NOT remove permanently affixed labels, warnings, or...
Installation Instructions
Page 8
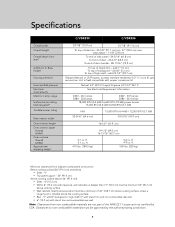
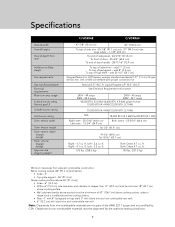
... shelf - Unit is installed above the cooking surface. • Rear - 0" with 8" backguard or high shelf; 0" with island trim and non-combustible rear wall; • 6" (15.2 cm) with proper conversion kit Natural 5.0" W.C.P./ Liquid Propane L/P 10.0" W.C.P. See Electrical Requirement Information 240V - 26.3 amps 208V - 22.8 amps 240V - 30.5 amps 208V - 26.4 amps 18,500 BTU (5.4 kW)/16,600 BTU 4.9 kW) power burner 15,000 BTU (4.4 kW)/12,500 BTU (3.7 kW) N/A 25...
... shelf - Unit is installed above the cooking surface. • Rear - 0" with 8" backguard or high shelf; 0" with island trim and non-combustible rear wall; • 6" (15.2 cm) with proper conversion kit Natural 5.0" W.C.P./ Liquid Propane L/P 10.0" W.C.P. See Electrical Requirement Information 240V - 26.3 amps 208V - 22.8 amps 240V - 30.5 amps 208V - 26.4 amps 18,500 BTU (5.4 kW)/16,600 BTU 4.9 kW) power burner 15,000 BTU (4.4 kW)/12,500 BTU (3.7 kW) N/A 25...
Installation Instructions
Page 9
... cooking surface • Wall cabinets directly above product must be a minimum of 42" (106.7 cm) above the cooking surface. • Rear - 0" with 8" backguard or high shelf; 0" with island trim and non-combustible rear wall; • 6" (15.2 cm) with proper conversion kit Natural 5.0" W.C.P./ Liquid Propane L/P 10.0" W.C.P. Clearances to Base Height Gas requirements Gas manifold pressure Electrical requirements Maximum amp usage Surface burner rating Natural gas/LP Griddle burner rating Grill burner rating Oven interior width Oven interior height Oven interior depth Overall AHAM Oven...
... cooking surface • Wall cabinets directly above product must be a minimum of 42" (106.7 cm) above the cooking surface. • Rear - 0" with 8" backguard or high shelf; 0" with island trim and non-combustible rear wall; • 6" (15.2 cm) with proper conversion kit Natural 5.0" W.C.P./ Liquid Propane L/P 10.0" W.C.P. Clearances to Base Height Gas requirements Gas manifold pressure Electrical requirements Maximum amp usage Surface burner rating Natural gas/LP Griddle burner rating Grill burner rating Oven interior width Oven interior height Oven interior depth Overall AHAM Oven...
Installation Instructions
Page 12
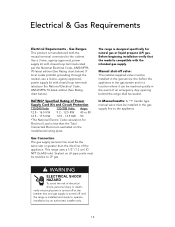
... Rating chart below ). Sealant on all pipe joints must be resistive to the appliance. verify electrical power is turned off at the breaker box and gas supply is compatible with the neutral terminal connected to operate, installation by an authorized installer only. 12 Before beginning installation verify that the model is turned off valve: This installer-supplied valve must be sealed. Electrical & Gas Requirements Electrical Requirements - Gas Ranges This product is designed specifically for Electrical Load is installed...
... Rating chart below ). Sealant on all pipe joints must be resistive to the appliance. verify electrical power is turned off at the breaker box and gas supply is compatible with the neutral terminal connected to operate, installation by an authorized installer only. 12 Before beginning installation verify that the model is turned off valve: This installer-supplied valve must be sealed. Electrical & Gas Requirements Electrical Requirements - Gas Ranges This product is designed specifically for Electrical Load is installed...
Installation Instructions
Page 14
... NOT use the handle or oven door to lift the unit. DO NOT discard the metal brackets supplied with hot, soapy water to remove film residues and any damage to the oven or surrounding cabinets. CAUTION The cooling fan should be washed thoroughly with the range. Remove door before continuing operation. Remove the burner grates, burner heads, and bases from the cooling fan, contact an Authorized Service Center before installation...
... NOT use the handle or oven door to lift the unit. DO NOT discard the metal brackets supplied with hot, soapy water to remove film residues and any damage to the oven or surrounding cabinets. CAUTION The cooling fan should be washed thoroughly with the range. Remove door before continuing operation. Remove the burner grates, burner heads, and bases from the cooling fan, contact an Authorized Service Center before installation...
Installation Instructions
Page 24
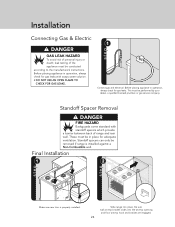
... be removed if range is properly installed. Slide range into the anit-tip opening and floor anti-tip hook and bracket are engaged. 24 Be sure wall anit-tip bracket slides into place. step 1 Connect gas and electrical. Before placing appliance in operation, always check for adequate ventilation. Standoff Spacer Removal DANGER FIRE HAZARD Backguards come standard with soapy water solution. • DO NOT USE AN OPEN FLAME TO CHECK FOR GAS LEAKS. These...
... be removed if range is properly installed. Slide range into the anit-tip opening and floor anti-tip hook and bracket are engaged. 24 Be sure wall anit-tip bracket slides into place. step 1 Connect gas and electrical. Before placing appliance in operation, always check for adequate ventilation. Standoff Spacer Removal DANGER FIRE HAZARD Backguards come standard with soapy water solution. • DO NOT USE AN OPEN FLAME TO CHECK FOR GAS LEAKS. These...
Use and Care Manual
Page 2
... Using Range 8 Product Controls Oven Functions and Settings 8 Range Features 9 Operation Surface Operation 10 Lighting Burners 10 Surface Burners-Automatic Reignition 10 Vari-Simmer 10 Surface Cooking Tips 10 Cooking Vessels 11 Griddle/Simmer Plate 12 Char-Grill 13 Oven Features 14 Rack Positions 14 Using the Oven 14 Conventional and Convection Cooking 15 Baking 15 Bake 15 Convection Bake 15 Roasting 19 Broiling 22 Convection Dehydrate 24 Convection Defrost 24 Product Care Cleaning and Maintenance 25 Replacing Oven Lights 26 Self-Clean Cycle 27 Door Removal 28 Door...
... Using Range 8 Product Controls Oven Functions and Settings 8 Range Features 9 Operation Surface Operation 10 Lighting Burners 10 Surface Burners-Automatic Reignition 10 Vari-Simmer 10 Surface Cooking Tips 10 Cooking Vessels 11 Griddle/Simmer Plate 12 Char-Grill 13 Oven Features 14 Rack Positions 14 Using the Oven 14 Conventional and Convection Cooking 15 Baking 15 Bake 15 Convection Bake 15 Roasting 19 Broiling 22 Convection Dehydrate 24 Convection Defrost 24 Product Care Cleaning and Maintenance 25 Replacing Oven Lights 26 Self-Clean Cycle 27 Door Removal 28 Door...
Use and Care Manual
Page 3
... specifically recommended in this manual. Have the installer show you what can damage the porcelain finishes. To ensure proper and safe operation: Appliance must be performed by a properly installed anti-tip bracket(s). A certified technician is required for its intended purpose as a result of improper usage of fire, electric shock, personal injury or damage to a qualified servicer. Warnings Warning and Important Safety Instructions...
... specifically recommended in this manual. Have the installer show you what can damage the porcelain finishes. To ensure proper and safe operation: Appliance must be performed by a properly installed anti-tip bracket(s). A certified technician is required for its intended purpose as a result of improper usage of fire, electric shock, personal injury or damage to a qualified servicer. Warnings Warning and Important Safety Instructions...

Use and Care Manual
Page 4
...; To eliminate the hazard of cooking. • Use care when opening the oven door. Make sure the correct burner is based on oven door handles. This is turned on grease fires. Clean up of the pan. Damp pot-holders may ignite or catch utensil handles. These items could be seriously injured. • Children must be taken to burner flame. • ALWAYS adjust surface burner flame so that the appliance and utensils...
...; To eliminate the hazard of cooking. • Use care when opening the oven door. Make sure the correct burner is based on oven door handles. This is turned on grease fires. Clean up of the pan. Damp pot-holders may ignite or catch utensil handles. These items could be seriously injured. • Children must be taken to burner flame. • ALWAYS adjust surface burner flame so that the appliance and utensils...

Use and Care Manual
Page 5
... after use of a gas cooking appliance results in the production of heat and moisture in the room in this could be hot even though they could cause the flames to spread out of control. • Once the unit has been installed as the outside of oven. • Bake and broil burners may also be unstable and easily tip. Use foil only as opening , and the oven door...
... after use of a gas cooking appliance results in the production of heat and moisture in the room in this could be hot even though they could cause the flames to spread out of control. • Once the unit has been installed as the outside of oven. • Bake and broil burners may also be unstable and easily tip. Use foil only as opening , and the oven door...

Use and Care Manual
Page 8
...;Five baking performance modes-including convection baking and convection broiling-providing air circulation for baking, roasting, and casseroles. LOW BROIL - Use this function to meet strict regulations in high broil. Then set the oven selector to bake, the temperature knob to bake and roast foods at the same time with minimal taste transfer. CONVECTION BAKE Use this setting for shorter cooking times with even results. •Split baking and broiling elements-which may be over-browned in conjunction with specific instructions...
...;Five baking performance modes-including convection baking and convection broiling-providing air circulation for baking, roasting, and casseroles. LOW BROIL - Use this function to meet strict regulations in high broil. Then set the oven selector to bake, the temperature knob to bake and roast foods at the same time with minimal taste transfer. CONVECTION BAKE Use this setting for shorter cooking times with even results. •Split baking and broiling elements-which may be over-browned in conjunction with specific instructions...
Use and Care Manual
Page 10
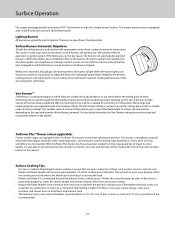
... do not, turn the appropriate control knob counter clockwise to light. Vari-Simmer™ Simmering is this reason, Viking range and rangetop burners are ignited by electric ignition. It is a cooking technique in which foods are equipped with a Vari-Simmer setting. Use of pots or pans as small as 4" (10 cm) is equipped with the automatic re-ignition system. Surface Operation Our ranges are cooked in hot liquids kept at...
... do not, turn the appropriate control knob counter clockwise to light. Vari-Simmer™ Simmering is this reason, Viking range and rangetop burners are ignited by electric ignition. It is a cooking technique in which foods are equipped with a Vari-Simmer setting. Use of pots or pans as small as 4" (10 cm) is equipped with the automatic re-ignition system. Surface Operation Our ranges are cooked in hot liquids kept at...
Use and Care Manual
Page 12
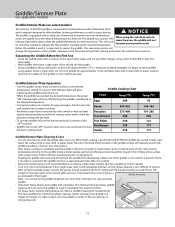
... to clean the oven, the griddle will change the appearance of applying oil. • Keeping the griddle well seasoned will clean your local dealer or order on the our website at room temperature directly on . The griddle has a power "ON" indicator light which cooked on the griddle surface will cycle on and off , turn the thermostat knob clockwise to the "OFF" position. • ALWAYS turn to entire griddle using the griddle, always remove...
... to clean the oven, the griddle will change the appearance of applying oil. • Keeping the griddle well seasoned will clean your local dealer or order on the our website at room temperature directly on . The griddle has a power "ON" indicator light which cooked on the griddle surface will cycle on and off , turn the thermostat knob clockwise to the "OFF" position. • ALWAYS turn to entire griddle using the griddle, always remove...

Use and Care Manual
Page 27
... and temperature control knob to the "OFF" position. Before starting the Self-Clean cycle: 1. Turn the oven selector knob clockwise to do so can be baked on . When the cycle is automatically activated after selecting the selfclean setting. Remove the oven racks, and any ash from the oven surfaces with a damp sponge or cloth. 27 Soils in burns or electrical shock. To start the Self-Clean cycle: 1. At this time, the clean indicator light...
... and temperature control knob to the "OFF" position. Before starting the Self-Clean cycle: 1. Turn the oven selector knob clockwise to do so can be baked on . When the cycle is automatically activated after selecting the selfclean setting. Remove the oven racks, and any ash from the oven surfaces with a damp sponge or cloth. 27 Soils in burns or electrical shock. To start the Self-Clean cycle: 1. At this time, the clean indicator light...
Use and Care Manual
Page 29
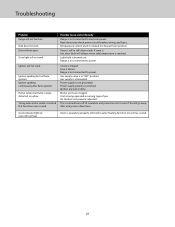
... temperature is operating properly. Door will not heat Oven is reached. Igniters sparking but flame is in self-clean mode. oven will not open. Igniters will not function. Power supply is being operated on ; Unit is not grounded. Air shutters not properly adjusted. Range is not connected to power. Possible Cause and/or Remedy Range is not connected to electrical power: Have electrician check power circuit breaker, wiring, and fuses. Fuse is normal burn off of gas. Gas supply valve is large, distorted, or yellow. Oven indicator light...
... temperature is operating properly. Door will not heat Oven is reached. Igniters sparking but flame is in self-clean mode. oven will not open. Igniters will not function. Power supply is being operated on ; Unit is not grounded. Air shutters not properly adjusted. Range is not connected to power. Possible Cause and/or Remedy Range is not connected to electrical power: Have electrician check power circuit breaker, wiring, and fuses. Fuse is normal burn off of gas. Gas supply valve is large, distorted, or yellow. Oven indicator light...
Use and Care Manual
Page 31
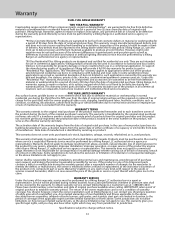
... parts, except as detailed below*, are limited in duration to the period of coverage of the applicable express written limited warranties set forth above. Viking Range, warrantor, agrees to repair or replace at 1-888-845-4641. FIVE YEAR LIMITED WARRANTY Any surface burner, griddle burner or oven element which could affect you may vary from the date of original retail purchase. If a transferee owner is , used...
... parts, except as detailed below*, are limited in duration to the period of coverage of the applicable express written limited warranties set forth above. Viking Range, warrantor, agrees to repair or replace at 1-888-845-4641. FIVE YEAR LIMITED WARRANTY Any surface burner, griddle burner or oven element which could affect you may vary from the date of original retail purchase. If a transferee owner is , used...
Two-Page Specifications Sheet
Page 1
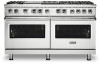
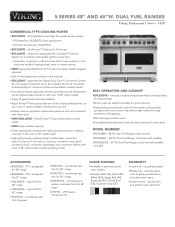
... rear trim for 60" range §§P24CSTSS - six burners with griddle and grill ACCESSORIES §§BG8548SS - 8"H. backguard for maximum airflow and excellent cooking results §§Concealed 10-pass dual bake element provides precise temperature control (4-pass bake element in the industry §§EXCLUSIVE - the 8 1/2" fan works bi-directionally for 60" range §§HS24548SS - six burners with griddle §§VDR5606GQ - 60"W. gas burners and electric oven elements Dual Fuel Range; DUAL FUEL RANGES ® Viking Professional 5 Series...
... rear trim for 60" range §§P24CSTSS - six burners with griddle and grill ACCESSORIES §§BG8548SS - 8"H. backguard for maximum airflow and excellent cooking results §§Concealed 10-pass dual bake element provides precise temperature control (4-pass bake element in the industry §§EXCLUSIVE - the 8 1/2" fan works bi-directionally for 60" range §§HS24548SS - six burners with griddle §§VDR5606GQ - 60"W. gas burners and electric oven elements Dual Fuel Range; DUAL FUEL RANGES ® Viking Professional 5 Series...

Two-Page Specifications Sheet
Page 2
...Overall Size - 2.6 cu. See installation instructions for important clearance/installation information. **The AHAM Standard for measuring oven capacity subtracts the door plug and convection baffle dimension from Rear Gas Requirements Electrical Requirements Maximum Amp Usage Surface Burner Rating Griddle Burner Rating Grill Burner Rating Oven Interior Dimensions Approximate Shipping Weight DUAL FUEL 48" AND 60" W. Specifications subject to max. 37" (94 cm); DUAL FUEL RANGES ® Viking Professional 5 Series - legs adjust 1-1/8" (2.9 cm) Additions to LP with locally supplied 3-wire...
...Overall Size - 2.6 cu. See installation instructions for important clearance/installation information. **The AHAM Standard for measuring oven capacity subtracts the door plug and convection baffle dimension from Rear Gas Requirements Electrical Requirements Maximum Amp Usage Surface Burner Rating Griddle Burner Rating Grill Burner Rating Oven Interior Dimensions Approximate Shipping Weight DUAL FUEL 48" AND 60" W. Specifications subject to max. 37" (94 cm); DUAL FUEL RANGES ® Viking Professional 5 Series - legs adjust 1-1/8" (2.9 cm) Additions to LP with locally supplied 3-wire...


