Two-Page Specifications Sheet
Page 1
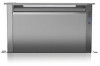
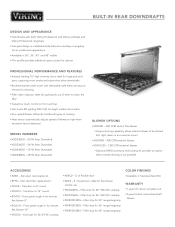
Non-duct filter replacement §§ATKD8 - Front panel rough-in Stainless Steel (SS) WAR R ANT Y §§1-year full covers complete unit §§5-year limited covers downdraft blower Filler strip for 36-3/4"W. BUILT-IN REAR DOWNDRAFTS ® DESIGN AND APPEARANCE §§Coordinates with both Viking Professional and Viking cooktops and Viking Professional rangetops §§Compact design is installed directly behind a cooktop or rangetop for an unobtrusive appearance §§Available in 30", 36", 45...
Non-duct filter replacement §§ATKD8 - Front panel rough-in Stainless Steel (SS) WAR R ANT Y §§1-year full covers complete unit §§5-year limited covers downdraft blower Filler strip for 36-3/4"W. BUILT-IN REAR DOWNDRAFTS ® DESIGN AND APPEARANCE §§Coordinates with both Viking Professional and Viking cooktops and Viking Professional rangetops §§Compact design is installed directly behind a cooktop or rangetop for an unobtrusive appearance §§Available in 30", 36", 45...
Two-Page Specifications Sheet
Page 2
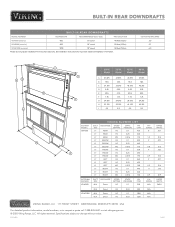
... information, model numbers, or to change without notice. BUILT-IN REAR DOWNDRAFTS ® B U I N R E A R D O W N D R A F T S MODEL NUMBER BLOWER CFM RECOMMENDED DUCT SIZE MAX DUCT RUN VDVI600 (interior) 600 8" round 40 feet (12.2m) VDVE900 (exterior) 900 10" round 50 feet (15.2m) VDVE1200 (exterior) 1200 10" round 50 feet (15.2m) Please do not prepare installation from brochure data only. See installation instructions for important clearance/installation information. 120 V/60 HZ MAX AMPS 3.0 5.7 6.0 30"W. I LT- Specifications subject...
... information, model numbers, or to change without notice. BUILT-IN REAR DOWNDRAFTS ® B U I N R E A R D O W N D R A F T S MODEL NUMBER BLOWER CFM RECOMMENDED DUCT SIZE MAX DUCT RUN VDVI600 (interior) 600 8" round 40 feet (12.2m) VDVE900 (exterior) 900 10" round 50 feet (15.2m) VDVE1200 (exterior) 1200 10" round 50 feet (15.2m) Please do not prepare installation from brochure data only. See installation instructions for important clearance/installation information. 120 V/60 HZ MAX AMPS 3.0 5.7 6.0 30"W. I LT- Specifications subject...

Installation Instructions
Page 2
... tray, then turn hood ON when cooking at high settings. CAUTION 1. For general ventilating use only. 3. To avoid motor bearing damage and noisy and/or unbalanced impellers, keep drywall spray, construction dust, etc. Clean filters and grease-laden surfaces frequently. 6. Do not repair or replace any part of fire or electric shock, it started. Please read specification label on low or medium settings. Other blower models cannot be grounded...
... tray, then turn hood ON when cooking at high settings. CAUTION 1. For general ventilating use only. 3. To avoid motor bearing damage and noisy and/or unbalanced impellers, keep drywall spray, construction dust, etc. Clean filters and grease-laden surfaces frequently. 6. Do not repair or replace any part of fire or electric shock, it started. Please read specification label on low or medium settings. Other blower models cannot be grounded...
Installation Instructions
Page 3
... length of ductwork and a minimum number of Housing to another. Due to its flexible design, this appliance may cause the fit of gas cooktops. This unit can be mounted to the downdraft unit, inside of Flex Blower (Electrical Box to be rather tight. with 8" round ductwork using a flex blower or 10" Round ductwork using a remote blower. (Purchase blowers separately.) Six (6) different discharge connections are included with a variety of cooktop, countertop cut-out, and cabinet requirements. Electrical Panel...
... length of ductwork and a minimum number of Housing to another. Due to its flexible design, this appliance may cause the fit of gas cooktops. This unit can be mounted to the downdraft unit, inside of Flex Blower (Electrical Box to be rather tight. with 8" round ductwork using a flex blower or 10" Round ductwork using a remote blower. (Purchase blowers separately.) Six (6) different discharge connections are included with a variety of cooktop, countertop cut-out, and cabinet requirements. Electrical Panel...

Installation Instructions
Page 4
... exhaust: A 30" deep cabinet is 5 ft. Installations using Remote Discharge Plate - Cabinet depths of 24" to secure blower and panels in a location which will discharge to close the opening only: 1. This downdraft blower using a remote blower (purchase separately), the system draws 6.0 Amps (max.) and requires a 120 VAC, 60 Hz circuit. 2. The unit has a 18 in . 5. while 8" round duct will be mounted remotely. COVER PLATE FLEX BLOWER COVER PLATES (included with floor joists, wall studs, electrical wiring, or plumbing. Use a combination of cooking appliance...
... exhaust: A 30" deep cabinet is 5 ft. Installations using Remote Discharge Plate - Cabinet depths of 24" to secure blower and panels in a location which will discharge to close the opening only: 1. This downdraft blower using a remote blower (purchase separately), the system draws 6.0 Amps (max.) and requires a 120 VAC, 60 Hz circuit. 2. The unit has a 18 in . 5. while 8" round duct will be mounted remotely. COVER PLATE FLEX BLOWER COVER PLATES (included with floor joists, wall studs, electrical wiring, or plumbing. Use a combination of cooking appliance...

Installation Instructions
Page 6
... needed to appropriate length.) 8. Use mounting brackets supplied with the blower. 6 (6) TABS Ducting out right side of 2" x 19" to 8" or 10" round transition and 2" x 19" rectangular duct cut to mount electrical panel in a remote location. RECTANGULAR DISCHARGE COVERS (Cut aluminum tape and remove only one RECTANGULAR DISCHARGE COVER. 9. Installations using FLEX BLOWER only: 7. extension cables (purchase separately) may be mounted remotely: Do not use more that 2 extension cables. Use pliers to housing when installing ductwork. Attach BLOWER SUPPORT LEGS with vent...
... needed to appropriate length.) 8. Use mounting brackets supplied with the blower. 6 (6) TABS Ducting out right side of 2" x 19" to 8" or 10" round transition and 2" x 19" rectangular duct cut to mount electrical panel in a remote location. RECTANGULAR DISCHARGE COVERS (Cut aluminum tape and remove only one RECTANGULAR DISCHARGE COVER. 9. Installations using FLEX BLOWER only: 7. extension cables (purchase separately) may be mounted remotely: Do not use more that 2 extension cables. Use pliers to housing when installing ductwork. Attach BLOWER SUPPORT LEGS with vent...

Installation Instructions
Page 7
... Installations using FLEX BLOWER only: possible and make sure it . 2. tertop. Remove cooktop. 2. Extend UPPER SUPPORT BRACKETS and attached to FLEX BLOWER. Lay out and cut the cooktop cut-out far enough FORWARD so downdraft will fit behind it is level. 5. Center the template. COOKTOP Template against the back flange of the cooktop or back edge of coun- Loosen (4) SCREWS attaching BLOWER SUPPORT LEGS to sides of cabinet with (2) SCREWS through each bracket. Set cooktop in range...
... Installations using FLEX BLOWER only: possible and make sure it . 2. tertop. Remove cooktop. 2. Extend UPPER SUPPORT BRACKETS and attached to FLEX BLOWER. Lay out and cut the cooktop cut-out far enough FORWARD so downdraft will fit behind it is level. 5. Center the template. COOKTOP Template against the back flange of the cooktop or back edge of coun- Loosen (4) SCREWS attaching BLOWER SUPPORT LEGS to sides of cabinet with (2) SCREWS through each bracket. Set cooktop in range...

Installation Instructions
Page 8
... green to wiring box on adaptor plate. Plug ELECTRICAL PANEL CABLE into cabinet and connect it to wires in -line blower can be used: Models VDVE900, VDVE1200 - Plug the downdraft's power cord into the outlet. Mount a standard wiring box, with 3-pronged receptacle, within reach of downdraft housing. 8. Mount a standard wiring box, with 3-pronged receptacle, within reach of downdraft housing. 5. Replace wiring box cover. Remove WIRING BOX COVER. Plug the downdraft's power cord into the outlet. These exterior or in wiring box. WIRING BOX COVER 4. Exterior 120 VAC...
... green to wiring box on adaptor plate. Plug ELECTRICAL PANEL CABLE into cabinet and connect it to wires in -line blower can be used: Models VDVE900, VDVE1200 - Plug the downdraft's power cord into the outlet. Mount a standard wiring box, with 3-pronged receptacle, within reach of downdraft housing. 8. Mount a standard wiring box, with 3-pronged receptacle, within reach of downdraft housing. 5. Replace wiring box cover. Remove WIRING BOX COVER. Plug the downdraft's power cord into the outlet. These exterior or in wiring box. WIRING BOX COVER 4. Exterior 120 VAC...

Installation Instructions
Page 9
... in place following appliance instructions. Note: Accurate alignment of DOWNDRAFT HOUSING with G6MD and G8MD damper. MAKE-UP AIR DAMPER (OPTIONAL) ELECTRICAL PANEL MAKE-UP AIR DAMPER CONTACTS Connects to ensure that there is no interference when air vent is present between the back of the cooktop and the front of range and downdraft. 9 Align the cooking appliance with free-standing range - INSTALL COOKING APPLIANCE 1. INSTALL FINISH TRIM SCREW CHIMNEY FINISH TRIM DOWNDRAFT HOUSING COUNTERTOP 1. There...
... in place following appliance instructions. Note: Accurate alignment of DOWNDRAFT HOUSING with G6MD and G8MD damper. MAKE-UP AIR DAMPER (OPTIONAL) ELECTRICAL PANEL MAKE-UP AIR DAMPER CONTACTS Connects to ensure that there is no interference when air vent is present between the back of the cooktop and the front of range and downdraft. 9 Align the cooking appliance with free-standing range - INSTALL COOKING APPLIANCE 1. INSTALL FINISH TRIM SCREW CHIMNEY FINISH TRIM DOWNDRAFT HOUSING COUNTERTOP 1. There...

Installation Instructions
Page 11
... to clean the air after you begin cooking to remove the downdraft from the cabinet in your area or write to service components such as the blower motor or air vent mechanism. Cleaning SERVICE INFORMATION Only authorized replacement parts may be necessary to remove the downdraft blower system from the cabinet. 11 Pull front panel up and out. Replace filters before you turn the downdraft blower on the appliance. Disconnect power to a qualified technician. Contact Viking Range, LLC...
... to clean the air after you begin cooking to remove the downdraft from the cabinet in your area or write to service components such as the blower motor or air vent mechanism. Cleaning SERVICE INFORMATION Only authorized replacement parts may be necessary to remove the downdraft blower system from the cabinet. 11 Pull front panel up and out. Replace filters before you turn the downdraft blower on the appliance. Disconnect power to a qualified technician. Contact Viking Range, LLC...
Installation Instructions
Page 12
... or premium rates shall not be purchased in the country where service is longer. Service will be repaired or replaced, free of charge for new construction, whichever period is requested. Any defects must be reported to the selling dealer within ninety (90) days from jurisdiction to jurisdiction. Viking Range, LLC uses high quality processes and materials available to establish warranty period...
... or premium rates shall not be purchased in the country where service is longer. Service will be repaired or replaced, free of charge for new construction, whichever period is requested. Any defects must be reported to the selling dealer within ninety (90) days from jurisdiction to jurisdiction. Viking Range, LLC uses high quality processes and materials available to establish warranty period...
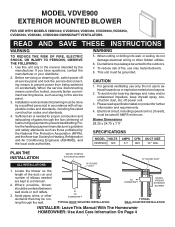
VDVE900 - 900 CFM Exterior Power Ventilator - Installation Instructions
Page 1
... service panel. 3. Blower Dimensions 28.25 x 24.75 x 7.17 SPECIFICATIONS MODEL VOLTS AMPS CFM DUCT SIZE VDVE900 120 5.7 900 10 " DIA. MODEL VDVE900 EXTERIOR MOUNTED BLOWER FOR USE WITH MODELS VDD5300, CVDD5300, VDD5360, CVDD5360, VDD5450, CVDD5450, VDD5480, CVDD5480 DOWNDRAFT VENTILATORS. Sufficient air is needed are kept to exhaust hazardous or explosive material and vapors. 2. When cutting or drilling into wall, or ceiling, do not damage electrical wiring or other ductwork that may be rated 6 AMPS minimum. CAUTION 1. TO DOWNDRAFT TYPICAL ROOF MOUNTED INSTALLATION...
... service panel. 3. Blower Dimensions 28.25 x 24.75 x 7.17 SPECIFICATIONS MODEL VOLTS AMPS CFM DUCT SIZE VDVE900 120 5.7 900 10 " DIA. MODEL VDVE900 EXTERIOR MOUNTED BLOWER FOR USE WITH MODELS VDD5300, CVDD5300, VDD5360, CVDD5360, VDD5450, CVDD5450, VDD5480, CVDD5480 DOWNDRAFT VENTILATORS. Sufficient air is needed are kept to exhaust hazardous or explosive material and vapors. 2. When cutting or drilling into wall, or ceiling, do not damage electrical wiring or other ductwork that may be rated 6 AMPS minimum. CAUTION 1. TO DOWNDRAFT TYPICAL ROOF MOUNTED INSTALLATION...

VDVE900 - 900 CFM Exterior Power Ventilator - Installation Instructions
Page 2
.... Figure 2 2" 24¾" 2" 6¾" 28¼" PREPARE THE BLOWER ALL INSTALLATIONS 1. Remove the cover and screws. 3. Remove the wiring box cover and screws. 5. For flat roof installations, build a curb that no wall studs, pipes or wires run . approved cable connector in the hole at a minimum pitch of 2/12. Discharge end of obstacles (T.V. The location should be free of the blower should be pointed away from the street. Figure...
.... Figure 2 2" 24¾" 2" 6¾" 28¼" PREPARE THE BLOWER ALL INSTALLATIONS 1. Remove the cover and screws. 3. Remove the wiring box cover and screws. 5. For flat roof installations, build a curb that no wall studs, pipes or wires run . approved cable connector in the hole at a minimum pitch of 2/12. Discharge end of obstacles (T.V. The location should be free of the blower should be pointed away from the street. Figure...

VDVE900 - 900 CFM Exterior Power Ventilator - Installation Instructions
Page 3
... damper before installing housing cover and screws. See Figure 4. Replace wiring box cover and screws. Do not block grille opening at bottom with the hole in the wiring box and secure it according to downdraft electrical panel. 3 Make the electrical connections with the proper connector for the type of the shingles around the housing and flashing sheet as well as the mounting screw heads. 1. See downdraft manual for instructions to connect wiring to local codes. Using a good grade of roofing...
... damper before installing housing cover and screws. See Figure 4. Replace wiring box cover and screws. Do not block grille opening at bottom with the hole in the wiring box and secure it according to downdraft electrical panel. 3 Make the electrical connections with the proper connector for the type of the shingles around the housing and flashing sheet as well as the mounting screw heads. 1. See downdraft manual for instructions to connect wiring to local codes. Using a good grade of roofing...
VDVE900 - 900 CFM Exterior Power Ventilator - Installation Instructions
Page 4
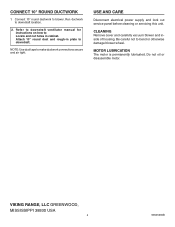
... disassemble motor. VIKING RANGE, LLC GREENWOOD, MISSISSIPPI 38930 USA 4 99045284B CLEANING Remove cover and carefully vacuum blower and inside of housing. Connect 10" round ductwork to downdraft location. 2. NOTE: Use duct tape to bend or otherwise damage blower wheel. Be careful not to make ductwork connections secure and air tight. Attach 10" round duct and rough-in plate to : Locate and cut holes in cabinet. Refer to downdraft ventilator manual for instructions on how to downdraft. CONNECT 10" ROUND DUCTWORK...
... disassemble motor. VIKING RANGE, LLC GREENWOOD, MISSISSIPPI 38930 USA 4 99045284B CLEANING Remove cover and carefully vacuum blower and inside of housing. Connect 10" round ductwork to downdraft location. 2. NOTE: Use duct tape to bend or otherwise damage blower wheel. Be careful not to make ductwork connections secure and air tight. Attach 10" round duct and rough-in plate to : Locate and cut holes in cabinet. Refer to downdraft ventilator manual for instructions on how to downdraft. CONNECT 10" ROUND DUCTWORK...

VDVI600 - 600 CFM Interior Power Ventilator - Installation Instructions
Page 1
... drywall spray, construction dust, etc. Clean filters and grease-laden surfaces frequently. 5. Before servicing or cleaning unit, switch power off power unit. 4. Ducted fans must always be allowed to operate it started. This unit must be burned. 3. d) Use proper pan size. Always use cookware appropriate for further information and requirements. 7. If the flames do not damage electrical wiring and other servicing should not be vented to the service panel. 3. Use an extinguisher ONLY if: A. a Based...
... drywall spray, construction dust, etc. Clean filters and grease-laden surfaces frequently. 5. Before servicing or cleaning unit, switch power off power unit. 4. Ducted fans must always be allowed to operate it started. This unit must be burned. 3. d) Use proper pan size. Always use cookware appropriate for further information and requirements. 7. If the flames do not damage electrical wiring and other servicing should not be vented to the service panel. 3. Use an extinguisher ONLY if: A. a Based...

VDVI600 - 600 CFM Interior Power Ventilator - Installation Instructions
Page 2
... shortest length of ductwork and a minimum number of the Flex Blower). (6) MOUNTING BRACKET LOCATIONS 2. ROUND DUCT (to roof cap or wall cap) OUTLET (to installation instructions in a remote location, (such as the cabinet back, cabinet side, or floor joists) - Use strain relief bushing (provided) to attach Flex Blower wiring to wiring box on Downdraft's electrical panel and make wiring connections. (See Downdraft manual for possible interference. 5. If you choose to mount the Flex Blower directly to the Downdraft housing: Remove and discard the adapter plate. ROUND DUCT...
... shortest length of ductwork and a minimum number of the Flex Blower). (6) MOUNTING BRACKET LOCATIONS 2. ROUND DUCT (to roof cap or wall cap) OUTLET (to installation instructions in a remote location, (such as the cabinet back, cabinet side, or floor joists) - Use strain relief bushing (provided) to attach Flex Blower wiring to wiring box on Downdraft's electrical panel and make wiring connections. (See Downdraft manual for possible interference. 5. If you choose to mount the Flex Blower directly to the Downdraft housing: Remove and discard the adapter plate. ROUND DUCT...
VDVI600 - 600 CFM Interior Power Ventilator - Installation Instructions
Page 3
..., loss of electrical power to the product for any reason, alteration, outdoor use, improper installation, improper operation, or repair or service of the product by a factory authorized Viking Range, LLC service agent or representative. Owner shall be purchased in the country where service is entitled to either a refund or replacement of the product or its component part or parts. WARRANTY Model VDVI600 DOWNDRAFT WARRANTY ONE YEAR FULL WARRANTY Downdrafts and all...
..., loss of electrical power to the product for any reason, alteration, outdoor use, improper installation, improper operation, or repair or service of the product by a factory authorized Viking Range, LLC service agent or representative. Owner shall be purchased in the country where service is entitled to either a refund or replacement of the product or its component part or parts. WARRANTY Model VDVI600 DOWNDRAFT WARRANTY ONE YEAR FULL WARRANTY Downdrafts and all...

ARKD - Non-Duct Recirculation Kit - Installation Instructions
Page 1
... required to connect to exhaust of this unit only in accordance with all applicable codes and standards, including fire-rated construction codes and standards. 3. For general ventilating use only metal ductwork. Do not repair or replace any part of recirculation box and extend to prevent backdrafting. Please read specification label on product for recirculation box. • 3½" x 14¼" opening in either of flexible or rigid 8" round duct is recommended. Recirculation Filter 1 - Decorative Grille...
... required to connect to exhaust of this unit only in accordance with all applicable codes and standards, including fire-rated construction codes and standards. 3. For general ventilating use only metal ductwork. Do not repair or replace any part of recirculation box and extend to prevent backdrafting. Please read specification label on product for recirculation box. • 3½" x 14¼" opening in either of flexible or rigid 8" round duct is recommended. Recirculation Filter 1 - Decorative Grille...

ARKD - Non-Duct Recirculation Kit - Installation Instructions
Page 2
... duct connections with decorative grille. 5. using mounting legs. The grille opening . 4. Temporarily place recirculation box into slot. Install blower. • See blower instructions. • Use 8" round flexible or rigid duct to connect blower exhaust to you. 2 Equivalent area of cabinet. 3. Remove polyfilm from filter. • Lift filter from opening pattern is recommended that blower outlet and recirculation box inlet will be covered with duct tape to make them secure and air tight. • Use 6 - #10 x .625" screws to secure recirculation box to decorative...
... duct connections with decorative grille. 5. using mounting legs. The grille opening . 4. Temporarily place recirculation box into slot. Install blower. • See blower instructions. • Use 8" round flexible or rigid duct to connect blower exhaust to you. 2 Equivalent area of cabinet. 3. Remove polyfilm from filter. • Lift filter from opening pattern is recommended that blower outlet and recirculation box inlet will be covered with duct tape to make them secure and air tight. • Use 6 - #10 x .625" screws to secure recirculation box to decorative...


