Two-Page Specifications Sheet
Page 1
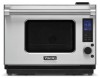
....com All models with 30" wide trim kit) Model Numbers VCSO210SS - Viking Professional Series Combi-Steam/Convect™ Oven Key Features 4 ovens in unit using the 43 automatic settings Cook a wide variety of conventional microwave Cookbook provides healthy recipes, cooking tips, and nutritional information to use the system and the corresponding model code numbers. Industry Exclusive! cosmetic parts such as a second oven providing excellent baking results • Microwave function - Depth: 23 1/4" (59.1 cm) 120v, single phase, 60Hz...
....com All models with 30" wide trim kit) Model Numbers VCSO210SS - Viking Professional Series Combi-Steam/Convect™ Oven Key Features 4 ovens in unit using the 43 automatic settings Cook a wide variety of conventional microwave Cookbook provides healthy recipes, cooking tips, and nutritional information to use the system and the corresponding model code numbers. Industry Exclusive! cosmetic parts such as a second oven providing excellent baking results • Microwave function - Depth: 23 1/4" (59.1 cm) 120v, single phase, 60Hz...
Installation Instructions
Page 1
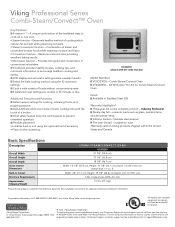
..., 15 amps. Viking Installation Guide IMPORTANT-Please Read and Follow! • Before beginning, please read these instructions with Viking COMBI STEAM/CONVECT™ OVEN. • Your oven can be built into a cabinet or wall or above any electric wall oven, gas wall oven or warming drawer. • NOTE: The bottom of the cut-out opening Built-in handling and installation to avoid the possibility of injury. • Do not remove permanently affixed labels, warnings, or plates from the product...
..., 15 amps. Viking Installation Guide IMPORTANT-Please Read and Follow! • Before beginning, please read these instructions with Viking COMBI STEAM/CONVECT™ OVEN. • Your oven can be built into a cabinet or wall or above any electric wall oven, gas wall oven or warming drawer. • NOTE: The bottom of the cut-out opening Built-in handling and installation to avoid the possibility of injury. • Do not remove permanently affixed labels, warnings, or plates from the product...
Installation Instructions
Page 7
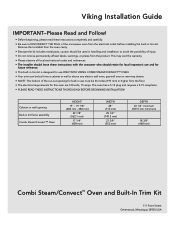
... the cutout. Check that were drilled with the mounting template. Tape it to the electrical outlet. 8.3 Install the oven into place. Remove template from the cabinet. STEP 10: DECORATION INSTALLATION Place the FRONT decoration onto the FRAME and align ball studs and receivers. Avoid pinching the cord between the oven and any wall as shown in Figures 8 and 8-A. One person should hold the handle...
... the cutout. Check that were drilled with the mounting template. Tape it to the electrical outlet. 8.3 Install the oven into place. Remove template from the cabinet. STEP 10: DECORATION INSTALLATION Place the FRONT decoration onto the FRAME and align ball studs and receivers. Avoid pinching the cord between the oven and any wall as shown in Figures 8 and 8-A. One person should hold the handle...
Use and Care Manual
Page 3
... Oven__________ 8 Ordering a Built-In Kit 9 Electrical Grounding Instructions 9 Extension Cord 10 Radio or TV Interference 10 About Your Combi Steam/Convect™ Oven__ 10 About Cooking Options 11 About Steam Convection and Steam Cooking_11 About Microwave Cooking 14 About Food When Using The Microwave Mode 15 About Utensils and Coverings 17 About Children 21 About Safety 21 Product Control 25 Part Names 25-26 Control Panel 26 Display Information 26 Important Instructions 27-31...
... Oven__________ 8 Ordering a Built-In Kit 9 Electrical Grounding Instructions 9 Extension Cord 10 Radio or TV Interference 10 About Your Combi Steam/Convect™ Oven__ 10 About Cooking Options 11 About Steam Convection and Steam Cooking_11 About Microwave Cooking 14 About Food When Using The Microwave Mode 15 About Utensils and Coverings 17 About Children 21 About Safety 21 Product Control 25 Part Names 25-26 Control Panel 26 Display Information 26 Important Instructions 27-31...
Use and Care Manual
Page 4
... Cooking 65 Temperature Adjustment 66 End Of Cooking Reminder 66 Multiple Sequence Cooking 66 Info 68 Product Care 71-80 Cleaning And Care 71-73 Oven Cleaning - Exterior 71 Door 71 Control Panel 71 Oven Cleaning - Interior 72 Door Gasket 72 Baking Tray / High Rack / Low Rack / Steam Basket 73 Reservoir And Reservoir Lid 73 Drip Tray And Drip Tray Lid 73 Descaling Within The Oven's Steam Parts ___ 73 Troubleshooting Chart 74-78 Service Call Check 79 Specifications 80 Combi Steam/Convect...
... Cooking 65 Temperature Adjustment 66 End Of Cooking Reminder 66 Multiple Sequence Cooking 66 Info 68 Product Care 71-80 Cleaning And Care 71-73 Oven Cleaning - Exterior 71 Door 71 Control Panel 71 Oven Cleaning - Interior 72 Door Gasket 72 Baking Tray / High Rack / Low Rack / Steam Basket 73 Reservoir And Reservoir Lid 73 Drip Tray And Drip Tray Lid 73 Descaling Within The Oven's Steam Parts ___ 73 Troubleshooting Chart 74-78 Service Call Check 79 Specifications 80 Combi Steam/Convect...

Use and Care Manual
Page 7
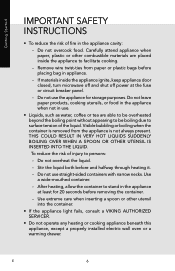
... let cord hang over edge of burns, electric shock, fire, injury to persons or exposure to explode and should be heated in the appliance. • Use this appliance only for its intended use . • As with the provided Installation Manual. • Some products such as described in this manual. To reduce the risk of table or counter. • See door surface cleaning instructions...
... let cord hang over edge of burns, electric shock, fire, injury to persons or exposure to explode and should be heated in the appliance. • Use this appliance only for its intended use . • As with the provided Installation Manual. • Some products such as described in this manual. To reduce the risk of table or counter. • See door surface cleaning instructions...
Use and Care Manual
Page 8
... light fails, consult a Viking AUTHORIZED SERVICER. • Do not operate any heating or cooking appliance beneath this appliance, except a properly installed electric wall oven or a warming drawer. E 6 To reduce the risk of injury to surface tension of fire in the appliance at the fuse or circuit breaker panel. - Stir the liquid both before placing bag in use. • Liquids, such as water, coffee or tea are placed inside...
... light fails, consult a Viking AUTHORIZED SERVICER. • Do not operate any heating or cooking appliance beneath this appliance, except a properly installed electric wall oven or a warming drawer. E 6 To reduce the risk of injury to surface tension of fire in the appliance at the fuse or circuit breaker panel. - Stir the liquid both before placing bag in use. • Liquids, such as water, coffee or tea are placed inside...
Use and Care Manual
Page 10
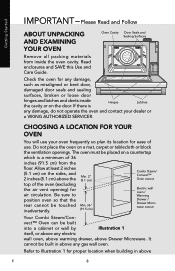
...) Combi Steam/ Convect™ Oven cutout the air vent opening) for proper location when building in above the top of 36 inches (91.5 cm) from inside the cavity or on a countertop which is Hinges Latches any damage, do not operate the oven and contact your oven frequently so plan its location for any gas wall oven. The oven must be built into a cabinet or wall by Illustration 1 itself, or above any electric wall oven, above warming drawer, above...
...) Combi Steam/ Convect™ Oven cutout the air vent opening) for proper location when building in above the top of 36 inches (91.5 cm) from inside the cavity or on a countertop which is Hinges Latches any damage, do not operate the oven and contact your oven frequently so plan its location for any gas wall oven. The oven must be built into a cabinet or wall by Illustration 1 itself, or above any electric wall oven, above warming drawer, above...
Use and Care Manual
Page 11
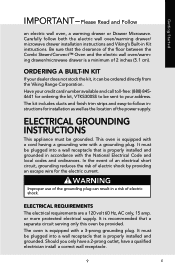
... the electric wall oven/warming drawer/microwave drawer is properly installed and grounded. The kit includes ducts and finish trim strips and easy-to-follow both the electric wall oven/warming drawer/ microwave drawer installation instructions and Viking's Built-in accordance with the National Electrical Code and local codes and ordinances. It must be provided. Electrical Requirements The electrical requirements are a 120 volt 60 Hz, AC only, 15 amp. It is recommended that a separate circuit serving only this oven be plugged into a wall...
... the electric wall oven/warming drawer/microwave drawer is properly installed and grounded. The kit includes ducts and finish trim strips and easy-to-follow both the electric wall oven/warming drawer/ microwave drawer installation instructions and Viking's Built-in accordance with the National Electrical Code and local codes and ordinances. It must be provided. Electrical Requirements The electrical requirements are a 120 volt 60 Hz, AC only, 15 amp. It is recommended that a separate circuit serving only this oven be plugged into a wall...

Use and Care Manual
Page 14
... to the charts in oven. Stand Standing time is not necessary in use Steam Convection (Roast, Convenience Foods, Broil) and Steam (Cook, Reheat, Keep Warm and Proof). • Always attend the oven when in most cases. If a cover is required, aluminum foil is even. Appearance will take longer to cook, so position with a soft cloth or sponge. For Steam Cooking COOKING TECHNIQUES Baking tray, High rack, Steam basket Place food in...
... to the charts in oven. Stand Standing time is not necessary in use Steam Convection (Roast, Convenience Foods, Broil) and Steam (Cook, Reheat, Keep Warm and Proof). • Always attend the oven when in most cases. If a cover is required, aluminum foil is even. Appearance will take longer to cook, so position with a soft cloth or sponge. For Steam Cooking COOKING TECHNIQUES Baking tray, High rack, Steam basket Place food in...
Use and Care Manual
Page 22
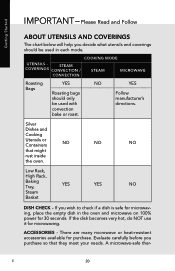
... might rust inside the oven. STEAM Coverings CONVECTION / CONVECTION COOKING MODE STEAM MICROWAVE Roasting YES NO YES Bags Roasting bags Follow should be used in the oven and microwave on 100% power for 30 seconds. A microwave-safe ther- There are many microwave or heat-resistant accessories available for microwaving. Getting Started IMPORTANT - Silver Dishes and Cooking Utensils or Containers NO NO NO that they meet your needs. convection bake or roast. E 20 Low Rack, High Rack, Baking Tray, YES YES...
... might rust inside the oven. STEAM Coverings CONVECTION / CONVECTION COOKING MODE STEAM MICROWAVE Roasting YES NO YES Bags Roasting bags Follow should be used in the oven and microwave on 100% power for 30 seconds. A microwave-safe ther- There are many microwave or heat-resistant accessories available for microwaving. Getting Started IMPORTANT - Silver Dishes and Cooking Utensils or Containers NO NO NO that they meet your needs. convection bake or roast. E 20 Low Rack, High Rack, Baking Tray, YES YES...
Use and Care Manual
Page 25
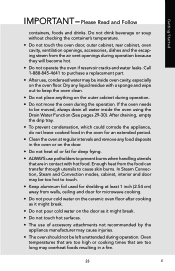
... air vent openings during the operation. Oven temperatures that are too high or cooking times that are too long may be moved, always drain all water inside oven cavity, especially on the outer cabinet during operation. • Do not move the oven during operation because they will become hot. • Do not operate the oven if reservoir cracks and water leaks. Getting Started IMPORTANT - In Steam Convection, Steam and Convection modes, cabinet, interior and door...
... air vent openings during the operation. Oven temperatures that are too high or cooking times that are too long may be moved, always drain all water inside oven cavity, especially on the outer cabinet during operation. • Do not move the oven during operation because they will become hot. • Do not operate the oven if reservoir cracks and water leaks. Getting Started IMPORTANT - In Steam Convection, Steam and Convection modes, cabinet, interior and door...

Use and Care Manual
Page 27
... High rack - Do not use when microwave cooking. For Steam. Always place on baking tray. 18 Low rack - Do not use when microwave cooking. 20 Steam basket - For Steam 8 Convection, Convection and 9 Steam. For Steam Convection, Convection and Steam. Product Controls Part Names 12 5 1 Air vent opening 2 Handle 3 LCD display 1 4 Control panel 2 5 Oven light 3 6 Upper level 7 Lower level 8 Reservoir lid (see page 27) 4 9 Reservoir (see page 27) 10 Door gasket 11 Latches 12 Ceramic oven floor 15 13 Door hinges 16 14 Steam outlets 15 Drip tray lid (see...
... High rack - Do not use when microwave cooking. For Steam. Always place on baking tray. 18 Low rack - Do not use when microwave cooking. 20 Steam basket - For Steam 8 Convection, Convection and 9 Steam. For Steam Convection, Convection and Steam. Product Controls Part Names 12 5 1 Air vent opening 2 Handle 3 LCD display 1 4 Control panel 2 5 Oven light 3 6 Upper level 7 Lower level 8 Reservoir lid (see page 27) 4 9 Reservoir (see page 27) 10 Door gasket 11 Latches 12 Ceramic oven floor 15 13 Door hinges 16 14 Steam outlets 15 Drip tray lid (see...
Use and Care Manual
Page 34
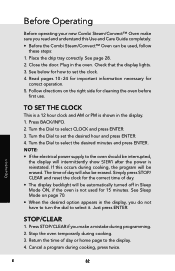
... PM is shown in the oven. Simply press STOP/ CLEAR and reset the clock for correct operation. 5. Stop/clear 1. The time of day will be erased. Turn the Dial to select CLOCK and press ENTER. 3. Return the time of day. • The display backlight will intermittently show Steam after the power is not used , follow these steps: 1. Check that the display lights. 3. Press BACK/INFO. 2. Just...
... PM is shown in the oven. Simply press STOP/ CLEAR and reset the clock for correct operation. 5. Stop/clear 1. The time of day will be erased. Turn the Dial to select CLOCK and press ENTER. 3. Return the time of day. • The display backlight will intermittently show Steam after the power is not used , follow these steps: 1. Check that the display lights. 3. Press BACK/INFO. 2. Just...
Use and Care Manual
Page 56
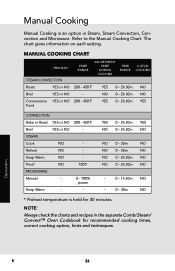
... - Proof NO 100˚F MICROWAVE Manual - 0 - 100% power Keep Warm - - MANUAL COOKING chart PREHEAT* STEAM CONVECTION TEMP RANGE ADJUSTMENT TEMP DURING COOKING TIME RANGE 2 LEVEL COOKING Roast YES or NO 200 - 450˚F YES 0 - 2h 30m NO Broil YES or NO - STEAM Cook NO - Operation E 54 Refer to the Manual Cooking Chart. Reheat NO - The chart gives information on each setting. YES 0 - 2h 30m YES NO 0 - 2h 30m NO NO 0 - 35m NO NO 0 - 35m NO...
... - Proof NO 100˚F MICROWAVE Manual - 0 - 100% power Keep Warm - - MANUAL COOKING chart PREHEAT* STEAM CONVECTION TEMP RANGE ADJUSTMENT TEMP DURING COOKING TIME RANGE 2 LEVEL COOKING Roast YES or NO 200 - 450˚F YES 0 - 2h 30m NO Broil YES or NO - STEAM Cook NO - Operation E 54 Refer to the Manual Cooking Chart. Reheat NO - The chart gives information on each setting. YES 0 - 2h 30m YES NO 0 - 2h 30m NO NO 0 - 35m NO NO 0 - 35m NO...
Use and Care Manual
Page 60
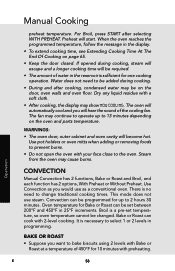
... Without Preheat. Use Convection as a conventional oven. This mode does not use as you would use steam. Oven temperature for up to be set temperature, so oven temperature cannot be required. • The amount of water in 25°F increments. Preheat will become hot. WARNINGS: • The oven door, outer cabinet and oven cavity will start. There is no need to 13 minutes depending on the oven and parts temperature. Bake or Roast can be added during cooking, steam...
... Without Preheat. Use Convection as a conventional oven. This mode does not use as you would use steam. Oven temperature for up to be set temperature, so oven temperature cannot be required. • The amount of water in 25°F increments. Preheat will become hot. WARNINGS: • The oven door, outer cabinet and oven cavity will start. There is no need to 13 minutes depending on the oven and parts temperature. Bake or Roast can be added during cooking, steam...
Use and Care Manual
Page 62
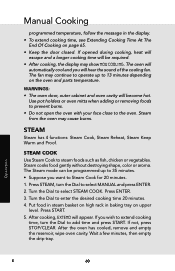
...; The oven door, outer cabinet and oven cavity will appear. STEAM Steam has 4 functions: Steam Cook, Steam Reheat, Steam Keep Warm and Proof. The Steam mode can be required. • After cooking, the display may show Now cooling. Put food in steam basket on high rack in the display. • To extend cooking time, see Extending Cooking Time At The End Of Cooking on page 65. • Keep the door closed. If opened during cooking, heat will escape...
...; The oven door, outer cabinet and oven cavity will appear. STEAM Steam has 4 functions: Steam Cook, Steam Reheat, Steam Keep Warm and Proof. The Steam mode can be required. • After cooking, the display may show Now cooling. Put food in steam basket on high rack in the display. • To extend cooking time, see Extending Cooking Time At The End Of Cooking on page 65. • Keep the door closed. If opened during cooking, heat will escape...
Use and Care Manual
Page 75
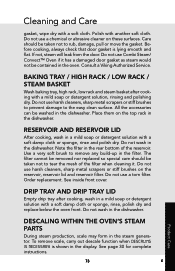
... remove scale, carry out descale function when DESCALING IS NECESSARY is lying smooth and flat. Order replacement. Do not use a torn filter. Care should be taken not to tear the mesh of the reservoir. Baking Tray / High Rack / Low Rack / Steam Basket Wash baking tray, high rack, low rack and steam basket after cooking, wash in the dishwasher. If not, steam will leak from the door. Cleaning and Care gasket...
... remove scale, carry out descale function when DESCALING IS NECESSARY is lying smooth and flat. Order replacement. Do not use a torn filter. Care should be taken not to tear the mesh of the reservoir. Baking Tray / High Rack / Low Rack / Steam Basket Wash baking tray, high rack, low rack and steam basket after cooking, wash in the dishwasher. If not, steam will leak from the door. Cleaning and Care gasket...
Use and Care Manual
Page 81
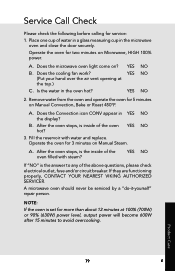
... be serviced by a "do-it-yourself" repair person. Product Care 79 E Place one cup of the above questions, please check electrical outlet, fuse and/or circuit breaker. Does the microwave oven light come on Manual Steam. YES NO 2. After the oven stops, is the inside of the oven filled with water and replace. Remove water from the oven and operate the oven for two minutes on Manual Convection, Bake or Roast 450°F. Does the cooling fan work...
... be serviced by a "do-it-yourself" repair person. Product Care 79 E Place one cup of the above questions, please check electrical outlet, fuse and/or circuit breaker. Does the microwave oven light come on Manual Steam. YES NO 2. After the oven stops, is the inside of the oven filled with water and replace. Remove water from the oven and operate the oven for two minutes on Manual Convection, Bake or Roast 450°F. Does the cooling fan work...
Use and Care Manual
Page 83
... abuse, accident, natural disaster, loss of electrical power to the product for the part itself, with respect to the goods or services covered hereunder, shall in normal household use , improper installation, improper operation or repair or service of warranty coverage. To obtain warranty service, contact the dealer from whom the product was purchased, an authorized Viking Range Corporation service agent, or Viking Range Corporation. ANY DEFECTS MUST BE REPORTED TO...
... abuse, accident, natural disaster, loss of electrical power to the product for the part itself, with respect to the goods or services covered hereunder, shall in normal household use , improper installation, improper operation or repair or service of warranty coverage. To obtain warranty service, contact the dealer from whom the product was purchased, an authorized Viking Range Corporation service agent, or Viking Range Corporation. ANY DEFECTS MUST BE REPORTED TO...


